Installing a greenhouse allows you to plant seedlings or grown plants much earlier than the weather allows.
Proper use of manure and its derivatives greatly increases the efficiency of the greenhouse, which accelerates plant growth, and the harvest can be harvested several weeks or even months earlier.
However, improper use of manure or droppings can completely destroy young growth and also make the land infertile for several years.
From this article you will learn:
- how manure can be used in greenhouses;
- how to make warm beds with your own hands;
- how to properly put manure in them, including cow, horse, etc., and how to “ignite” it;
- what to do with rotted manure from greenhouses and greenhouses.
Greenhouse application options
Here are the main methods of application and the forms of manure necessary for this , which we described in detail here:
- improvement of soil structure (humus or sapropel);
- mineral or organic fertilizer (humus, sapropel, mineral water, liquid fertilizer);
- mulch (humus);
- heating the soil (fresh manure or droppings).
To improve the soil structure, humus or sapropel is spread over the soil surface and dug up. The substances contained in these fertilizers loosen the soil and are especially effective in cases where the greenhouse or greenhouse is filled with clay soil.
Humus and sapropel can also be applied at any time of the year to improve soil fertility, because both materials contain many useful nutrients. We described the use of these substances in more detail in this article (Humus compost from manure).
Mineral water is used when the condition of the plants indicates a lack of mineral fertilizers, and liquid fertilizing is used if they lack nutrition. However, they must be used with caution, observing the dosage, otherwise they will cause harm instead of benefit.
How to apply manure in the spring. Timing of work
Determining what fertilizer to apply and how much is half the battle. You need to know the optimal timing of work for feeding to be beneficial. Conventionally, the time of applying fertilizers in spring is divided into three periods:
- Fertilizing soil on snow. The biggest mistake is to scatter mineral fertilizers in early spring on unmelted snow cover. Most of the nutrients will go with meltwater outside the garden. Unfertilized areas will appear, as well as places with a large accumulation of minerals. The method is only suitable for large farms that did not feed the fields in the fall, and a large amount of work remains in early spring. In general, organic matter cannot be scattered on snow.
- Fertilizing the soil before sowing or planting seedlings. Ideal period for all crops. The fertilizer will have time to dissolve, distributing evenly throughout the entire area. The root system of a young plant will immediately receive nutrients after planting. To achieve the optimal effect, the scattered fertilizer is covered with a layer of soil.
- Applying fertilizer to the hole during sowing or planting seedlings. An effective but dangerous method that requires a lot of experience. The root system immediately receives a large concentrate of substances. Errors with the dose will destroy the plant.
A novice gardener should adhere to the second period of soil feeding - before planting garden crops. This rule is also suitable for flower growers. Fruit trees can be fed before the ground around the trunk has completely thawed.
Advice! With any fertilizing option, you should not immediately apply a large portion of fertilizer. It is better to divide the process into 2-3 times at short intervals.
Soil heating
Excrement consists of partially or completely digested organic matter and also contains various microorganisms involved in the complex process of food digestion.
One of the characteristics of these microorganisms is that they continue to process organic matter even after their intestines have passed .
During their life, quite a lot of heat is released, which is used to heat the soil. However, such use of excrement is associated with serious risks, so it is necessary not only to understand what processes occur inside the manure mass, but also to take measures in advance to neutralize the negative effects of fresh manure.
Composition of greenhouse soils using humus
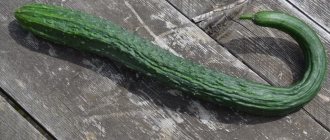
The percentage of soil components for the greenhouse will depend on the type of vegetables planned for planting in this area. If we take tomatoes as an example, the ideal soil for them will be turf, which consists almost entirely (80%) of field soil. But for cucumbers, humus is necessary to get a good harvest.
Universal soil for most crops grown in a greenhouse is usually mixed in the following proportions: take 2 parts of humus with turf soil and 1 part of river sand and peat. When growing seedlings in a greenhouse, the ratio changes, since it requires lighter soil with a significant content of organic matter and minerals, with good air and moisture permeability. Therefore, the amount of peat increases to 3 parts, and humus, sand and forest leaves can be taken in 1 part each.
The danger of fresh excrement
The basis of any soil is made up of three components:
- clay;
- sand;
- humic acids.
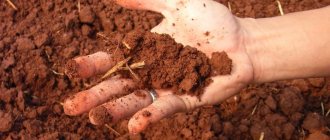
Clay is a natural binder that holds all other soil components together. Its main drawback is its inability to pass water, so clay soils absorb liquid very poorly.
Sand is a natural loosening agent that increases the soil’s ability to absorb and pass water. However, only humic acids , in other words, humus (humus), are a nutrient substrate suitable for absorption through plant roots.
Fresh manure or droppings contain substances that change humic acids and negatively affect any plants, so introducing fresh excrement in close proximity to seeds or roots quickly leads to their death .
For tomatoes in open ground
When growing tomatoes in open ground, weather conditions are taken into account. During rainy periods, large amounts of precipitation wash away nutrients from the soil, starving the crop.
In dry and arid weather, before carrying out the procedure, it is necessary to water the beds abundantly to ensure the supply of nutrients to the plants and to protect the roots from burns. Cold weather slows down the plant's metabolism, and its roots absorb fertilizers from the soil less well, so it is preferable to carry out foliar spraying.
14 days after transplanting, the grown tomatoes need to be fed. To do this, use only two-year-old humus, preparing an infusion from it. After pouring 200 g of horse or 400 cow rotted organic waste into 10 liters of water, leave the mixture to ferment for a week.
250 ml of the resulting infusion is dissolved in 10 liters of water and watered with 0.5 liters for each bush, avoiding contact with the leaves and stem of the tomatoes.
The second feeding is needed after the appearance of the second branch with flowers.
The third is when fruit set begins.
What benefits does fresh material applied correctly?
When applied correctly, fresh manure warms the soil and allows seeds or seedlings to be planted weeks or even months earlier.
Moreover, the process of rotting takes 2–4 months, when the roots grow and reach the heating layer, it will completely rot and turn into high-quality humus, which is a source of humic acids.
In combination with a heated greenhouse, the use of animal or bird excrement to warm the soil allows plants to be grown year-round in many Russian regions , and near the Arctic Circle allows plants to be planted in mid-spring.
Autumn work, before frost
The soil in the greenhouse also needs to be prepared for the onset of frost. It is necessary to remove the soil from the beds from the greenhouse and scatter them in a layer of 60-80 centimeters. Then humus is added to the greenhouse in a layer of 15-20 centimeters. If the soil is not fertile, fertilizers are added to it and then also added to the greenhouse. At the end, you can spread mulch on the beds.
After the greenhouse survives the frost, by the time the plants grow there will be fertile and soft soil ready for planting.
How to properly lay manure with your own hands?
In order for the heating layer to be as effective as possible and not harm the plantings, several conditions must be met:
- separate the soil and the heating layer with heat-insulating material;
- properly prepare manure and other elements of heating material;
- start the process of “burning” manure;
- divide the heating and fertile layer with soil of sufficient thickness;
- load the fertile layer and plant seeds or seedlings in it.
Separating soil and excrement
Rotting manure is heated by bacteria, which process complex polymer chains, turning them into humus and monosaccharides.
However, bacteria are very sensitive to ambient temperature , so they begin to act only at temperatures of +15 degrees and above. But the release of heat sufficient for the active life of bacteria begins only at a temperature of +20–25 degrees.
Moreover, in winter or early spring the ground temperature rarely exceeds 5 degrees. If you put the molding material in a ditch without insulation, then thanks to the huge heat capacity of the soil, it will absorb all the heat generated and cool the manure to its temperature, which is why the bacteria will fall asleep and stop releasing thermal energy.
Components and proportions of heating material
To prepare heating material you need:
- actively rotting manure;
- sawdust;
- hay or straw.
The optimal proportions are from 1:1:1 (manure, sawdust, straw) to 3:1:1 .
The higher the volume of plant components, the higher quality the humus will be after the process is completed, but the less thermal energy will be released. Therefore, the ratio of components is selected individually, taking into account:
- air temperature;
- condition of the greenhouse or greenhouse;
- optimal temperature for germination of certain plants.
Which type of manure is best?
Any type of animal or bird excrement contains all the substances and microorganisms necessary for intense heating, but horse manure is the best.
It combines several important factors:
- it contains more poly- and monosaccharides, which are food for bacteria;
- has the most optimal humidity for this application (75–80%);
- Due to the fact that horses are often fed cereals, their intestines, and therefore manure, contain more essential bacteria, making it easier to “ignite” such manure.
However, you can make a greenhouse from cow manure, pig manure, and chicken manure.
Step by step guide
In order for the manure to heat well, it is necessary to determine in advance whether only the beds need heating, or whether the entire greenhouse will have to be heated.
In this case, even heating the beds will, although slightly, raise the temperature in the entire greenhouse, and heating over the entire area will at the same time heat the beds .
The difference lies only in the amount of preparatory work and the volume of components required for the process.
Preparation
The greenhouse or greenhouse must be cleared of old vegetation. If possible, after harvesting, it is necessary to pull out the dying trunks from the ground and plant green manure in their place, which are then dug up along with the soil.
In addition,
it is necessary to carefully check the soil and plants for various diseases and, if necessary, treat them or remove heavily affected soil.
It is equally important to check the condition of the greenhouse/greenhouse, eliminate all cracks and drafts, and make sure that ventilation and standard heating are working properly.
You cannot load fresh manure or litter into greenhouses with a faulty ventilation system, because during overheating a lot of carbon dioxide will be released, and this can lead to poisoning and death.
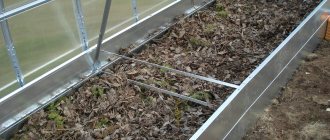
After making sure that the greenhouse is ready for use, the entire fertile layer of soil is removed from it. If you plan to heat only the beds, then the fertile layer can be removed with grooves half the width of the bed, but if you heat the entire area, then remove it completely.
The depth of the fertile layer is 10–30 cm and depends on the size of the root system of the plants that will be planted here.
Then trenches or a pit are dug to load the heating mass. When heating only the beds, they dig trenches 40–60 cm deep; when heating the entire area around the perimeter of the greenhouse, stepping back 20–40 cm from the edges, remove a layer of soil 50–80 cm deep.
Bookmark
To perform this operation you will need:
- freshly collected manure with a moisture content of 75–85%; if only manure/liquid slurry is available, it can be passed through a separator, setting the required humidity level;
- any healthy (not affected by disease) shredded/unshredded plant waste;
- cakes made from dried manure or droppings - dung.
First, the bottom and walls of the trenches or pit are lined with dung , it will reduce the heat loss of the smoldering heap, due to which less thermal energy will be wasted on useless heating of the surrounding soil. Then they are also lined with chopped plant remains, with hay or straw 10–30 cm long being best suited.
Having insulated the walls and bottom, the trench or pit is filled with a “pie” of fresh manure and grass, trying not only not to compact it, but also to loosen it a little.
It is most convenient to do this in layers, and the height of each layer should be 15–30 cm. Crushed vegetation is placed between the layers of manure (the thickness of this layer is 1–5 cm).
When filling a pit, it is necessary to lay wide boards 25–35 mm thick on top of the manure and walk only on them , this will reduce the pressure on the material being laid and protect it from excessive compaction. The upper level should be slightly higher than the usual soil level in the greenhouse or greenhouse, because the manure will quickly settle.
How to light it?
If the “pie” is laid correctly, and the humidity of the excrement is in the optimal range, then the main condition for the start of combustion is temperature.
Indeed, at temperatures below +15 degrees, bacteria go into dormant mode, and only an increase to +20–25 degrees allows them to go into active mode and begin to produce a sufficient amount of heat for a self-sustaining reaction.
Therefore, to ignite the manure, it is necessary to heat it with hot stones or water. To do this, in a small, randomly selected area, the top layer of excrement and grass is dug up, then stones heated to a temperature of 60–70 degrees are laid out, or water is abundantly watered at the same temperature.
The excavated area is then immediately covered with the excavated material and left for several days to allow bacteria to multiply and heat the soil.
After 2–3 days, without digging up the “pie,” a hand is inserted through its layers to a depth of 40–60 cm. If the material “burns up,” then the hand will be hot, but if the hand is cold or it does not feel a change in temperature, then the material will not be ignited managed.
What if it doesn't light up?
If all preparatory measures are carried out correctly, then the manure flares up over the entire area in a maximum of a week . If the manure in the greenhouse does not burn, then it is necessary to carefully analyze the procedure and the materials used.
Often the cause of failure is purchased manure, which had previously been stored somewhere for a long time, due to which bacteria have already managed to process most of the organic matter contained in it.
In this case, you will have to pull all the manure out of the greenhouse and, putting it in a heap, leave it for several months so that it completely rots and turns into humus.
To speed up the process of decay, it can be treated with bacteria-based preparations, and sprinkled with earth or crushed plant waste on top.
If the manure is really fresh, that is, it is no more than two or three days old, but the standard method of igniting did not give results, then it is advisable to install a heating stove or an air-heating boiler in the greenhouse or greenhouse. However, this can only be done where the dimensions of the frame allow.
In greenhouses for one bed, you need to act differently. Along the entire length of the bed, you need to use the handle of a shovel to make several holes in increments of 0.5–2 m, into which to pour bacteria-based preparations, for example, Compost-10 or Baikal EM-1.
Then fill the holes with fresh manure and after 2-3 hours, carry out standard combustion activation next to any hole using hot water or heated stones.
Soil loading
After making sure that the manure has flared up over the entire or most of the area, you can begin loading fertile soil .
To do this, use the following procedure:
- the surface of the manure is sprinkled with wood ash, the layer thickness is 3–5 mm;
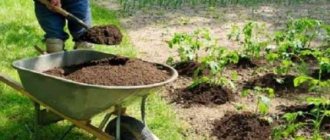
- mix the extracted soil with humus and sand, thus obtaining a soil mixture;
- This soil mixture is placed in a greenhouse or greenhouse.
The optimal distance from the surface of the manure to the bottom of the root of a seedling or planted seed is 10–15 cm .
At this depth, the soil will warm up within a day, after which the plants will develop in optimal conditions, which guarantees rapid growth, as well as maximum health of the seedling, so it can bring a good harvest.
What mineral fertilizers are needed in the spring before planting?
Mineral fertilizers are also important for enriching the soil composition. Mineral preparations can be simple or complex. Complex ones have a wider spectrum of action: the plant receives nutrition from several “dishes”.
Potash fertilizers: norms and rules of application
In spring, potash sulfate fertilizers are used. Small doses are used.
- The most universal fertilizer is potassium sulfate. It contains up to 50 percent potassium. The drug is highly soluble. It is used as the main feeding. Take 20 g of the drug per square meter.
- Potassium chloride is also used, which contains up to 65 percent potassium. Since the chlorine contained in the fertilizer makes the soil acidic, you need to use the drug together with lime. Take no more than 40 grams of the drug per square meter.
- Potassium magnesium is needed for cultivating soil poor in magnesium. Fertilizer is used as the main feeding. You will need 25 grams per square meter of soil.
- Potassium salt, rich in chlorine, is not used in spring. This fertilizer is dangerous for greenhouse plants. You will need 30 grams of the drug per square meter.
Phosphorus fertilizers: norms and rules of application
Plants in a greenhouse need soil that is generous with nutrients. Phosphorus fertilizers create such a fertile environment.
- Superphosphate is a favorite phosphate fertilizer. Simple superphosphate must be diluted and left for at least three days. The very top of the infusion is used to fertilize the soil. To prepare the soil, you need to take 30 grams of simple superphosphate per square meter; double superphosphate is used in an amount of approximately 20 grams per square meter.
- Gardeners also use phosphate rock. If this fertilizer is used, then ash, calcium or lime are no longer used. Phosphorite flour is needed for acidic soil. Phosphorus will not dissolve in another less acidic one, which means plants will not be able to absorb it. Before using phosphate rock, it is mixed with manure and only then added to the soil. Phosphorite flour needs 80 grams per square meter.
Nitrogen fertilizers: norms and rules of application
Ammonium nitrate is fed to plant roots. However, when using nitrogen fertilizers, you need to remember that this drug acidifies the soil. If the soil is not already neutral, then you should be very careful with nitrogen fertilizers. Vegetables are fed with urea. If a fertilizer with less nitrogen is required, use potassium nitrate.
- Ammonium nitrate is added to the soil along with potassium salt and superphosphate. Usually, granules are simply scattered; 30 grams of the drug per square meter is enough.
- Before introducing ammonium sulfate into the soil, dissolve it in water, following the instructions on the package.
- The soil is treated with urea, mixed with superphosphate, which is previously neutralized.
Nitrogen fertilizers are introduced into the soil at approximately 10-12 grams per square meter.
Spring feeding with wood ash: how to apply it to the ground correctly
To reduce the acidity of the soil, use wood ash. This is a fertilizer with the richest composition. Wood ash contains phosphorus, potassium and calcium, magnesium and iron, sulfur and zinc. These components are necessary for the growth and development of crops.
In the spring, ash is applied to the soil, which in its structure is more sandy or saturated with peat. You can simply spray the fertilizer and then dig up the soil. For loam you will need approximately 400 grams of ash per square meter. If the soil is sandy loam - 200 grams per square meter. This fertilizer is used as a remedy against slugs, aphids, and powdery mildew.
How to properly feed with saltpeter so as not to harm
In order for the plant to develop properly, it is necessary to apply a fertilizer such as ammonium nitrate. It is recommended to administer it along with chalk. Plants need saltpeter fertilizing during the growth period, in spring.
It should be noted that saltpeter can only be used on non-acidic soils, otherwise the soil will be unsuitable for growing plants. But sodium nitrate, on the contrary, is used on acidic soils. And it is prohibited to use this fertilizer in a greenhouse. This is a rather poisonous drug.
In order to alkalize the soil, take calcium nitrate. It dissolves well in water, so you can simply water the beds with the solution. By the way, calcium nitrate helps protect tomatoes from blossom end rot.
The soil is treated with calcium nitrate before planting vegetables - no more than 12 grams of the drug are taken per square meter. This fertilizer must not be mixed with phosphorus-containing preparations.
What microfertilizers can be applied in the spring before planting?
Before planting plants, the soil needs to be enriched with nutrients, so gardeners use microfertilizers. They influence the increase of plant immunity.
Microfertilizers:
- Sulfur;
- Copper;
- Cobalt;
- Zinc;
- Manganese;
- Boron;
- Iron;
- Zinc;
- Molybdenum and others.
Microfertilizers are usually sprayed on plants, but they can also be used to enrich the soil with healing substances. Manganese is usually used before planting.
How to feed seedlings
Features of arranging portable greenhouses
The main difference between this type of greenhouses is the ability to install them anywhere on the site. In addition, in most cases they are small in size, so they are suitable for installation in one bed.
The preparation of such greenhouses begins in early or mid-autumn, for which, after harvesting green manure, the soil at the site of their installation is covered with mulch from rotted sawdust or manure.
After the snow melts, the mulch and top fertile layer of soil are removed , then a trench is dug, the width of which is 2–2.5 times the width of the bed, this will compensate for the influence of cold soil.
Indeed, in large greenhouses, the temperature of the soil even outside the manure-heated beds is slightly higher than that of the soil outside the greenhouse. If in small structures the lower soil temperature is not compensated, then the plants will grow in less comfortable conditions, so the width of the trench should be slightly larger than when creating insulation inside a greenhouse.
It is also advisable to increase the depth of the trench so that more material can fit into it, this is also one way to compensate for the lower temperature of the surrounding soil.
How to make soil yourself
For seedlings, soil mixture components are stocked up in the fall and stored separately in any containers, always in a shelter, preventing freezing. Mix the required composition and apply fertilizer immediately before sowing the seeds.
For other plants the technology is different. In the fall, all components are brought into a disinfected greenhouse and laid in layers, sprinkled with fertilizers if necessary. Then everything is dug up, overwintered and dug up again in the spring; thickness of the finished layer is 25-30 cm.
If you only need to enrich the depleted fertile layer, then disinfection is carried out again, then compost and sawdust are thrown onto the beds, everything is dug up and the surface of the soil is generously sprinkled with chalk. Next, dry humus is laid out (about 15 kg per m2) and left to overwinter. To prevent the death of beneficial microorganisms due to freezing of the ground, a half-meter layer of snow is poured onto the beds inside the greenhouse, which will insulate the ground and prevent it from freezing.
To avoid the appearance and spread of diseases, greenhouse soil should ideally be changed at least partially every 2-3 years, then you will be provided with an early and generous harvest every year.
What to do with burnt excrement?
The process of active decay lasts 1–3 months .
Moreover, the temperature remains consistently high only for the first month, then gradually decreases, and after the end of the process it drops to the temperature of the surrounding soil.
However, for another 9–12 months when treated with bacteria-based products, or 12–18 months without such treatment, bacteria will convert the excrement into humus.
The next season, ready or almost ready fertilizer from the trench . If bacterial preparations were not used, then the extracted rotted manure must be left in the fresh air so that it completely rots, after which it can be used as one of the components of a fertile soil mixture.
How to get rid of a mole cricket. Greenhouse disinfection
Unfortunately, it is rare to find humus without mole crickets, so it is better to immediately get rid of this pest by spreading the treated seeds in the greenhouse a couple of days before the dive.
If the same crops are grown in a greenhouse, for example tomatoes, most likely various pests of these particular vegetables have already appeared in the soil. Therefore, before planting seedlings, it is worth spilling the soil with a hot (about 60 ° C) solution of potassium permanganate at the rate of 1 gram per 10 liters of water.
It is necessary to disinfect not only the soil, but also the greenhouse itself. To do this, all wooden structures are washed with copper sulfate, which destroys fungi, lichens and moss, and after a week they are coated with bleach.
To obtain the treatment agent, 400 grams of bleach are infused in 12 liters of water for 2-4 hours. Then the liquid is drained and the sediment is used for coating. If in the summer the greenhouse plants suffered any disease (for example, tomatoes suffered from brown spot), greenhouse structures and glass should additionally be sprayed with foundationazole or oxychome.
You can read more about disinfection in the article: disinfection of greenhouses and greenhouses.
Test for correct preparation: how do seedlings behave?
From the moment the seedlings are moved into the greenhouse, it is necessary to carefully monitor their appearance and well-being. If plant leaves become thick but brittle, and after some time they curl and dry out, the soil is “overfed.” Abundant watering will help save the future harvest, which should literally wash away excess fertilizers from the ground.
If the lower leaves of young plants begin to turn yellow, and this phenomenon cannot be attributed to violations of agrotechnical norms and requirements (seedlings are planted in “warm” beds, the watering regime is strictly observed), the cause of yellowing may be a lack of nutrients in the soil. The problem is solved by additional feeding of plantings with a half dose of an organo-mineral complex corresponding to the crop being grown. After applying fertilizer, the ground under the plants is mulched with any suitable organic matter - chopped grass, peat, humus or compost, sawdust, etc.
Only on nutritious and healthy soil can an excellent harvest of vegetables and other cultivated plants be grown, so the soil for greenhouses should be prepared and processed according to all the rules. Neglecting the norms and recommendations for working with soil can negate all other work on caring for the greenhouse and the plants planted in it.
Universal combined mixtures
Nitrophoska - the mixture is ideal for greenhouses. It contains phosphorus (11%), potassium (14%), nitrogen (16%). Can be used as a solution for watering, 20-30 g. for 10 l. Or as dry granules 50-60 g. per 1m2.
Wood ash - applied in autumn or spring. Neutralizes soil acidity and contains many microelements useful for plants: potassium, calcium, phosphorus, sulfur, silicon, iron, etc. The required amount is 50-200 g/m2, depending on the acidity of the soil. Payment is allowed once every 2 years.
Feeding scheme for closed ground
Without enriching the soil with additional nutrition for plants, it is quite difficult to obtain a good harvest. However, it is still necessary to create a special microclimate in the greenhouse for the correct absorption of nutrients by the crops being grown. The traditional preparation and feeding scheme is as follows:
- Autumn application of manure and other organic matter to a depth inaccessible to the roots, to warm up and nourish the plants (on heavy soils, it is additionally recommended to apply sawdust and nitrogen fertilizers).
- Throwing snow into a greenhouse in winter.
- Spring digging.
- Adding manure to the greenhouse in the spring or sowing green manure in it.
- Loosening and leveling beds.
- Introduction of ash and lime.
- Soil moisture.
- Direct planting of cultivated plants.