With the end of the harvest season, we always draw conclusions about what the harvest was like and whether it is profitable to plant this or that crop on our plot. Such an analysis should be carried out by both novice gardeners and experienced gardeners. In order not to be left without your favorite crops, a number of works should be carried out to prepare future soil. Even if its depths are completely devoid of fertile layer, this is not a reason for disappointment. Will warm beds always come to the rescue, which need to be prepared this fall or spring? Let's talk about this below.
Arranging a warm bed in a greenhouse
An organic warm bed can be set up equally in open ground and in a greenhouse. The greenhouse provides an advantage for the northern regions. This means that the first seedlings can be planted in the beds under the greenhouse at the beginning of spring, and with the arrival of summer the first greenhouse fruits will be ready. Warm beds come in several types and shapes, but despite this, the earthen filling is laid out in a clear sequence. This is done so that the filler constantly works, interacts with each “ingredient” and heats up layer by layer from bottom to top.
Organically heated beds can be deepened, raised, pyramid-shaped, or even. They are arranged according to the same principle. The most common beds are those with sides made of slate, brick, and other materials that are used as improvised materials. They look impressive and at the same time neat. At first glance, few would guess that an orderly garden structure can produce profitable harvests for several seasons in a row. Preparation should be carried out from the first layer. To begin with, the bottom of the fruit-bearing structure is leveled and covered with sand.
A fine mesh net is placed on top of the sand cushion, with large branches on top of it, which will be the main ones in heating the layer. A layer of waste paper or beveled tops is placed on them. Then there are small branches, gradually the density of the filler decreases. Leaves and animal waste remained. Turf soil is laid out on top of a kind of organic pie, the bed is leveled and awaits its time to be planted. As a rule, beds of this type have 2 seasons: spring and autumn. The need for seasons is selected individually for each summer resident.
How to make a bed for tomatoes in the country: step-by-step guide, ideas + photos
Preparing the soil and properly making beds for tomatoes are two main points that experienced summer residents recommend approaching as responsibly as possible. It is not for nothing that there is a saying that a spring day feeds the whole year. For summer residents, this expression is a kind of law, as a result of which, with the arrival of the first warm days, they all go to their summer cottages. No weather conditions can prevent the opening of the summer season. During this period, it is important not only to properly prepare the soil for planting crops, but also to make beds for planting tomatoes. You can complete all the work much faster if you adhere to certain recommendations and advice from summer residents and follow a step-by-step algorithm.
Features of beds for tomatoes
If you plan to prepare garden beds for tomatoes, you need to take into account some important nuances. Thus, preparatory work must be carried out from the beginning of autumn - during this period, a plot of land is selected for planting a crop, and the soil is carefully dug up before the start of winter.
In the spring, the soil is dug up again - doing it the second time is much easier physically. Carefully remove weeds and apply fertilizers. Only after this can you begin to prepare high or warm beds.
Types of tomato beds
Today, the type of beds for growing tomatoes depends entirely on the imagination of summer residents. The most common shapes are round and rectangular.
If necessary, pallets, hanging structures, and pyramids can be used to grow crops.
Dimensions of beds for tomatoes
During the planting process, it is recommended to make the beds for tomatoes a small width, which will make it possible to reach the crop without any difficulty. You should carefully ensure that the distance between tomato bushes is about 30 cm, but the distance between the beds must be several times greater. The length can be absolutely any, it all depends on the parameters of the land plot.
How to make beds for tomatoes with your own hands
Making your own beds is quite easy. If necessary, you can start arranging a high or warm bed for tomatoes in the spring. No difficulties should arise if, in the process of carrying out the work, you follow a step-by-step algorithm, as well as the advice and recommendations of experienced gardeners.
It is important to understand that in order to obtain a high yield, it is important not only to choose the right planting material and carry out the planting process. An equally important point is preparing the soil and place for planting tomatoes. The ease of caring for the plants and the amount of sunlight penetrating each crop depend on how well the site is landscaped. It is worth thinking in advance about how watering will be organized - this will save you from many problems in the future.
How to make raised beds for tomatoes
It is important to correctly determine the optimal height of the beds for tomatoes. In high beds it is quite easy and convenient to carry out the process of cultivating tomatoes. In order to make the sides, you will need to use the following materials:
- asbestos-cement slate sheets;
- building brick;
- boards.
Just as in warm options, in this case it will be necessary to use organic matter, due to which the seedlings will be heated in the spring. You can do planting work several weeks earlier than gardeners usually do. During the process of decay of organic matter, the process of heat release begins. If, during the growth of the crop, you water the tomatoes frequently and abundantly, then the process of decay of organic matter becomes much more intense.
Raised beds consist of several layers. The sequence of layers should be as follows:
- wood – you can use bush branches after sanitary pruning or crown formation;
- hay, weeds, fruit and vegetable peelings;
- compost, manure, chicken droppings;
- wood ash;
- nutritious soil.
Many experienced gardeners note that it is not necessary to use a fence. In this case, you can simply form mounds, on the surface of which tomatoes are subsequently planted.
How to make warm beds for tomatoes
Making a warm bed with your own hands in the spring for tomatoes is not as difficult as it might initially seem. Considering that tomatoes love warmth, then warm beds are the best option. Organic residues that are located deep in the ground gradually begin to rot, resulting in the heating of the tomatoes. In addition, it is recommended to take into account the fact that warm beds are made only once, after which they can be used for 8 years.
The step-by-step algorithm of actions is as follows:
- First of all, they dig a trench, the width of which is 1 m, and the depth varies from 50 to 60 cm. You can make any length - as far as the land plot allows.
- After cutting, the remains of trees and shrubs are placed at the bottom of the resulting trench.
- A layer of organic matter is placed on top of the wood, which consists of vegetable and fruit scraps, weeds, leaves, and vegetable tops.
- Then manure is poured in, the layer of which must be about 6 cm, but no less. The manure is sprinkled with a small amount of wood ash.
- The final stage is the arrangement of the top layer, which consists of last year's rotted compost.
After the warm trench for tomatoes is prepared, cover it with a top layer of soil and then cover it with black plastic film. It is worth taking into account the fact that the organic layer should be between 30 and 35 cm, while the soil layer should be approximately 20 cm.
How to prepare a bed for tomatoes
Before you start preparing the beds for tomatoes, you should first take care of the soil. It is best to plant tomatoes on those plots of land where carrots, cucumbers, and onions previously grew. It is not recommended to plant tomatoes on land where eggplants and potatoes grew. This is due to the fact that the pathogens of these crops are the same; in addition, they remain in the ground for some time, as a result of which the tomatoes may become susceptible to disease.
It is not recommended to plant the crop on acidic soils. If sorrel or buttercups grow in the beds, this indicates increased acidity of the soil. To reduce acid levels, it is recommended to add wood ash. For these purposes, for each square. m. scatter 400 ml of wood ash and 200 g of limestone. In addition, as soon as a site for planting tomatoes is selected, it is recommended to dig it up, break up large lumps of earth, remove weeds, and apply fertilizer if necessary.
How to prepare a garden bed for tomatoes in spring
The process of preparing beds for tomatoes in the spring is not as complicated as it may seem to many novice gardeners. The first step is to carefully dig the ground and loosen the soil. To prevent many types of diseases and pests, it is recommended to carry out preventive work. For these purposes, the ground is watered with a solution of potassium permanganate or Bordeaux mixture.
Fertilizer will need to be added to the brand. Mixtures containing nitrogen, phosphorus and potassium are ideal for these purposes. In addition, you will need to add potassium nitrate, ammophos, nitrophos and nitroammophos.
How to prepare a garden bed for tomatoes in the fall
It is important not only to correctly plant the planting material in a permanent place of growth, but also to carry out the process of preparing the beds in the fall for tomatoes. In the autumn, it is necessary to select the plot of land on which it is planned to plant the crop. After the choice is made, you need to carefully dig up the ground. If we consider the optimal thickness, then it must vary from 20 to 25 cm.
Many experienced gardeners recommend not to break up the earthen clods after the land has been dug up. This is necessary so that snow can be retained during the winter.
Advice from experienced gardeners
If you listen to advice and recommendations from experienced gardeners, then you should take into account the following points:
- If you plan to make warm beds for tomatoes yourself, but there is no manure, then an excellent alternative solution is to choose bales with straw. It is recommended to first fill the bales with straw with a solution based on chicken solution, which is made in the ratio: 1 bucket of chicken manure per 50 liters of water ;
- Basil, lettuce, sage, garlic, bell pepper, and onion can be excellent neighbors for tomatoes;
- as practice shows, it is best to plant tomatoes in narrow beds, while the paths are best made wide, this is due to the fact that if the beds are narrow, then it is possible to reach all the tomato bushes without trampling the soil in the beds;
- if the path is wide, this will allow you to stretch the hose for watering the plants without much difficulty;
- when arranging warm beds, it is recommended to first lay a metal mesh with small cells and only then rotted manure; this approach will prevent the penetration of rodents.
Growing tomatoes is not as difficult as it may initially seem, but it will take some effort to get the desired result.
How to make beds for tomatoes: features of beds, types, sizes. How to make high and warm beds yourself. Preparing beds in spring and autumn. Advice from gardeners.
Photo of beds for tomatoes in open ground
As the experience and reviews of many gardeners show, beds designed for growing tomatoes can be not only useful, but also quite beautiful. When planting tomatoes in their summer cottage, many people show their imagination, resulting in beds appearing in the form of a spiral or circle.
When you plan to arrange warm beds, you can make them triangular or trapezoidal in shape. In some cases, you can find flower beds. For tomatoes, proximity to marigolds and nasturtiums is quite beneficial. That is why the beds in most cases resemble flower beds, in the center of which there are crops useful for tomatoes.
Conclusion
Making beds for tomatoes is not as difficult as it may seem to many inexperienced gardeners. In this case, many experts recommend following the advice and recommendations of more experienced gardeners while working. If you follow a step-by-step algorithm for arranging beds intended for growing tomatoes, then anyone can cope with such work. If necessary, the beds can be given any geometric shape, even the most complex - all that is required is to make some effort and use your imagination. Thanks to this approach, beds can not only carry a useful function, but also become a rather pleasant decoration of the land.
What to put first in a warm bed, and what to put next?
- Greenhouse beds are a great temptation for rodents and moles, who are always in a hurry to feast on the young and succulent shoots of newly planted plants. To prevent this from happening, we suggest laying thick PVC film on the bottom of the bed. It can be found in greenhouse or swimming pool stores. Next, it is worth laying a fine mesh on the surface so that rodents cannot penetrate into the layers of wood, tops and above;
- Now comes the important part of the bed - its fillers. Subsequently, water each layer generously to start the reaction. In the meantime, the first layer of organic masonry. It should be the most capacious in terms of heat transfer; before laying it, you need to make sure that this filler will not freeze. This feature applies to the northern regions. Therefore, in this case, you should take care of thermal insulation. A layer of plastic bottles would be suitable as a base for preserving heat. Fill them with air and screw the lids on them. This creates a space between the first fertile layer and the cold soil;
- Regions with a temperate climate can simply replace the bottle layer with a sand cushion. Next, a loose layer of wood is laid on the plastic/sand. This layer will be heating; in the future it must be maintained at constant humidity, because it is from this that the processes of decomposition of the biomaterial will be launched and heating will come from it. Small logs, driftwood, sawn trees, corn stalks or sunflower trunks can be used as wood filler. The wood should be approximately the same size so that the decomposition process occurs evenly. The layer height is 30-50 cm. The volume of wood filler will determine how long the warm bed will function. 30 cm is enough for about 5-8 fruiting seasons;
- The next layer consists of small sawdust, paper or cardboard. It will serve as a kind of guide to the next filling (10-20 cm);
- Branches of shrubs and trees are laid on top of the waste paper as laying material. The cut material must be free of rot and painful damage, so that infection does not develop inside the bed (20-25 cm);
- After this, recently fallen leaves are laid out. The layer should be approximately 25-30 cm;
- Animal waste, barnyard, and chicken droppings are laid out on top of the fallen leaves;
- The last and final warm bed will be a layer of turf soil. The bed is leveled and covered with film for 10 days. After this time, in the spring, ready-made seedlings can be planted into it. If you want to make a bed in the fall, complete it and cover the soil with mulch film. Leave it like this until the season opens.
Arrangement rules
When groundwater approaches close, the bed is raised above the soil. In dry regions, on the contrary, they deepen it, making it level with the soil or slightly higher. Raised beds are bordered with different materials. Most often they use wood or slate, less often metal. Placed in the middle of the lawn, framed by a tiled blind area, such a bed pleases the eye and decorates the area. Or they make it in the form of a meter-long hill without sides. Essentially, a warm bed is a compost heap, folded in the form of a layer cake according to certain rules.
Neat beds look very nice
- Coarse organic matter is placed on the lowest layer, which takes a long time to decompose: stumps and tree trunks, thick branches. Spill with urea. The larger the waste, the longer the bed will last. Wood retains moisture well.
- The next layer is laid with smaller organic matter: corn and sunflower stalks, small shrubs. Paper and kitchen waste, leaves, and straw can also be used.
- To speed up the process of decomposition and warming up, lay semi-rotted manure or compost. Top with turf, grass side down, and then a layer of mature compost.
- After this, the seeds are sown.
The length of the bed can be any, the optimal width is about a meter. The depth will depend on the composition of the soil and the type of bed chosen. The deepened one is made at 40 - 60 cm. The height of the raised bed is up to 1 m. The air remaining in the cavities between the large organic matter will ensure breathing and rapid heating of the bed. You can speed up the process by sprinkling the soil with special bacteria.
Advice. If the soil is initially good, then the need to dig up the bed will disappear on its own. Already in the first year, the soil is well loosened to a depth of 20 cm; the next season it is enough to add compost and plant plants.
High warm beds
One of the varieties of warm beds are high beds. They have been operating for 10 years. All the gardener needs is to make a good-quality bed with an earthen embankment on the sides and a high-quality substrate. In the future, only watering and fertilizing.
A high bed is made in 4 layers of organic substrate. First, a clear plan is made with the layout and size of the plantings, material for framing the sides and layer fillers are prepared. After this, you need to make markings, drive in stakes and secure the board. Wooden planks will last their entire service life if they are treated with an antiseptic.
It is easier to dig up soil in a ready-made box, because... the boundaries of the bed are known. The recommended depth and height of the bed is 2 shovels down and 2 shovels up. The upper part will shrink over time and become much lower. When the niche for the layers is ready, a greenhouse film is first laid out on the bottom of the box, with a metal mesh on top. Next, large branches, rotten logs, and boards are filled in. To eliminate gaps, the earth is filled up. This way the layer will sag less.
After adding soil to the wood layer, water the surface generously and begin laying a new layer consisting of knots, paper, sawdust or cardboard. Water again, lay out small branches, you can add straw and tops. We do not spare water, we make a new gap from leaves. It will be the final one before the layer with humus. We water the compost on top, lay a layer of fertile soil and let the bed sit until spring.
When is it better to make a warm bed in autumn or spring?
Autumn and spring beds with organic filler have their pros and cons. Some gardeners recommend harvesting such structures in late autumn, and some advise not to delay using the fertile layer and begin exploitation immediately after harvesting, in the spring. From the experience of gardeners, it can be noted that after harvesting in the autumn, a lot of plant residues remain, which are perfect for an organic cushion in a warm garden bed.
In addition to this, in the fall, although late, the earth has not yet had time to freeze, which means that you do not have to dig up a frozen layer of earth and wait for it to thaw. Autumn time is also good because the bed cushion begins to work; over the winter the structure will sag and the seedlings will receive the first dose of rotted fertilizers, which will undoubtedly affect the harvest. However, autumn beds also have some disadvantages. Primarily they concern rodents. All the mice and moles that flee from the fields can find out about the biological filler and stay in the bosom of the beds for the winter. During this period, rodents will cause a lot of trouble. To avoid such troubles, it is recommended to carefully protect the beds, regardless of whether they are in autumn or spring, with a metal mesh pad, as well as with light-proof thick film.
If you look at it from the point of view of labor costs, spring means a number of gardening jobs. Few people will want to conduct experiments during the period of sowing seeds, opening and developing soil, and other matters. But, despite this, spring is the time of year when water independently feeds a multi-layered bed, thereby heating the fruiting layers. In general, if you have the strength and desire, then warm beds will take root at any time of the year.
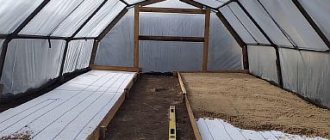
Warm bed in a greenhouse in autumn
Greenhouse beds are limited in the size of cultivation. Before preparing them, you first need to correctly distribute the sizes. Draw up a diagram that clearly defines the dimensions of the boxes and places for passage. When the diagram is ready, mark the locations for the trench. Place the first removed layer near the future bed. The depth of the trench must be at least 40 cm to accommodate all organic fillers. A greenhouse bed will be much warmer and more efficient than an outdoor one, so you don’t have to put tree branches or rotten logs into it. We suggest going straight to the plant layer.
If you don't have a metal mesh, use prickly branches of raspberries, gooseberries or spruce leaves. Rodents do not like discomfort at all. The next layer will be the removed turf. Turn it over with the grass side down and place it on the bottom. Water the fruiting layer with urea or a solution that accelerates decay. Next, lay a layer of tops, leaves, and water again with an aqueous solution. Finally, fertilize the layer with manure and add a layer of turf soil on top. Cover the greenhouse bed with film and leave it until spring.
Warm bed in a greenhouse in spring
Arranging a warm bed should be started at the moment when the ground has thawed from ice and cleared of snow. Icy soil will prevent the reaction from starting. As soon as the earth has warmed up, you can start making a box (made of wood, plastic, metal, slate) and digging out the earth. However, the most accessible material for gardeners has always been wood. Hands often get cut on slate, and plastic and metal are too expensive. When designing, it is worth considering the fact that instant construction of a bed will not result in the same rapid shrinkage of the soil. The top layer will have to be made above the level of the frame so that the crop does not sink below the natural earthen layer.
The layers of the spring bed will be the same as the filling of the autumn heating pillow, we wrote about them above: a wooden layer (optional), paper, vegetable, manure, earthen. Layers for a warm spring bed must be carefully compacted. Only you need to tamp not with your feet, but with a wooden plank, a thick plastic panel or, as in the photo, an old wooden door, so that shrinkage under the press occurs evenly. Compaction is carried out from the beginning to the end of the bed. The plank is laid on each layer, and under the weight of a person, the fruit-bearing rows are compacted. As compaction progresses, the bar moves.
The top layer of soil in a warm spring bed should be at least 30 cm. Otherwise, the plants may burn from the high temperatures emanating from the organic layer. In addition, do not forget about soil shrinkage. To make the greenhouse with beds work as efficiently as possible, it is recommended to place bottles of water between the rows during the cold season. Bottles must be black. When sunlight penetrates, the container will heat up, and accordingly, the liquid will heat up, and, as a rule, this will make the earth warmer than usual, which will have a beneficial effect on the course of the reaction.
Is manure needed for warm beds?
Manure in warm beds acts as a warming substrate, which simultaneously nourishes the soil with various elements and provides it with gas exchange. Manure is especially needed in cold northern lands. Just imagine, the manure layer can maintain a temperature of about 75ºC for 1.5 months. And this will be just enough until the onset of natural warming.
Manure is mixed with straw and used to grow champignons, cucumbers, tomatoes, and zucchini. Often the manure layer is laid down first to act as a sort of fire starter for the organic bed. It is worth cultivating such beds in a place where there is a lot of sun. With its help, the reaction will be supported with double the effect. The manure will warm the bed from below, and the sun will warm it from above. For the winter, the manure bed is sown with green fertilizers, for example, mustard or rye. As soon as the grass grows, it is cut and scattered over the ridge. Thus, manure will enhance the reaction of heat and gas exchange.
Cucumbers and warm beds
In the first year of life, warm beds intensely release nitrogen. Therefore, it would be logical to plant crops on them that require this particular element. These include cucumbers. Warm beds for cucumbers are erected both in the greenhouse and in the open ground. At the same time, in the greenhouse the beds are placed at a height, and in the open air they are deepened. Another difference between a greenhouse bed and a ground bed is the first layer. In the greenhouse it should be more porous. It is better to pour drainage at the bottom: small stones, broken bricks. It is better to place tree branches in the ground. The rest is a classic sequence.
For cucumbers, the filling must be manured. Any manure can be used, except chicken and horse manure. It is best used for autumn preparations. For spring ones, it is better to take a mixture of cow manure and straw. The last layer in a warm bed is always the turf layer. The soil is watered with hot water, left under film for 3 days in a greenhouse and for 7 days in an open bed, after which the first seeds can be planted. A reaction will occur from the water and the structure will begin to work.
Another feature for growing cucumbers in a warm bed is the need to construct arcs. Cucumber vines will bloom along them. In addition, for the gardener this is a help in harvesting. The spacer made of arcs can be replaced with vertical tying of lashes. Such a structure is most convenient to erect in a greenhouse.
Option #2 - we heat the bed with pipes
Long before the advent of electric cables and warm infrared floors, beds in greenhouses were heated with pipes - they simply ran them underground and ran warm water through them. The water came out already cooled and was heated again in the boiler. Very quickly, gardeners realized that it was easier and more economical to heat just a few beds than to heat the entire greenhouse at once, and especially its air, which, when heated, of course rushed upward. And warm beds with pipes turned out to be effective. As for the boiler, for these purposes it is better to take a gas one, and to circulate water in the system, purchase a pump and an automatic thermostat.
Take pipes for constructing such a warm bed from copper or plastic. The latter are good because they are cheap, lightweight and resistant to corrosion.
The main advantage of this method of making warm beds with your own hands is the simultaneous heating of both air and soil.
Tomatoes and warm beds
Warm beds for tomatoes perform best in open soil. They need to be installed from north to south in order to get the maximum amount of light, which is so necessary for the full ripening of tomatoes. The optimal width of a tomato ridge is considered to be 60-80 cm. They are convenient to process and harvest from. It is better to prepare a heating pad in the fall. Until spring, the bed will sag and acquire its permanent shape, thereby the soil will not injure the root system of the tomatoes.
A garden bed is suitable for growing tomatoes in the first three years of life. During this period, under the influence of internal microorganisms, the soil produces the elements necessary for them. And then the soil will be ideal for cabbage, celery, and herbs. As soon as the soil temperature has reached 10 degrees, the bed is watered abundantly with warm water to start the reaction, it is kept for 2-3 days and the first seeds can be planted. The internal temperature is quite enough for night and day heating.
Seeds are sown under a cover made of plastic bottles. 3-4 tomato seeds are buried in each hole, and a pale pink solution of potassium permanganate is poured over the material. The soil is sprinkled on top of the seeds to a height of 2-3 cm. At night, warm beds are covered with covering material directly on top of the plastic. This must be done until the temperature reaches above zero. At the beginning of May, the seedlings will be fully grown and the plastic caps can be removed from them. The bushes may seem sluggish for the first two days, but moderate watering will correct the situation.
On warm ridges, tomatoes feel much more comfortable, and the harvests differ in weight and quality. For example, varieties that have not previously ripened grow faster and turn out just like in the picture. Tomato bushes grow due to the abundant supply of nutrients, do not be afraid of this, remove weak side shoots and leave stronger ones for further growth and development of fruits, and so that the bushes have an orderly appearance, tie them up.
Option #1 – heat the bed with an electric cable
What is the advantage of heating the bed this way over compost? It is simple and possible to constantly control the soil temperature with an accuracy of one degree, which is simply necessary when growing particularly capricious plants.
Place the cable itself on geotextiles - it allows water to pass through, but holds the soil, and therefore the weeds immediately die out, and the ground quickly becomes soft and loose - which is good, of course. Lay the cable deep enough, mice don’t dig like that, and moles don’t gnaw things like that - 40 cm. The standard laying step is 15 cm.
It is best to take Green Agro to create warm greenhouse beds - such wires are used today wherever possible: for heating roofs, floors and even in plumbing systems. And you need to configure the entire system like this: as soon as the heating of the cable reaches 25°C, the power should be turned off. On average, back in March, electricity consumption will be about 20 kW per greenhouse, but in April it will drop to 9 kW, which is not at all expensive. Such warm beds in the spring produce as many as three harvests of radishes alone!
Most of the electricity, of course, will be consumed in the first days - the soil will defrost and thaw, but with each passing day significantly less heat will be needed. For accuracy, additionally purchase a thermostat - it will help to constantly maintain the temperature that is needed. In addition, it will take into account the sunshine of the day and the weather outside the greenhouse, determining the frequency of turning on the heating.
Pepper and warm beds
Is it possible to grow peppers in warm beds? Many gardeners are afraid of the high temperature conditions of the nutrient bed. In fact, there is no need to doubt the landing. As soon as the pepper has acquired its first green leaves and has stretched out, it needs to be planted in a warm bed. The fact is that pepper loves heat. To transplant it into open ground, you need to wait for the ground temperature to be at least 25ºC. The root system of this vegetable is very sensitive, so a warm organic bed is the ideal solution.
As with all of the above crops, a warm bed is first watered with hot water, left to settle for 3 days, and then replanted. The finished sprouts are buried in soil, watered and covered with film. The protective material is stretched along pegs or arcs installed on the bed. With the arrival of constant heat, the film is removed. Thus, the pepper will be in an artificial greenhouse and protected from sunburn.
Types of insulated systems
All of them are divided into two types. Seedlings are grown on temporary ones. After transplanting it, the vacated space is used as a regular garden bed. Permanent structures are in use for 4-6 years. There are three types of them, differing in the depth of biofuel incorporation.
- Tall. All decomposing layers are on the surface of the earth. It is necessary to arrange sides with a height of 0.5-0.8 m.
- Trench. The biomaterial is laid to a depth of 0.4-0.5 m. Above the ground level there are low sides, no higher than 0.2-0.3 m.
- Combined. Used in areas with high groundwater levels. The type of arrangement is similar to that of trenches, but the laying depth is less. Therefore, the sides of the structure are higher.
Instagram ogorody_dacha
Instagram viktoriakublashvili
- Landscape
What to plant along the fence at the dacha: a selection of trees, flowers and shrubs