Why do we need warm beds in a greenhouse?
The principle of operation of a warm bed is quite simple. If there is a lack of solar energy in the spring, soil heating occurs very slowly. Sufficient temperature for planting plants is reached no earlier than the end of April-beginning of May.
If you warm the soil artificially, you can create favorable conditions for planting as early as March.
At the same time, the roots of the plants immediately find themselves in comfortable conditions, quickly take root and begin to develop. Some of the heat enters the air and also helps to warm it up.
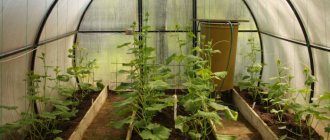
Tomatoes and warm beds
Warm beds for tomatoes perform best in open soil. They need to be installed from north to south in order to get the maximum amount of light, which is so necessary for the full ripening of tomatoes. The optimal width of a tomato ridge is considered to be 60-80 cm. They are convenient to process and harvest from. It is better to prepare a heating pad in the fall. Until spring, the bed will sag and acquire its permanent shape, thereby the soil will not injure the root system of the tomatoes.
A garden bed is suitable for growing tomatoes in the first three years of life. During this period, under the influence of internal microorganisms, the soil produces the elements necessary for them. And then the soil will be ideal for cabbage, celery, and herbs. As soon as the soil temperature has reached 10 degrees, the bed is watered abundantly with warm water to start the reaction, it is kept for 2-3 days and the first seeds can be planted. The internal temperature is quite enough for night and day heating.
Seeds are sown under a cover made of plastic bottles. 3-4 tomato seeds are buried in each hole, and a pale pink solution of potassium permanganate is poured over the material. The soil is sprinkled on top of the seeds to a height of 2-3 cm. At night, warm beds are covered with covering material directly on top of the plastic. This must be done until the temperature reaches above zero. At the beginning of May, the seedlings will be fully grown and the plastic caps can be removed from them. The bushes may seem sluggish for the first two days, but moderate watering will correct the situation.
On warm ridges, tomatoes feel much more comfortable, and the harvests differ in weight and quality. For example, varieties that have not previously ripened grow faster and turn out just like in the picture. Tomato bushes grow due to the abundant supply of nutrients, do not be afraid of this, remove weak side shoots and leave stronger ones for further growth and development of fruits, and so that the bushes have an orderly appearance, tie them up.
Creating warm beds in various ways
The answer to the question of how to make a warm bed in a greenhouse is simple. There are several options for heating the soil in a greenhouse:
- Electric.
- Water.
- Biological.
The advantage of this option is the ability to accurately adjust the heating intensity , as well as control the achieved soil temperature.
To create it, an electric cable is used, placed in a layer of geotextile laid to a depth of 40 cm. The cable is laid in rows at a distance of 15 cm between them.
This type of heating has a thermostat in its design, which allows you to automatically regulate the temperature. The relay is configured in such a way that the cable heats up to 25-30 degrees and then turns off.
The highest energy consumption of such beds occurs in early spring - 20 kW per day, then energy consumption is halved.
During the hot period the heating can be turned off and used again in the fall to continue the fruiting period of the plants.
It is based on PVC pipes through which hot water is passed. Such a system also acts as heating in winter, and the greenhouse can be used all year round.
To ensure fluid circulation in the system, a pump is installed, and a water heater (gas or electric) is used for heating.
In this case, warm beds are created using biofuel placed under the fertile soil layer. Experienced gardeners recommend preparing biofuel for the greenhouse with your own hands.
During processing, the biological material placed in the bed actively releases heat and thereby warms the roots of the plants.
Manure and various plant residues , sawdust, and wood trimmings are used as filler Horse manure gives the highest temperature; it is able to maintain a temperature of about 70 degrees for a month and a half.
In addition to horse manure, cow manure is suitable. But experienced gardeners do not recommend using pig and sheep manure as biofuel.
IMPORTANT. Do not use fresh manure as a filler; it can burn the roots of the plants.
Advantages and disadvantages
Manufacturing heated structures in a greenhouse is a labor-intensive and costly process, but the opportunity to recoup the investment in 2-3 seasons attracts summer residents. The structures have several undoubted advantages:
- An increase in temperature accelerates the process of photosynthesis in plants;
- plants do not suffer from return frosts and temperature changes;
- fertilizer consumption is reduced due to their active decomposition in the soil;
- you can grow several crops;
- reducing the number of weeds.
There are significantly fewer disadvantages, but they are there:
- high cost of arranging beds;
- electricity and water heating costs;
- Increased temperature and humidity provoke increased growth of pathogens.
If the soil is heated by decomposing organic waste, a strong, unpleasant odor may occur in the greenhouse.
Preparing filler for a warm bed
Beds using biological materials are the most environmentally friendly and at the same time economical. To warm the soil in such a bed, there are no costs for their construction and maintenance.
In addition to the thermal effect, this option enriches the soil with nutrients and carbon dioxide. Plants are in warm soil and receive enough nutrition. At the same time, they become resistant to diseases.
The ideal filler for the garden bed is a layer of rotted manure. Various plant residues, foliage, and trimmed branches are mixed into it.
If there is no manure, freshly cut grass mixed with food waste and potato peelings can serve as a filler.
You can fill the bed with straw bales, which are watered with a solution of chicken manure or Baikal fertilizer.
Last year's tops mixed with fresh humus can also be planted in the garden bed in the fall.
Compost bed
The traditional compost heap, created on the surface, has a large number of disadvantages. It is laid in a fairly high layer in the fall and freezes through in the winter. In frozen layers, the rotting process does not occur, which means that decomposition does not occur and the summer resident does not receive ready-made compost by spring.
In addition, such a high layer will thaw in the spring later than it will be necessary to use compost. Another disadvantage of such a heap is its maintenance in the summer.
The unpleasant appearance and smell, periodically watered with slops, causes a lot of unpleasant sensations. Flies fly over the heap, maggots begin to crawl along the edge, this phenomenon causes a lot of inconvenience not only to you, but also to your neighbors in the area.
An expedient way to prepare this biofuel is to create a compost trench bed. It is dug to a depth of 40 centimeters, the top layer is deposited, and the hole is filled with plant debris. In autumn, falling leaves are placed in the same trench.
To start the fermentation processes, the vegetable compost filler is spilled with slurry or grass infusion. The surface of the trench can be covered with roofing felt or a piece of linoleum. It is better to place them on poles for air access.
In winter, the compost trench is filled with a layer of sawdust and covered with a layer of snow to avoid severe freezing.
In the spring, the trench becomes a source of effective biofuel for laying in a warm bed.
Leaf compost
Fallen leaves are an excellent material for creating compost - biofuel. To obtain compost in a greenhouse to generate heat, you can use two options:
- Compost pile of leaves for heating a greenhouse. .
The foliage is laid on the surface of the soil, and a certain amount of ready-made compost is added to it to start the decomposition process. The top of the pile is covered with straw or bags. This is necessary so that the foliage does not dry out, but rot. The compost preparation process takes place over two years. The pile is periodically watered. - compost pit. To make it, a hole two meters wide and 30-40 centimeters deep is dug in the ground. The bottom is covered with film or roofing felt.
Fallen leaves are laid in layers, each of which is spilled with a solution of saltpeter and sprinkled with a small amount of turf soil. The next layer is shed with slurry.This is followed by a layer of caustic soda. Next, a layer of foliage is laid, sprinkled with wood ash. This sandwich is covered with straw on top, and then with turf, with the grass laid down.
After a month, the pit must be loosened to allow oxygen to enter and all layers to be mixed.
REFERENCE. The use of plant waste and branches as a filler for warm beds solves the problem of recycling plant waste on the site. Instead of simply being destroyed, they will serve as fuel and at the same time fertilizer for other plants.
Fertilizer application and soil disinfection
If even novice vegetable growers are familiar with applying fertilizers, and the suitability of a particular product for tomatoes grown in a greenhouse is described in detail in the instructions, then not everyone is familiar with soil disinfection. And clean soil is no less important for tomatoes than rich soil. They will not work to their full potential on problematic soil, so you need to know and follow several rules, and also know how much humus to add - this will help the normal growth of tomatoes and a good harvest.
It is imperative to change the soil in the greenhouse. If this is not done, the minerals will gradually disappear. But a colony of insects will grow, occupying and corroding the root system. Then there can be no question of any productivity. Another rule: you should not bring soil taken from the garden: there will be a lot of harmful microelements. They will simply change their place of residence, “registering” in the greenhouse, and will continue to harm the plants. The alternative here is land from a site where vegetables are not constantly grown.
Copper sulfate has been and remains a reliable and affordable means of disinfection. It is only necessary to observe the proportions of the prepared solution: one tablespoon of copper sulfate per 10 liters of water. But you should water the soil after harvesting. This is an effective preventive method. And quite affordable in terms of cost.
But you have to be careful: copper is toxic. Its effect on the human body is negative. Gloves are required, closed shoes, feet and long sleeves will protect against possible contact of copper sulfate solution with the body.
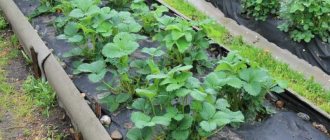
Photo
The photo shows: arrangement of warm beds in a greenhouse, heating the greenhouse with manure
Rules for forming a warm bed
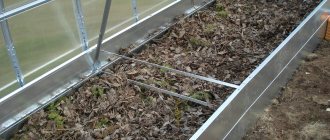
The process of making a warm bed in a greenhouse begins with the onset of the first warm days. It is made in the form of a trench into which various fillers are laid in layers.
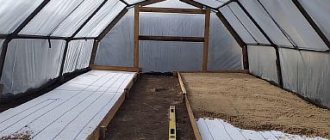
The main condition for the normal operation of a warm bed is its sufficient volume . The width of the bed is about 90 centimeters, the depth is 40 cm, the length depends on the size of your greenhouse.
Like any bed in a greenhouse, a warm one must be made using a wooden, metal or any other frame.
This will allow you to obtain the required height , as well as prevent soil from spilling out and washing away during the process of growing vegetables.
REFERENCE. Ready-made aluminum borders for beds are very convenient to use. They are durable to use and easy to install.
When laying layers of warm beds, certain conditions must be observed:
- The bottom layer should contain the largest fractions for slow rotting and increased heating time;
- When using a layer of turf, it is laid with the grass side down;
- Each laid layer must be spilled with liquid; there should be no dry layers in it;
- Plant waste affected by any disease should not be placed in the garden bed. Only healthy plants are used.
ADVICE. To protect plants from rodents, a fine mesh net is laid at the very bottom of the trench.
The bottom of the dug trench is filled with drainage. The material of the drainage layer depends on the quality of the soil on your site.
On peaty soils, the bottom of the trench before laying branches should be covered with thick fabric, and a layer of sawdust or crushed tree bark should be poured onto it.
This technique will prevent excessive water seepage during irrigation. On the contrary, on loam it is necessary to ensure the outflow of excess moisture , therefore, the bottom is covered with large branches left over when pruning shrubs.
The next layer is biofuel: manure mixed with plant residues or any of the fillers available. To speed up decomposition, the layer is spilled with a biological product .
The layer with biofuel is well compacted and covered with fertile soil. For nutritional value, a mixture of peat, humus, soil and sand is prepared. Superphosphate, wood ash, urea, and potassium sulfate are also added.
IMPORTANT. Experienced gardeners advise not to lay fertile soil right away. And after 2-3 days the biofuel field is laid.
The layer of fertile soil should be at least 30 centimeters. All layers are spilled with hot water and covered with black film for heating. After a week, the bed is ready for planting seedlings.
IMPORTANT. If you are a supporter of organic fertilizers, you don’t need to add chemical elements.
A properly made warm bed in a greenhouse speeds up the time of planting seedlings , and therefore increases the yield. A greenhouse with such beds does not need to be heated, and there is no need to apply additional fertilizers. The process of caring for plants is simplified. We hope you now know exactly how to heat a greenhouse with your own hands in the spring, as well as the best way to do it.
What kind of soil can I use?
One of the dangers that lurks in greenhouse soil is that it quickly depletes. And on emaciated, meager soil one can hardly expect a rich harvest. That is why, when setting up a greenhouse, it is necessary to design it in such a way that aged soil can be easily replaced. But it is not at all necessary that the greenhouse, which was placed on the land where excellent vegetables grew last fall, will also amaze with a rich harvest of tomatoes. The soil in this place does not always remain healthy and fertile. In this case, it is safer to prepare the soil for tomatoes yourself. Knowing the quality of the soil, add the missing components to it.
Homemade
Soil prepared independently, as a rule, excludes unwanted components or the wrong amount of them, which will definitely affect the tomatoes. To begin with, in the fall, after harvesting, the soil is thoroughly cleaned of remnants of greenery and dug thoroughly, removing the roots of old plants. The prepared soil must be checked to see if there is too much moisture. This can be done by making a lump and observing whether it crumbles. If it crumbles, it means the humidity is okay. Self-prepared soil will save money and give you a generous harvest.
Did you know? In the XYI century
Only tomato flowers were valued, as aristocrats used them to decorate their boudoirs .
Required Components
The greenhouse in which they are going to grow tomatoes “loses” to the garden: in the garden you can swap crops. But in a greenhouse the area is limited, other measures are necessary.
You can prepare three types of soil:
- humus predominates - leaves that have rotted, with the addition of turf;
- with the addition of manure;
- mixed type.
We must not forget about earthworms - they process all the components of the soil into vermicompost, which is considered an ideal fertilizer. Thanks to him, you can really count on a good harvest.
Unacceptable additives
The first rule: do not use organic fertilizers at the moment of their decomposition. At this time, intense heat is released that can burn seeds or destroy young shoots. Avoid clay - it makes the soil heavy, dense, and prevents it from breathing. Heavy metals accumulate, so soil taken from the side of highways or from hazardous areas, such as chemical production, should not be used for the greenhouse. Simply put, the soil must be clean.
Ready
When purchasing ready-made soil, which will make the work easier, it still needs to be treated with “Fitolavin” - a special biological solution. Dilution proportions: per liter of water 2 ml of “Fitolavina”. This is an effective preventive measure, because there cannot be complete confidence that the purchased land was not contaminated during its procurement. Specialty stores also have other options for soil treatment solutions.
Important! The manufacturer must provide rules for using such a solution. It is better to follow them exactly, without saving or increasing the dose by eye.