Author's rating
Author of the article
Yakov Pavlovich
Professor, Head of the Department of Vegetable Growing
Articles written
153
Experienced gardeners have many agrotechnical techniques that increase the yield of vegetable crops. Among them, worthy of attention are recommendations that reveal how to competently and quickly germinate cucumber seeds in order to increase their germination rate, successfully adapt to open ground or greenhouse conditions, and reduce ripening time.
Is it necessary to germinate
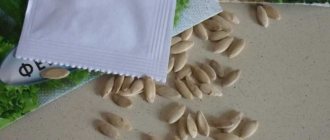
Germinating seeds before planting is the key to getting a rich harvest. Cucumber seeds germinate without preliminary preparation, but there are situations when it is necessary:
- you need to know the percentage of germination;
- there is no time to replant unsuccessful crops;
- friendly, even-aged seedlings are required.
The viability of cucumber embryos lasts only two years, so purchasing seeds that have been stored longer is not recommended.
Advantages and disadvantages
The following advantages of the procedure are highlighted:
- Selection of quality grains. During soaking, you can see which of them will grow better than others. The bad ones get rid of immediately.
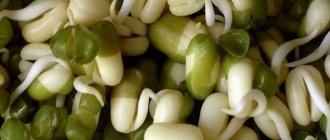
- Friendly germination. Sprouted grains germinate simultaneously, 8-10 days after sowing.
- Protection against diseases. During soaking, the seeds become strong, and plants grown from them are rarely susceptible to fungal and viral diseases.
The main disadvantage of the process is its complexity, which is why some gardeners do not use it.
Why germinate cucumber seeds before planting?
Cucumber seeds can germinate well directly in the soil. In this case, too, there are some nuances and findings. But still, it should be recognized that a faster harvest can be expected if you plant cucumber seedlings that have already grown and become stronger in the garden. And even if the seeds are planted without seedlings, it makes sense to germinate them first. Advantages of this procedure:
- will help ensure the germination of planting material;
- guarantees more friendly shoots;
- will avoid re-seeding in case of failure.
Germinating seeds will help you wait for the harvest earlier
Preparing for germination
Before the procedure, planting material is carefully prepared.
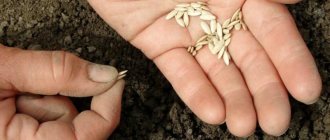
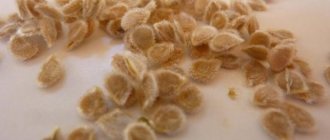
Calibration
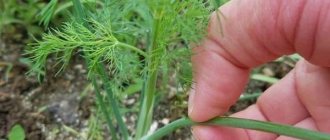
Select grains from healthy plants that are not affected by diseases. If these are not available, you will have to purchase them at a garden store.
When selecting, the following nuances are taken into account:
- the background should be green;
- the grains must be from the female type of plant, as they will give a good harvest;
- The planting material must be completely dry, dense and complete before planting.
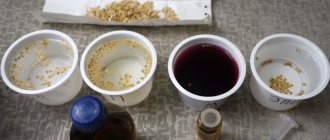
To prepare a saline solution, pour 3-5 g of salt into 100 ml of water, then drop the seeds into it. Those that float up are empty, they are thrown away.
Why is seed calibration needed? It's easy to check the germination of seeds!
Sterilization
Plant diseases are transmitted along with planting material, so the sterilization stage is important. They refuse it only if they use purchased seeds.
Homemade seeds are sterilized in this way:
- Take a 1% solution of potassium permanganate and immerse the grains in it.
- The water in the solution should be warm – +20-26°C.
- Keep the seeds in the solution for 15-20 minutes, then wash them under running water.
There is a second method of sterilization - heating. Planting material is immersed in warm water (+50°C) and the grains are kept for 20-30 minutes. This time is enough to get rid of viruses or fungi remaining on the seeds.
Hardening
It is necessary if the seeds are planted directly in open ground. The air temperature will be low, so it will be difficult for the plant to adapt to weather conditions. If you plant seeds in the hot season, hardening will not be required.
Attention! Hardening begins on the first day after placing the seeds in containers for germination.
Procedure:
- The container is placed in the refrigerator at a temperature of 4-6°C for 12 hours so that the planting material adapts to the conditions. You can do this at night.
- Similar manipulations are carried out for 2-3 days until the seeds germinate.
Bubbling
Allows you to accelerate the emergence of seedlings. The essence of bubbling is to saturate the planting material with oxygen, which has a positive effect on overall germination.
To do this, you will need an aquarium compressor and a container of 0.5-0.7 liters, or a regular glass jar.
Procedure:
- Fill the container 1/4 full with water.
- Dip a small amount of grains into the water so that they float freely in the jar.
- Lower the compressor tip to the bottom of the container and turn it on.
- This processing of grains lasts for 18 hours.
- After bubbling, dry the planting material.
The process increases germination rate to 100% and guarantees rapid seed germination - in 3-7 days.
I SOAK CUCUMBER SEEDS TO GET AN EARLY HARVEST. Olga Chernova.
Problems that arise during germination
Several problems may arise during germination - the seeds do not germinate or they become diseased. The first one can be solved very simply. It is only necessary to establish the conditions in which they are grown, adjust the temperature and, if necessary, wet the substrate. But the second one will not be resolved. The seeds cannot be cured, since the disease penetrates into the core.
Germinating cucumber seeds before planting at home is a simple and effective task. Since cucumbers are a heat-loving plant, thanks to preliminary preparation you can ultimately get healthy, strong and fruitful bushes that will grow and develop quickly.
Methods for germinating cucumbers
Let's take a closer look at how and with what help they are carried out.
On paper
You can use regular toilet paper, as it contains components that have a beneficial effect on plant growth.
This includes cellulose and other polysaccharides that act as organic fertilizer. First, the paper is spread on a flat surface and sprayed with water. Afterwards, lay out the seeds and cover with film, roll the paper into a roll. After 2-3 days, the grains will begin to hatch.
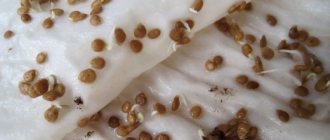
On a damp cloth
For these purposes, you will need a damp cloth on which the seed is carefully laid out. Sprinkle the seeds with warm water on top and cover them with another piece of damp cloth. Germination lasts 4-5 days.
In the peat
A peat tablet is compressed peat in the shape of an oval puck. There are small holes on the surface into which the seeds are placed. But before using peat tablets, they are placed in a container with water and kept there for 10 minutes.
When their size increases 2-3 times, grains are placed in the holes and sprinkled with peat on top.
For germination, take special peat pots. They are filled with a soil mixture consisting of soil, organic and mineral fertilizers. Next, holes are made in the soil and cucumber seeds are planted in them.
In a rolled-up cigarette
This is a relatively new method, thanks to which strong seedlings are obtained.
Reference. This method can be used not only for cucumbers, but also for other vegetable crops.
Procedure:
- Polyethylene film is spread on the surface, paper is placed on top and water is poured over it.
- Lay out the seeds so that there is a distance of 4-6 cm between them.
- Roll the paper-polyethylene strip into a roll and wait for the seeds to germinate.
In coconut substrate
To prepare the substrate, take shavings and coconut fibers. Before use, coconut tablets are soaked in boiling water to swell, and then the seeds are planted.
All not
Procedure:
- Pour boiling water over the hay, and while it is still hot, place it in a suitable container.
- Lay out the seeds, keeping a distance of 2 cm, cover them with a thin layer of hay.
- The container with hay is covered with plastic wrap and the container is placed in a warm place where the air temperature will not be lower than +25°C.
Sowing sprouted cucumber seeds for seedlings
Soil for cucumber seedlings
The soil that I prepared for growing cucumber seedlings consists of 70% turf soil. We brought it from the planting and carefully sifted it through a sieve. I added river sand, a little homemade compost and a couple of handfuls of wood ash to the soil to make it looser. Since the seedlings will only grow in this soil for one month, it should not be too nutritious. It is enough for it to be loose and moisture-absorbing.
Preparing containers for seedlings
I will grow cucumbers in two hundred gram cups. As usual, I use scissors to make 2-3 drain holes in the bottom of the cups from different sides. On each cup I glued small pieces of masking tape with the sowing date and a number indicating the name of the variety.
I do not fill the glasses with soil to the very top: I leave about 2 cm of free space between its surface and the top edge of the glass. This is done so that when the seedlings are pulled out, a little soil can be added to the glass.
Sowing seeds
I make a small hole in the ground, approximately 2 cm deep, and use tweezers to place the sprouted seed in it (Figure 2.1, Figure 2.2). This must be done carefully so that the tiny sprout does not break off.
Having spread the seeds into cups, I close up the holes and water the crops with a solution of Fitosporin-M the color of weak black tea (Figure 2.3). This drug disinfects the soil and protects young plants from pathogens of various fungal diseases of cucumbers.
- Method of sowing any seeds on hydrogel
I put the cups with the crops in a large box, the bottom and sides of which are covered with thick transparent film (Figure 2.4). I will cover the cups with the other end of the film to make a greenhouse.
I will keep the cucumber crops at room temperature, but as soon as the shoots begin to appear, I will move the box under a bicolor lamp to illuminate the seedlings, and when all the seeds have sprouted, I plan to take the box out onto the covered veranda during the day, if the temperature is not lower than 10 ⁰C. and at night I will bring the seedlings home.
An interesting way is to grow cucumbers in a barrel
This is how I germinate and sow cucumber seeds for seedlings and invariably get healthy, strong seedlings. I also wish you friendly shoots, good mood and rich harvests.
Requirements
For 100% germination of grains, it is important to comply with the following conditions: temperature, humidity, lighting, and also protect them from pests.
Temperature
Cucumber seeds should be kept at a temperature no higher than +25-26°C and no lower than +20°C. If temperatures are high, this will slow down seed hatching and prevent seedlings from fully developing.
Lighting
Cucumbers are a light-loving crop, so seedlings should be in a well-lit place. Shaded places on the site are not suitable - there the seedlings will grow slowly.
Watering
Cucumbers must be moistened from time to time, otherwise their growth will stop. Water them three times a week using warm water.
Protection of crops from pests and diseases
Regular treatment of plants with drugs will help prevent the development of diseases and the appearance of pests:
- "Ordan";
- "Baktofit";
- "Fitolavin".
Treatment is carried out in the evening or early in the morning.
When to start germination
Germination occurs quite quickly: from 2 to 10 days. The duration depends on the type and quality of the grains. Before planting, you need to make sure that the air temperature at night does not drop below 7 °C.
If you plan to plant cucumbers in a greenhouse or on a windowsill, you can start germinating in the second half of April or early May. The air temperature at this time will be optimal for planting the plant in the ground. If the seedlings go straight into open ground, it is important that the temperature does not drop below 15 °C.
How to speed up the process
To make the seeds germinate faster, you can use the following medications:
- "Kornevin". The product is suitable not only for stimulating growth, but also for protecting against diseases. To obtain a solution, combine 2 liters of water and 2 g of the drug. Treat seeds once every 2-3 days before planting.
- "Silk." Activates the development of vegetables and increases their productivity. The drug protects crops from fungal diseases.
- Sodium humate. Add 55 g of the drug to 5 liters of warm water. Before use, the composition should sit for 5-6 hours.
Pre-treatment of seeds
Before sending seeds for germination, they must be subjected to several important procedures that will significantly increase the chances of getting a sea of juicy sweet greens.
Germinating seeds will allow you to get a harvest faster
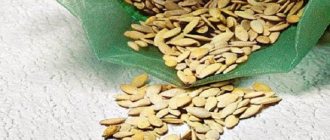
- Selection and calibration. The seeds are sorted, weeding out deformed, puny, and small ones. Friendly seedlings will grow from seeds of equal size. Sometimes they are thrown into salt water (2 tablespoons per liter) and the ones that float are discarded.
- Warming up. The seeds are placed in a bag made of natural fabric (linen, jute, cotton) and placed in the sun or a piece of cardboard on top of a central heating radiator. Warm the seeds for several days, periodically shaking the bag for mixing.
- Disinfection. Seed disinfection is carried out using available means. A disinfectant solution can be created based on 1% potassium permanganate (20 minutes), 3% hydrogen peroxide (10 minutes). Boric acid (0.5 teaspoon per glass) and copper sulfate (1/4 teaspoon per glass) give a good effect - leave for 2-3 hours. Specialized preparations “Fitosporin-M” and “Trichodermin” help (dilute according to instructions). Folk remedies include aloe juice (50:50 with water) and garlic infusion - the seeds can spend a day in them.
- Growth stimulation. To enhance growth energy, vegetable growers recommend pre-soaking in the preparations “Epin-Extra” and “Gumi”.
Attention! If the packaging says that the manufacturer has treated the seeds, there is no need to further disinfect them.
What to do if the seeds do not hatch and what are the reasons?
This problem arises when using low-quality seed material. Pecking may slow down if vegetables are grown in a cool and poorly lit place. It is necessary to normalize the growing conditions and, if there is no result, repeat the procedure using high-quality seeds.
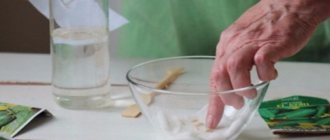
Soak seeds correctly
| Prepare the soaking area |
You can spread the seeds in toilet paper . But you should choose a dense option that will not spread in a humid environment.
Cotton pads are often used, as in the photo . This is a very convenient solution that is perfect for such purposes.
Another option is a bandage, gauze or cotton cloth. The seeds are laid out on one layer and covered with a second layer on top.
Provide optimal conditions
Moisten the material in which the seeds lie well. And place it in a closed space, it can be a plastic container, a plastic bag. You can also place the seeds in a glass jar with a lid.
Place in a warm place . Ventilate every day and add moisture if the material is dry. If you need to plant urgently, you should soak it for at least 12 hours so that the shell softens and it is easier for the sprouts to break through
Sowing seeds on time
Check the seeds daily for sprouts.. You need to wait until almost all the seeds hatch.
Be careful . The sprouts are quite fragile and can be easily damaged
Carry out hardening
Even when planting in a greenhouse, it is better to harden the seeds; they will be more resistant to adverse conditions. The container is placed on the bottom shelf of the refrigerator.
You need to stand for 12-16 hours . Then the seeds are taken out and left indoors for 3-4 hours for gentle heating. After this they can be planted
conclusions
If all the above conditions are met, then in a few days strong and healthy seedlings will appear.
For normal seedling growth, warmth and good lighting are required.
After this, the containers can be placed on window sills or insulated balconies. In this case, the seedlings will receive the right amount of light. In cloudy weather, seedlings must be illuminated with phytolamps . If the weather is sunny outside , then it is better to cover the window on which the pots with seedlings stand with newspapers or paper. This will prevent direct sunlight from damaging young plants.
Sowing cucumber seeds is quite simple, but there are many reasons for poor seed germination. But if you take into account the recommendations of experienced farmers when choosing planting material and soil for planting, and follow all stages of germination, this will save time and make it possible to obtain strong and healthy seedlings.
Proper care of seedlings
In the first 3-5 days after the emergence of cucumber shoots, the temperature is reduced to 12-16°C, then maintained at 18-20°C. If the seedlings are on the windowsill, be sure to check if they are suffering from drafts.
Within 5-7 days, the first leaves should appear on the sprouts. At this time, you need to water the plants as the soil dries out and it is better not from above, but into the pan. It is important not to overwater the seedlings, otherwise the roots will rot.
It is extremely important to provide the seedlings with good lighting, otherwise the seedlings will either stretch out or wither. Cucumbers need at least 7-10 hours of daylight per day. If the room is a little dark, “help” the plants, especially at first - an ordinary fluorescent lamp is enough for this.
If you initially planted cucumber seeds in a common container, you will have to start picking them when the cotyledon leaves fully open or the first true leaves appear.
To speed up the formation of the root system, improve the survival rate of seedlings after picking and transplanting, and increase the resistance of plants to unfavorable environmental conditions, it makes sense to treat growing cucumbers with a growth stimulant. Among such safe and effective preparations for seedlings, Kornestim has proven itself well.
How to use Kornestim
Step 1 . Dissolve the powder in water at the rate of 1 g per 1 liter, stir vigorously for 3-5 minutes.
Step 2 . For the first time, water the cucumber seedlings at the stage of the first true leaf, using about 50 ml of solution for each seedling.
Step 3 . Water the cucumber seedlings a second time a week after the first treatment, using about 50 ml of solution for each seedling.
After two true leaves appear, feed the plants with a solution of nitroammophoska (1 tsp per 1 liter of water) or complex fertilizer for seedlings. 10-14 days after the first, carry out the second feeding.
Seed development process
On what day do cucumbers sprout after sowing depends on how successfully the seed has passed through all the necessary phases of its development.
To begin with, the seed, when it finds conditions favorable for development, is saturated with a sufficient amount of moisture, swells and, ultimately, opens its rough skin. After which the enzyme system is activated and aerobic activity begins.
The embryo begins to develop. In order for an embryonic root to appear, many different chemical reactions must take place. Once it emerges, nutrition will be provided by absorbing nutrients directly from the soil.
It is important to place the seed at the correct depth when planting. Usually the seed is placed in the ground and sprinkled with a layer of 1.5-2 cm of soil.
A seed planted too deep will make germination difficult, and a seed left at a shallow depth will prevent the embryonic root from getting rid of the skin, which will lead to its death.
In such a situation, you can try to save the seedling. To do this, it should be generously drained from the spray bottle, and after achieving sufficient moisture, carefully remove the skin with your hands.