Growing vegetables and other crops in a greenhouse allows you to protect them from frost and bad weather, as well as provide optimal conditions in terms of temperature and humidity. And as a result, all the time and effort spent on arranging the building and caring for the plants will more than pay off with a bountiful harvest of high quality. Do you like to do everything around the house yourself? Are you a "jack of all trades"? Then try making a greenhouse from a profile with your own hands.
Do-it-yourself greenhouse from a profile
Greenhouse made of profile 25x25 mm
Advantages and disadvantages of profile greenhouses
Why is it worth building a greenhouse from a profile yourself? How will such a structure be better than a wooden greenhouse or a purchased building, which only needs to be brought and assembled on site? Before getting down to business, you should understand what the advantages of a profile greenhouse built with your own hands are.
- Freedom of choice - you can decide for yourself what size and shape your future greenhouse will be. Your imagination can only be limited by the requirements for the strength of the frame and the budget allocated for the arrangement of the greenhouse.
- Savings - metal profiles are cheap, polycarbonate or film cladding is also not expensive. In addition, a markup from the greenhouse manufacturer, which can be significant, is not added to the cost of construction. As a result, a building of equal size and quality can cost you 30-50% less than a purchased one.
Greenhouse frame made of profile pipe
- Durability – galvanized metal profiles do not require additional protection against corrosion. They are not afraid of dampness, moisture and air, they do not rust. With proper construction and care of the greenhouse, the structure will serve you for a very long time.
- Mobility - a frame made of galvanized metal profile and casing made of film or polycarbonate are extremely lightweight. You can move such a greenhouse to a new location without even dismantling the building. If this is necessary, then dismantling and reassembly will not take you much time.
- Ease of construction - to independently build a greenhouse from a metal profile, you do not need to have any special knowledge and skills; you only need basic skills in working with a set of tools that can be found in any home. And for those who have previously repaired and installed plasterboard ceilings, things will go even easier and faster.
Galvanized profile
Prices for galvanized profiles
galvanized profile
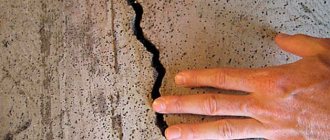
In addition to the advantages, before starting construction work you should also become familiar with the disadvantages of a greenhouse made of metal profiles. In fact, it is one, but quite significant - in winter, under the influence of large masses of snow, the frame and fastenings may not withstand and the greenhouse will collapse. There are two ways to solve this problem.
Insufficient reinforcement of the frame and irregular cleaning of the greenhouse roof from snow can lead to such a sad result
The first is to strengthen the frame of the greenhouse. To do this, the distance between the arches (or trusses, depending on the design) is reduced, additional jibs and pillar columns are introduced to support the roof of the greenhouse. You will have to spend more materials, but these costs will pay off over time.
Introduction of additional jibs and racks into the frame structure
Reducing the spacing between posts and rafters also increases the reliability of the greenhouse.
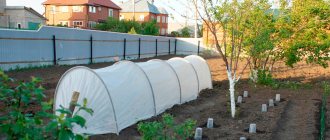
The second way to solve the problem with snow load is to install a removable roof. This is suitable for those greenhouses that are used only during the summer season. Upon completion, the roof of the greenhouse is removed for the winter. As a result, nothing threatens the frame, and in the spring you just need to remove the remaining snow and mount everything back.
Example of a retractable roof design
Important! If you live in southern latitudes and get little snow in winter, then there is no need to worry about snow load. It is enough to regularly remove it from the roof of the greenhouse after the next precipitation.
Pros and cons of galvanized profiles in greenhouse construction
Even a beginner who has no experience in construction can assemble a profile frame. He will need an electric jigsaw, a screwdriver and a drill. Metal profile is a durable material, but its cutting is often done using an ordinary saw (if a jigsaw is not at hand).
Galvanization corrodes less often than other materials. It does not require painting or the use of anti-corrosion agents. The durable and lightweight frame can be assembled, disassembled and installed in another place at any time.
Advice! If you wish, you can immediately buy a ready-made frame. It is sold unassembled. A diagram is attached to the set of parts, according to which the structure will be easy to assemble.
The disadvantage of the material is that it cannot withstand much weight. If there is wet snow more than 5 cm thick on the roof of the greenhouse, the structure will not withstand the weight and may collapse. That is why greenhouses are most often made with arched or gable roofs. Thanks to this shape, snow and other precipitation does not accumulate at the top.
The metal profile is resistant to corrosion. On the other hand, if the integrity of the zinc coating is damaged, corrosion penetrates into the metal. In this case, it must be painted with durable paint.
Types of profiles
Strictly speaking, a profile greenhouse is a collective concept. It denotes structures that are noticeably different from each other and are built from many types of metal (and not only) profiles. Some of the profiles were originally manufactured for other purposes, while others were created specifically for the construction of greenhouses. The most popular of them are shown in the table below.
Table. Types of profiles suitable for building greenhouses.
| Title, photo | Description |
| U-shaped or U-shaped profile | Many subtypes of U-shaped profiles, differing in width, wall height and metal thickness. They are used for the construction of various structures, including greenhouses. To combat corrosion, depending on the material, it is galvanized (for steel) or anodized (for aluminum). |
| V-profile | Metal profile of V-shaped section with “shelves” for fastening in the lower part and on the edges. A cheap and easy-to-use product, but inferior in strength to some U-profile options. Created specifically for the construction of greenhouses. Reinforced options may be called W-profiles. |
| Profiled pipe | Galvanized steel pipe of rectangular or square section. High levels of strength and reliability. To combat corrosion, it is galvanized or powder coated. |
| CD profile for drywall | Load-bearing ceiling profile (PP) for plasterboard. It has a U-shaped section, bends at the ends. Equipped with corrugations that increase the strength of the product. |
| UD profile for drywall | Guide profile for drywall. It has a U-shaped cross-section and is used to form a frame plane from a CD profile and attach the latter to a wall, floor or ceiling. |
| PVC profile | Profiles made of polyvinyl chloride of U-shaped, square and other sections. It differs from metal analogues in greater flexibility and low cost with less resistance to loads. |
There are several ways to fasten profile elements to each other.
- Bolts and nuts with washers - well suited for profiled pipe, V-shaped and U-shaped structures. They provide ease of subsequent dismantling and reassembly of the greenhouse, but at the same time require preliminary drilling of holes in the profile and careful monitoring of the reliability of the connections.
- Self-tapping screws - used in working with all types of metal profiles, especially CD and UD. For a greenhouse, it is justified to use not “bugs”, but self-tapping screws with a press washer - a thin head will not interfere with the installation of the sheathing. Some of the screws come with drill bits on the ends to facilitate entry into the metal.
- Welding is a reliable and durable permanent fastening. Use only if subsequent dismantling of the greenhouse is not planned. Welding seams require additional protection against corrosion.
- Connectors - a variety of designs used to connect PVC profiles to each other.
Self-tapping screws with press washers
An example of fastening corners with self-tapping screws to a profile
Advice! When choosing a profile for a greenhouse, pay attention to the quality of the anti-corrosion coating, especially on the corners and bends - there it should not have abrasions, stains, foreign inclusions or other defects. Otherwise, the service life of the frame may be significantly reduced due to the gradual destruction of elements affected by corrosion.
Testing a 40x20 pipe for strength
10 bricks
10 bricks
20 bricks
20 bricks
Unfortunately, we ran out of bricks and frames to hang them, so we couldn’t break the 40x20 pipe.
From this experience it is clear that a 40x20 pipe can withstand a load more than 2 times greater than a 20x20 pipe. This is due to the fact that the load is carried by a 40mm rib, and it is 2 times larger than the rib of a 20x20 pipe. For comparison, the weight of 1 meter of pipe 20x20 is 0.42 kg, and 40x20 is 0.66 kg. It turns out that a pipe that weighs only 57% more is 100% stronger.
To get a 40x20 pipe from a 20x20 pipe you need 2 pieces, as in the picture. But 2 horizontal walls do not carry any load and they are simply not needed for greenhouses.
The 20x20 pipe has 4 sides of 20mm, you need to add an additional 2 more sides of 20mm (highlighted in green dotted line) to turn the 20x20 pipe into a 40x20 pipe. It turns out that a 40 x 20 pipe, with an increase in the amount of metal by 50%, becomes 100% stronger.
In practice, it turns out that the cost of a greenhouse made from a 40x20 pipe is 30% higher than the cost of a greenhouse made from a 20x20 pipe, and the strength is 100% higher.
Along with a number of advantages (ease of processing, low weight, resistance to corrosion), thin-sheet galvanized metal as a material for building structures has an important drawback. The small thickness means that the metal has poor resistance to deforming loads. As a result, to obtain the required strength, it is necessary to either increase the thickness of the metal or use other technological solutions.
One of these solutions is the inclusion of stiffeners in the design. These elements ensure that the original geometry of the part or structure as a whole is preserved, while the total mass of the product does not increase.
Stiffening rib
- this is a part of a part or structure that takes on part of the load. Due to this, the product becomes less susceptible to deformation and can withstand greater weight in static conditions and greater force in dynamics.
The arcs of arched greenhouses made of thin sheet metal are lightweight. But at the same time, thin metal can deform under load, which leads to a deterioration in the performance and appearance of the object. This problem is solved by including stiffeners in the structure.
Firstly, the stiffener does not increase the mass of the product. Thanks to this, savings on material are ensured, and as a result, the cost of the product is reduced.
Secondly - and this is the most important thing - any stiffener takes on part of the load. This provides additional structural strength.
The V-shaped profile can withstand some load, the 40x20 pipe can also withstand some load. If you connect a 40x20 pipe and a V-shaped profile, then the amount of withstanding load will increase and this is what it might look like:
Choosing a greenhouse shape
Before you start creating drawings and plans, you need to decide on the general shape of the frame for the future greenhouse. There are several basic options that have their own advantages and disadvantages. Let's look at them separately.
Gable greenhouse . The classic form that has existed, exists and will exist for decades. In essence, it is a reduced and simplified house with a gable roof.
Frame of a gable greenhouse
The advantages of the design are as follows:
The disadvantages of a gable greenhouse are as follows:
- relatively high consumption of materials;
- design complexity;
- inconvenience with roof cladding.
Arched greenhouse. The most common form of greenhouse frame at the moment. It is a set of profile arches connected to each other by horizontal ties.
Arched greenhouse frame
Advantages:
- simplicity of design;
- low material consumption;
- resistance to strong winds;
- quick assembly of the frame and laying of the sheathing.
But the arched greenhouse also has its drawbacks, and noticeable ones:
- the need to regularly clear snow;
- you need a flexible profile or tools to bend it;
- Narrow areas directly next to the wall cannot be used.
Greenhouse with arches from a set of straight elements
A-shaped. Imagine that all that remains of an ordinary greenhouse with a gable roof is the roof, which is very elongated in height. This is what an A-frame greenhouse looks like.
A-frame greenhouse
Quite an unusual design, rare, but with its advantages:
- no problems with snow;
- ease of assembly;
- unusual appearance.
The rarity of the A-frame greenhouse can be explained by its disadvantages:
- problems with usable space;
- more labor-intensive installation of sheathing;
- inconvenience in working with beds.
Single slope greenhouse. It is an ordinary greenhouse, but the roof is tilted only in one direction. The advantages and disadvantages do not differ from those of a gable greenhouse. Well suited as an extension to a residential building and a greenhouse for growing seedlings for a “large” greenhouse.
Lean greenhouse
There are other, more complex structures - dome, tent, etc. However, it must be taken into account that the greenhouse is made independently and from a relatively light frame, therefore it is possible to build such greenhouses, but only with extensive experience, as well as time and effort, which don't mind spending it.
Important! There is a subtype of greenhouse with a gable roof - the Mittleider greenhouse. It differs from the original in that the tops of the slopes are located one above the other, and vents are installed in the resulting vertical wall. As a result, the Mittleider greenhouse is the best in terms of ventilation and air circulation efficiency.
Mitlider's greenhouse
A-frame model
To achieve maximum illumination during the day, most owners prefer just such greenhouses made of PVC profiles; there are no problems with precipitation, and maintenance becomes quite simple.
Installation will also not cause problems; you do not need to have special skills to implement it, you just need to follow the diagram and correctly measure the length of the components.
An unusual appearance can add zest and decorate the area, and the plants will receive the right amount of lighting without additional devices. There are some disadvantages, among them the following should be highlighted:
- Usable area is limited.
- The sheathing is difficult to install.
- It may be difficult to use in some areas.
The edges of the structure are located too close to the soil, which does not allow planting there plants that reach large sizes at the time of their growth.
Getting to this area is also problematic; pulling out a weed or watering a crop will require maximum effort, and older people will face inconvenience.
Designing a greenhouse from a profile
Having chosen the shape of the future greenhouse, you need to take several sheets of paper (preferably graph paper or squared), a pencil, an eraser and begin drawing up a drawing of the building. If you have computer skills, the drawing can be drawn up in programs for 3D modeling and design. Of these, the easiest to learn is Google SketcUp.
Designing a Greenhouse Using Google SketchUp
First you need to choose the size of the building. In this case, proceed from the dimensions of a standard sheet of cellular polycarbonate - 6 by 2.1 m. Also take into account the method of connecting individual sheathing elements to each other - using connecting profiles or overlapping. Most often, summer residents choose a greenhouse width of 2-3 m. The length can be 4, 6, 8 and 10 m, with some adjustments to the standard dimensions of the SPK sheet. The height of an arched greenhouse is rarely made more than 2.1 m, but for a gable structure there are no special restrictions, the main thing is to maintain an inclination angle of 25-30° for the slopes.
An example of a greenhouse drawing from a profile
Prices for cellular polycarbonate
cellular polycarbonate
Don’t forget also about the doorway, think about what size it will be convenient for you. Pay attention to the location of windows and transoms, especially in large greenhouses, since the plants in them will especially need ventilation.
The final stage of design is thinking through and drawing profile connections into a single frame on the drawing. Do not forget to calculate the amount of material and fasteners needed for subsequent purchases, taking into account a reserve of 10-15%.
Greenhouse assembly
When building a greenhouse, it is better to use an omega profile. Before buying material, you will need to make a drawing and diagram of the arrangement of elements and sectors of the structure. This will help you avoid common mistakes.
Manufacturing of end walls
When using an omega profile, the roof must be gable. The end walls are made in this way:
- before work, the finished elements are placed on a flat surface;
- from them they lay out the shape of the future greenhouse, marking the bottom and top at the frame;
- Before fastening the parts, measure the distance between the corners located opposite each other. If the shape of the square or rectangle is correct, the difference between the length of the diagonal sides of the frame will be no more than 5 mm;
- the ends of the frame elements are fastened and tightened using self-tapping screws;
- a line is drawn perpendicularly from the top of the frame (this is the future ridge of the roof);
- measure the distance from the ridge to the corner parts of the frame. If everything is done correctly, the amount will be the same;
- the two sums are added to obtain the profile length;
- cut it off using a jigsaw or hacksaw;
- mark shelves on the sides on the workpiece;
- bend it into the shape of a gable roof.
All that remains is to attach the roof with dowels to the frame, reinforcing the corners with stiffening ribs. To do this, the remaining scraps of material need to be screwed obliquely. The resulting roof is fixed to the frame with self-tapping screws, creating a rear end wall. The front wall is made according to the same principle, leaving space for the doorway. Two vertical posts are used as its basis.
Important!
The door is assembled last. This will help avoid mistakes.
After the work with the roof and walls is completed, you need to cut new pieces of material and make additional skates from them. At the same time, their dimensions should be similar to the dimensions of the walls. Additional ridges are used to strengthen the roof to reduce the width of the spans. They will not sag or break under the weight of snow. The pitch between skates is about 1.05 m.
To fasten the end walls you will need 4 more parts of the metal profile. Their size must correspond to the length of the greenhouse.
Foundation arrangement
Some readers may have doubts whether a foundation is needed for a greenhouse at all. On the one hand, this is not a heavy building, and the greenhouse is unlikely to sag under its own weight. But for a greenhouse without a foundation, there is always a risk that it will be blown away by the wind. In addition, the base laid under the greenhouse protects plants from drafts, freezing, rodents, insects and other pests.
Before starting to build the foundation, you need to choose the place where the future greenhouse will stand. Ideally, this should be a flat area with a minimum slope, rich soil, no shade from buildings and some kind of shelter from the north winds in the form of a fence or hedge.
Important! Do not place the greenhouse between two houses or next to such a place - this creates a “wind tunnel” effect, that is, constant and strong drafts.
Choosing the right location to install the greenhouse
The simplest and most affordable type of foundation is a timber structure. Arrangement of some other types is possible, but redundant. For your convenience, step-by-step instructions are provided below.
Step 1. Clear the area for the greenhouse from debris, stones and tall vegetation.
Step 2. Make markings. To do this, you can use pegs or pieces of reinforcement and a thread stretched between them.
Marking a site for a greenhouse
Step 3. Determine the condition of the soil. If it is sufficiently solid, then the timber foundation does not need to be deepened. Otherwise, there is a need to construct a trench.
If the soil is hard, then the timber foundation does not need to be deepened.
Step 4. If the soil is soft, then dig a trench along the perimeter of the greenhouse with the width of a beam and a depth of one spade bayonet.
Foundation trench
Step 5. Compact the bottom of the trench and add a layer of sand or gravel. The layer thickness should be 25-30% of the ditch depth.
Step 6. Measure and cut the timber to the length and width of the greenhouse.
Advice! It is advisable to use larch timber as a material for the foundation - it is resistant to rotting and mold.
Larch timber
Prices for larch timber
larch timber
Step 7. Treat the wood with an antiseptic. Alternatively, you can use copper sulfate, bitumen or used motor oil.
Timber treated with bitumen and joined “in half a tree”
Step 8. Assemble the timber into a rectangular box. Connections can be made using dowels or long half-wood self-tapping screws, or using galvanized metal corners.
Fastening beams to corners
Step 9. Transfer the timber box to the trench, lay it there and level it horizontally. To do this, you can use sand, earth or thin planks.
Step 10. Drill through holes in the corners of the timber box and insert 1 m long reinforcing pins there. Drive them into the ground. This is necessary to securely fasten the foundation of the greenhouse so that it will not be blown away by the wind.
In some cases, it is not necessary to drive pins into the wood itself - reinforcement dug into the inner corners can also protect the greenhouse from being toppled over by the wind
Step 11: Fill the gaps between the trench and the foundation with sand, gravel or soil.
Step 12. For additional protection of the timber, the foundation can be covered on top with a layer of roofing felt or other roll waterproofing.
Step-by-step instructions for building a greenhouse with profile pipes and coating materials
Let's look at how to make the simplest arched structure. Before making a greenhouse, you need to think in advance about the necessary tools. Will need:
- shovel for leveling the area;
- drill for installing racks;
- grinder for cutting pipes;
- screwdriver for installing fasteners;
- pliers and hammer;
- measuring instruments (angle, level, tape measure);
- welding machine;
- a hacksaw if the walls are planned to be made of polycarbonate;
- wooden stakes and rope for marking the area.
It is recommended to install the greenhouse on sandy, dry soil to avoid stagnation of moisture. The long side of the structure should face the south side so that the crops receive maximum light. It is also important to take into account design features during installation. So, for gable and arched greenhouses, the longitudinal axis should have a direction from north to south, a deviation of 15-20 degrees is acceptable. And if, for example, you decide to build a simple greenhouse with a pitched roof, the slope must be made to the south.
In the selected area you need to make markings using pegs and rope. And also dig a trapezoidal trench into which to pour biofuel to quickly warm the soil.
Foundation
For a profile greenhouse, a columnar foundation will be sufficient:
| Illustration | Actions |
| Make holes in the ground located at the same distance from each other. Their diameter should be 1-1.5 cm larger than the circumference of the posts. | |
| Place asbestos pipes inside. Fill the gap between the pillars and the ground and compact it with a sand-crushed stone mixture. | |
| Pour cement inside the pipes so that there are no voids. Place a metal plate or piece of reinforcement into the concrete. In the future, they will become the connecting link between the foundation and the frame. |
For an arched greenhouse, you can also make a strip foundation, but this will take more time.
Cold and hot pipe bending step by step
To give the pipes an arc shape, you can contact specialized companies; they will bend them using special equipment.
You can do this yourself in several ways. One of these technologies is called cold. For cold bending of pipes, a spring with a diameter such that it can be inserted inside the profile is used. Thanks to the spring property, it is possible to change the cross-section and change the shape.
If the profile is less than 1 cm, it does not require filler. When the pipe is thicker, you need to pour rosin or sand inside. In winter, you can pour water and wait for it to freeze.
Another technique is called hot, because. produced by heating profiles. It can be used at any time of the year. It is recommended for pipes with large thicknesses. To carry it out you will need a manual, factory or stationary pipe bender.
Step by step steps:
- Make a pair of plugs for both ends of the profile. Their length should be 10 times greater than the width of the base. The wide part is 2 times the circumference of the pipe opening.
- Make grooves in one plug to allow gas to escape when heated.
- Heat the pipe bend.
- Sift and dry the river sand. Heat on a sheet of metal to 150 degrees until the moisture has completely evaporated.
- Install a plug without gutters on one side of the profile.
- Pour calcined sand from the other end, periodically tapping the walls so that it compacts.
- Attach the second plug.
- Mark the fold location with chalk.
- Fix in a vice, placing it on the template.
- Heat the metal until red and bend it with a smooth, precise movement.
- Compare with the template, if everything is correct, you can remove the plug and shake out the contents.
Note! If the profile has welding seams, after bending this line should be located on the side. It is not advisable to bend along it.
Installation of arches
If you plan to make the greenhouse collapsible, then it is recommended to use bolts for fastening. They are also used to secure the doors (by the way, they are often used for greenhouses, for example, the Butterfly or Bread Box design). If the structure is stationary, it is better to weld its elements.
It is necessary to cut the racks to which the arcs are later attached. Also required are strips that will connect the bent pipes. The joints are fixed with crabs or a welding machine. The frame is placed on the foundation and attached to metal plates or reinforcement.
Helpful information! If there are welding seams, it is recommended to seal them with a primer. This will make the structure more reliable.
Sheathing
The following materials can be used for cladding:
| Type of coverage | Advantages | Flaws | Material cost |
| Polyethylene film | It's cheap Easy fastening. Quick replacement. Little weight. Ideally attached to the zigzag profile. | It quickly becomes unusable (service life is about 2 years). Deteriorates under the influence of ultraviolet rays and breaks easily. It transmits light poorly and poorly insulates. | From 30 rub. per linear meter or from 3000 rubles. per roll (1 m * 100 m) |
| Non-woven fabric | The service life is longer than that of film, about 5 years. It allows sun and moisture to pass through well and protects crops from aggressive environmental influences. | It breaks easily, for example, under strong gusts of wind. | 20-150 rub. / lm (depending on thickness) |
| Glass | Available in many areas after renovation. It transmits sunlight well, protects from frost and retains heat inside. Tomatoes, cucumbers, peppers, etc. grow well in such a greenhouse. Fire resistance (for those structures that are heated additionally). Low sensitivity to temperature changes. Easy to care for. | Difficult to install. High fragility. In hot weather it lets in too much light, in cool weather it cools the greenhouse too much. Heavy weight. | Window glass – from 800 rub. per sq.m. |
| Polycarbonate | Solid polymer with high strength and low weight. Provides diffused light, retains heat well, is fairly easy to install, fire resistant, and durable. Perfectly protects against UV rays. | High price. Intensity of thermal expansion. | From 1000 rub. per sheet |
Note! If the structure will stand in winter without a canopy, it is recommended to use polycarbonate sheets for cladding, because they can withstand the weight of snow.
Frame assembly
Let's consider the process of manufacturing two frame options for a greenhouse - a gable structure made from plasterboard profiles and an arched structure made from V-shaped metal products.
Scheme of a gable greenhouse (top view)
The first option consists of the following elements, assembled separately:
- main and secondary gables;
- side walls;
- roof.
One of the gables of the greenhouse (and in the case of a long building, both) must have an opening for a door, which is assembled separately. The gables themselves were assembled from the base, vertical posts, upper horizontal beam, roof and jibs.
Step 1. Measure the profile for the base and cut it to the required length. To do this, use either a UD guide profile or a ceiling profile, but with bent bends at the ends at the entry points of the vertical posts.
An example of connecting a vertical stand and a base made of CD profiles with bending of the ends
Step 2. Drill holes in the base profile for attachment to the greenhouse foundation. The interval between them is 0.75-1.5 m.
Step 3. Insert the outermost vertical posts "shelf" to the left and right, respectively. Secure it to the base using four self-tapping screws for each connection - two per “foot” of the UD profile.
Step 4. Insert the inner uprights using the same method. Use a horizontal lintel to form the door frame. It can be fastened in two ways - either using a T-shaped connector, or by trimming the sides of the lintel profile and fixing it to the resulting “petal”.
Fastening scheme using a “petal”
Step 5. Install the top horizontal beam from the same profile from which the base is made.
Example of an end from a profile
Step 6. Secure the rafter profiles to the gable wall and to each other by trimming the sides and forming “petals.”
Step 7. Provide gable rafters with ties and jibs to form a stronger structure.
Using the same scheme, build the second gable of the greenhouse. After this, you can begin creating the side walls.
The final version of the gables, with a reinforced structure and a mounted door and window
Step 1. Measure and cut the base profile, drill holes for fastening to the foundation. Leave “petals” at the edges to connect the side walls of the greenhouse with the gables.
Step 2. Prepare vertical posts of the required height, insert them into the base and connect them together with self-tapping screws (two or three on each side of the profile). The interval between the racks, depending on the plan, can be 0.5-1 m. The smaller its value, the stronger the structure, but also the more materials it will need.
Vertical rack mounting diagram
Step 3. Install another horizontal profile on top of the racks, connect everything with self-tapping screws.
Advice! For additional structural strength, provide the side walls with a horizontal beam in the middle. It can be connected to the racks either using cross-shaped “crab” connectors or by trimming the sides of the profile.
Cross-shaped fastening of drywall profiles using a crab connector
Step 4. Mount both gables and both side walls to the foundation, secure with long screws or anchor bolts.
The last stage of frame formation is the arrangement of the roof. It is assembled according to the same principle as on the gables, only the rafters are fixed to the upper horizontal beams using “petals”. For additional structural strength, many craftsmen supplement the frame with jibs that connect the rafters and vertical posts directly.
Fastening the rafters to the wall of the greenhouse on the “petal”
Frame reinforcement
With the help of such oblique elements, you can significantly strengthen the frame and protect it from kinks.
Advice! You can improve the strength of connections between profiles with each other using specialized racks and connectors, as in the images below.
Strengthening connectors
Strengthening racks for profiles
There are many V-profile structures sold on the greenhouse market today. But if you have the proper skills and tools, it will not be difficult to reproduce it yourself, at home. Let's start the construction process with the gables.
Ready-made V-profile building
Step 1. Cut individual pieces of profile that will make up the greenhouse arch. The optimal number of its constituent elements is 5 pieces. To make the profile round, use a pipe bender.
Mandrelless pipe bending machine
Bending a profile using a homemade manual pipe bender
Arch elements separately
Arch elements assembled
Step 2. Drill holes for fasteners according to the drawing. To protect against corrosion, treat them with cold galvanizing.
Cold galvanizing spray
Step 3. Connect the arch elements into a single semicircular structure using nuts and bolts.
Connection of arch elements
Step 4. Attach the jibs and crossbars to the arch.
Strengthening the arch
Example of reinforced greenhouse arches
First stage of amplification Second stage of amplification
Step 5. Using corners and triangle plates, mount vertical posts, a door frame and oblique crossbars on the pediment. Also secure the corners for the horizontal ties of the greenhouse in advance.
Fastening profiles with an angle
Connecting profiles
Step 6. Attach the side and top horizontal ties to the gable.
Fastening ties to the pediment
Step 7. In turn, attach the intermediate arches to the ties with bolts.
Intermediate frame arches
Step 8. Steps 6 and 7 are repeated several times in succession to form a solid greenhouse frame.
Fastening horizontal ties
Step 9. Assemble another pediment from the back side, but without a frame for the door.
Step 10. Secure the finished frame to the foundation using angles and self-tapping screws (or anchor bolts). Check that all fastenings are correct and secure.
An example of attaching a frame to a concrete base
Video - Do-it-yourself greenhouse made of metal profile
Sheathing: what covering material to choose?
Choosing a greenhouse covering is a crucial moment. Of course, many try to save as much as possible and choose regular plastic film. But such savings are not always justified.
Of course, you can use film coating, spunbond, and reinforced reinforced film. But in this case, this is not the best option. Let's explain why.
When making a greenhouse from a plasterboard profile with your own hands, it is better to sheathe the frame with polycarbonate , because it will give more rigidity to the entire structure. In this case, the sheet thickness must be at least 4 mm.
Polycarbonate, as a covering material, has other significant advantages: it is much more durable and stronger than greenhouse film, retains heat well and transmits sunlight. By the way, it is more convenient for them to cover arched structures.
Greenhouse lining
The last stage of building a greenhouse from a metal profile is the cladding. The most commonly used sheets of cellular polycarbonate are 4 mm thick. Here are step-by-step instructions for working with them.
Step 1. Unpack the sheets and determine which side the stabilizing coating is located on.
Step 2: Cut one of the sheets into two pieces.
Cutting polycarbonate
Step 3. Remove the protective film and seal the ends with perforated tape at the bottom and sealing tape at the top.
Removing the film from the front side
Perforated tape for polycarbonate
Step 4. Place one of the cut sheet halves against the gable with the side with the stabilizing coating facing out.
Step 5. Secure the polycarbonate to the gable using roofing screws or plastic thermal washers. In the latter option, you need to pre-mark and drill holes in the material, taking into account the thermal gap.
Installation of a polycarbonate thermal washer
Step 6. Trim excess sheets, cut out elements for the window and door.
Step 7: Repeat the previous steps with the opposite gable.
The ends of the greenhouse are sheathed
Step 8. Now lay the sheets on the roof and walls of the greenhouse, fastening them in the same way - with the stabilizing layer facing outwards and using roofing screws. Lay adjacent sheets overlapping.
Sheathing the roof and walls of the greenhouse
In addition to polycarbonate, polyethylene film can be used as cladding. In this case, it is secured either with strips, which, in turn, are screwed to the frame with self-tapping screws, or with the help of hoops.
Greenhouse made of galvanized profile under film
Double-glazed greenhouse
True fans of summer cottages are always in search of the best material for construction. Nowadays, double-glazed greenhouses are very popular among gardeners, which have established themselves as one of the most expensive, but durable types of these structures.
If you are already a fairly experienced builder and want to start growing vegetables indoors, be sure to try making a greenhouse with your own hands from a metal profile. Not only will it save you money, but it will also be a fun and rewarding experience.
Lean greenhouse
This implies an extension of the structure to more stable buildings: a garage, a bathhouse or a house. Despite its simplicity, this is a fairly convenient type of greenhouse.
- Firstly, this design provides sufficient space for comfortable work.
- Secondly, the construction of such a structure does not require any imaginable financial costs.
- In addition, there is an opportunity to save on heating, because if you build a structure near a residential building, some of the heat will necessarily be transferred to the greenhouse.
The construction of a structure requires a number of rules. For example, the greenhouse should not be located in the shade of the house, otherwise it will have a detrimental effect on the cultivation of vegetables and other plants.
If you don't want to give up grapes, strawberries and tomatoes, build on the sunny side. The best option is on the south side of the facade.
Tips on what else can be made from profiles and drywall
Galvanized profiles are widely used in construction; in combination with plasterboard, they are used to install internal partitions, create multi-level ceilings and zones of different heights in the room. In some European countries, even the frames of panel buildings are built from thick and durable galvanized profiles, although the height of such houses does not exceed 3 floors.
You can build a greenhouse either with the help of a team of specialists, or you can do it for free, yourself or with the help of your friends. A polycarbonate greenhouse allows a gardener to extend the growing season for vegetables and herbs by several months a year. If you build it correctly, in compliance with all recommendations, then such a structure will serve its owner for a very long time: from 7 to 10 years.
Galvanized greenhouse - assembly instructions
As an example, we will give the process of assembling an Alpha greenhouse from a galvanized profile and polycarbonate produced. This is a factory-made structure, standard for its class, with the possibility of subsequent extension and enlargement.
Features and advantages of the Alpha greenhouse
Frame material – galvanized steel profile pipe with a cross-section of 20x20 mm. The width and height of the building are 3 and 2.1 m, respectively, the length can be 4, 6 and 8 m. When disassembled, the Alpha greenhouse can be delivered to a personal plot or summer cottage by car.
Greenhouse made of galvanized steel. Alpha pipes, 6 m/68 cm
Greenhouse equipment "Alpha"
Let's get started with step-by-step assembly instructions.
Step 1. Check that the parts are complete and free of any damage. Unpack the greenhouse frame elements.
Unpacking greenhouse frame elements
Step 2: Read the instructions that come with each greenhouse kit. By reading the instructions in full, you will greatly simplify the assembly process.
Read the manufacturer's instructions carefully
Step 3. Assemble the end and intermediate arches from separate rounded parts. Connect them using the appropriate screws and nuts.
Connection of arch elements
Connection shown
Step 4. Using M6x45 countersunk screws, attach vertical posts to the end arches - two for each arch.
Vertical posts must be attached to the end arches
Connection point
Countersunk head screws M6x45 are used for connection.
Step 5. Using self-tapping screws with a press washer, assemble the parts for attaching the Alpha greenhouse to the ground.
Assembling parts for attaching the greenhouse to the ground
All parts are collected
Step 6. Attach transverse horizontal beams to the vertical posts of the ends of the greenhouse. For fastening, use the previously mentioned M6x45 screws with a countersunk head. This way you will form frames on which the doors to the greenhouse will be attached in the future.
The horizontal beam is fitted to the vertical end posts
Fastening a horizontal beam
Step 7. Attach the parts for fastening the greenhouse in the ground to the vertical posts of the frame. Use pins to secure.
Attaching the lug
Step 8. Install horizontal beams between the vertical posts of the door frame and the arch.
Horizontal beam attached to door frame post
Fastening a horizontal beam
Step 9: Assemble the lower horizontal beams. They are attached to the door frame using the studs mentioned in step 7. Also, do not forget to attach the ground anchors to the edges of the arcs. The end of the greenhouse can be considered ready.
Bottom horizontal beams
grouser
Fastening the lower horizontal beams
Finished end for the Alpha greenhouse
Step 10. Repeat the previous steps to assemble the opposite end of the greenhouse.
Step 11. Install one of the ends on the site where the greenhouse should be located. Attach the lower horizontal ties to it.
Installation of lower horizontal ties
Step 12. Complete the horizontal ties with intermediate arches with lugs mounted on them in advance.
Installation of intermediate arches
Step 13. Complete the structure with middle horizontal ties, which are mounted between the arches of the greenhouse.
Installation of middle horizontal ties
Attaching horizontal ties to the arch
Step 14. In the same way, install the upper horizontal tie on the arches and securely fasten it.
Installing the top horizontal tie
Mounting location
Step 15. On the other side of the frame, attach the opposite end of the greenhouse, connecting it with all horizontal ties with bolts.
Installation of the second end
An example of attaching a horizontal tie to the end
Step 16. Secure the remaining arches to the greenhouse frame. The standard interval between them is 1 m.
Installation of the remaining arches
Important! In some cases, the Alpha greenhouse design must withstand significant loads. Then the interval between the arches is reduced, and the frame is strengthened with additional arches, which can be located 51 cm or 68 cm from each other.
Step between arches
Step 17. Dig holes one spade deep at the interval between the arches, install the frame lugs there and bury them. At the same time, do not forget to use a building level and a ruler to check the horizontalness and compliance of all dimensions - the structure should not be skewed or tilted.
Digging holes for lugs
Checking Diagonals
Step 18. Prepare the cellular polycarbonate sheets - determine where the stabilizing coating is applied, remove the packaging film and cut with a construction knife.
Preparation of cellular polycarbonate
Important! Don't forget to seal the ends with sealing and perforated tape to protect the interior of the cells from moisture and dirt.
Step 19. Assemble the greenhouse doors, which consist of two independent parts (thanks to this, they also act as vents). Cover them with cellular polycarbonate and secure them to the frame frames.
Greenhouse door assembly
Step 20. Attach a sheet of cellular polycarbonate to half the end and tighten the roofing screws at the fastening points.
A polycarbonate sheet is applied to half the end
Roofing screws are used for fastening
Step 21. Cut off the “excess” cellular polycarbonate from half the end. To do this, use a regular construction knife with a retractable blade.
Trimming cellular polycarbonate
Step 22. Repeat the previous two operations with the second half of the end and the opposite wall of the greenhouse.
Step 23. Attach a small sheet of cellular polycarbonate to the upper part of the end, which is not included in the skin of the “halves”. Use the same roofing screws as fasteners.
Polycarbonate fastening at the top end
Important! Instead of roofing screws, you can use screws with thermal washers - they are better because they take into account the large coefficient of linear expansion of cellular polycarbonate as the temperature rises.
Step 24. Lay and secure sheets of cellular polycarbonate to the arches of the frame. After this, only the finishing touches remain - installation of hooks, latches and other fittings.
Covering the greenhouse with cellular polycarbonate
If you follow the technologies and instructions during assembly, as well as with proper maintenance, greenhouses with a galvanized profile frame can last a very long time and become an effective and indispensable assistant in growing vegetables and berries indoors.
Greenhouses "Alpha" photo
Instructions for assembling greenhouses “Alpha” and “Beta”. Downloadable file (click the link to open the PDF in a new tab).
Assembly instructions
Do-it-yourself zinc coating of a profile for a greenhouse
If for some reason you are not satisfied with the purchased options for greenhouses with a similar frame, then you can assemble it yourself - there are many publicly available drawings and instructions. Galvanizing a profiled steel pipe can also be done at home. To do this, purchase special compounds that are supplied to the market either in the form of a liquid similar to paint or in aerosol cans. An example of this is “Galvanol”, which consists of 96% zinc and 4% binder, thanks to which the product can be easily applied with a brush or spray.
Compounds for cold galvanizing "Galvanol"
Step 1. Select metal products for galvanizing. If they are seriously damaged by rust, check them with a thickness gauge and discard the most damaged ones.
Step 2. Clean the surface of the profiles with a wire brush, emery cloth or grinder grinder.
Step 3. Degrease the surface of metal products.
Step 4. Prepare the composition for galvanizing, stir it a little.
Step 5. Using a brush or spray, apply the composition to the accessible surface of the metal profile.
An example is the coating of metal plates with liquid zinc
Step 6. Wait 30 to 60 minutes for the applied composition to dry.
Step 7. Turn the part over and apply liquid zinc to previously untreated areas. Again, wait until it dries.
Step 8: Repeat steps 5, 6 and 7 again and apply a second coat of protective coating.
Important! When drilling holes for fasteners in a steel profile, the integrity of the zinc coating is compromised. As a result, these points in the frame become centers of corrosion. This can be prevented by treating the holes and fasteners with a zinc compound in the form of an aerosol.
"Galvanol" in the form of an aerosol
Prices for Galvanol
Galvanol
Video - Installation of a galvanized greenhouse on crab systems
Galvanized profile for a polycarbonate greenhouse: strength, reviews, photos
The supporting structure is the basis of a film or arched shelter. The service life of the greenhouse structure depends on the frame material. For the construction of a film or arched shelter, plastic pipes, processed logs, bent steel profiles, and beam structures made of thin galvanized steel are used.
Pros and cons of galvanized profile
A galvanized element is a building material made from an alloy of iron and carbon. Under the influence of air, an amphoteric oxide is formed on its surface, protecting it from corrosion and oxidation.
Used for the construction of greenhouse complexes for finishing internal walls. The metal product has a square, oval or polyhedral configuration and empty space inside.
Has benefits like:
- simple assembly that even a person with no experience in construction can handle;
- the use of tools when constructing a greenhouse, which every owner has;
- ease of construction. If desired, it can be moved to another site;
- the cost of galvanized elements is three to four times lower than metal pipes;
- absence of spontaneous self-destruction of the alloy as a result of interaction with the environment. Thanks to this quality, there is no need to use protective anti-corrosion coatings.
The only drawback of galvanized metal structures is their inability to withstand strong wind gusts or snow loads. Under unfavorable weather conditions, galvanized arcs bend and the greenhouse structure becomes deformed.
Types of galvanized profiles
Galvanized profile pipes are manufactured using professional welding processing, after which the product acquires strength.
Steel 20 by 20 and 20 by 40
Steel profile elements of rectangular cross-section with a wall thickness of 1–2 mm are used to create greenhouses and other outdoor structures. During the construction of a greenhouse structure, this type of rolled metal found application due to its cross-sectional features. Thanks to the flat edges, it is convenient to mount when installed on a flat surface.
Steel 40 is a high-quality carbon metal. One of its features is its immunity to welding.
Omega profile
For the installation of a polycarbonate greenhouse, a galvanized omega pipe is recommended to be used as a purlin. It will give the structure sufficient rigidity, and thanks to the coating of the pipe surface with polyester enamel, it does not require systematic painting and the use of anti-corrosion agents.
When installing omega pipes, no welding is used. Therefore, it is possible to build a greenhouse structure in the absence of electricity. The complex “omega” configuration consists of five ribs, has high strength and low weight. Has a long service life of up to 70 years.
Twin
The double S-mounting element is a supporting structure, used for working with plasterboard, building arched and film greenhouse structures. Produced in lengths up to 2.5 m.
During installation, it is combined with the universal cantilever support part KU for fastening to any surface.
Made from galvanized steel using hot zinc coating followed by polymer powder epoxy paint.
Unclosed
An open galvanized pipe with an axial cross-section that is square, is made from a sheet of hydrocarbon steel with a thickness of one millimeter. The material is fragile, therefore, when constructing a structure, there should be a distance of no more than 60 cm between each arc. This feature of a galvanized open pipe slows down the assembly process.
W-shaped
A W-shaped galvanized pipe is made from a metal sheet 0.8 cm thick. The greenhouse structure is assembled using fasteners. It is lightweight, but less reliable in contrast to rectangular metal pipes. Cultivation rooms made of a w-shaped profile are recommended to be used only from spring to autumn. It is advisable to remove the covering for the winter.
Corner
A metal corner coated with a layer of zinc is a high-quality profile with a surface protected from the negative influence of the external environment.
The use of sherardization technology ensures a strong connection between the pipe and the anti-corrosion top layer. Its length reaches 12 meters, and they can be installed even in rainy and damp weather.
Under any conditions, the metal product retains its structural qualities and does not deteriorate.
For drywall
Rack-mounted galvanized pipes used for installing drywall are also used in the construction of greenhouses. Thanks to the optimally selected dimensions of the supporting structures, the material is consumed very economically.
After working with ceiling profiles, there is practically no waste left.
In addition to the main types of profiles, there are special protective parts for the frame that facilitate installation, providing the opportunity to bend and fix the pipe in difficult areas.
Assembling the profile frame
Before you begin assembling the greenhouse structure and purchasing the material, you should draw an accurate outline image of the future product. This will simplify installation and allow you to calculate the footage.
Manufacturing of end walls
After purchasing material for the future greenhouse, it is worth collecting the necessary tools. During installation you will need: screws, screwdriver, level, tape measure, cutting tool.
To ensure that the side and cross walls are symmetrical, before starting work, lay out all the parts on a flat area.
By following the step-by-step instructions and following all the recommendations, you can ensure that the greenhouse structure will last for more than one year. The back surface is assembled first.
The prepared profiles are fastened with self-tapping screws to obtain a rectangular shape. The transverse part is inserted sideways and secured with self-tapping screws.
- After assembling the back surface, proceed to the roof. Having measured its middle, a part of the profile intended for the roof is fixed to it.
- When assembling the front surface, perform the same steps as with the rear.
- The side parts are installed last. The main thing is to securely fasten the parts with self-tapping screws.
As the thickness of the polymer decreases, it is necessary to reduce the distance between the arcs on which it rests in order to avoid deformation of the structure under the influence of loads.
Reinforcement of the frame with additional stiffening ribs
A metal supporting structure made in accordance with all the rules is a fairly durable product that can withstand gusts of wind and large amounts of precipitation. If desired, it can be reinforced with an additional structure to strengthen the base and take on the load. Spacers are made from the remains of the profile, fixing them diagonally.
Polycarbonate sheathing
In order for the polymer upholstery to go smoothly, it is worth knowing in advance some of the nuances associated with its installation:
- begin laying material from the roof. The sheets are inserted into the joints at the joints and screwed with self-tapping screws;
- all material must be pressed tightly against the supporting structure. However, do not overdo it so that the sheet does not crack;
- after final fixation, snap the top cover of the groove;
- secure the end walls with plugs;
- remove the protective coating from the polycarbonate.
Polycarbonate sheathing
Covering the frame with polycarbonate begins with attaching the lock to the profile at the joints of the sheets. The lock is simply screwed on with self-tapping screws and rubber gaskets.
It is optimal to start laying polycarbonate from the roof. The sheets are inserted into the grooves of the lock and screwed to the profile with self-tapping screws and plastic washers.
All polycarbonate sheets must be evenly pressed against the frame with self-tapping screws. It is important not to overdo it so that the sheet does not crack.
After fixing all the sheets, all that remains is to snap the top cover of the lock and remove the protective film from the polycarbonate.
The video shows the production of a greenhouse frame from a profile:
The greenhouse is completely ready, all that remains is to do the interior arrangement and you can grow your favorite crops.
It is now becoming popular to make greenhouses from plasterboard profiles with a removable roof. This approach can increase the life of the greenhouse by many years. Depending on the size of the future greenhouse, other profiles can be used. When choosing, the main thing is to pay attention to the quality of the material - when bent, a good profile will not bend, but will return to its original form. Assembling a greenhouse frame from pipes
- A rectangle of the required size is made. The slats are attached to the corners using iron inserts;
It should be understood that in winter, plants need light. You should take care not only of heating and water, but also of lighting. Fluorescent lamps are best suited for this.
They are energy efficient while still providing enough light for plants to photosynthesize.
What are the problems with a metal profile not coated with zinc?
In addition to zinc, metal profiles used for the construction of greenhouses are often powder coated in white or another color. Such material is somewhat cheaper, but you have to pay for it with less durability. Why? Let's explain now.
An example of powder-coated ends for a greenhouse
The main problem with powder paint, even the most modern one, is its weaker (compared to zinc) “adhesion” to steel and lower resistance to mechanical stress. And metal profiles for greenhouses are constantly faced with the latter - starting from the warehouse at the factory where they are made, and ending with the transportation of finished elements to the personal plot for assembly. Any sufficiently strong impact or fall results in small, often almost imperceptible chips of paint from the surface. And after some time, this place becomes a source of corrosion on the finished greenhouse frame.
Therefore, if you are interested in the greatest possible durability of the greenhouse, choose only galvanized steel profile. At the same time, do not forget to ensure that the coating is applied efficiently and without defects.
Galvanized greenhouse assembly
And for interior decoration you can use such galvanized beds
Assembling the frame
At this stage, the structure of the greenhouse will turn out to be crooked and unstable, but you should not pay attention to this, in the future it will strengthen and level out.
So, it is necessary to install the walls at the required distance from each other, in the place where the greenhouse will be located. Here you may need help from someone to hold the walls upright, but if no one is there, you can simply install temporary spacers.
When the walls are exposed, we connect them together with a horizontal profile along the top of the square. We do the same on the other side, and only after that we fasten the lower ties. As a result, we get a finished frame, which is still sagging and does not look like a greenhouse.
Now we make marks on the lower and upper horizontal lines every 1.05 meters. In these places we install galvanized rack profiles, which add rigidity and even out any sagging.
When all the ribs are installed, the frame needs to be leveled. At this stage he can still move, but later he will not be able to do this.
We attach additional ridges to the exposed frame of the greenhouse, which should be flush with the rack profiles. The next stage is attaching the ridge profile. It is necessary to remove the walls in those places where it comes into contact with the corner parts. Thus, you get an even ridge that does not stick out above the top point.
How to bend profile pipes for an arched greenhouse
The profile has one drawback. It is difficult to bend the pipe into an arc for an arched greenhouse. Stiffening ribs prevent uniform bending. It would be nice to bend a profile pipe for a greenhouse yourself using a pipe bender, but there is no point in buying an expensive machine for one day of work. It is better to order ready-made profile arches in the workshop. If this is not possible, they try to bend the pipe, resorting to folk tricks.
Using sand
The profile bending method is considered simple and effective. First, prepare the sand. It is sifted from large stones and spread out in the sun to dry. If the weather is cloudy, sand is spread in a thin layer on the tin. A fire is lit under the sheet metal. After calcination, the sand is allowed to cool.
Wooden plugs are cut into the ends of the profile. They should fit tightly with a hammer. One plug is installed at once. Dry sand is poured inside the pipe. The second end of the profile element is similarly closed with a plug. Place the pipe between strong supports and try to bend it with gentle pressure. The sand inside the profile will create pressure that prevents the square walls from deforming. When the profile arch is ready, the plugs are removed. Sand is poured out of the workpiece.
Using water (winter method)
The traditional method has many disadvantages. Firstly, you can only use it in winter, when there is severe frost outside. Secondly, if the technology is violated, frozen water can tear the walls of the profile during expansion.
To bend the profile blank, you will need plugs in the same way. The plugs are made so tight that they prevent water from flowing out. The plug is driven in with a hammer from one end of the profile. Water is poured inside the pipe and closed with a second plug. The profile blank is left in the cold. When the water turns into ice, the metal element begins to bend. The result is similar to sand.
When the profile arch is ready, the plugs are removed. The profile is heated over a fire until the ice is completely melted.
Grinder cuts
The bending method with notches is considered the most difficult, but guarantees a 100% positive result. The profile is clamped in a vice. Markings are applied in the form of wedges at equal distances. According to the markings, cuts are made with a grinder, but not through. Only wedges are cut. The opposite flange of the profile remains untouched. After cutting, the pipe is bent into an arc. If the radius is large, cut out several more wedges. The procedure is continued until the arch bends to the desired radius. The cut areas are welded.