Author of the article
Daria Vorontsova
Reading time: 30 minutes
AA
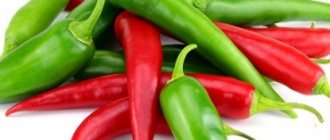
Sweet and hot peppers can be successfully grown on a windowsill or balcony. This culture is unpretentious and does not require a special approach or growing conditions. Great for novice and amateur gardeners. Small bushes decorated with miniature bright fruits will decorate the interior no worse than indoor flowers and plants.
Which type of sweet pepper to choose
There are a huge number of varieties of peppers, bred specifically for indoor conditions. Of the sweet varieties, the following are very popular:
- Philippok . It is distinguished by a bright range of colors - from dark green to bright red. It is an early ripening variety. The first fruits appear 75 days after planting.
- Treasure Island . It has bright orange heart-shaped fruits. Fruiting occurs 95-100 days after planting.
- Dwarf . It has small bright red cone-shaped fruits. The first fruits appear on the 110th day.
- Martin . The fruits have a bright red color, bright aroma, and juicy pulp. Refers to mid-season varieties. The harvest ripens on the 130th day.
- Kolobok . Pepper gets its name from its round fruits with thin skin and tender flesh. This variety belongs to the low-growing species. The height of the bushes does not exceed 30 cm.
- Gift from Moldova . The first harvest appears on day 125-130. The fruits are large, have a rich red color and a strong sweet taste.
- Watercolor . Begins to bear fruit on the 110th day. The miniature fruits are cone-shaped with a bright red glossy skin. This variety is well suited for ornamental cultivation.
- Firstborn of Siberia . The fruits appear on days 110-115 and have a round shape of a rich red color.
- Sturdy . Early ripening and high-yielding variety. The fruits are cone-shaped with a bright yellow color.
- Winnie the Pooh . Low growing variety. The height of the bushes does not exceed 30 cm. Fruiting occurs on the 100-110th day. The fruits are cone-shaped and bright red.
All of the varieties listed above are small in size and have high yields.
What is decorative pepper
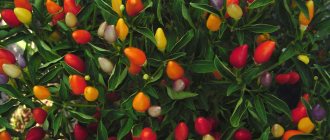
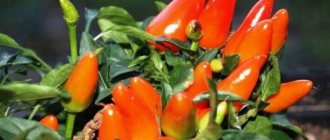
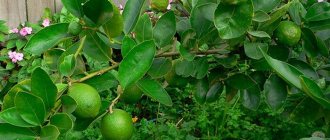
Ornamental pepper (Capsicum) is a subshrub native to South America. The fruits are considered inedible. Plants are grown exclusively for interior decoration. Its numerous fruits ripen in time for Christmas. They cover the entire plant and are brightly colored.
Is it possible to eat decorative peppers?
Small peppers have a hot, bitter taste, but are not poisonous and can completely replace chili seasoning.
Caring for decorative peppers
Care measures are practically no different from caring for any other pepper:
- from February to November - regular watering;
- from November to February – dormant period (watering infrequently, temperature +18…+20°C);
- transplant every 2 years;
- during the fruiting period - regular fertilizing with phosphorus-potassium fertilizers (every 2 weeks);
- pinching and crown formation.
Flowering, growth and fruiting of ornamental peppers
Ornamental peppers bloom more abundantly, with fruits covering the entire plant. At the same time, the plants contain buds, ovaries and ripened fruits. Fruits on one bush can be of different colors depending on the variety (yellow and red, purple and red). Excess ovaries are not pinched.
Choosing a place in the apartment to grow such peppers
The abundant fruiting of a houseplant depends on the light. Choose places for your pet that are lit throughout the day (south, southwest or southeast windows).
Which type of hot pepper to choose
The following varieties are suitable for growing hot peppers at home:
- Fire Maiden . Tall large plant up to 140 cm in height. Fruiting occurs on the 115th day. The fruits are narrow, long, from bright green to red colors. They have a pronounced pungent taste and aroma.
- Falcon beak . It has small bushes up to 50 cm in height. Refers to mid-season varieties. Fruit ripening occurs 115-130 days after seedling germination. Miniature peppers are cone-shaped, bright red in color, and have thin, glossy skin. The taste is distinctly pungent.
- Coral . Refers to high-yielding mid-season varieties. The bush has a neat compact shape, 40-45 cm tall. The ripening of the crop occurs on the 112th day after emergence. The fruits are bright red, small, round in shape. They have a strong pungent taste.
- Bell . Tall bush up to 1.5 meters. Belongs to late-ripening varieties. A bountiful harvest ripens 130-140 days after seed germination. The red fruits have an original bell-shaped shape. The degree of spiciness is medium.
- Bishop's Crown . The tall variety has high yields. You can get up to 50 fruits from one bush. Peppers have an unusual bell-shaped shape. The taste of the fruit in the area of the stalk is sweet-sharp with fruity notes, and closer to the edge it is piquant, sweet and sour.
Sweet and hot pepper varieties grown together can cross-pollinate with each other. This can cause sweet peppers to taste bitter. Therefore, it is recommended to grow different species in separate rooms.
What kind of pepper do you prefer?
SweetSpicy
When to sow peppers in a pot
Pots are considered the optimal container for pepper at home. In this way, it can be grown all year round, providing additional illumination to the plants and proper care. To get a harvest in summer, seeds should be planted in late March or early April. To provide yourself with fruits in the autumn, you need to plant peppers at the end of July, beginning of August, but if you want to please yourself with vitamins in winter and early spring, plant them at the end of November or beginning of December.
When growing peppers in a pot, you should definitely feed the soil, as they grow in a small volume of soil.
The main advantage of such cultivation is that in this case there is no need to pick, thereby exposing it to additional stress.
Preparing for landing
To successfully grow peppers, it is necessary to carefully prepare for planting. This will help avoid many problems in caring for seedlings in the future.
Choosing a landing site
Pepper seedlings love light and warmth.
Therefore, when choosing a location, it is best to give preference to the most illuminated place in the house. A window sill on the south or east side of the house is best. It should be remembered that direct sunlight is harmful to young plants. Therefore, you need to prepare a screen in advance that can cover the seedlings during a bright sunny day.
The place on the windowsill should be protected from drafts. In winter, containers with plants can be placed on a piece of foam plastic 5 cm thick. This measure will provide additional protection for heat-loving plants.
Boarding time
Homemade peppers can be sown at any time. Care features depending on the season should be taken into account:
- When planting in the winter months, additional artificial lighting will be needed. Daylight hours should be at least 12 hours.
- When planting at the end of winter or early March, there is a danger that active sunlight will inhibit the growth of seedlings. During this period, the seedlings need to be shaded or moved to a window on the north side of the house.
- When planted from mid-summer to early autumn, seedlings can be grown without additional lighting. By sowing the seeds during this period, you can get fresh fruits for the New Year holidays.
Soil preparation
As soil, you can use ready-made mixtures for peppers and nightshades. To make your own soil you will need:
- 2 parts of turf;
- 1 part fine sand;
- 1 part humus.
Helpful information
Daria Vorontsova
Amateur gardener. He is interested in growing various greens at home.
Experienced gardeners recommend using turf from the places where meadow clover grows. This soil is considered the most nutritious.
Pepper loves an alkaline environment. Therefore, to the self-prepared soil add:
- lime or dolomite flour in a proportion of 150 g per 10 kg of soil;
- ash at the rate of 1 cup per 5 kg of soil.
Before sowing, any soil, including purchased soil, is generously spilled with a weak solution of potassium permanganate or calcined for 15-20 minutes in the oven.
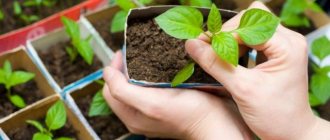
Small plastic cups are suitable as containers for the first time. In the future, the peppers can be transplanted into separate pots, containers or seedling boxes.
Seed preparation
Seeds intended for planting must be sorted. Grains that are too small and damaged are thrown away. The rest are dipped in a weak salt solution. The floating seeds are hollow and will not sprout.
Selected good seeds are soaked in a slightly pink solution of potassium permanganate for 20 minutes. This disinfection procedure will reduce the risk of fungal and infectious diseases.
To speed up germination, seeds can be soaked in a biostimulator such as “Epin” or “Zircon” for 4-6 hours. The soaking solution is prepared at the rate of 2-3 drops per 200 ml of water. The finished product is stored in a cool, dark place for no more than 2 days.
When to sow pepper at home on the window
Growing a vegetable at home on a window is not at all difficult; it is important to know some tricks and agrotechnical aspects so that this crop pleases you with its flowering and excellent harvest. Before planting seeds for seedlings, careful attention should be paid to their quality. Only the best can get a decent result.
To ensure good germination, you need to carry out the procedure of soaking them in a solution of potassium permanganate. To do this, place them on gauze and dip them in a pre-prepared solution for 30 minutes.
If you plan to grow seedlings at home, with further transplanting them into open ground or a greenhouse, then it is best to start the process in February, so that by May you will get strong roots that will be able to “survive” the picking.
If your goal is to fully grow peppers on a windowsill or balcony, then you can do this at any time of the year, the main thing is to provide the plant with proper lighting and temperature. In order for a vegetable to grow and develop fully, it needs light for about 14 hours a day, and the temperature should not fall below 14 degrees.
Planting peppers
Prepared and processed seeds are wrapped in a damp cloth or gauze, placed in a plastic bag, and stored in a warm and dark place. The first shoots appear on days 7-10. During this period, it is important to ensure that the tissue with the seeds does not dry out.
After the first signs of germination appear, the seeds are transplanted into the ground. To do this, the prepared cups are filled 1/3 with a drainage layer. Pebbles, broken bricks, and fragments of ceramics can be used as drainage.
The seeds are laid on the surface of the soil, lightly sprinkled with soil and sprayed with warm water. Future seedlings are covered with glass or film and again put away in a warm and dark place. On the 7-8th day, after the first shoots appear, the pots with seedlings are transferred to a sunny place away from temperature changes and drafts. After 1-2 true sheets appear, the glass or film is removed.
Helpful information
Daria Vorontsova
Amateur gardener. He is interested in growing various greens at home.
You can grow seedlings without pre-soaking, sowing the seeds directly into the ground or peat bowls. In this case, seedlings will appear much later, approximately 20-25 days after sowing.
How to get pepper seeds yourself
If you wish, you can collect the pepper seeds yourself during harvest. Rinse the ripe vegetable and cut lengthwise. Remove the seeds and place them in a glass of water for 5-10 minutes. Then drain the water and discard the deformed, blackened seeds. Place light, apparently healthy grains on a napkin and leave to air dry.
At room temperature, drying will take 1 to 3 days. Place dry seeds in a bag or box and place in a dark place where the relative humidity is no more than 80%. The shelf life of the grains is from 1 to 3 years.
Pepper seeds
Picking peppers
On the 20-30th day, after 2-3 true leaves appear on the seedlings, it is necessary to pick the plants. To do this you need:
- Prepare containers for transplanting with holes in the bottom and a good drainage layer.
- Prepare the necessary tools - nail scissors, a fork or any sharp object.
- A day before picking, the soil prepared for replanting is spilled generously with warm water.
- 1-2 hours before the procedure, the seedlings are well watered with warm water.
Tools and hands are thoroughly disinfected. Using a fork or other sharp object, carefully pry up the sprout along with a lump of earth. Using scissors, shorten the main root by 1/3. This stimulates the development of a strong root system. The sprout is planted in a container with soil, deepening the root collar by 0.5 cm, sprinkled with earth and transferred to a bright and warm place.
Helpful information
Daria Vorontsova
Amateur gardener. He is interested in growing various greens at home.
You can do without picking by sowing the seeds directly into spacious boxes.
Preparing soil and containers
It is better to use special soil for pepper seedlings - it already contains all the nutritional elements that seedlings need in the initial stages of cultivation. There is no need to feed them before picking.
It is recommended to plant not in a common box, but to use individual pots or plastic cups of 100-150 ml. If the containers do not have bottom holes for water drainage, you will need to make them yourself.
Before reuse, used containers are washed with a brush, doused with boiling water and soaked in potassium permanganate.
Pepper care
By following the rules of care and cultivation, you can achieve a strong and healthy harvest. Caring for peppers does not require special skills or abilities. However, when growing this crop, certain care nuances should be taken into account.
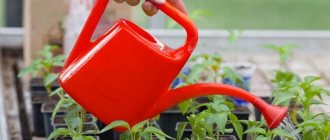
Watering and humidity
Water the peppers with warm, settled water at a temperature not lower than 25 °C. Watering is carried out as the upper layers of the soil dry out. To provide oxygen access to the roots of the plant, experienced gardeners recommend regular loosening of the soil. You can do this with a table fork, loosening the top layer by 1-2 cm.
Loosening is not necessary if the top layer of soil is mulched with light materials: mown grass, straw, sawdust.
The optimal humidity level for peppers is from 55 to 70%. To maintain the necessary parameters in the summer, it is enough to spray the plants with water once a day. In winter, the plant may suffer due to dry air in the apartment. To increase the humidity in the room, you can install a humidifier or a container of water near the seedlings.
Lighting
For proper development of pepper plants, a daylight period of at least 10-12 hours is required. In winter, you can highlight plants:
- Phytolamps. They emit ultraviolet rays and at the same time heat the plantings. Phytolamps are not recommended for installation in a living room. Blue light can cause eye irritation and headaches.
- Fluorescent lamps with cold light. To maximize the use of lamp light, it is recommended to use foil reflectors.
- Gas-discharge sodium lamps imitate the light of the setting sun and are not irritating to the eyes.
Helpful information
Daria Vorontsova
Amateur gardener. He is interested in growing various greens at home.
Conventional incandescent lamps cannot be used to illuminate plants. They emit little ultraviolet light and a large amount of rays in the red and orange spectrum. Besides. Large amounts of heat from such llamas can cause burns to tender sprouts.
In the warm season, there is no need for additional lighting. To ensure that the sprouts develop evenly, the containers with pepper are turned over from time to time to face the sunlight.
Temperature
The optimal temperature level for peppers is 20-24 °C during the day and 10-12 °C at night. Peppers can easily tolerate cold snaps, the main thing is that there are no sudden temperature changes or drafts.
Feeding peppers
The first feeding is carried out 3 weeks after transplantation to a permanent place. In the future, organic fertilizers are applied at least once every 2 weeks and mineral fertilizers once a month. As a top dressing you can use:
- Ash solution at the rate of 2 tbsp. spoons per liter of water.
- Herbal infusions of nettle and clover. Plantain.
- Superphosphate, potassium salt and urea are used as mineral fertilizers. It is not recommended to fertilize with potassium chloride. Pepper reacts painfully to such feeding.
- Ready-made preparations marked “for peppers”.
Feeding solutions are applied by root watering. To avoid burning the roots, it is recommended to water the plants thoroughly beforehand.
Pepper pollination
Most varieties of peppers for home growing are self-pollinating. Lack of flowering may occur due to:
- sudden temperature changes;
- non-compliance with the watering regime;
- large amounts of nitrogen fertilizers.
You can stimulate the beginning of flowering of peppers by treating the plants with the preparation “Ovary”.
To improve pollination processes, you can lightly shake the cups with seedlings several times during flowering. Installing a fan near the plant promotes the appearance of ovaries.
Pre-planting concerns
To grow pepper from seeds, you need to get these seeds. Prepare the soil and planting containers, determine the planting date. For experienced gardeners, all this is not a problem, but beginners may have questions, some of which we will try to anticipate.
Where to get seeds
The easiest way to buy seeds is to check their expiration date - if the package date on the bag is two years ago or more, you shouldn’t take them. But it is difficult for less experienced gardeners to choose the “right” variety based on the description and picture; it may turn out to be too tall or not to their taste.
Therefore, it is better to prepare the seeds yourself. For this, ripe fruits that your neighbors in the country have treated you to, as well as those bought in a store, are suitable.
The seeds are easily separated from the pulp
The seeds removed from them must be dried, spread on paper or cloth, placed in a paper bag and stored in a cool and dry place. Or plant immediately if the time of year matches the planting time.
When to plant
The time for sowing seeds for seedlings depends on the type of pepper and the end of frost in your area.
The longer the ripening period, the earlier sowing begins.
- It is believed that seeds of mid-season pepper varieties in the middle zone are best planted 70 days before the onset of stable heat. This is approximately the beginning or middle of March.
- Late-ripening ones require more time to develop; they are sown 2-4 weeks earlier.
- And early ones can be grown even at the end of the first spring month.
These dates are suitable for regions where the air temperature after June 5-8 rarely falls below +12-15 degrees. For other climatic zones, an adjustment must be made in one direction or another.
If you plan to grow peppers at home or in a large heated greenhouse, you can move them at your discretion.
Which soil to choose
Soil for seedlings is prepared in the fall, selecting a mixture of components with certain properties for each crop. Pepper loves loose and fertile soil with a neutral reaction. To prepare this mixture, you need to take:
- 1 part of garden land;
- 1 part compost or humus;
- 1 part peat;
- 1 part sifted sand.
The soil mixture can be prepared from other components, the main thing is that it is nutritious and breathable
It is important! The soil must be taken from the bed where relatives of pepper - tomatoes, eggplants, potatoes - did not grow this year and last year. If it has an acidic reaction, then add a handful of wood ash, dolomite flour or lime to a bucket of the mixture.
If the idea of planting your own seedlings came to your mind in winter, you should not go to the dacha and dig into the frozen ground. Just buy soil at the garden store - universal or designed specifically for peppers and tomatoes.
What to plant in
In what container to sow the seeds is not a minor question, especially for beginning gardeners. The fact is that pepper has very sensitive roots that do not tolerate frequent transplants. Therefore, when growing seedlings, it is better to do without picking the sprouts. And to do this, you need to plant the seeds either immediately in individual containers, or in large boxes at a sufficient distance from each other so that the roots of the growing plants do not intertwine before transplanting to the garden bed.
The distance between seeds is at least 3 cm
Although experienced gardeners consider this problem to be exaggerated and sow pepper seeds as usual, at a distance of 2 cm from each other, and the strongest and healthiest sprouts dive into separate cups later.
Both options are correct, the choice is yours. If you decide to choose the first method of growing peppers from seeds, then you can plant them in peat tablets, in special plastic cassettes with separate cells, or simply in disposable cups. By the way, they can be replaced with small plastic cups for sour cream, yogurt and other dairy products.
Cassette plantings are convenient because each plant is in its own cell, but they can be transferred all at once
Advice! Plant 2 seeds in each container. If both sprout, leave one of the strongest and healthiest sprouts.
Mistakes when growing peppers
Errors in care can be understood by changes in the appearance of plants:
- The leaves of the plant acquire a marble tint. To eliminate the problem, it is necessary to fertilize with magnesium sulfate.
- The leaves curl and dry out at the edges. This symptom is a sign of potassium starvation. It is necessary to fertilize the plant with potassium sulfate or potassium nitrate.
- The plant stretches strongly upward. At the same time, the leaves shrink and acquire a purple tint. This type of plant indicates a lack of phosphorus. It is necessary to fertilize the pepper with a 16% solution of phosphoric acid.
- The bush has a large number of small leaves of a matte and grayish hue. To eliminate the problem, it is necessary to fertilize the plant with ammonium nitrate.
At the end of autumn, some plant varieties begin a dormant period. At this time, plant foliage may turn yellow and fall off. During this period, you need to collect the remaining fruits and cut off too long branches.
Helpful information
Daria Vorontsova
Amateur gardener. He is interested in growing various greens at home.
Peppers can be grown as a perennial plant. The older the seedling, the smaller the harvest will be. Therefore, gardeners recommend changing the plant every three years, growing a new one from its own seeds.
Why I decided to grow peppers on the windowsill
For the first time I decided to grow peppers as an experiment - then on my windowsill I already had a green garden of basil, dill and onions. As it turns out, things are not much more complicated with pepper. The plant feels great on the windowsill and grows in any container - ceramic pots and plastic buckets, special containers and wooden boxes.
The main thing is to transplant it into a freer container as the bush grows. Do not forget about care - it practically repeats the care of garden peppers. And monitor changes in time to prevent difficulties and problems. I will tell you further how to do all this specifically, step by step.
Pepper diseases
Errors and carelessness in care can lead to fungal and infectious diseases. At this moment, it is important to recognize the first signs of the disease and take appropriate measures.
Sunburn
Sunburn on pepper leaves
This type of disease occurs due to prolonged exposure of the plant to direct sunlight. Burns can also occur if water gets on the leaves in hot weather.
You can notice the problem by characteristic spots on the leaves. The damaged areas first lighten, then turn white and become papery.
Prevention of the disease consists of maintaining optimal lighting, darkening and protecting plants from the rays of bright sun.
If burns occur, the damaged areas are removed and the plant is transferred to the shade for several days.
Blackleg
Black leg of pepper seedlings
This fungal disease appears at the very beginning of seedling growth. Seed infection occurs through poorly treated tools, soil or hands.
Too thick seedlings and excessive soil moisture contribute to the spread of infection.
A sign of the disease is blackening and rotting of the root neck of the sprout. As a preventive measure it is necessary:
- carefully observe the watering regime;
- adhere to the planting scheme without thickening the seedlings;
- Disinfect seeds and soil before planting.
If signs of disease appear, the affected plants must be removed and the soil treated with 3% copper sulfate.
Gray rot
Gray rot on peppers
Another type of fungal infection that mainly affects pepper fruits.
It appears as dark gray spots on the fruits, less often on the trunk of the plant. The root system, as a rule, is not affected by the disease.
High humidity and too dense plantings contribute to the spread of fungus.
As a treatment, all affected fruits are removed.
Spots on the trunk are covered with lime with the addition of an antifungal drug.
Lime can be replaced with ash or crushed activated carbon.
Root rot
Pepper root rot
This fungal disease affects the root system of the seedling. Usually appears after picking seedlings.
The cause may be poorly treated hands or tools.
Signs of the disease:
- the leaves turn pale, then turn yellow and fall off;
- a gray or dark green coating appears in the area of the root neck;
- a constriction can be seen between healthy and damaged tissue;
- if the seedling is removed from the ground, you can find an almost complete absence of the root system.
Treatment for root rot is the same as for blackleg.
Non-infectious chlorosis
Non-infectious chlorosis in pepper
The appearance of this disease can occur for the following reasons:
- acidic soil;
- insufficient heat and light;
- excess or lack of humidity;
- lack of nitrogen, magnesium. Calcium or iron.
Signs of chlorosis are curling of the leaves and the appearance of yellow spots on them. The plant stops growing, young leaves turn yellow and fall off.
For treatment, the care regimen is adjusted, unscheduled fertilizing with mineral fertilizers is carried out and the bush is treated with Epin Extra solution.
The first shoots have sprouted, what to do next?
After some time, seedlings appear. Now they need to create the most optimal conditions . The first is light. If there is not enough of it, the plants will begin to stretch out and then die altogether.
Attention! Do not place young seedlings directly under the scorching sun.
It is convenient to use artificial lighting for seedlings. Now special lamps for flowers are sold, but you can also use daylight by selecting the right amount. Incandescent lamps are not suitable for these purposes - they emit little light, but a lot of heat, which can burn delicate leaves.
Lamps with daylight are placed at approximately a height of 30 cm; daylight hours should last about 18 hours , but not less than 14 hours. To make it more convenient, you can connect special timers to control on and off to the lamp.
Planting in a permanent place
As soon as the pepper seedlings reach 10-15 cm, they must be planted in a permanent place . Use large pots or boxes for these purposes: it grows quickly and has an extensive root system.
Carefully remove the sprout. It is most convenient and less traumatic for the plant to use the transshipment method . Peppers sprouted in peat tablets are planted in a pot with them.
Keep in mind that the larger the planting container, the larger the plant will be. As soon as the frost passes, the plant is taken out to the balcony.
If you grow large varieties of bell peppers, then take care of large containers and ways to garter the plants.
Preparation of seed material
Before sowing, the seeds need to be sorted, checked for hollowness and the presence of spoiled, damaged grains. Then, the grains are placed in a glass filled with a weak salty solution for several minutes. The seeds that have sunk to the bottom of the dish are suitable for sowing. They must be washed and disinfected for half an hour in a weak solution of potassium permanganate.
After processing, the seeds are thoroughly washed and dried again. The seed must be kept for seven hours in a nutrient composition that stimulates growth or in an infusion of wood ash. After the soaking procedure, the seeds should be wrapped in moistened material or gauze and put in a dark and warm place. In ten days the shoots will appear and you can start planting.
Soil for peppers and fertilizing
Soil for seedlings, as well as garden soil, is perfect . Peppers require a lot of nutrients for good fruiting, so humus is added.
Fertilizers are used only specifically designed for vegetable crops.
Remember! You eat the fruits, so it is not recommended to over-water them with fertilizer.
The safest fertilizing is humus. You can also mix wood ash with water at the rate of 2 tablespoons per liter.