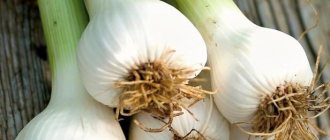
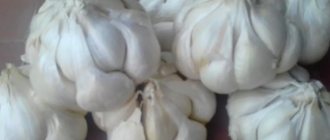
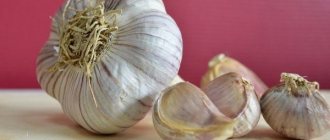
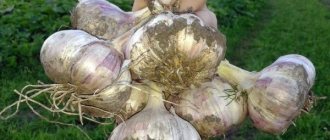
Heirloom garlic attracted the attention of vegetable growers only recently, but immediately became popular. This is an unusual vegetable that is characterized by high yield. In terms of taste, it is no different from the traditional one, but from one clove you can get at least five full-fledged garlic bulbs. The fewer there are, the larger they are. In this it resembles such a culture as the family onion. Family garlic is used for preparing various dishes, used for preservation, and consumed raw. Is it worth growing heirloom garlic, and how should you plant it: in spring or autumn?
Planting heirloom garlic
You can choose one of two planting methods: winter, garlic is planted in autumn, or early spring. Experienced gardeners who have been growing this garlic for a long time recommend planting the crop in the country in the spring. Winter garlic produces a smaller harvest because it often shoots up. This can be avoided if the bed with planted garlic is well insulated, and if the winter is warm, the risk of arrowhead formation is reduced to zero.
The time to plant garlic in the spring depends on soil and air temperatures. You need to think about planting if the temperature approaches 5 degrees. It is advisable that there is no strong humidity. Approximately, this occurs at the end of April. If the winter is long, you need to wait until May, but you shouldn’t plant garlic too late either, the garlic won’t have time to ripen and produce a harvest. Planting is done with cloves.
Soil for heirloom garlic
Heirloom garlic prefers light, nutritious and non-acidic. Do not plant garlic on heavy and sandy soils. If the soil on the site is far from perfect, you can correct this a little by saturating it with nutrients. The simplest thing is to add to the soil the natural element that it lacks. For example, clay in sandy soil or sand in too clayey soil. For 1 square meter of clay soil you will need to add up to three buckets of sand. The added elements must be thoroughly mixed with the soil to the depth of a spade bayonet.
You can use the following method of enriching sandy soil: 5 buckets of clay should be mixed in 200 liters of water. It's better to do it in a barrel. Leave the mixture for 7 days, stirring everything every day. The resulting solution is enough to treat 50 square meters. meters of land. In spring and autumn, water the soil with this solution before digging it. Lime materials will help reduce soil acidity. They are introduced a year before planting. A site with properly prepared soil is the first step to successfully growing this crop.
For garlic, high beds 1 meter wide are made. This will help avoid excessive exposure to melt and groundwater and ensure maximum exposure to sunlight.
Fertilizers for heirloom garlic
Failure to follow crop rotation rules will lead to soil depletion. Then you will need to feed it with various mineral and organic fertilizers.
When planting garlic, the soil is fertilized with compost (a bucket per 1 sq.m.) and double superphosphate. Fertilizing with potassium sulfate and wood ash is also effective. Potassium monophosphate is suitable as a source of phosphorus and potassium. It is applied to the soil only with irrigation water. You can use complex fertilizers designed specifically for garlic and onions.
It is necessary to avoid introducing fresh manure into the soil. It contains an excess of nitrogen, it affects the garlic, which will actively develop green leaves, and the heads will form poorly, grow loose, and will not be stored. There is a risk of garlic becoming infected with a fungal infection. The same reasons force you to abandon feeding garlic with herbal infusion and urea in the spring.
You can completely avoid feeding if the garlic grows healthy. And use complex mineral fertilizers if the plant is weakened and lags behind in development.
Medicinal properties
Garlic has pronounced bactericidal properties, improves digestion, dilates blood vessels, lowers blood pressure, removes cholesterol from the body, and lowers blood sugar levels. It is very useful for patients with colds, sore throats, and pneumonia. It is also useful for the prevention and treatment of atherosclerosis, hypertension, cholecystitis, rheumatism, and vitamin deficiency. In folk medicine, garlic is used as an antitumor agent.
Bulbs are rich in saccharides. Ascorbic acid in them is 7-10 mg%, in leaves – up to 50 mg%. Essential oil (about 30 mg%) gives specific taste, smell, and also a bactericidal effect. Garlic contains a lot of potassium salts and microelements - magnesium, iodine, phosphorus, etc. The leaves contain vitamin E, beta-carotene and other vitamins and provitamins. The bulbs contain a lot (1.2 mg%) of nicotinic acid - vitamin PP.
However, in case of gastric and duodenal ulcers, exacerbation of chronic gastritis, and if there are kidney problems, the use of garlic is strictly contraindicated.
Propagation of heirloom garlic
Purchasing this variety of garlic is often problematic, so if you like the garlic, you need to regularly update the variety through airy bulbs. It is necessary to plant the plants from seeds; they must remain in the garden until the inflorescence shells open. To grow bulbs, you need to leave the thickest arrows.
To prevent the inflorescence from bursting right in the garden and the bulbs from scattering in different directions, you can put a gauze cap on the arrow. The fact that the bulbs are ripe is indicated by the spirally twisted arrows of the garlic, which began to straighten. Sometimes nature fails, the heads crumble, but the bulbs are not yet ripe. You can cut off the arrows, leaving a long stem, put them in water or hang them by the stems. This will help the bulbs ripen. The bulbs are dried together with the garlic intended for planting. They are even planted at the same time.
Bulb planting scheme
There is a distance of 20 cm between the rows, and only 5 cm between the bulbs. It is necessary to plant them with a reserve, not all bulbs will germinate. In the spring, remove excess bulbs, leaving a distance of 15 cm. You can plant bulbs together with garlic in the same bed. The bulblets will ripen next season and will produce a full harvest next year.
Types and varieties
There are two main varieties of garlic that you need to familiarize yourself with in advance - winter and spring.
Winter
This type of garlic is not planted in spring, but in mid-autumn. Most often, planting begins on October 1-5. However, in warm weather, you can postpone the procedure to the 15th-20th. Each vegetable grower determines the optimal planting time independently, depending on the weather and outside temperature.
Winter garlic is distinguished by the size of its fruits, consisting of several identical cloves. If you cut the onion into two equal parts, you will notice that in the center there is an arrow around which all the garlic cloves are located.
At the moment of flowering, small empty flowers without seeds form on the bushes. The seeds are found in aerial bulbs that appear on the plant after flowering.
Spring
The distinctive features of this species include the fact that its bulbs do not have a central stem. Also, adult plants do not form bulbs in the upper part of the bushes, and therefore spring garlic reproduces only with the help of young cloves.
The fruit size of this species is much smaller than that of the winter variety. However, one onion contains about 10-15 cloves. They are all completely different and differ in size. The harvested spring garlic crop is perfectly stored even in rooms at room temperature. Under optimal conditions, it will not deteriorate within 1-2 years.
Subtleties of spring planting
Spring garlic has recently been increasingly planted by vegetable growers. To get a high-quality harvest, amateur gardeners should use the following rules for preparing planting material and placing it in open ground:
- Planting material is being prepared. This is a mandatory procedure that will help disinfect the cloves. First, the cloves are sorted, freed from the husk, and the dry specimens are thrown away. A solution of copper sulfate is prepared (1 tablespoon of the chemical is dissolved in ten liters of water). The cloves must be kept in this solution for 20 minutes. The cloves are rinsed with water and lightly dried.
- You can restore too dry heads by soaking them overnight in vermicompost. A solution is prepared in the same proportions as copper sulfate.
- Before planting, it is necessary to slightly moisten the prepared grooves and sprinkle them with wood ash. Ash is needed to prevent the occurrence of diseases; it also repels pests well.
- You should not plant heirloom garlic where garlic, onions, root vegetables, and potatoes previously grew. All these crops thin the soil, depriving it of calcium. This will not have the best effect on the further formation of large individual heads.
- You should not make a bed for garlic between trees and shrubs; they will shade the bed, interfering with the growth of the plant.
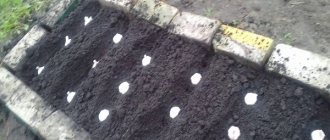
- The cloves are buried in the soil to a depth of about 5 cm. This should be done bottom down. It is necessary to leave a lot of space between them, since several bulbs will form. It’s good if the distance is about 23 cm. The next row is made by placing the cloves in a checkerboard pattern.
- The planted garlic cloves are carefully sprinkled with soil, leveling the bed with a rake. If planting was carried out before winter, the bed must be covered with mulch. It's better to use sawdust. When planting cloves in the spring, mulching is carried out between the rows, the distance between them should be about 50 cm. You can spread straw there, it will help the soil not dry out, retain moisture, and prevent the appearance of weeds.
- The higher the soil and air temperatures, the faster you can see the first shoots of garlic. Usually the first leaves appear at the end of May. Sometimes there are unexpected frosts in May, they can slightly freeze the leaves. If you notice the leaves turning yellow, don't worry. When the weather changes again, the crop will continue to grow.
Preparing seedlings
Before you start planting garlic in open ground, you should start growing seedlings. It is recommended to plant it in autumn or winter so that by spring the seedlings can be transplanted into the garden.
Soil preparation
Garlic loves soil that contains many nutritional components and therefore it is better to prepare the soil mixture in advance. To do this, the earth is mixed in equal quantities with wood ash, nitrophoska and superphosphate.
After adding fertilizers to the soil, the soil is disinfected to remove pests and pathogens from it. To carry out this procedure, copper sulfate is added to the ground.
Some vegetable growers add peat with loam and sand to the soil to improve the quality of the soil mixture.
Selection of capacity
Before growing garlic seedlings, you need to decide in what container it will grow. Some advise growing it in plastic pots, in which almost all plants take root.
However, these pots are quite small, so it is better to use boxes instead. You can grow several seedlings in them at once. Instead of planting boxes, you can use cassette containers, which consist of several combined pots.
Landing
Having chosen a container for planting and prepared the soil mixture, you can begin planting.
First, all containers are filled to the top with soil and watered with warm water. Then shallow holes are made for planting the garlic cloves. When all the garlic has been placed in the soil, it is covered with soil and watered again. All containers with planted garlic are transferred to a warm room for further cultivation.
Planting heirloom garlic before winter
Family garlic can be planted in the fall at the dacha before winter. For the garden bed you need to choose a sunny place. There are no exact rules for planting garlic before winter; heirloom garlic is considered an unpretentious variety. But experienced gardeners give several recommendations regarding planting:
- the distance between the cloves should be 10 centimeters;
- the cloves are deepened by 10-15 centimeters;
- you cannot press the cloves into the ground;
- large snowdrifts will protect the beds from winter cold.
The bed needs to be prepared a month before planting. The soil is dug up, humus and compost are added to correct the condition of the acidic soil, and ash is added. After this, the bed needs to rest. Every meter of bed area should settle naturally; it should not be compacted. Autumn planting will help you get a good harvest and reduce the time for other work in the garden in the spring.
Adviсe
Try it: place your teeth so that their noses point out:
on one row to the east, on the other - northeast, on the third - to the north, on the fourth - to the northwest. All that remains is to check which row has the largest yield and choose the best method.
Bush method
growing garlic (winter only) - planting not cloves, but heads (5-6 heads grow from each). Along the perimeter of the crown, use a hoe to make a furrow 12-15 cm deep, spill it with a solution of copper sulfate (1 tablespoon per 10 liters of water), put humus, ash (! glass / sq.m) and superphosphate (2 tablespoons / sq.m). Heads (not cloves) of garlic are kept in a saline solution (3 tablespoons/1 liter of water) for 10 minutes and placed at a distance of 20-30 cm from one another. Lightly press and cover with fertile soil in a layer of at least 6 cm. Before the onset of frost, the furrow is mulched with peat (up to 4 cm layer). For new planting, the furrow is moved 20 cm inward or outward.
Winter in Siberian style
In severe frosty winters, they also use this time-tested method of growing winter garlic, without caring whether the garlic will overwinter or not. At the beginning of October, in the highest place (in the lowlands, the garlic dies out in the spring), they dig a hole two spade bayonets deep. The bottom is lined with coniferous spruce branches or dry moss, a linen bag with heads of garlic is placed, covered with spruce branches on top and a hole is buried. The earth is compacted tightly. They place a peg nearby to quickly find a place in the spring.
When the ground thaws, the garlic is dug out of the hole. By this time, its roots had already grown and leaves were sprouting. Soak the cloves in a solution of microfertilizers and potassium permanganate, plant them in grooves 5-6 cm deep, water them, and sprinkle them with earth. After 2-4 days, green shoots appear. Further care as usual.
Caring for garlic plantings
Caring for heirloom garlic plantings does not require much effort. Until the leaves grow to ten centimeters, you don’t need to do anything at all. This culture is resistant to infections and diseases; it should not be fed or sprayed. The cloves go deep into the soil in search of moisture, strengthen there, thus preparing for full growth.
As soon as the garlic grows, you can use one of the care methods. Everyone can choose the method that suits them:
- Use mulch. It is laid out between the rows in a layer 5-10 cm high. For mulch, mown grass is used, preferably chopped. Until June, you need to water the garlic once a week.
- Some summer residents prefer regular loosening of the soil and weeding. In this case, you don’t need to use mulch. With this method, you will need to water the beds more often - 2 times a week. With frequent summer showers, there is no need to water the garlic frequently.
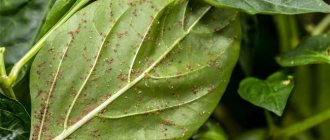
The formation of garlic bulbs ends by June. It is necessary to observe the leaves; they will tell you when it is time to start harvesting. Dried, yellow leaves indicate that you cannot hesitate, you need to remove the garlic bulbs, otherwise they will absorb all the moisture from the soil, and this will affect the shelf life of the crop. They will begin to germinate within a few months.
Harvesting
Harvesting is done on a dry, sunny day. Garlic is pulled out of the ground, left to dry in the beds until evening, then collected and placed in the attic or under a shed. After the garlic dries, you need to remove the stem and leaves. Garlic is stored braided. You can use special boxes where the garlic is placed, sprinkled with salt. The shelf life of garlic is 6-8 months.
The bed needs to be dug up right away; garlic cannot be planted in this bed next year, and onions too. You can prepare this bed for planting legumes.