How to make supports for currant bushes with your own hands at the dacha
Here you can focus on your preferences and your vision of how the fences on the site should look.
You need to choose a material that does not interact at the chemical level with the branches. For example, untreated metal can rust, damaging the branch's bark and leading to disease transmission. Read about planting and caring for blackberries here.
From pipes
For production, pipes made from a variety of materials are used. Popular are plastic, metal-plastic, metal, PVC, polypropylene.
Plastic
For production you will need:
- plastic fittings;
- pipes 7-10 pcs., approximately 50 cm long;
- plugs for pipes.
Make a hole in each section of pipe, the dimensions of which will be 3–5 centimeters from the top. Reinforcement is threaded into these holes. Install this structure around the bush, driving the ends into the ground. After this, connect the ends of the reinforcement and make fences of the width that will be optimal for you. Caps must be installed on all racks.
Metal-plastic
Such a fence is considered simple, but reliable and strong. You will need:
- metal-plastic pipes;
- hoses;
- screwdriver;
- pegs;
- hammer.
Metal fixtures
This garter is considered one of the strongest. To make it you will need steel pipes measuring 50 - 60 centimeters. The walls for such a fence are made from any available means (for example, from reinforcement).
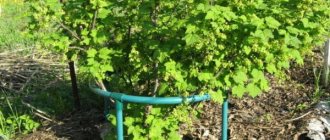
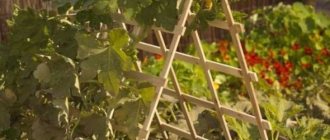
Idea for a bush trellis made of polypropylene pipes
At the hardware store you need to purchase:
- tees (fastenings);
- 5 meters of plastic pipes;
- soldering iron for polypropylene pipes (no professional skills are required to work with the tool).
It is necessary to make several stands, 50-60 centimeters in size, and drive them into the soil. Solder tees onto them using a special soldering iron. Place the stands on the pipe and close it around the currant bush. This material will tell you about the arrangement of the greenhouse inside.
PVC (propylene) fencing - what materials and fastenings will be needed
The propylene PVC support is strong, but not resistant to frost and heavy rainfall. Therefore, gardeners recommend removing such structures during the cold season. You need to make a fence by cutting several pipes, 60 - 70 centimeters in size. After this, drill small holes in each pipe; their dimensions should be approximately 3–4 centimeters. It will be necessary to thread a wire or any other strong material through them - this will be the wall of the fence, the base that securely fixes the structure.
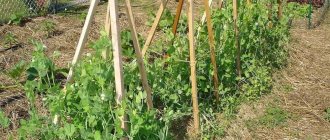
How to fence bushes using stakes and twine
Pegs are forgotten around the bush. The more there are, the stronger the fence will become. Bury them deep into the soil, but leave at least 50–60 centimeters on top. Tie twine to the first peg, lift the branches and tie it to the next support. Instead of twine, you can use any strong material: wire or twine.
Holder made of spears and branches
This is one of the cheapest options for fencing currants, on which you will not need to spend money, because the material for it is always at hand.
Rogatins are made independently, using a variety of fruit trees. They are hammered into the ground so that more than 50 centimeters of support remain on top. Branches are placed on top of it: collect them of the same length and size, clean them of dirt, twigs and small twigs, then use them for their intended purpose. Find out why currant branches dry out at this link.
How to fence with a structure with an iron base
The idea of making a bush holder from iron pipes is the most reliable; such a fence will withstand absolutely any weather conditions and will serve you for a long time. For production you will need 5-6 steel pipes. They need to be dug into the soil and left about 50 centimeters on top. Next, a beam is attached to such a support using self-tapping screws.
To fence currant bushes Lazy, Bagheera and other varieties, a wooden device is prepared into blocks, carefully polished and installed in the soil. The dimensions should be 60 - 70 centimeters. Plates about 100 centimeters in size are also made from wood; they are attached to installed beams. This type of holder can be made independently, without assistance in assembling the structure.
Support made of pegs and twine
The simplest fencing option for currant bushes is made of pegs and twine. If the structure is completed in good faith, it will last for several seasons. For this fence you will need:
- 5 stakes of such length that they rise above the soil by about 0.5 m (more stakes are used to support a powerful, spreading bush);
- twine (you can use wire or twine instead).
Peg support
Stakes are placed around the currant at such a distance as not to damage the roots. Then the twine is fixed on one of the pegs. Selecting the branches to the desired height, secure it to the next support. In this way, they go around the entire bush, lifting the shoots and tying the twine to the stakes. It turns out to be an improvised fence.
Benefits of currant propping
Do-it-yourself support for currant bushes has a number of advantages:
- Making a frame does not take much time, it will save money and make good use of leftover building material;
- Unnecessary pipe cuttings, small bars, dry branches of garden trees, sticks can be used as available material;
- The size of the structure and design can be adjusted independently, based on the size of the bush and the material for support;
- The currant bush will look presentable; the branches, carefully laid on the support, allow the bush to grow correctly, with a lush and beautiful crown;
- Possibility to save almost 100% of the harvest. Berries that do not have contact with the ground remain on the bush longer and are not attacked by diseases and pests;
- Supporting the bush additionally protects against mechanical damage and branch fractures in areas with frequent and strong drafts;
- The main advantage is the saving of garden space. Currant branches can grow greatly. The support forms the bush.
Saving garden space
Making a support yourself will allow gardeners to grow beautiful currant bushes and reap a rich harvest. The methods are simple and do not require investment, a lot of time and effort. Supports can be used to decorate your garden plot in an interesting way.
Garter rules
The basic rule of gartering is that the plant should look not only attractive and neat. The main thing is to securely fix the trunk and provide conditions for the growth of shoots and the development of the entire currant bush. Therefore, before starting gartering, you need to choose the right one, taking into account the basic requirements for supports:
- sufficient strength and reliability of the posts, which should support the weight of the entire plant;
- sufficient size to accommodate branches. The shoots should be evenly fixed, leaving the middle of the bush free for the penetration of sunlight, ventilation and the convenience of treating the branches from diseases and pests;
- environmental safety of the design - when purchasing a Chinese counterfeit from materials that emit phenol, a gardener should think about the health of his family;
- attractiveness is an optional, but necessary characteristic. The support should serve as a decoration for the garden, but not lose its essential beneficial properties.
This article will tell you about Dutch varieties of tomatoes.
Holders
These devices are described above. They are the main type of permanent supports for shrubs and tall plants. Such designs can be purchased at any garden store. But it’s easy to make with your own hands:
- 4 square steel tubes are hammered around the bush. They should stand firmly and reach the level of the top of the bush in length. It is better to drive the pipe at a slight angle outward;
- Steel wire with a cross section of 6-8 mm is fixed at different heights. You can use steel strips 2-3 mm thick, but their edges will need to be rounded on a sharpening machine. The hoops are secured with clamps or self-tapping screws;
- All that remains is to distribute the shoots evenly around the entire circumference of the hoop and secure them with straps or rope so that there is space for the shoots to grow.
Central shaft
This device is used to create temporary support and fixation of seedlings or for the standard form of bush formation. A wooden or steel rod is driven into the soil until it stops, and the main trunk of the bush is fixed to it. To secure young bushes, it is recommended to fill a wooden strip at the required height and distribute it evenly. It is better to secure them with clothespins or clips.
Features of a garter for winter shelter
Covering the plants with special materials will help protect young seedlings or adult plants when grown in harsh winter conditions. But first the shoots must be collected in a bundle to facilitate the main operation. Read about the features of growing onions by following this link.
For young growth, fixing the shoots to a central peg is suitable; it is better to tie the branches of an adult bush in a spiral with a rope. But it is not recommended to pull the crown of the bush tightly; the rope can damage the skin of the shoots and pests or pathogenic fungi will certainly settle in the abrasions. To cover large bushes fixed on permanent supports, you will need to wrap Agrospan around the support structure.
Bush holders made of plastic pipes
Not only the appearance of the plant, but also its development depends on the choice of bush holder design, therefore a number of requirements are put forward for this type of device:
Reliability (the supporting structure should not deform under the weight of the bush). Durability (the support must be stable and able to withstand bad weather conditions such as strong winds). Convenience (the bush holder should not restrict the growth of the bush too much, but the internal space should also be filled). Practicality (collapsible fastenings should be easy to assemble and not take up much space during storage). Safety (when choosing a support, you should pay attention to sharp corners and fastenings that can injure both the gardener and the bush). Environmentally friendly (preference is given to natural materials). Aesthetics (bush holders can affect the appearance of a personal plot; they must fit into the overall landscape design). Cost (there is no point in buying too expensive supports, since they are easy to make yourself).
Many gardeners do not buy fencing for shrubs, preferring to make them with their own hands or use garters. At the same time, they can choose not only the optimal design, but also choose the materials and design they need.
Pipe supports
Pipe supports are installed around the bush. Small wooden rods are fixed in their holes. You can use unnecessary sticks. Flat boards and slats are laid on top of them, which are then fixed with self-tapping screws.
Instead of bars, slats and boards, you can fence using metal wire. To do this, measure the gap between the iron supports. Add another 20 cm to a wire of this length. The ends of the resulting segment are bent 10 cm on each side and inserted into the holes of the pipes. A fence using wire should be wrapped in soft rubber so as not to injure the branches.
They also use protective rings made of iron, fastened with a bolt. These hoops are fixed to supports using hooks. The rings are put on top of the bushes in the spring before the leaves appear.
Fence
To give a decorative look, the bush holder can be painted. It is recommended to use paint to protect the metal from rust.
Currant fences made of plastic look decorative. They are comparable in strength to metal structures. To create them you will need PVC pipes 4 meters long and 4 corners for connecting the pipes.
Assembling the currant fence begins with cutting the pipes into 8 equal parts. If the bush is tall, then longer pipes are taken to make the structure higher. You can cut it with a hacksaw or a pipe cutter. 4 plastic supports are placed around the bush. They are connected to each other using the remaining plastic pieces and “triangles”, secured with screws or an iron for soldering propylene pipes.
Bush holder
A bush holder made of plastic pipes is a lightweight design. For better balance, you should stick it deeper into the ground.
A metal-plastic support is one of the most durable and decorative.
Note! Here we consider 2 methods of making the structure
1 way
To make a currant fencing with your own hands, you need the following materials:
- metal-plastic pipe;
- nails or screws;
- a piece of rubber hose;
- pieces of wood;
- hand saw;
- hammer;
- screwdriver
First, supports are made from the pipe by cutting 3 equal parts of approximately 80 cm each. For greater stability of the fence, you can build a larger number of stakes.
Metal-plastic pipe
Wooden pieces are hammered into the openings of the supports. Using nails or self-tapping screws, the top hoop is attached to these wooden pegs. The lower circle is fixed to the supports through pipes or simply put on the lower part using wire for fastening. After installing the bush holder, the lower hoop should be located at a height of 20-30 cm from the ground surface.
To ensure that the design is not conspicuous and harmonizes with the bush, it is recommended to use green materials.
Method 2
Before you make such a fence for currants yourself, you need to prepare the following materials:
- metal-plastic pipe;
- polypropylene pipe;
- "tees";
- machine for welding plastic pipes (soldering iron);
- a piece of hose.
A hoop is constructed from metal-plastic. 3-5 supports are made from polypropylene. Then “tees” are soldered to the supports. Racks with tees are put on the hoop and evenly distributed. The ends of the hoop are fixed with a piece of hose. The posts can be installed on metal pegs driven into the ground. Then the structure will be the most stable.
Wooden fencing
You can fence a currant bush in your dacha using wooden slats. A bush holder made of natural materials will not only serve as a support for currants, but will also harmonize well with the local landscape.
To make this fence you will need:
- 4 pegs 70 cm long;
- narrow slats for a garden fence (they can be cut from timber) measuring 100 cm in length;
- hammer;
- self-tapping screws;
- screwdriver
Pegs are hammered around the bush. They can be treated in advance with an anti-moisture and rotting agent.
Wooden fencing
Important! The pegs must be driven in perpendicularly, otherwise the structure will lose stability.
Check that the supports are at the same height. Then, using self-tapping screws, the planks are secured to the pegs. Wooden fencing can be painted green or some other bright color. Some summer residents prefer coating with yacht varnish, which not only protects from moisture, but also makes the products decorative.
Each summer resident chooses what kind of fencing he wants to make for currant bushes with his own hands. This takes into account practicality, durability, availability of available materials and ease of manufacture.
The cheapest options from the considered fencing: from pegs and twine, from slings and branches. These bush holders are not as reliable in bad weather conditions, but reassembling them is not difficult. In addition, they are easy to disassemble. This means they can be used for the next season.
A fence made of wooden slats using self-tapping screws is already more solid. It looks more presentable than the previous options. This is a non-demountable design. The disadvantage is that if it is not removed for the winter, it may break if there is a lot of snow. And if you try to remove it in the fall, you can break the grown branches.
The iron-based currant fence is strong and solid. However, it is susceptible to corrosion. And the wire, if not wrapped with soft rubber, can injure the shoots.
Bush holders made of plastic pipes are neat and reliable. Only such structures should be built from thick materials, otherwise in winter they may break under a layer of snow and become brittle under the influence of low temperatures.
Fences made of metal-plastic pipes are considered the most durable, decorative and expensive. However, a gardener who has allowed himself such luxury will enjoy such a fence for currants for many years and will justify the investment in it.
Specialized supports are important not only for currants, but also for growing ornamental and fruit shrubs. Such stands are suitable for viburnum, gooseberries, raspberries, and blackberries. Ornamental plants also need them: roses, hydrangeas, mock orange.
0 0 votes
Article rating
Mistake 4. You don't trim the currants
Fearing mistakes when pruning, many gardeners leave currant bushes untouched. As a result, they become very thick, overgrown with old unproductive branches that shade young fruit-bearing shoots, as well as with tops - powerful, unproductive shoots inclined to the ground. Such plants produce a very poor harvest and often get sick.
What to do?
For black currants, immediately after planting, shorten all branches to 2-4 well-developed buds. In the fall of next year, leave only 3-4 of the strongest and most well-developed shoots in the bush. Cut all the rest close to the ground. In each subsequent year, prune the currants according to the same principle - from all the shoots that grew over the summer, select the 3-4 strongest ones and shorten them for better branching, and remove all the rest. After 4-5 years, you will have a fully formed bush with 15-18 branches of different ages.
Subsequent pruning of blackcurrant bushes comes down to removing branches older than 5-6 years of age (they are the thickest and most branched) and replacing them with the same number of well-developed “first-years”.
Red and white currants do not form as many shoots as black currants, and their branches retain their “working capacity” for 7-8 years. Therefore, the principle of pruning these bushes is different. In the first years, only sanitary pruning is carried out, removing all diseased, broken and thickening shoots of the bush.
In red currants, the largest number of berries are formed on the tops of the shoots. Therefore, under no circumstances should they be cut or pinched - by doing this you will deprive yourself of a significant part of the harvest.
From 5-8 years of age, begin to remove old unproductive branches that have produced few berries or did not bear fruit at all during the season. On average, to obtain a good harvest of large berries, a red (white, pink) currant bush should have 10-12 branches of different ages.
Recommendations and common mistakes
For beginner gardeners, experienced gardeners recommend the following:
- When making a fence with your own hands, take into account the age of the currant. If the plant is young, then the stand is made larger so that in the future the dimensions correspond to the overgrown bush.
- When planting linearly, you can make a common long support and tie all the plants to it.
- The racks are deepened by 0.5 m. This is necessary to guarantee stability.
- Monitor the condition of the material. To prevent corrosion on the metal, the surface is periodically treated.
- If the fence is wooden, you should not allow the wood to rot and mold to appear on the surface. It is recommended to replace problematic parts.
What mistakes should you avoid:
- Thin synthetic twines should not be used to secure the branches to the support; they cut into the structure, sap flow is disrupted, and the shoots die. For this purpose, it is better to use special fasteners (clothespins) or wide tapes.
- It is a mistaken belief that branches need to be tied up in spring and autumn. Twice a season is not enough. The mount is constantly moved as the currant grows.
- You cannot pull the shoots tightly together; this will cause them to dry out, and it will be impossible to restore the seedlings.
Important! At the beginning of the season, be sure to prune old or damaged branches, paying special attention to the central part of the currant
Only after processing are the seedlings tied to the bush holder.
Attract bees to your garden
Bees are the main assistants of the gardener who grows currants, because they are the ones who pollinate this plant. Therefore, to prevent insects from flying past the currant bushes, the plants need to be sprayed with sweet water (1 tablespoon of honey per 1 liter of water).
The currant harvest largely depends on bees
Another way is to plant plants that attract bees: asters, verbena, helenium, hyacinth, honeysuckle, buddleia, weigela, monarda, peonies, rhododendrons. This will allow insects to settle in your garden for a long time. Plant flowers in places that are sunny but protected from strong winds: this is where bees usually collect nectar from flowers.
We hope that in the new season you will be able to harvest the best harvest from currants. Take note of our tips and you will definitely succeed.
Currant garter - a practical guide
Almost everyone who has their own plot grows currants on it. This berry is a storehouse of vitamins that everyone wouldn’t mind enjoying.
In order for the currant bush to please with a bountiful harvest, it needs care: pruning, loosening, fertilizing and, of course, proper currant garter is necessary.
All adult bushes of black, red, white, and other popular types of currants need a garter (bushes from 5-6 years of age are considered adults).
Reasons for the need to garter berry bushes
- The branches of an adult plant are located close to the surface of the ground. When the harvest appears, such branches bend under the weight of the berries and touch the soil. As a result, the berry crop does not ripen well, rots, or simply gets dirty, which is not very pleasant.
- Increased risks of bush infection.
When twigs and berries come into contact with the soil, there is a risk of the bush becoming infected with fungal diseases and pests. - Difficulties in caring for the plant, feeding, watering, etc.
- There is another reason, this is a garter for the winter.
Such a garter is needed to protect the bush from damage to the plant in winter.
Currant garter - a practical guide with photos
Currant garter can be temporary or permanent; there are several ways to garter berry bushes. In this material we will tell you how to tie currant bushes to a temporary support. This is the simplest and easiest way to tie up bushes.
For temporary (seasonal) gartering of a currant bush you will need:
- pegs (any wood, metal, plastic, etc.);
- rope, wire, tourniquet (you can use a metal hoop);
- hammer or sledgehammer
A very simple way to garter currant bushes, when three or four supports are driven into the ground.
Pegs can be metal or wooden; now polypropylene pipes are often used as supports; they last longer than wooden ones and look neat.
Preparation of material, installation of supports and garter
supports for currant garter
We prepare pegs for the supports. We use plastic pipes.
install supports
The pegs need to be cut to such a length that when deepened into the ground by 20-30 cm, the above-ground layer reaches 1/3 or the middle of the bush (our supports are about 70 cm long).
Drive the pegs in with a hammer so that they stand firmly and do not wobble.
An ordinary rope or wire is placed around the perimeter, due to which the branches are raised. It is better to make a double garter. The first turn is at a distance of 10-15 cm from the ground.
Second on the top edge.
You need to make a loop on each support by running a rope around the support so that it does not fall off.
The edges are fixed with a knot.
The branches of tied currant bushes are less damaged, air circulation improves, and the berries are better illuminated by the sun, which contributes to their faster ripening.
When planting currant bushes in rows, the pegs between the bushes can be used for the second, third and subsequent bushes.
Other ways to garter currant bushes
- Permanent fencing. You can purchase special holders for bushes in the store, but it is cheaper to make such fencing yourself. You can make them according to the previously described scheme, but instead of a rope use a hoop or a wooden frame. Other available materials will also be suitable.
- Gartering a bush onto one peg in the center of the bush. For this method of gartering, a peg is driven into the center of the bush. A self-tapping screw is screwed into its top, and a hoop is placed under the bush, and if necessary, the hoop is raised, secured to the central support with ropes.
- Tie the bush with a rope. This method is suitable if you are pursuing the goal of faster ripening of the berries on the lower branches, but remember that this method thickens the bush.
It can be used only when some of the berries on the upper branches are already ripe and collected, and the berries on the lower branches do not have enough heat and light. It is not advisable to leave the bush in this position. After harvesting, it is better to remove the rope. This method of gartering is also suitable if you are preparing bushes for winter. A tied bush overwinters better; fragile branches are not so damaged under the weight of snow. In spring, currant bushes should be freed.
Whatever method of gartering bushes you choose, they work the same.
The main task is to raise the branches and provide air circulation to the bush, which will avoid infection with fungal infections, accelerate the ripening of berries and provide easy access to the roots of the plant for applying fertilizers, loosening and weeding the bushes.
DIY strengthening methods
To know how to tie currants correctly, you should consider the following points:
- the total number of shrubs on the site;
- plant age;
- specifics of landing.
The answer to the question of how to tie up currant bushes with your own hands can be found in different ways. The most commonly used methods are:
On the trellises
In order to tie a currant bush to a trellis, the first thing you need to do is make a frame. For this purpose, stakes are driven into the ground at the corners of each planting row, onto which a wire or rope is pulled.
Currants hold up very well on trellises
This method is convenient because as the bush grows, it is possible to add one or more new upper strings. As a result of such tying, the shoots are evenly distributed in all directions, which has a positive effect on the yield.
For a single frame
If the currants are not planted side by side, but as separate bushes, then gartering on a single frame is the best way.
Single frame is great for gartering currants
To do this, pegs are driven around the bush in such a way that a square is formed. The driven stakes are connected to each other by horizontal strips, to which the fruit and berry crop is tied.
On a triangular support
Like the square support in the form of a single frame, the triangular option requires the installation of a support.
Only it involves the installation of three stakes, which are positioned in such a way that the result is an equilateral triangle.
On a pipe support
The horizontal component of the frame can also be a ring (circle). It is easiest to make from polyvinyl chloride pipes.
Round supports are used no less often
On the standard
Forming a currant bush on a small trunk is practiced somewhat less frequently than conventional cultivation. As a rule, standard bushes are attached to a single pole directly during the planting process. As the plant grows, it is necessary to remove all shoots that grow below the height of the trunk. With this method of growing, the lower tier of the plant does not grow back in principle, and accordingly, the problem of its contact with the ground does not arise. This method of tying currants has one serious drawback - it is very unstable to strong gusts of wind. But on the other hand, shrubs externally decorated in this way look very interesting and original.
In each individual case, the owner of the garden plot independently decides which way to tie up the currant bushes with his own hands.
Fence made of slingshots and simple branches
A fence for currants made of slingshots and simple branches is one of the most budget-friendly structures. Rogatina can be made from unnecessary branches of a fruit tree on your site or found in the forest. If you don’t find a suitable material, you can make it yourself from boards.
DIY supports for currant bushes
The reverse end of the spear should be sharpened to make it easier to stick it into the ground. If the fence does not hold well in the ground, it can be secured with additional pegs. It is desirable that the branching angle of the spear be wide enough. Then the branch that will be attached from above will be able to fit tightly into its base.
Four spears are installed around the bush at the required height. Dry, strong branches are placed on top of the fork. Then they should be tied with rope or wire.
Additional Information. In the fall, such a support can be easily disassembled until the next season. In order for the product to be used for a long time, it must be dried and disinfected. The disadvantage of this fence is its low resistance to strong gusts of wind. Additional fixation of the slingshots with pegs is required.
The structure of a currant bush
It is very easy to determine the age of a currant branch by the color of the bark (the older the shoot, the darker the bark):
- Zero age - young, green, not yet lignified shoots growing from the center of the bush in the summer.
- Annuals are the lightest (almost white, light yellow or olive), without lateral branches.
- Two-year-olds - branches with bright brown bark and side shoots.
- Three-year-old shoots are thick and dark, highly branched.
- Four-year-olds and older have cracked, ash-black bark, often covered in moss or lichen.
Each currant bush consists of branches of different ages: the lightest ones are annual ones, and the darkest ones are three years old and older.
In turn, each branch in the second and subsequent years is overgrown with annual growths (they differ from the main one in color). The size of the increments can be used to judge the productivity of the branch: the longer they are, the more berries there will be. In healthy and productive currants, annual growths can reach a length of 80 cm.
If they are short, it means the bush is growing in the shade or it lacks nutrition.
The currant bush should consist of 10–15 shoots of different ages:
- 4–6 annuals;
- 4–6 two year olds;
- 2-3 three year olds.
Of the zero shoots that grow in the summer, you should also leave 4–6 of the strongest ones.
Correctly formed bush: sparse, there are branches of all ages, old ones are cut into vertical shoots, have good growth
Ready-made bush holders (purchased)
To save time and effort, purchase bush holders and trellises at a specialty store or order online.
The price of ready-made fencing starts from 129 rubles.
You can choose fencing of all colors and shapes, made from different materials. This article will tell you about planting currants in the spring.
It is important to choose not only a beautiful fence, but also to ensure that it is durable. The service life depends entirely on this.
Metal fences
Very strong and resistant to any weather conditions. Forged metal fences will decorate your garden area. These supports are not removed during the cold season; they are usually coated with a special powder that has an anti-corrosion effect.
Forged products will cost more than regular metal ones.
Plastic stands
Plastic coasters are strong, but not as stable as metal ones. A distinctive feature is that they are light in weight and also easy to assemble. It takes a novice gardener who has no experience or skills to assemble such a fence no more than 10-15 minutes. Convenient to transport, easy to disassemble and assemble to support another bush. The downside is the high price and in gusty winds the structure becomes deformed or even falls down.
Why tie up currants?
After about 3-4 years, the young seedling reaches the size of an adult bush, consisting of 20–25 shoots. At the same time, some side branches begin to bend toward the surface of the ground under the weight of foliage and crops, so they need to be lifted by tying the plant to a support.
Did you know? The Russian word “currant” comes from the consonant word “stench”, meaning a strong smell. The berries were named so because they contain a lot of essential oils and have a persistent aroma.
The main reasons why gartering is recommended are listed below:
- branches growing in all directions take up a lot of space in the garden bed, leading to increased density of plantings;
- berries located on shoots inclined to the ground become dirty and rot when they come into contact with the ground;
- as a result of contact of branches with the soil, diseases or pests may appear that damage the crop;
- fruits located near the ground receive little sunlight, so they ripen slowly and taste sour;
- shoots growing at a strong slope to the soil surface make it difficult to water the currant bush, apply fertilizers and remove weeds;
- In winter, branches inclined to the ground can break from gusts of cold wind or under the weight of snow.
What are the requirements for bush holders?
The main purpose of a bush holder or support for a currant bush is its proper development and increased productivity. The branches are located above the ground, which does not create a greenhouse effect at the roots - mold and mildew do not multiply. Therefore, when choosing a purchased support or when designing your own, you need to take into account the following requirements:
- Reliability and durability. On average, a branch weighs 3-7 kg, depending on the variety and age of the plant. This weight “pulls” the branches down, and the support must support this weight. Also, don’t forget about weather conditions - the structure must withstand strong winds and heavy rains.
- Safety. The bush holder should not have sharp corners or crossbars (often found with metal supports).
- Practicality and accuracy. They do not take up too much space, are easy to assemble and disassemble, and are not too rough in appearance.
When planting, you need to take into account the distance between the bushes, because if there is a small distance from each other, when they grow, it will be necessary to create stronger and narrower structures, which will harm their growth and affect the yield.
What materials will be required for self-fencing of shrubs?
For the full construction of a wooden fence, the following materials will be useful:
- picket fence or bars;
- stakes from various trees;
- white spirit or yacht varnish and a brush for it;
- several screws measuring 4 by 50 and 5 by 80 mm;
- tape measures of 3 and 10 meters;
- level and axe;
- saw, preferably a circular saw, maybe a grinder and a corner saw;
- hacksaw, plane;
- battery powered drill;
- screwdriver, hammer.
It all depends on the chosen fencing option. An old hoop, table top, wire, the rim of an old bicycle wheel, rope and many other materials that have come out of their own functionality can be used as the main material; it all depends on imagination and the possibility of manufacturing.
Let's take a closer look at the recommendations for the necessary materials.
Why is it better to use yacht varnish? The reason is its characteristics and resistance to environmental influences.
If you are using a block more than half a meter long, use a saw to divide it into 8 equal parts. If you use ready-made picket fences as holders, then shorten them to 1/3 of the height of the bush. The bars are sharpened with an ax, and the stakes are processed using a plane before applying varnish. White spirit is used to rinse brushes after applying varnish.
Screws are required to secure all parts together. Each part is varnished separately, and the second layer is applied to the finished product.
Quick ways to fencing bushes
Above were ways to use end-of-life materials (countertop, bicycle wheel, etc.).
Let's look at examples of the implementation of such fences.
Using bicycle wheels is a very convenient way to quickly fence in bushes.
To do this, you will additionally need a rope or wire in the form of a stand for the bases.
For production, you will need 3-4 supports for bushes, which can be made of either iron (pipe) or wood.
The main thing is to choose a circle that matches the size of the bush or rectangle.
Options for using a tabletop to support shrubs or wire supports allow you to use it effectively instead of throwing away old furniture.
If the plant is very tall, then it is worth using the method of fencing on both sides with “crosses” in the form of a stand for branches. In this case, the bottom of the fence can be covered using any of the methods presented above.
All kinds of materials are quite suitable for use, including in vegetable garden areas.
If you want the plant to be preserved in winter, you can place glass bottles in the fence with the neck inward, which will look like a decorative element of the site and will retain heat.
Also, do not forget to compact the soil near the currants, i.e. a moisture-loving shrub must be surrounded with a kind of cushion of earth, sawdust, stones, so that the water does not spread around prematurely, giving the shrub enough moisture. By the way, this will also help when feeding the plant.
One of the options for protection both from external rodents and from the possibility of water spreading during irrigation is the use of car tires.
Whatever type of fencing is chosen, it is worth remembering 3 components:
- structural strength;
- accessibility of roots and lower branches;
- protection against rodents and moisture retention.
Currants, like other bush plants, are often planted as hedges, without always worrying about them. This hedge requires fencing as protection from the external environment and the formation of a beautiful contour and functionality, and most importantly, the productivity of berry bushes.
Making your own fencing for shrubs will allow you not only to compete with your neighbors in the uniqueness of the design, but also in the craftsmanship.
conclusions
- Currant bushes of any variety, including Titania and Black Pearl, need high-quality support that will prevent injury to the branches and improve the quality of lighting. They also increase the productivity of the plant.
- Wooden elements last much less than plastic or metal, and therefore need to be replaced every few seasons.
- A metal fence lasts for many years, but it is difficult to create.
- Experienced gardeners recognized PVC and metal-plastic as simple, cheap, affordable and long-lasting materials. You can make a support out of them yourself.
- Available options in the form of quick garden supports have disadvantages and cannot be used for a long time. Their service life is one or two seasons.
Design options and methods of fastening currants
Below are popular methods for attaching currant bushes to supports. Provided the installation algorithm is followed, the shoots will remain on the holders for a long time.
On the standard
To garter currant bushes using the standard method, immediately after planting, fix them to a single pole. During the growth period of the crop, excess branches that have grown in the lower part of the bush are removed. The upper copies should not be touched.
On a pipe support
Supports can be made from polyvinyl chloride pipes. They need to be dug in next to the currants, forming a circle. Afterwards, between each pipe, pull the rope into a pair side by side at a distance of 50-60 cm.
On a triangular support
The triangular version of the support involves installing a frame. It consists of 3 stakes, they are placed so as to form a triangle.
For a single frame
Sometimes currant bushes are planted separately. Then it is better to tie them to a single frame of pegs. To build such a structure, 4 pegs are placed around the bush, they form a square. The spaced tubes are connected horizontally by localized planks. The lower shoots are attached to them.
Installation of supporting structures and tying to trellises
Before tying the bushes to the trellis, a special frame is made. Pegs are driven in at the ends of each row of fruits, and a tight rope is secured between them. Shoots are tied to it. This method is extremely convenient, since it makes it possible to add, if necessary, a couple of upper branches to which they can be attached.
Stand for currant bushes made of slingshots and simple branches
You need to take 4 spears 70-80 cm long and drive them around the plant. They can be made from branches of fruit crops. Smooth stems are placed on top.
Rope supports
Stretching currant shoots using a rope is widely used when the berries on the upper stems are already ripe, and the lower ones are still green. The manipulation is carried out in this way: those branches where the fruits are not ripe due to lack of sunlight are tied up and pulled up. After harvesting the berries, the garter is removed, as this method contributes to the strong thickening of the bushes.
We use plastic stands for currants
Plastic fencing is famous for its budget cost, wide choice depending on the purpose: cascade, currant, rose, peony, pyramid. They are easy to install, disassemble, and assemble. Plastic stands are attractive in appearance, light in weight, quick to assemble, durable and rigid. The holder is made from plastic pipes. Its cost ranges from 150-300 rubles. When selecting a stand, it is worth considering such features of the products.
- Bush holder shape. The elements holding the upper shoots can be made in the form of a circle, semicircle, or square. You can focus on personal preferences and the shape of the bush.
- Number of support legs. The stand should have 2-4 support posts. If there are many of them, the structure will be more rigid and durable.
- Collapsibility, integrity of the structure. Often it is difficult to put a solid stand on a dense bush, then it is advisable to use collapsible options. For heavy, spreading currant bushes, you can choose collapsible metal models with 4 supports.
They are suitable for bushes of different sizes. They are the most popular method of gartering currants.
https://fermer.blog/bok/sad/smorodina/vyraschivanie-smorodiny/uhod-za-smorodinoy/10857-kustoderzhatel-dlya-smorodiny.html https://svoizabor.ru/sad/ograzhdenie-dlya-kustov-smorodiny .html https://moefermerstvo.ru/smorodina/kak-podvyazat-podporki
Advantages and disadvantages of strengthening bushes
Shrub garter has some advantages and disadvantages that you should familiarize yourself with in advance. The main advantages include the following:
- Protection against the appearance of fungal diseases, the causative agents of which are found in the upper layers of the soil. Even careful pinching of bushes does not protect them from contact with the soil. The most effective way to prevent currants from contacting the ground is with a garter. Bushes tied to supports suffer several times less often.
- Simplifying access to berries. Harvesting from untied bushes is not easy. Tied branches do not bend to the ground and therefore picking ripe berries is much easier.
- Wind protection. It is no secret that currant branches can break due to gusts of wind. If you tie a bush to a support, its branches will not break even in strong winds.
The only serious disadvantage of growing tied currants is that you need to spend a lot of time creating and installing a support.
Is it possible to make a currant bush holder yourself?
The average size of a currant bush is 1-1.5 meters per branch.
For better currant growth and high yield, it needs to be thinned out with periodic pruning. Gardeners understand a properly formed bush to be a plant with 12-14 large branches with a wide base. This applies to already mature plants; for young plants (2-3 years old) it is enough to have 3-5 large branches. The wider the base, the more illuminated and unthickened the bush will be, which is reflected in the quality and quantity of fruits.
Such a bush needs support, which not only promotes the active growth of the plant, but also prevents the development of fungal and bacterial diseases. Such structures are called bush holders.