Do I need to tie up peas in open ground?
Only some low-growing varieties of peas can be grown without support, and even then it must be taken into account that the fragile stems will lie down. You will have to collect the pods on the ground, which will cause inconvenience and reduce the yield. The minimum height of the plant is 40-45 cm, and most varieties are tall, some bushes grow up to 2.5 meters. They need to cling to something in order to grow vertically.
Therefore, the construction of supports for peas is very desirable, especially since it is not difficult to do: you can often get by with improvised materials. Only some low-growing varieties are resistant to lodging, and if you plant two peas side by side, the plants will support each other. But there are few such varieties, and the yield of low-growing peas is usually low.
If you do not provide the peas with support, the stems lying on the ground in damp weather and from watering (and this is a moisture-loving plant) will begin to rot, and then fungal diseases are not far away. In addition, in such conditions, slugs often accumulate and happily eat the juicy pods. In addition, with a lack of light and poor ventilation, the quantity and quality of the harvest is noticeably reduced, and it takes longer for the peas to ripen. Harvesting becomes difficult, and ripe pods that are not noticed in time and not removed hinder the appearance and development of new ones. The presence of overripe pods on the plant gives it a signal that the growing season has ended; the peas begin to dry out prematurely.
Peas not tied to special supports look for natural obstacles, trying to cling to them. These may be plants located in the neighborhood, as a result of which their growth and development will be inhibited. Stems tied up and directed towards the sun look much neater and more aesthetically pleasing than those lying chaotically on the ground or clinging to random obstacles.
Any garden crop that grows vertically takes up less valuable space in the garden bed. It can be occupied with other vegetables: low-growing greens such as parsley, dill, sorrel, etc. are planted next to the pea bed.
Agrotechnical techniques
Peas are sown from the 20th of April until July. It is recommended to sow peas after ten days. This will allow you to consume a fresh, sweet and healthy product all summer long.
Pea bushes love an open, sunny and windless place. This crop will appreciate being planted in light, fertile soil. Just do not overdo it with nutritional value, since an excess of nitrogen will adversely affect the development of the plant.
The soil for planting peas begins to be prepared in the fall. It is necessary to dig and add superphosphate (50g/1m2), potassium salt (20g/m2). If the soil is acidic, then add ash (300g/1m2).
The height of the planting beds should be high enough. The depth of the grooves is at least 8 cm, the distance between the grooves is approximately half a meter.
Compost, ash and finally soil are added to the holes. The seeds are placed in the ground after 7-10 cm, sprinkled with soil and compacted. At the end, watering is carried out.
A couple of weeks after the sprouts hatch, the soil is loosened and the young shoots are hilled. Weeds are removed regularly if they appear.
Once the support structures are in place, the tops of the plants need to be pinched back. A little later, the shoots are pinched.
Water the peas once every 7 days, in dry times - 2 times a week.
It is important to remember that peas are fertilized 2 times in 30 days. To do this, you will need nitroammophoska at the rate of 2 teaspoons per bucket of water (this amount is enough for 1 square meter of area)
Rules for sowing and gartering peas: useful video
How to easily tie up peas in open ground
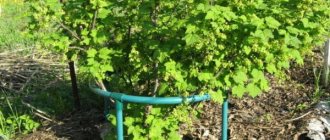
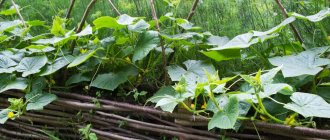
Gartering peas is one of the easiest garden jobs. Since it clings to obstacles itself, for low-growing varieties it is enough to place a palisade of half-meter sticks (preferably wooden, worse – metal or plastic) between the plants. True, you will need a lot of them: at least one per pair of plants, which is not easy to find in a summer cottage.
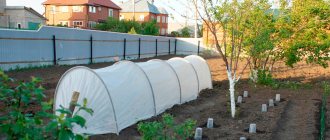
For most varieties, especially late-ripening ones, very high stakes are needed, so instead of them, trellises made of various materials are often used; There are other ways to ensure a vertical position for peas. The use of vertically placed grids with large cells is popular. If the bed is not too long, it is enough to drive strong stakes along its edges and stretch several rows of rope or wire between them.
After arranging a trellis or other vertical structure, it is necessary to guide the growing stems along it. Slightly grown peas themselves look for something to cling to and even grab onto weeds with their tendrils. There is no need to forcibly tie the stems, but since not every plant in any place in the space will find a fragment of the trellis, they need help. You can carefully hook the existing tendrils to the lower support or loosely tie a stem to it at a height of 20-30 cm. Then the peas themselves will quickly climb up, forming a “pea wall” over the entire provided area of the structure.
You can save space by sowing peas next to a fence or fence, which will become the basis for a pea wall. It would be better if it was a wooden fence. The chain-link mesh perfectly supports the pea stems without blocking them from sunlight, but in the heat the metal becomes very hot, which can damage the plant until it dies.
Let's take a closer look at the most popular methods of tying peas.
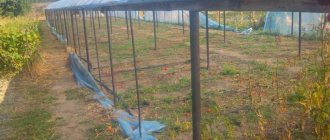
Horizontal trellis for peas
Like any other garden crop, peas cannot be grown constantly in one place. Therefore, the trellis for it should be light, portable (or disposable). However, you can make it more durable so that next year you can plant, for example, cucumbers in this place. A portable trellis, which looks like a wide double-sided stepladder with several steps, is easy to make yourself. You need two-meter beams for the posts, wooden slats with a length equal to the width of the bed, rope (twine) and screws (screws).
The trellis is made like this:
- Vertical racks are installed at a slight angle, connecting them in pairs using screws. For an ordinary bed, you only need two of these “triangles”; for a long one (from three meters), supports are desirable not only at the edges of the bed. The width of the base of the triangle is equal to the distance between the rows of peas.
- The triangular supports are connected with transverse crossbars (slats) every 30-35 cm (the first is placed 15-20 cm from the ground). The rail should also be at the very top of the structure.
- The twine is pulled vertically between the slats every 25-30 cm, throwing it over the upper crossbar and tying it on the lower slats.
It is better if the trellis is installed before sowing the seeds, but you can build it soon after germination.
Mesh garter
A convenient support for peas in open ground is a metal or plastic mesh installed vertically and secured to strong posts driven into the edges of the bed. The height of the structure depends on the selected pea variety; Usually a commercial two-meter mesh is used. Metal products are stronger, but less desirable: in the heat, stems are more likely to suffer from them. The cells must be at least 10 x 10 cm (small ones are harder to harvest). The mesh is installed before sowing, the seeds are sown on both sides of it in a checkerboard pattern. Sometimes the mesh is not placed vertically: since it is flexible, various structures can be formed, for example, arched ones. With careful use, the nets last up to ten years: for the winter, plastic structures are dismantled and brought indoors, galvanized metal ones are often left in the garden.
Standing at attention
I liked this idea: two cords are pulled between two posts at the same level, and a tomato (pepper, eggplant) stem is placed between them. The bush grew bigger - they pulled a couple more ropes, higher, and so on. In theory, even a bush weighed down with fruits should not fall over - it doesn’t weigh a ton. But in practice? If anyone has tried tying up tomatoes or eggplants this way, please share your impressions.
This method is good for individual plantings, and sowings of the same peas can simply be limited to several rows of twine so that they do not lie on the ground.
Variations of rope supports
If you don’t want to “strangle” plantings in a rope hug, pay attention to these methods. The coarse mesh will both support and preserve some freedom for the plant - excellent support. But the practicality of ropes with spacers raises some doubts: it is clear that the bushes will not fall sideways, but what will prevent them from settling between the cords?
I like the grid idea better
Slightly reinforced options for double-sided fencing. To be honest, the reliability of the support in the photo on the left raises doubts. The soil in the garden bed must be loose, then how deep should the slats be so that they can support the weight of the bush with fruits?
The design on the right is only good for low-growing tomatoes, since its height is initially limited. It’s hard to tell from the photo, but it seems to me that it stands freely, not secured with pegs or pins. Such an unstable structure is definitely not for me: there is a high probability of accidentally knocking over the support and breaking the bush while watering or weeding.
READ MORE: DIY brick gazebo made of rubble or foam blocks
Strengthened version
How to install a pea net
Ordinary gardeners are not rich people, so they try to make do with available materials. This is where all sorts of original devices arise. However, modern plastic nets, the range of which is wide in gardening and construction stores, turn out to be not so expensive, since they last for many years.
It's easy to install:
- The required number of stakes no less than the width of the mesh are driven into the ground. Depending on the length of the bed, 3-4 of them may be required: it is advisable that the distance between them does not exceed 1.5-2 meters.
- Place the roll vertically and stretch the mesh along the bed, attaching it to the stakes with wire or clamps.
- Plant peas on both sides, trying to ensure that the seeds are not opposite each other.
Sometimes it is more convenient to position the grid not strictly vertically: this depends on the location of the bed and can add light to the growing peas.
A little about how to tie up climbing beans
Climbing beans are tied to supports made independently. Supporting structures can be made of stakes, metal pipes, rods, branches and other elements. Such structures can be trellises, huts, nets and other options, the same as for supporting peas. All of them look original and can become a decoration for your site.
What materials can be used for gartering peas?
If the tendrils themselves do not cling to obstacles, they can be helped, but in this case it is easier to tie up the stems. This is done lightly, using soft materials at hand, for example:
- cotton twine;
- strips 2-3 cm wide, cut from old natural fabric or plastic film;
- thick threads or plastic cords.
The work is made easier if there are special plastic clips or harnesses from the electricians' arsenal, but you should not specifically spend money on them. What really cannot be used for tying is too rigid materials such as fishing line, wire and even thin twine.
When to support peas and when to tie them up
Since when installing supports, damage to plants or, at least, interference with their root system (when driving stakes) is inevitable, it is better to install supports before sowing seeds. After all, it will have to be placed in close proximity to the seedlings (no further than 10 cm from the plants).
Tying may not be necessary at all if the peas quickly develop tendrils with which they themselves will cling to obstacles. However, if the stems have grown to 20-25 cm and do not grab the support on their own, they should be tied up (better even earlier). Soon, having crossed the 30-40 cm mark, the peas will begin to lie down, and attempts to tie them at this age are already fraught with breakage of the stems.
Mistakes when gartering peas
Even in such a simple procedure, some inexperienced gardeners find the opportunity to make mistakes.
Most often this concerns:
- installing a support structure after sowing seeds and even after germination;
- using metal objects as the main support (mesh, tensioned wire); a couple of metal poles will not do much harm, but the stems should not stretch over the metal heated by the sun;
- use of rigid materials for garter;
- low support height: long stems, having reached the top point, roll over and hang down;
- insufficient strength and stability of the structure.
Not a very good solution is to use natural “stakes” as support structures: sunflowers or corn planted together with peas. In this case, the plants may not have enough nutrients for full development.
Tying peas in the garden is a simple but mandatory procedure. Without this, the conditions for its growth deteriorate significantly, which leads to a decrease in yield and inconvenience in collecting pods. The garter does not require expensive materials or high qualifications; it is accessible to any beginning gardener.
Agricultural technology
Sowing of peas begins in the third ten days of April and is completed in July. You can sow seeds every 10 days. This will allow you to enjoy sweet peas for several months in a row.
For pea bushes, you need to choose an open, but sunny bed protected from the winds. The culture prefers light, fertile soil. True, soil that is too saturated with nutrients is undesirable. This is especially true for nitrogen.
Planting peas in open ground
The land for peas is prepared in the fall. They dig it up, add superphosphate and potassium salt (per 1 M2 / 50 and 20 g). Acidic soil is sprinkled with ash (0.3 kg/1 m2). It is better to make beds for peas on “ridges” - high. The furrows must be at least 8 centimeters deep and spaced 0.5 meters apart. The hole is filled with compost and ash, then with soil. The grains are laid out every 7-10 centimeters, sprinkled with soil, compacted and watered.
When two weeks have passed since the sprouts appeared, the ground around them is loosened and the young shoots are hilled up. Emerging weeds are regularly weeded out (several times per season).
After installing the supporting structures, the tops of the seedlings begin to be pinched. After some time, the same procedure is done with the side shoots.
Plants are watered once a week, twice in the hot summer.
Important! Feed pea bushes at least twice a month. Use nitroammophoska (per 10 liters of water / 2 teaspoons) per 1 m2.
The main insect pests of peas are: leaf rollers, pea codling moths, garden moths, and cabbage cutworms.
- garlic infusion (20g / 10 liters of water). Strain. Spray the foliage;
- liquid solution of tomato tops (3 kg / 10 liters of water). Spray the crop;
- In case of severe damage, use the substance Fastak, Iskra.
Peas can be affected by viral infections such as mosaic and powdery mildew. Treatment is carried out with the fungicide Topaz, Topsin-M, Quadris.
Harvest 65-80 days after sowing peas. Remove the pods carefully so as not to damage the bushes.
Note! Carrots, radishes, spinach, eggplant, turnips, beets, and Chinese cabbage can grow next to peas.
The remaining pea vegetation is considered a good fertilizer; it saturates the soil with nitrogen.
Growing peas is not difficult. By following simple care rules, you can achieve a good harvest.
Peas are a climbing crop, and to reduce the risk of diseases and pest damage, and therefore increase productivity, they need staking. Peas can be tied in various ways, the choice of which depends on the availability of the necessary material and the method of planting. If you know how to properly make supports for peas, you can quickly install them on the beds in the spring, and in the fall you can easily disassemble them and hide them for storage.