Useful tips
Many summer residents are trying to create drip irrigation, so they are trying to learn more about it, because, having installed such irrigation, you can leave the entire system almost unattended.
The main advantage of drip irrigation is that it works autonomously, and you do not need to stand with a hose or walk with a bucket filled with water to water the seedlings.
However, it is worth noting that ready-made drip irrigation, which is powered by a water supply system, is very expensive.
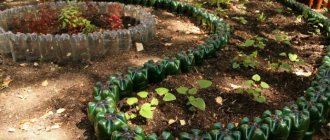
A good and inexpensive alternative to ready-made irrigation is drip irrigation from a plastic bottle. This option cannot be called completely autonomous, since you will have to add liquid to the bottles.
The benefits of drip irrigation
With all this, the creator of such irrigation will still have time for other activities.
Several important advantages of drip irrigation:
1. No need to purchase material - everyone has plastic bottles.
2. This type of watering is easy to make, even for inexperienced summer residents.
3. Drip irrigation saves time and effort.
4. This watering system is easy to use - just go to the bottle and add liquid.
5. The root system develops due to the fact that all moisture goes under the top layer of soil, thereby feeding only the roots, without spilling over unnecessary territory. It also strengthens the roots of the plants.
6. Water consumption is significantly less and swamps do not form.
7. The excess surface remains dry, which means there are no conditions for weed growth.
Advantages and disadvantages
The drip irrigation technique has pros and cons!
Advantages of the technique:
- Saving water, which is most important in areas where access to water supply is limited.
- Good growth of garden crops due to uniform supply of moisture to the roots.
- Possibility to use heated water for irrigation.
- Minimal physical effort.
- No soil erosion.
- A crust does not form on the soil, so there is no need for loosening, which injures the roots.
- Automation of the process during long-term absence from the site.
- Only cultivated plants receive moisture; weeds are left without replenishment.
The disadvantages of the method include:
- The difficulty of laying structural elements of the system over large areas. In large areas it will be necessary to install a huge number of devices, and their use will lose rationality.
- Inability to use on too dense, heavy soils. In heavy soil, bottles quickly become clogged and will have to be constantly cleaned.
- Lack of moisture at elevated air temperatures. If the summer is very hot, you will have to additionally water the area.
Simple DIY drip irrigation
As already mentioned, this type of watering not only costs almost nothing, but it is also very simple to do.
1. Prepare several plastic bottles and make holes in the bottom of each of them through which water will leak.
* The volume of the bottle depends on the area of the site. The minimum volume is 1.5 liters.
2. Bury the bottles in the ground at a distance of 1 meter from each other.
3. Now simply fill the bottles with water.
* The speed of watering directly depends on the diameter of the holes in the bottles.
* Experts advise making sure that water flows into the ground slowly.
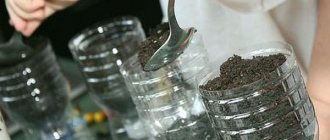
* If desired, you can dilute compost tea in water - it is believed that the water will become more beneficial.
Application of bottles
Such a “dripper” allows you to organize timely watering of vegetation in your summer cottage. The procedure itself is carried out using a storage tank and water itself. The technique of using plastic bottles is simple, but certainly effective, as water is transferred to each individual sprout. The watering material penetrates perfectly into the soil and fills the root system of the plant with life-giving moisture.
Drip irrigation from plastic bottles
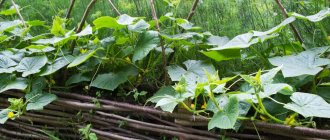
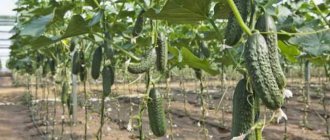
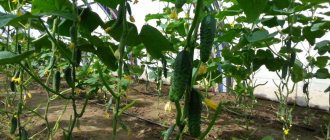
Experienced gardeners know that yield directly depends on both the quantity and quality of watering. Cucumbers need water at room temperature and in large volumes, so spot irrigation will be the best option for many summer residents throughout the summer until the crop is fully ripe.
Important! Overwatering also has an unfavorable effect on vegetable crops, since high humidity is considered an ideal environment for the development of fungal infections.
This plastic sprinkler can be purchased ready-made, but it must be assembled separately and then installed. Many summer residents, in order to save money, make such an irrigation system themselves.
Homemade sprinklers do not require financial investments; the material used is ordinary plastic beer bottles or old barrels. It is worth adding that such systems can be used not only on vegetables, but also on indoor plants, therefore, in case of departure, home flowers will not die.
Do-it-yourself watering system for a summer residence
You will need:
- 2 liter plastic bottles
- screwdriver
- stationery knife.
1. Take a utility knife and make 2 cuts at the base and 2 more cuts in the middle of the plastic bottle.
2. Using a screwdriver or awl, make 2 holes at the bottom of the bottle.
3. Check how much water flows from the bottle. Ideally it should drip.
4. Make a small hole in the ground to place the bottle in.
5. Pour water into the bottle.
How to do watering yourself
You will need:
— 1.5 liter plastic bottle
- screwdriver or awl
— FUM tape
- clamp.
1. Using an awl, make holes in the side of the bottle. To make the process easier, heat the awl - it will penetrate the bottle more easily.
2. Insert the watering hose into the bottle. However, you should first wrap the end of the hose with FUM tape, thereby ensuring a tight connection between the bottle and the hose.
3. Use a clamp to tighten the neck of the sprinkler structure.
* You can also create vertical irrigation. You will need a small stake inserted into the ground. Attach the hose to this post.
4. You can improve the design using regular plastic handles. Use a 3 liter plastic bottle. Make holes in it slightly smaller than the diameter of the pen. Take the handles apart and insert the top half of each handle into the holes.
If necessary, seal the structure with FUM tape.
Make a hole in the lid and insert the hose adapter into it. It is advisable to treat this adapter with silicone glue to make it more airtight. This design will provide water to a large area of your garden and/or vegetable garden.
DIY drip irrigation from plastic bottles
This type of drip irrigation is best suited for plants with a small root system. It will not be able to feed long roots, but is great for watering shallow roots.
You will need:
– plastic bottle with cap (1.5 – 2 l)
- an awl, a small nail with a hammer or a screwdriver
- stationery knife or scissors.
1. Make several holes in the cap of a plastic bottle. This can be done using an awl or a screwdriver. It is advisable to preheat the instrument.
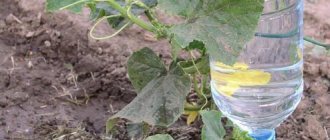
2. Make a small hole next to the plants. It should be deep enough to insert 1/3 of a plastic bottle with a volume of 1.5-2 liters.
3. Using a utility knife or scissors, cut the bottom of the bottle.
4. Insert the bottle into the hole, neck down. Use earth to secure the bottle in place. Place some rocks around the bottle to keep soil out.
5. Fill the bottle with water.
Make several more similar designs for the remaining plants.
Advantages and disadvantages of drip irrigation
Drip irrigation is an ideal way to achieve soil moisture with a minimum of physical costs and financial investments. Of course, this method is not suitable for all crops, it is not autonomous, and it is still not worth replacing it with full-fledged watering. However, we recommend exploring this option and trying to put it into practice to all gardeners who do not have the opportunity to often come to their dacha for regular watering.
What are the advantages of do-it-yourself capillary irrigation:
- Minimum material costs. There are large plastic bottles in any home; you can save them up over the winter or ask them from friends.
- There are many options for homemade designs, each of which is quite simple to organize and does not require any special skills.
- Saving time, effort, finances.
- Easy to use. All that is required from a person is to timely fill plastic containers with water.
- The temperature of the liquid inside the plastic container will gradually increase, heating up in the hot summer sun. Therefore, the plants will receive warm water, more suitable for most garden crops.
- Using a drip system made from an ordinary bottle, it is very effective to apply fertilizers to the soil - their consumption will be less, but at the same time they will get directly to the roots of the plants.
- The rationality of watering really pays off, because the moisture goes directly to the top layer of the earth, thanks to which the roots of garden crops are nourished. The liquid will not form huge mud puddles, evaporating under the scorching rays of the sun. Accordingly, the root system develops better and strengthens faster.
- The absence of moisture on the leaves and stems minimizes the risk of developing diseases caused by excessive humidity. It is also worth remembering that drops of water can cause burns on the leaves, acting like a lens.
- Watering with plastic bottles prevents the growth of weeds, because the soil becomes loose. Due to excess moisture during normal watering, water gets into the spaces between the beds, feeding weeds.
Disadvantages of the method
This method, of course, has its drawbacks:
- In heavy, loamy soils, the capillary system can quickly become clogged, preventing plants from receiving the moisture they need.
- Drip irrigation can hardly replace a traditional irrigation system, because a capillary system can only maintain the required level of moisture. It often becomes useless or ineffective in cases where large areas need to be watered.
Before you start organizing homemade drip irrigation, you need to think through all the little things. For example, the type of crop determines the volume of liquid required and exactly what holes will have to be made for proper nutrition.
Do not forget about the peculiarities of the location of plants - in the beds you need a large bottle, for indoor plants you will need a very small container.
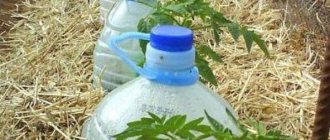
Do-it-yourself drip irrigation for your dacha
You will need:
- plastic bottle with cap
- stationery knife or scissors
- an awl, a screwdriver or a small nail with a hammer
- thin fabric (cotton) or old nylon tights (to create a filter).
A fabric filter is needed to prevent soil particles or small debris from clogging the irrigation system.
The size of the bottle depends on the size of the plant for which watering is being prepared. For example, for one plant, a small bottle with one hole on one side is sufficient.
1. Make holes over the entire area of the plastic bottle. In this case, leave a little more than 2 cm to the bottom of the bottle. There is also no need to make holes in the lid. A 2 liter bottle should contain about 10 holes.
2. Make a hole next to the plant. Its size should be equal to the size of the bottle.
3. Bury the bottle, leaving its neck on the surface.
4. Attach a nylon stocking to the neck.
* The bottle can be closed with a lid, or left without a lid. The only difference is the rate of evaporation of water from the container.
Now just add water to the bottle when needed.
Operation and maintenance of homemade products
For novice gardeners, some practical tips for maintaining drip irrigation systems will be useful:
- You can prevent clogging of irrigation holes from debris and soil using an unnecessary nylon or cotton rag. They wrap it around the vessel. Another method of protection is to line the container with straw so that it covers the holes.
- The number of containers used for micro-irrigation is taken in accordance with the number of bushes. The best option is 1 to 1.
- The number of holes through which water will seep is made depending on the type of soil - the more difficult it is to absorb moisture, the more punctures there should be. So, for sandstone the recommended value is 2-3 pieces, and for loams you will need 5-6.
- The volume of water for irrigation varies depending on a number of factors: weather conditions, soil type, schedule for visiting the summer cottage. For plants in open ground, during the growing season, 3-4 liters per week is enough. When flowering begins and ovaries form, up to 7 liters will be needed. With persistent heat, water consumption increases to 11-12 liters in 3 days. In greenhouses, the amount of moisture increases due to its intense evaporation.
- It is better to install micro-irrigation structures in the ground at the beginning of sowing.
- The vessels are placed at a distance of 15-20 cm from each other from the bushes, immersing them to a depth of 12-15 cm. The containers can be installed both vertically and at an angle (angle of about 40 degrees).
If the crop is not particularly demanding on watering, it is permissible to install one large vessel for 2-4 bushes. You just need to make more punctures.
Do-it-yourself hanging drip irrigation from bottles
This type of watering is more suitable for short plants, including cucumbers or herbs. To make it, you need to make a frame in the shape of the letter P or G.
1. Bury the posts into the ground at both edges of the garden and attach a long stick to them, which should be parallel to the bed. The height should be such that the neck of the suspended bottle is about 50 cm from the ground.
* Bottle length - no more than 40 cm.
*The number of plastic bottles depends on the number of plants.
2. Using an awl or screwdriver, make several holes in the bottom of the bottle. Also make holes in the lid (their number depends on how much you want to water the plant).
3. Cut off the bottom of the plastic bottle, and next to the cut edges, make holes through which you need to insert a wire or strong rope and hang it upside down from the frame.
* Drops of water from the bottle should not fall directly on the plant, but between neighboring bushes.
* Now all that remains is to add water as needed.
Schemes of the future system
To create a rational drip irrigation system with your own hands from plastic bottles, make a schematic planting plan. If you have several beds and greenhouses with cucumbers, a diagram of upcoming activities will help you calculate how many drip irrigation units will be needed.
To create a diagram, follow the recommendations:
- look around the garden;
- enter data on the number of beds in a notebook;
- schematically draw the plantings to scale;
- display the location of the bushes and their number in each bed;
- calculate the number of containers needed for drip irrigation.
If there is a shortage of bottles or dense planting of cucumber crops, use large containers with a side lying arrangement.