Characteristics of the Arosa potato variety
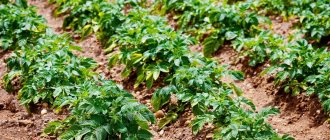
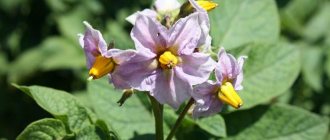
Arosa potatoes are an early ripening variety for universal use. The bush is dense, of medium height, numerous shoots do not fall apart on the sides. Characterized by strong branching. The leaves are green, standard size. Waviness is observed along the edges of the leaf plate. The flowers are purple-red, collected in a corolla. The size of the inflorescences is average. Shoots are uniform.
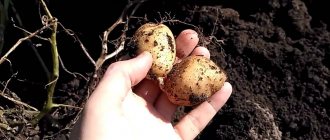
The tubers are oval, oblong, slightly flattened. Weight 70-140 g. The peel is thin, pink with a reddish tint. There are small eyes on the surface. Plant them at medium depth. The pulp is yellow. Does not darken during heat treatment. The appearance of the Arosa potato in the photo matches the description.
Estimated indicators of Arosa potatoes:
- marketability – 96%;
- resistance to mechanical damage – 94%;
- keeping quality – 95%;
- starch content – 13-14%;
- increased drought and cold resistance;
- yield up to 17 tubers per bush.
Step-by-step instructions for growing
Inventory
Advice Arosa is planted in holes or trenches. With the hole planting method, a shovel or scoop will be sufficient. When planting in trenches, it is better to use a walk-behind tractor.
Preparation:
Soils – Arosa is not picky about soil composition, as it adapts perfectly to any conditions. To create the best growing conditions during the autumn preparation of the site, you can apply organic and mineral fertilizers - 1 tbsp will be required per 1 m². l. superphosphate, 1 tsp. potassium sulfate, 1 glass of ash and 1 bucket of humus or compost. In the spring, it is enough to loosen and level the area with a rake to saturate the soil with oxygen.
Planting material - for planting you should choose whole medium-sized tubers (weighing 60-75 g)
It is important that the tubers are free of stains and dents. A month before planting, it is recommended to remove the tubers from the cellar for germination - keep them in a well-lit place at a temperature of +11-16°C
Sprouted potatoes will sprout faster and will most likely produce a larger harvest in the future.
Two weeks before planting, Arosa tubers need to be treated with drugs to prevent rhizoctonia and scab. Suitable for these purposes:
- "Alirin-B".
- "Fitosporin-M".
- "Gamair".
Advice You can also treat the tubers with growth stimulants - “Agat 25-K” or “Cherkaz”. These drugs will speed up the ripening of potatoes and increase their yield.
Boarding time
Arosa should be planted in well-warmed soil - +9-10°C. In the regions for which this variety is zoned, this time falls in the first ten days of May. If the weather conditions are favorable and the soil has already warmed up sufficiently, you can plant Arosa a little earlier.
Scheme
Arosa tubers are planted with sprouts upward to a depth of no more than 10 cm. The distance between holes should be left 35-40 cm, between rows - 70-75 cm.
Care
Hilling is an important component of potato care, as it helps enrich the tubers with oxygen and moisture, and helps strengthen the root system. Hilling is recommended to be done three times - when the first shoots appear (when they grow 8-10 cm), during the appearance of buds and after flowering. If the bushes become too elongated and begin to fall apart, additional hilling can be done.
Watering – Arosa successfully resists drought and does not require regular watering. It is enough to water three times a season - a month after planting, during the appearance of buds and after flowering. Watering should be done in the evening or early morning before the onset of extreme heat.
Loosening is done after each watering or rain. Thanks to this, the crust that forms on the surface of the earth is broken, which delays the flow of oxygen to the tubers.
Weeding is carried out simultaneously with loosening.
Arosa loves feeding very much and responds well to it. The first time fertilizing is done during the appearance of buds and flowering. You can use ready-made potassium-phosphorus complexes or prepare it yourself - mix 15 g of potassium sulfate and 15 g of superphosphate in 10 liters of water
The resulting solution is used to water the beds at the rate of 1 liter per 1 m². Important! 20 days before harvest, you can also fertilize - dissolve 250 g of manure and 20 g of superphosphate in a bucket of water.
Other care measures - no additional special measures are required for Arosa, other than preventive protection against certain diseases and pests.
Pros and cons of potato varieties
German breeders worked seriously to create a new variety. As a result, Arosa potatoes have many advantages that outweigh the disadvantages.
Positive qualities of the Arosa variety:
- high and stable fruiting;
- adapts well to climatic conditions;
- excellent presentation;
- resistance to viral infections;
- long storage period;
- taste indicators;
- low tendency to degeneration;
- uniform shoots.
There are some disadvantages, but they are few. Potatoes suffer from late blight and scab. Therefore, it is worth taking forced measures to treat the tubers before planting. The variety reacts negatively to excess mineral fertilizers, so fertilizing should be done according to the instructions.
Regions suitable for cultivation
Potatoes bred by German breeders are suitable for cultivation in the regions of the Eastern European and Western Siberian plains (Urals, Caucasus). The variety also produces good harvests in the Middle Volga region and Siberia. It is extremely popular in Ukraine, Romania and Moldova.
The Arosa variety is not recommended for growing in regions where light and loose sandy soils predominate. They contain a minimal amount of humus, so additional enrichment with nutrients is indispensable. In addition, sand will not retain moisture, so the summer heat may cause the tubers to simply burn due to exposure to the sun.
Soil dominated by clay is also not suitable. Its high density entails poor air and water exchange. With the onset of spring, alumina warms up later than other types of soil, and melt water often stagnates on them. An additional disadvantage of regions with alumina is increased acidity.
Planting and caring for Arosa potatoes
Arosa potatoes grow in any soil, regardless of the chemical composition. However, there are several recommendations for improving crop fruiting.
- If the planting areas have predominantly peat soil, then it makes sense to dilute it with river sand, humus or compost.
- Humus and peat are added to clay soil at the rate of 10 kg per 1 sq. m.
- Sandy soils are mixed with rotted humus, clay soil or peat.
Caring for potatoes involves complete weeding of plantings, timely hilling, loosening, and treatment against pests.
Selection and preparation of planting material
The yield of the crop directly depends on the quality of Arosa seed potatoes. Main criteria for choosing planting material:
- tuber weight 50-75 g, but no more;
- the presence of a large number of eyes on the surface;
- absence of rot and signs of infection;
- There should be no dents, cuts or traces of deformation on the peel.
Preparation of Arosa potatoes for planting begins 2 weeks in advance. First, it is taken out of the cellar or bought. Then they sort, removing damaged, rotten, limp, diseased root crops. Preventive and at the same time stimulating treatment is carried out with the following drugs: “Gamair”, “Alirin-B”, “Fitosporin-M”, “Cherkaz”, “Agat 25-K”. The substances are designed to protect tubers from diseases and also promote rapid growth.
Arosa potatoes are transferred to a room with a temperature of + 10-12 ° C. Lay it out in boxes in one layer. During the germination process, regular inspection and removal of rotten tubers is necessary. After 2 weeks, the sprouts peck. Vegetables with thread-like sprouts are not suitable for planting. The sprouts must be powerful and large, then the vegetable will produce full-fledged offspring. Arosa potatoes are ready for planting if the pagons have reached 1 cm. To reduce the germination time, the seed material is planted in boxes with peat and periodically sprinkled with water.
Landing rules
Planting is carried out in well-warmed soil. Arosa potatoes feel comfortable at a soil temperature of + 8-10 °C. The soil should still be moist so that the spade bayonet easily sticks together into a lump and does not crumble. They begin to plant Arosa potatoes from the end of April, but it all depends on the weather conditions of the region.
To get a good harvest, the vegetable crop needs to organize a large feeding area. Tubers are placed at a depth of 10 cm at a distance of 30-40 cm. The distance between rows is 70-80 cm. According to the standard pattern, holes or a trench of the required depth are dug. The sprouted root crop must be planted manually so as not to break off the sprouts.
Advice! It is preferable to make rows from north to south. This way the bushes will be better illuminated and warmed up.
Watering and fertilizing
Arosa potatoes need to be watered three times during the entire growing season. However, in dry summers the number of procedures is increased. The water requirement for one plant is 30 liters. It is better to water the bushes in the morning or evening. Approximate timing of irrigation and fertilization:
- 30 days after planting;
- during the budding period;
- after flowering.
Watering can be combined with fertilizing vegetables. Mineral preparations with a high content of potassium and phosphorus are used as fertilizers. Proportions for nutrient solution per 10 square meters. m of planting area: 15 g of potassium sulfate, 15 g of superphosphate and 10 l of water.
3 weeks before harvesting, Arosa potatoes are watered with a mixture of organic and mineral fertilizers: 40 g of superphosphate, 0.5 kg of humus and a bucket of water. Thanks to this procedure, the vegetable will be stored longer.
Attention! Excess nutrients can kill plants.
Loosening and weeding
To saturate the soil with oxygen and retain moisture, loosening is carried out. This procedure speeds up the emergence of seedlings. The process has a positive effect on the development of tubers. Loosen the soil after watering, when the water is completely absorbed and the soil dries out a little. The optimal loosening depth is 3-5 cm. For preventive purposes, this regular action helps to avoid fusarium or bacterial rot and late blight.
By loosening and weeding the soil, you can remove weeds that interfere with the full development of tubers and bushes. Weeds often contain many parasites that carry dangerous diseases.
Hilling
Hilling is the process of raking earth into the lower part of the bush. As a result, the roots branch more strongly. More ovaries appear. With the help of hilling, you can save Arosa potato sprouts from return frosts by covering them completely with soil. The procedure is carried out 2-3 times per season. For the first time, when the height of the shoots is 10-15 cm from the surface of the earth. The second time - during the appearance of buds. The third time was during the flowering period of the culture. The height of the raked earth should be 20 cm.
Hilling Arosa potatoes with dry soil is pointless. The soil is watered first.
Attention! Hilling up may be unplanned if the potato bushes fall apart or stretch out.
Photo gallery
Taste qualities
The taste of root vegetables is excellent. When assessed on a 5-point scale, the taste characteristics reach 4.5. It is worth noting that the taste of the vegetable directly depends on the amount of starch.
Diseases and pests
Arosa potatoes, like other varieties, are often attacked by the Colorado potato beetle and mole cricket. This variety of vegetable crop is susceptible to silver scab, late blight, and rhizoctonia. To minimize crop losses, root crops should be treated in advance:
- By soaking in a special solution for 3-4 hours. The potatoes are then dried and planted.
- Spraying the planting material on both sides with an aqueous solution of fungicide.
- Rubbing the tuber with dry preparations mixed with ash.
Before planting, for medicinal purposes or for prevention, the root crop is treated with chemical compounds: Celest, Quadris, Top, TMTD, Titusim.
Control of parasites
Of the parasites, the Colorado potato beetle and mole cricket are considered the most dangerous, so there are several methods of protection against them.
Tubers are rolled in ash, as it can also be an effective means of protection against parasites.
Spraying
The material is irrigated with chemicals before planting.
"Arosa" also does not have resistant qualities in relation to resoknoniosis; its appearance is provoked by pathogenic microorganisms. This disease can be noticed at the very beginning of the season, in March. Main signs of the disease:
- tubers germinate poorly;
- weak sprouts curl into spirals.
Another parasite that harms crops is mole crickets; they reach a length of up to 4.5 cm. Insects dig tunnels in the ground, while gnawing the roots of the plant and feeding on beneficial substances from them. To get rid of the parasite, use one of the following remedies:
- "Medvedox";
- "Baverin";
- "Rombek".
Harvesting and storage
Experienced gardeners speak well of the Arosa potato variety; it is characterized by long-lasting shelf life. The root crop is dug up at the end of June, after flowering. Young potatoes are already suitable for eating. For storage, the harvesting procedure should be postponed until the end of July. After digging, the tubers are dried, sorted and chopped into boxes with holes for ventilation. For the first two weeks, temperature parameters should be within + 16-17 °C. Afterwards, it is advisable to set the constant indicators at + 2-5 ° C with an air humidity of 80%.
Features of cultivation
Before planting potatoes in the soil, it is recommended to keep the tubers in the sun for 2 weeks so that they turn green and sprout. This operation can be carried out outdoors, indoors or on the balcony.
It is recommended to prepare the area for planting Arosa in the fall. It is necessary to add organic fertilizers to the soil and then dig it up. You can also add potassium sulfate or superphosphate.
In spring, the soil is dug up again and holes or furrows 7-10 cm deep are made. The distance between each tuber should be approximately 20 cm. The distance between rows is 50 cm. The tubers are planted and sprinkled with soil.