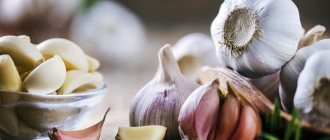
Garlic is a crop grown for many years on the lands of Russian summer residents, which is as popular as onions. The specific taste of this vegetable determines its widespread use, because just one clove of garlic can add incredible appetizing and spiciness to any dish. In addition, the benefits of garlic for the body are undeniable; eating it raw allows the immune system to more effectively fight viral diseases and other ailments. There are a large number of varieties of this crop, but Russians love spring garlic most of all. We will look at growing and caring for this vegetable in this article.
Spring garlic: cultivation and care
The difference between spring garlic and winter garlic
All varieties of garlic are usually divided into winter and spring . Spring crops are planted in early spring, and winter crops are planted in the fall. It is not difficult to distinguish one species from another.
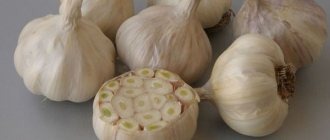
Winter varieties are distinguished by a small number of cloves and an even number (from 4 to 6). The head can be compared to a tangerine: all the cloves are even, of the same size and shape.
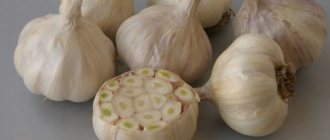
The spring cloves are much larger and can be of different sizes and shapes . Another difference is that in the center of the head of the winter plant there is a trunk - the dried base of the peduncle.
Important! Only spring garlic is suitable for long-term storage. Winter crops are eaten immediately or used for preparations.
Kinds
Garlic can be spring or winter, and the main difference between them is the timing of planting. The first type is planted in spring, the second in autumn. Comparing them, you can identify the following differences:
| Winter | Spring |
| Shoots | The shooter does not form (with rare exceptions) |
| Has an even number of slices (usually 4, 6 or | The number of slices varies from 12 to 20 |
| All the cloves are even, approximately the same size, and the head looks like a tangerine | All cloves are small and of different sizes |
| The cloves are arranged in a row along the contour of the peduncle | The teeth are arranged in a spiral |
| More productive | Less productive |
| Reproduces by cloves, aerial bulbs | Reproduces only by cloves |
Spring varieties are suitable for long-term storage. Winter crops are often used for harvesting and are eaten immediately after harvesting.
The root system of the crop in question is fibrous, consisting of string-like, branching roots with small hairs. Most of the roots are in the arable layer.
How to plant spring garlic
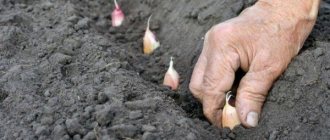
To plant spring garlic, select the largest intact cloves , carefully separating the garlic heads. It is better to do this just before planting, so that the bottom of the cloves, from which the roots will appear, does not dry out.
Small slices are perfect for growing healthy, tasty greens, but in this case it is better to choose a bed in the shade.
Selection and preparation of a site for planting
A well-lit, not damp place is suitable for garlic . Excess moisture can cause rot. In low-lying areas, growing vegetables is possible in high beds. Neutral soil is best. Acidic soil is neutralized with chalk or dolomite flour.
The site is being prepared in the fall . The earth is dug up, 6-7 kg of humus, about 25 g of superphosphates and 20 g of potassium salt are added to each square meter. Before planting spring garlic in the spring, the soil is loosened, leveled and slightly compacted.
The planting site is changed every year - this helps to avoid diseases. It will be possible to return to the same place in 4-5 years.
It will be interesting:
The best varieties of spring garlic
How to grow large garlic in your garden
We protect the future harvest from pests and diseases
Preparation of planting material
Preparation of spring garlic for planting will be determined by the method of storing the bulbs . If in winter they were stored at a temperature of about +20°C, then the new bulbs will grow larger, but may not have time to ripen before the end of the season. If the heads were stored at low temperatures (+6...+10°C), then the bulbs will grow smaller, but will ripen.
Combining these two methods will help you get a stable harvest . Immediately after harvesting, store spring garlic in a warm room, and 1-2 months before planting, place the bulbs in a cool place, such as on a balcony or in the refrigerator. The cooling time is determined by the size of the heads. The larger the bulbs, the longer they take to cool.
It is good to use cloves with overgrown roots for planting . To do this, garlic cloves are immersed for 30 minutes in a solution of potassium permanganate or soaked for a couple of hours in plain water. Then the water is drained, and the cloves are wrapped in damp cloth and polyethylene and placed in a cold place for several days. Plant the cloves with roots carefully so as not to damage the shoots.
To protect against pests, planting material is disinfected in a 0.1% solution of potassium permanganate or 1% solution of copper sulfate.
Harvesting
Spring spring garlic is usually harvested in August, depending on the region, when the feathers are slightly dry. Harvesting should be done in warm, dry weather. The dug up bulbs are shaken off the soil and placed in a dry, ventilated area. The heads can be arranged in rows or hung. Green leaves are cut off after drying, leaving 4-5 cm from the bulb. In this way, the shelf life can be increased to 2 years. To improve shelf life, it is recommended to store it in an open glass container and observe the temperature regime (+20-22°C).
Site articles on the topic
- When to plant tomatoes for seedlings at home, timing of planting tomato seeds in January 2022, lunar calendar of favorable days for seedlings
- Optimal planting dates for different types of fruit trees in dachas in the Moscow region in 2022
- Optimal planting dates for different types of fruit trees in dachas in the Moscow region in 2022
- Optimal planting dates for different types of fruit trees in dachas in the Moscow region in 2023
- Optimal planting dates for different types of fruit trees in dachas in the Moscow region in 2024
You may also find the following materials useful:
- Reasons why you should not apply manure to the hole before planting garlic
- How to care for tomatoes in a greenhouse after planting?
- Cucumber leaves turn yellow in greenhouses and open ground: why and what to do
- Which cucumbers are best to plant in the Moscow region. The best varieties of cucumbers for the Moscow region - cultivation and care
- Growing cucumbers in bags step by step guide
Recommended garlic precursors
When choosing a place for planting, you should pay attention to the root system of the predecessor . Garlic bulbs have short roots, so during growth they actively use minerals and fertilizers from the top layer of soil. Accordingly, the preferred predecessors will be crops with a long root system.
For reference. It is good to plant garlic after grains, pumpkins, legumes, and herbs.
Avoid areas where carrots, potatoes, beets, onions, peppers, and tomatoes used to grow.
Soil preparation
When choosing a place for planting, priority is given to illuminated areas that are protected from the wind and conduct moisture well. The soil must have a neutral pH level and be fertilized with humus. The best soil option for growing spring garlic is loam. If the area is wet, then it is necessary to make high beds. The planting location changes once a year: the crop can be returned to its original bed only after 5 years. The best predecessors are:
- Cereals.
- Pumpkin.
- Legumes.
You should not choose areas where the following grew last year:
- Carrot.
- Onion.
- Pepper.
- Beet.
- Potato.
- Tomato.
- Spices.
The beds need to be prepared in the fall: dig up the soil to the depth of a spade, add humus and organic fertilizers (half a bucket for every 1 m2 of sown area).
The following types of compost are ideal:
- Peat-manure - 1 part peat mixture, from 0.5 to 1 part mullein.
- Manure-phosphorite - a mixture of manure and 1% phosphate rock.
For every 1 m2 of land, 6 to 7 kg of humus is added. Additionally, complex phosphorus-potassium fertilizers are used in the amount of 10-15 g per 1 m2 and wood ash (100 g per 1 m2).
Already in the spring, when planting spring garlic, you need to carefully dig up and loosen the beds prepared in the fall. There is no need to add fresh manure. Perfect for:
- A mixture of humic fertilizers, azofoska and ash.
- Compost from a bucket of humus and 3 tbsp. wood ash.
To improve the structure of the earth you need to add for every 1 m2:
- For clay - a bucket of peat.
- For loamy soil - a solution of 3 kg of humus, 1 tbsp. l. superphosphate, 1 tbsp. l. potassium sulfate and 200 g of lime.
- For peat - a bucket of loam.
- For sandy - a bucket of peat and 2 buckets of clay.
When spring garlic is planted, the beds are often treated with copper sulfate at the rate of 1 tbsp. l. for 10 liters of water. This procedure helps prevent infection with a dangerous fungal disease - fusarium.
After the gardener scatters fertilizers on the ground, you will need to form a planting surface: thoroughly loosen and level, lightly compact the soil. To retain moisture around the perimeter of the beds, make small sides of soil. To disinfect the soil, a saline solution is used: 3 tbsp. l. table salt in a bucket of water.
Planting dates for spring garlic
There is no clear answer to the question of when to plant spring garlic in open ground . The timing is determined by the climate of a particular region. They begin to sow when the soil warms up to +3-5°C. Light frosts are not harmful to crops. You should not delay planting, otherwise there will not be enough moisture in the soil and the bulb will not take root well.
The planting scheme is simple . On the prepared bed, furrows are formed 3-4 cm deep at a distance of 25-30 cm from each other. The teeth are laid out bottom down at intervals of 10-12 cm and sprinkled with earth.
When to plant
To get an excellent harvest, you need to choose the right time to plant spring garlic. This crop has a very short growing season. Therefore, it should be planted as early as possible in the spring: only then will the vegetable have time to form a mature bulb and root system. It withstands spring frosts well: at low temperatures it demonstrates excellent growth and development.
You can start planting as soon as the ground warms up to +5-6°C. The timing of planting spring garlic this season will depend on the weather conditions of a particular area. In the Moscow region and central Russia, the optimal period is the third ten days of April. In rare cases, they are planted in early May, but this may affect the quality of the harvest.
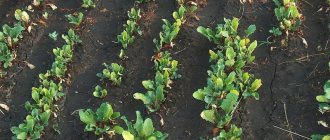
Spring garlic is propagated exclusively by cloves, which are planted in the garden in early spring, as soon as the soil warms up to 5-7 ºC. The roots of spring garlic form and grow at temperatures from 4 to 10 ºC, at the same time the leaves of garlic form and grow. A delay in planting can negatively affect the harvest, since as the air warms up to higher temperatures, the development of the plant stops and the bulb does not form. If you follow the agricultural technology of the species, growing spring garlic and caring for it does not cause any difficulties.
Care
Caring for spring garlic is easy . The plant needs watering and fertilizing, loosening the soil, and removing weeds. Mulching the area with humus, peat or rotted compost makes maintenance easier.
Abundant watering is needed only in the first phase of growth , when the vegetable is growing green. Drying or yellowing feather tips indicate insufficient moisture.
After 6-7 feathers grow, a garlic bulb begins to form . During this period, watering is reduced. Excess water leads to disease and rot. The day after watering or rain, the soil is loosened.
In the second half of August, watering is stopped.
Tying garlic feathers
Tying garlic leaves into a knot is one way to increase yield . The point of the procedure is that at the last stage of growth, all the nutrients go to the bulb, and not to the leaves. However, there is no scientific confirmation of the effectiveness of this method.
Tying is carried out several days before harvesting . First you need to carefully weave the braid, and then make a knot at the end, being careful not to damage or tear the feathers. Don't forget to wear gloves to avoid damaging your hands.
Fertilizer application
Fertilizing spring garlic begins as soon as the first green shoots appear from the ground . The more leaves are formed in April-May, the larger the bulb is formed.
Nitrogen fertilizer is applied first. This can be a solution of mullein in a ratio of 1:10, bird droppings in a ratio of 1:12, herbal infusion, humus or mineral fertilizer. After 14 days, fertilizing is repeated.
At the end of June - beginning of July, the plant begins to form a bulb. Now it's time to apply potassium-phosphorus fertilizers (for example, an infusion of wood ash). Such feeding is done until mid-August.
Harvesting and storing spring garlic
The drying of garlic feathers in August indicates the ripening of the bulb . Garlic is ready for harvest. Cleaning is carried out in dry, warm weather.
The dug up bulbs are shaken off the ground and placed in a dry, ventilated place . It is preferable to arrange the heads in rows or hang them.
After the green leaves have dried, they are cut off at a distance of 4-5 cm from the bulb . Store garlic in fabric bags or cardboard boxes in a cool, dry place. If the necessary conditions are met, the vegetable can be perfectly stored for up to two years without losing its beneficial properties.
Disease and pest control
The phytoncides contained in garlic do not save the plant from pests and diseases.
Spring garlic is attacked by hoverflies, onion flies, moths, thrips, stem nematodes, root mites and garlic mites.
The appearance of insects is prevented by fertilizing with ammonium sulfate . If pests do appear, the affected plants are removed by carefully digging them out along with the roots.
Culture is not immune from diseases . This can be black mold, fusarium, downy mildew and white rot. The main cause of such diseases is excess moisture in the soil and poor-quality planting material.
Spring garlic
Disease Control
This crop is a favorite treat for many pests. Therefore, it is necessary to carry out preventive measures to protect young plants from insects and worms - stem nematodes, hoverflies, onion flies, and root mites. Experienced gardeners advise following several rules:
- Follow crop rotation standards.
- Disinfect soil and planting material.
- Get rid of diseased plants in a timely manner, weed out weeds and apply moderate watering in a timely manner.
- Treat the soil before planting with a solution of table salt (3 tablespoons per 10 liters of water) at the rate of 3 liters per 1 m2.
- When an onion fly appears, you should sprinkle every 1 m2 of soil with a mixture of 100 g of wood ash, 1 tbsp. l. tobacco dust and 1 tsp. ground pepper. After pollination, it is necessary to regularly (once every 4-5 days) loosen to a depth of 2.5 cm.
- To save vegetables from rust during the period of massive growth, you should spray with a solution of copper oxychloride at the rate of 1 tbsp. l. substances, 1 tbsp. l. liquid soap per 10 liters of water. You need to spray the plant twice with an interval of 2 weeks.
The preparations “Gamair”, “Tiram”, “Champion” and “Polycarbacin” are suitable for treating diseased plants (the proportions are indicated in the instructions). To repel pests, you can plant marigolds.
Little tricks and common mistakes
Mistakes made when planting and growing:
- use of low-quality planting material (damaged cloves are the cause of disease and low yield);
- pressing the cloves into the soil when planting (deep planting delays root formation);
- fertilizing the garlic bed with fresh manure (such fertilizing provokes infection of plants with fungal diseases);
- using for planting an area where bulbous crops previously grew (onion fly larvae love garlic leaves and bulbs);
- delay in harvesting (untimely harvesting leads to rupture of the integumentary scales and destruction of the bulb).
Little tricks for care and planting:
- Using mulch, hay and straw will prevent the soil and bulbs from overheating on hot days. The most active ripening of the head occurs at temperatures up to +25°C.
- Maintaining crop rotation. It is fundamentally important to regularly replant plants to another area; only in this case can you count on a good harvest.
- Marigolds, chicory, calendula, planted next to garlic beds, repel the larvae of onion flies and nematodes.
Harvesting and storage
The beginning of mass drying of the lower leaves, lodging of the stem, and yellowing of the ends of the upper leaves serve as a signal to harvest garlic. At the same time, the root system begins to dry out. The timing and conditions of harvesting depend on the varietal characteristics, soil, and weather conditions.
Approximately in the second half of August, when 2/3 of the leaves have fallen and turned yellow, they begin harvesting spring garlic. By keeping garlic in the soil for too long, you risk getting a low-quality product with decaying cloves, a sprouted bottom and cracked scales.
A few weeks before harvesting, stop watering. Choose a dry day for cleaning. The garlic is dug up with a pitchfork, removed from the soil, shaken off and laid to dry. You can dry garlic directly in the garden for 5 days. If it starts to rain, the bulbs are moved under a canopy or into a ventilated area.
The garlic is dried along with the leaves, then the roots of the bulbs are shortened to 3 millimeters, the leaves are trimmed, and the stems are shortened to 10 centimeters. After this, the garlic is sorted by size and stored.
A dry, well-ventilated place is suitable for storing spring garlic. You can weave garlic into braids or tie bunches; you can store the bulbs suspended in a mesh bag or nylon stocking. You can store garlic in wooden boxes made from boards or in wicker baskets. The heads, stored in plastic or glass containers, are sprinkled with coarse salt, which absorbs moisture well.
Popular varieties of spring garlic
There are more than 70 different varieties . From this variety it is not difficult to choose a variety to suit your taste, taking into account climatic conditions, site characteristics and soil.
Here are the most popular varieties:
- Abrek is mid-season, large, perfectly stored, not too sharp, light scales, white cloves.
- Aleisky - mid-season, the bulb is round, flat, stored until spring.
- Gulliver is medium late, productive, the bulb is round, slightly flat, the scales are light. Little susceptible to diseases and pests.
- Elenovsky - mid-season, productive, rounded heads. The color of the scales is whitish on the outside, and pinkish on the inside of the cloves themselves. The variety is resistant to diseases.
- Sochi-56 is mid-season and produces a stable and high-quality harvest. The shape of the head is slightly flat and round. The color of the scales can be white or purple, and on the teeth themselves – pink with a purple tint. The variety is resistant to diseases.
Variety selection
The efficiency of growing spring and winter garlic largely depends on the correct choice of variety: it is advisable to buy a local variety, since the vegetable is a locally grown crop. So, for residents of Siberia, the varieties “Sibirsky” and “Novosibirsky 1” are suitable, and for the middle zone - mid-season varieties (“Moskovsky”, “Ershovsky” and “Elenovsky”).
The most popular “spring” varieties are:
- “Permyak” is mid-season, perfect for the northern regions. The head has an oval, slightly elongated shape. The scales are light white. The weight of the bulbs is up to 37 g. The number of teeth is from 14 to 17. It has a moderately pungent taste and contains a large amount of essential oil. The yield is on average 300 g per 1 m2. Shelf life – up to 10 months.
- “Porechye” is mid-season, with tall leaves (up to 49 cm). The head weighs 25 g and consists of 15-20 cloves. This is a high-yielding variety - up to 900 g can be harvested from 1 m2. It can be stored for about six months.
- “Nugget” - the bulbs are white, pear-shaped and weigh 67 g. The number of cloves is from 20 to 22 pieces. Productivity reaches 500 g per 1 m2. Shelf life – up to 10 months.
- “Shunut” - the head has a spherical shape and weighs up to 48 g. One bulb contains up to 16 cloves. Productivity – 400 g per 1 m2. Shelf life – 10 months.
- “Gulliver” is a mid-late southern variety with a growing season of 3 months. The bulbs weighing 95-120 g have a slightly flattened spherical shape and contain up to 12 segments. It has a spicy, rich taste. Resistant to diseases. High-yielding - from 1 m2 you can harvest up to 1 kg of crop. Shelf life – 8 months.
- “Moskovsky” is a universal mid-season. The bulbs are small, weigh only 14 g. They have a slightly pungent, spicy taste. The yield is small - only 300 g per 1 m2. Characterized by excellent immunity to putrefactive fungi.
It is also worth paying attention to such semi-sharp varieties as:
- "Countryman."
- "Victoria".
- "Uralets".
- "Demidovsky".
- "Ershovsky".
If you need a spicy variety, it is recommended to buy “Sovet” or “Abrek”.