Cherry grafting methods
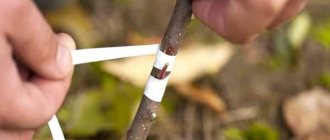
There are various ways to plant cherries. The simplest and most accessible for people taking their first steps in gardening are split grafting, copulation and budding. The essence of budding comes down to the relocation of axillary buds to the rootstock. The grafting material is given the name “eye”. The operation must be carried out with a special budding or sharpened disinfected blade. You will also need to stock up on PVC tape. The algorithm for performing the procedure is as follows:
- Select a good bud and cut it off along with the scutellum (part of the bark). The shield should be approximately 200 mm in length; it is laid out on a layer of moistened fabric so that the cut surface does not dry out.
- Part of the rootstock is provided with a T-shaped cut.
- The eye is inserted between the flaps of the incision and pressed so that only the kidney is visible from the outside.
- The structure is wrapped with electrical tape, with the adhesive side facing outward, so as not to damage the bark when removed.
The viability of the crop and a number of important indicators, such as fruit taste and yield, depend on the choice of the optimal grafting method.
Some gardeners recommend building small greenhouses made of plastic film around the grafted cuttings. However, the sun's rays can burn the graft, so you should weigh all the risks before making such a decision.
Important! Budding is considered the least traumatic method of grafting.
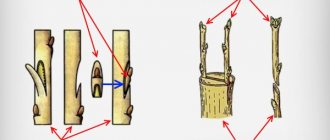
The “split” option is simple. Whole cuttings are used as grafting material. The following tools will be required: a knife with a sharp blade, a file and garden pruners. To graft a cherry into a cleft, you need to follow the following sequence of actions:
- Prepare a cutting that has 2-3 normally developed buds. The lower end is processed with a knife until a double wedge appears. The thickness of the shoot should be several times less than the cut length.
- If the diameter of the rootstock is too large, a cut is made at the required height. If the thickness of the rootstock and scion is equal, use garden pruners.
- At a depth of 4.5-5.5 cm, an incision is made along the diameter of the cut. To prevent the cleft from closing, a special peg is placed in it.
- The cutting is inserted into the cleft by cutting it to the maximum permissible depth. If the rootstock is too thick, the cutting is placed at the edge so that both cambium and bark coincide.
- The rootstock is tightly wrapped with electrical tape (not the sticky side) to ensure a perfect fit between the rootstock and the scion.
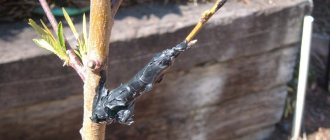
- The end side of the split is covered with garden varnish to achieve complete tightness.
You can graft a cherry from a scion using a simple copulation method if the diameters of the scion and rootstock are identical. For this manipulation you will need: a knife with a sharp blade or a special knife for copulating, garden pruners and adhesive tape. A tool designed to adjust the angle is made from a piece of metal or plastic pipe of small diameter.
You can graft cherries using the simple copulation method using the following algorithm:
- The cutting is inserted into the pipe until the lower end is slightly peeking out.
- Using a knife, make a cut along the line of the end of the pipe.
- The rootstock is shortened to the required height using garden pruners. A tube is then placed over it to make an identical cut.
- The cutting is applied to the rootstock using the cut-to-cut method so that the tissues match. The docking area is wrapped with adhesive tape.
The advantages of simple copulation are accessibility and a high survival rate. The disadvantage of this method is the lack of strength in the fusion area. Cherry has fragile wood, so the most reliable method that guarantees a decent result if done correctly is budding.
Preparation and storage of cuttings
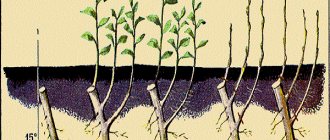
Cuttings for spring grafting are harvested mainly in November, after the end of leaf fall and the tree going into hibernation. It is also possible to harvest cuttings at the beginning of December, but provided that there were no severe frosts. Harvesting cuttings during the January and February thaws is impractical - the survival rate of such a scion is close to zero.
Only annual shoots (grown over the past spring and summer) with a diameter of 5-6 cm are suitable for cuttings. A prerequisite is that the cut cutting has an intact growth bud at the top and several formed leaf buds on the sides of the cutting.
But it is much more important (and much more difficult) to preserve the cut cuttings until spring. The best option for storing them is in a mixture of peat, sawdust and sand. The cuttings are placed in this mixture, brought into the cellar or basement and left to wait until spring, making sure that the mixture always remains slightly damp. Cuttings are preserved in this way in the spring and take root best.
If you don’t have a cellar or basement, you can also store the cut cuttings in a refrigerator near the freezer. The cut cuttings are wrapped in several layers of moistened cloth, then, to prevent the moisture from evaporating, they are packed in a plastic bag and sent to the refrigerator.
Spring grafting of cherries with freshly cut cuttings is also practiced, but it is not always successful. But with summer and autumn grafting there is no choice - they are carried out only with freshly cut cuttings.
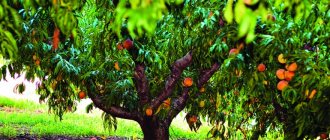
What is the best way to graft cherries?
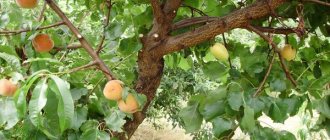
You can graft cherries onto different crops, but not all experiments are successful
Gardeners are experimenting with various rootstocks: plum, cherry, blackthorn, sweet cherry, apricot. The most popular and reliable rootstock tree is wild cherry.
Grafting cherry onto cherry
Intraspecific grafting is quite common and allows you to graft a varietal crop onto wild cherries. The tree becomes resistant to dry weather, coccomycosis and increased carbonate content in the soil.
Grafting cherry onto bird cherry
Bird cherry is a crop that is resistant to parasites and unstable temperature conditions, so you can plant cherries on it in almost any garden plot. However, the overwhelming number of varieties are grafted exclusively onto a variety called Antipka.
Grafting cherries onto plums
Grafting a cherry onto a wild plum means changing the taste of the fruit for the better, making it sweeter and increasing its size. The ripening time is significantly reduced, resistance to stress and immunity against a number of diseases inherent in stone fruits increases. If plum is chosen as a rootstock, it improves growth and nutrition, and cherry, in turn, has the most favorable effect on the taste of the berries.
Such crossing allows you to achieve an extraordinary taste and aroma of the fruit and guarantees an early harvest.
Grafting cherry onto rowan
Despite the fact that rowan is a member of the Pink family, it is unlikely that it will be possible to graft cherry onto it. Experimentation is not prohibited, but most likely time will be wasted.
Grafting cherry onto blackthorn
To graft a cherry onto a thorn tree, you will have to tinker a lot, because... The rootstock is distinguished by a large number of root suckers, the fight against which is a very troublesome task.
Grafting cherries onto cherries
Even a novice gardener can graft cherries onto cherries. This is worth doing to increase frost resistance and get rid of a number of problems characteristic of stone fruits. The place for intraspecific grafting should be located at a level of 15-22 cm from the ground. The optimal method is enhanced copulation with a cut of approximately 40 mm.
Cherry grafting onto cherry plum
There are different opinions about what the consequences will be if you graft cherry onto cherry plum. Some gardeners believe that such manipulation significantly increases productivity and stress resistance. Cherry plum is known as the “Russian plum”. It received this name due to its high tolerance to negative temperatures. However, cherry cuttings do not take root on it in the best way, so the operation requires certain knowledge and practical skills from the gardener.
Grafting on pear and apple trees
Grafting cherries onto a pear or apple tree is not the best idea. It is very difficult to achieve positive results; most likely the harvest will be small, and the tree will become very vulnerable to parasites, diseases and temperature deviations. Attempts to combine stone fruits and pome fruits usually lead to negative results.
Cherry grafting onto apricot
Apricot is not the best choice as a rootstock for cherry crops. This combination has a low percentage of fusion, and the resulting tree will have fragile branches.
At what time can cherry trees be grafted?
The optimal time of year for grafting cherries is spring, when sap flow is most active.
Attention! You can also plant cherries with the onset of autumn: after the first leaves fall before the onset of frost.
The difficulty is that it is very difficult to preserve them until spring. It is necessary to create ideal conditions under which the branches will be able to maintain moderate humidity, but at the same time will not rot and freeze, and will not awaken prematurely. The deadline for cherry grafting in the Moscow region is the last days of April. It is better to graft cherries using the advanced copulation method.
Why do they do this?
Novice gardeners are not always aware of the benefits of cherry grafting.
Crossing plant fragments with buds and cuttings is necessary for:
- preservation of varietal properties of cherries;
- improvement of yield indicators. The grafted cherry will be ready to bear fruit within 2 years. Trees that have not undergone the splicing process and have sprouted from seed will take about 6 years to begin bearing fruit;
- increasing resistance to pathologies and pests. Hybridization of crops increases the immunity of the resulting plant and reduces the degree of exposure to negative environmental factors.
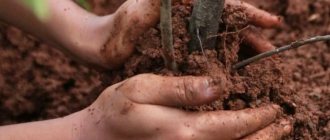
How to properly graft a cherry tree
There are various methods to properly graft a cherry tree.
Budding involves grafting with an eye (one bud), and copulation with a cutting, when the rootstock and scion have identical thickness
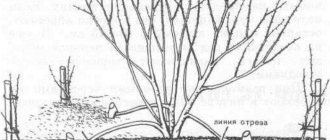
Both options can be implemented through a side cut behind the bark or into the butt. For beginners, the best method is grafting into the cleft. This method is the simplest and does not allow serious mistakes. To plant cherries in the spring step by step, you will need cuttings up to 16 cm in length with a couple of buds and the following algorithm of actions:
- They take the rootstock (the diameter of the branch is up to 6 cm) and make a cut, after which they clean it with a sharpened blade.
- Using an ax or a sharp blade, a split is made in the center of the rootstock branch, the depth of which should vary between 9-10.5 cm. If the split is too dense, you need to move the blade in different directions so that the cuttings fit into them.
- On one side of the cutting you will need to make a couple of side cuts to obtain a wedge. The depth should be identical to the length of the cut.
- After removing the hatchet, instead of it, you need to insert a small chop made of wood or a screwdriver, which will prevent the sides of the rootstock from closing. The cutting is placed in the area of the cleft so that the cambial layers coincide.
- The screwdriver must be removed without moving the scion. If the scion is thinner than the rootstock, a couple more cuttings are placed in the split.
The top of the rootstock is tied with adhesive tape. The area of the upper even cut on the grafted cutting and the grafting site are coated with a special varnish. Then they take a polyethylene bag and build a small greenhouse into which the grafted cutting is placed. This ensures that the required level of humidity in the grafting area is maintained. It takes root after 11-15 days, after which you can get rid of the package that acts as a greenhouse. It is not recommended to remove the adhesive tape until the scion and rootstock are completely fused.
How to properly plant cherries in spring
Grafting cherries into clefts in the spring is done using material purchased at the market or cut yourself in the spring.
Cherry cuttings
Harvesting cherry cuttings in the spring is carried out according to the following algorithm:
- The mother tree is inspected for the presence of normal shoots that appeared in last year's growth. They are distinguished by their shiny, glossy, thin and reddish bark.
- You need to make sure that the shoot contains only buds with sharp tips. Last year's growths with round buds are best suited for fruiting cherry crops.
- To cut the shoot, you need to use pruning shears, which remove buds from the tops and cut sticks up to 31 cm in length. Each cutting should have 4 buds.
The procedure should not be carried out in too hot or rainy weather. The most preferred time to plant the crop is a cool, cloudy day. It is not recommended to graft cherries with buds; it is better to carefully remove most of them before merging.
How to graft cherries in summer
Summer grafting of cherries with green cuttings is considered more problematic and complex than grafting done in the spring. Cherry can only be grafted onto a defect-free crop with a trunk of 6 cm in diameter and above.
Harvesting cuttings
Taking cherry cuttings is a streamlined process.
During harvesting, it is not recommended to take cuttings from several bushes of different varieties at once; cuttings can easily be confused. Therefore, you need to finish one tree first and then move on to the next one. It is recommended to take cuttings early in the morning or in the evening. It is advisable to do this in cloudy weather. Having chosen a good, healthy branch, it is cut into several parts. To cut cuttings you need to take a sharp knife or razor. If you cut cuttings with a dull knife, their vascular system will be damaged.
All cut cuttings must be tied into bunches and a tag indicating the variety should be hung on each bunch.
Propagation of cherries by cuttings: the right time to take cuttings
Cuttings can be taken from cherry trees throughout the summer. Many gardeners do this from early spring until autumn. The most favorable time to start cutting shoots is the end of May. By this time, the cherry blossoms end.
The first spring cuttings are cut from the tops of last year's shoots. It is advisable that there are no ovaries on them. In summer, it is preferable to take cuttings from the current year's shoots. Autumn cuttings are taken after the leaves have fallen from the cherry tree. This usually happens at the end of October.
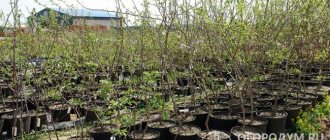
Selection of ready-made seedlings
When purchasing seedlings, by looking carefully at their roots, you can determine how they were grown.
If the root is straight and rod-shaped, then the plant was grown from seed. The root system of the seedling is fibrous - it was obtained using vegetative propagation. And if a bend in the trunk is visible a little above the root collar, then the seedling has been grafted.
Features of cutting cuttings
Procurement of seedlings has its own characteristics. Before you start taking cuttings, the mother tree needs to be watered abundantly. This is done a couple of days before harvesting; the cherries are watered generously. This is necessary so that the wood tissue is well saturated with moisture.
If cuttings are cut in summer, then after cutting they need to be soaked for one and a half to two hours in clean water. After soaking, their lower ends must be treated with Kornevin solution. The cuttings can then be planted in the nursery. Cuttings cut in the fall are processed and stored.
The length of the cut cuttings should be on average 10 cm. Each cutting should have three or four buds. Under the bud, 5 mm lower, it is necessary to make a straight cut so that the first roots begin to form. An incision is also made above the upper kidney; it should go in the direction where the kidney is facing.
All leaves must be removed. Then the cuttings need to be placed in water. To make rooting happen faster, you can add some means to the water to speed up root formation.
If the cuttings cannot be planted immediately, then you need to spray them with water, preferably using a spray bottle, and pour them into a plastic bag or wrap them in film.
Cherry care after grafting
The grafting site is wrapped with electrical tape or plastic wrap, with a couple of turns of rope on top. Do not wrap tightly, as this may cause harm to the tree.
After the first buds bloom, you should get rid of the binding material, leaving only a layer of electrical tape
Remove it when the first leaves begin to fall. After the buds swell, the weakest ones are pinched off, leaving 2-3 of the strongest ones. Thanks to this trick, the tree will not lose sap, which will have the best effect on its development.
Required Tools
For cherry grafting to be successful, the procedure must be carried out quickly. To do this, the gardener must have a sharpened, disinfected tool at hand: a budding knife, a small ax, a garden saw. To fix the scion with the rootstock and disinfect the cherry grafting site, you need to prepare thick plastic film, electrical tape, and garden varnish in advance.
Budding tools
A wood disinfectant can be prepared at home using the following recipe:
- melt 200 g of crushed beeswax in a water bath;
- add 400 g of rosin crushed into dust;
- when the components melt, pour in 100 g of heated fat (pork, lamb or beef);
- move the dishes with the ingredients to the fire and cook, stirring constantly for 30 minutes;
- cool the cooker;
- transfer to a glass jar for storage and cover with a strong lid.
Advice from experienced gardeners
When preparing cuttings, you need to take into account that annual shoots are strewn with buds. They prefer long shoots with a small number of flower buds.
Important! The scion and rootstock must be young and healthy.
If a candidate rootstock has been discovered in the forest, then the transplanted tree must have the opportunity to take root and adapt to the new location. It will be able to turn into a full-fledged rootstock only after a few years. Grafting cherries during flowering is possible only if you have certain experience and skills.