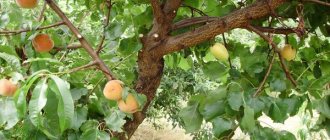
Spring grafting, grafting an apple tree with cuttings in the spring onto an old, mature tree, an old mature apple tree.
Tree grafting is a vegetative method that allows trees to propagate. Almost all trees can be grafted, including apple trees. Over time, each apple tree becomes old, produces little fruit, and the fruits decrease significantly. In order to prevent the aging of the apple tree and preserve the fruits, it is necessary to graft the tree. How to properly graft an apple tree? Read about it below.
Grafting apple trees in spring for beginners: methods
With the help of grafting, you can increase the lifespan of the apple tree, plus you will get an excellent harvest. If you do not have a very large garden, then you can save the day by grafting. And all because it is recommended to graft several species onto one apple tree at once, or add branches of other trees, for example, pears.
Having followed all the rules, you will end up with a tree, thanks to which you will collect not only apples, but also other types of fruits. Also, using this method, you will propagate apple trees of the variety you need and rejuvenate the old tree.
Grafting an apple tree has its main advantages:
- The fruits begin to ripen much faster.
- Thanks to grafting, other types of apple trees can be developed.
- The tree's immunity increases significantly, after which the apple tree is able to withstand many negative influences of the external environment.
- After grafting, the crown is renewed, plus resistance to severe frosts increases.
- And most importantly, thanks to grafting, you can get a wide variety of fruit varieties in a very small area.
Grafting apple trees
There are several types of grafting. We will highlight the most important ones:
- Standard vaccination. As a rule, this type is used for young apple trees.
- Into the cleft The method allows you to obtain an increased percentage of tree survival, therefore, it is considered the most common among gardeners. Thanks to this species, you can graft a young cutting onto an old tree or get a new variety by grafting a mature branch.
- Budding. In this method, a bud is grafted, which is taken from another tree.
- Grafting in the side cut. In this method, grafting is carried out into the side cut of the tree bark. As a result, both parts grow together faster.
- Grafting using a grafting pruner. It is advisable to vaccinate in mid-spring.
- Ablactation. Suitable for saving a tree that is damaged. It is carried out in May, the scion is applied to the rootstock using the method of rapprochement.
Preparation of apple tree cuttings
You need to know the tree from which you will take cuttings:
- Graft your good one onto another tree.
- Neighbors and friends really liked this variety.
Take:
- A good variety, productive, resistant, not susceptible to diseases.
- On the southern side and its most illuminated part.
- Leafy one-year shoots at least 40 cm long with 6-8 buds.
Do not take:
- Short, thin, tops, damaged.
- From sick trees.
Deadlines
Preparation time:
- From autumn after the leaves fall, but before the onset of severe frosts.
- If you cut them after the first frost, they are considered to be better seasoned.
- In the spring it is possible if the winter was mild.
Attention! After severe frosts, the branches may become frostbitten.
How and where to save cuttings until spring?
Store in basements:
- Tie the prepared cuttings into bundles according to variety and attach tags with names.
- Prepare a box with wet sand and sawdust.
- Choose a place that is dry and cool.
- Temperature 2-5 degrees.
- Periodically (once a month) moisten the substrate.
If there is no basement, but there is plenty of snow in winter and it remains for a long time:
- First into damp burlap.
- After snow falls - into snow piles without burlap.
Not everyone has such basements and snow (after all, in most basements and cellars the temperature ranges from 14-15 degrees and even below minus).
But there is in the apartment:
- An equipped balcony or loggia where the temperature does not drop below zero degrees.
- Space for vegetables in the refrigerator.
- Wrap the cuttings in a cloth moistened with water (melt or rain). Place in a plastic bag and place them in the refrigerator.
- Review their status monthly.
Preparation of cuttings
- The day before grafting, soak the cuttings completely in water.
- Let dry and wipe with a cloth.
Watch how apple trees are grafted in the spring, video lesson on preparing cuttings:
Grafting apple trees in spring for beginners: which month is better, timing
Theoretically, you can graft an apple tree at any time of the year. Here everything will depend on the climate of the area and the grafting method.
Spring grafting
Spring is the most ideal time of year when you can vaccinate. After all, after the sap begins to move inside the tree, the scions take root better.
- It is advisable to graft an apple tree using cuttings in early spring, from March to April. It is at this time that the frosts should end.
- Spring vaccination has its own advantages. For example, if your scion does not take root, you can graft the tree in the summer without losing a year.
Summer vaccination
From July to August, fruit trees begin to actively produce sap again. Therefore, for this period of the year, budding using a “sleeping” eye is suitable. In the southern regions, it is with the help of this method that apple trees are grafted from August to September.
Plant an apple tree in spring
Autumn vaccination
In the fall, professional gardeners do not recommend vaccination. But, if the weather permits in September, you can graft using the “eye”.
For September and October, other grafting methods are suitable. For example, in the cleft. It is worth considering that young rootstocks take root well in the fall. But grafting will cause harm to an adult apple tree.
Winter vaccination
This grafting is only suitable for trees that grow indoors. Hence, it is called “table grafting”. Using this method, you can graft seedlings for spring planting.
- Tree seedlings, as a rule, are grafted from the beginning of winter to March.
- Grafting will be successful if the rootstocks are stored properly in winter. Keep seedlings with cuttings in a cool place where the temperature is approximately 0 degrees.
When is the best time to graft an apple tree?
Vaccination activities can actually be carried out at any time of the year. However, each season has its own nuances. If the procedure is performed properly, but at the wrong time, the graft simply will not take root, and the tree may become sick or even die.
A scion is a cutting (shoot) that is fused to the rootstock. The rootstock is the lower part of the grafted tree.
In the spring, grafting work is carried out at the beginning of sap flow, that is, when the tree is at rest and the buds have not yet awakened. This is explained by the fact that at this time the processes that occur in the tree are aimed only at maintaining life. If the growing season has not begun, then the cutting simply will not be able to take root. Determining the timing of spring vaccination is quite simple:
- the buds have barely swelled, but their growth has not yet begun;
- the branches of the tree took on a red tint;
- under mechanical action, the bark separates and the cambium remains on it.
Cambium is green tissue located under the bark.
When grafting a cutting, it is necessary to combine the cambial layers of the scion and rootstock
Depending on the region and climatic conditions, spring grafting occurs at the end of March or beginning of April. At later dates, the grafted material will most likely be rejected.
As for the summer period, most gardeners do not carry out such procedures at this time. It is generally accepted that the scion takes root very poorly, and the tree itself can only suffer from such an operation. However, it is not always possible to vaccinate in the spring, because there may simply not be enough time. If you approach the issue at hand more seriously, you can find out that grafting an apple tree in the summer is possible, but within a certain time frame:
- the fruits begin to fill;
- an apical bud has formed on the shoots;
- the bark, just like in spring, is easily separated from the wood;
- on annual shoots, the internodes of the upper part were reduced.
In the summer, vaccination is best done at the end of July.
Splitting in the fall is not suitable for every region. So, in areas characterized by early frosts, all the work can go down the drain. If for some reason it was not possible to graft an apple tree in spring or summer, then it is permissible to do it in early autumn, and more specifically, in early September. In regions with warm winters and late frosts, work can be carried out until mid-October.
Winter vaccination is carried out indoors, so all materials are prepared in advance:
- one- and two-year-old rootstocks are dug up in late autumn and stored in a frost-free room;
- cuttings with 2–4 buds are used as a scion, which are harvested at the beginning of winter.
The rootstock is brought into the warm place 7 days before work, and the cuttings 2–3 days before. In terms of timing, winter grafting is carried out in mid-December, and grafted seedlings are planted approximately in the second half of March. Store planting material at a temperature of 0…-4˚С.
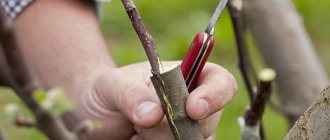
How to make a graft and prepare an apple tree for grafting: description
Do you have several apple trees in your garden, but are you getting little fruit from them? Therefore, you can graft the plants. How to properly prepare an apple tree and how to graft?
- For this job you will need a well-sharpened knife. Vaccination is similar in complexity to a surgical operation, so be extremely careful and don’t miss a single detail. Decide from the very beginning exactly when you will get vaccinated. If you decide to graft in the spring, then choose a method using a cutting from another tree. But in the summer you can safely graft an apple tree onto a bud.
- Prepare the cutting after the first frost has passed. Use a sharp knife while working. Use it to cut off a young branch that grows upward. Make the cut so that it is 3 times the width of the branch. Remove the top of the cutting. You should end up with a cutting that is 30 cm long. Store the cutting in a cool place, immerse it in a box filled with sawdust or sand.
- In the spring, after the buds swell, prepare the cuttings. Wash your hands thoroughly before working. Cut a branch of the apple tree so that the cut is the same as the rootstock. Do this immediately before the main work. Place the oblique cuts next to each other. This way they will grow together faster.
Apple scion
- If the diameter of the branches is not the same, then use the “bark” method.
- It doesn't matter which vaccination method you decide to choose. Most importantly, make sure that the edges of the scion and rootstock are in close contact.
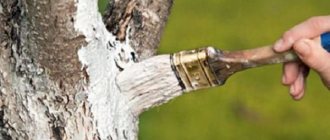
- Never use electrical tape for work. Since there is glue on it, the scion will not grow to the rootstock. Use plastic film, wrap it around the graft and apply oil paint or drying oil over it. Apply the graft several times and loosen the bandage after a couple of weeks. After the buds open, you can safely remove the bandage.
The best rootstocks for apple trees
The ideal rootstock for apple tree cuttings can be considered seedlings of cultivated apple tree varieties or mature trees. Grafting of seedlings can be done on young “wild” ones that you dug up in the forest or grew from seeds.
What else can you graft an apple tree on? There are several alternative rootstock options:
- Rowan;
- chokeberry (chokeberry);
- hawthorn;
- viburnum;
- quince;
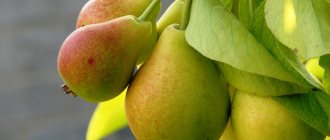
- pear.
When grafting an apple tree onto “non-native” rootstocks, it is worth considering some nuances:
- such grafting is not very durable compared to the classic grafting of apple tree onto apple tree;
- the apple tree takes root worse on chokeberry than on red rowan (ordinary);
- Rowan rootstock gives the apple tree winter hardiness, but due to this “relatedness” the fruits may become smaller. The same problem also applies to apple trees grafted onto hawthorn, viburnum and quince;
- an apple tree can be grafted onto a quince as an experiment, because the likelihood that the scion will take root well and bear fruit abundantly is not very high;
- The pear takes root well on the apple tree rootstock, but it itself “accepts” the apple tree scions less well. Therefore, such a grafting should also be considered as a horticultural experiment.
Despite all the “buts,” grafting apple trees onto alternative rootstocks is often used by gardeners. Especially when there is a choice: cut down an unnecessary rowan tree or try to graft a valuable apple tree variety onto it.
It is best to graft an apple tree onto such rootstocks in the following ways:
- improved copulation;
- into the cleft;
- into the side cut;
- for the bark.
Grafting apple trees in spring for beginners with grafting pruners: description, video
With the help of a grafting pruner, you can make a high-quality grafting of a tree, even without much experience. It is advisable to carry out the vaccination process using this method in April, or even later, but not earlier.
A pruner is a simple and affordable tool. Therefore, you can easily do the job:
- Using pruning shears, make a cut on the rootstock.
- Make a cut on the scion as well. Make sure that the shape of the cut is the opposite of that of the rootstock.
- Connect the joints, then treat them with varnish.
- Wrap the joint with twine, or you can also use a special film.
This method is suitable for cuttings whose length is no more than 13 cm. As a rule, grafting pruners have spare attachments that can be changed. When deciding which pruning shears to buy, pay attention to models that have a ribbon spring and a blade.
What should be the temperature during vaccination?
In order not to make a mistake with the choice of timing, you can focus on the weather.
To carry out spring work, it is necessary that the average daily temperature exceed 5 degrees.
It is necessary to take into account the possibility of return frosts. If they are possible, grafting apple trees should be postponed.
In summer, work should be planned for cloudy or cloudy days without precipitation. If it is hot, you should try to complete the operation before sunrise.
In autumn, you need to carefully monitor the weather forecast. Vaccination activities should be completed at least 2 weeks before the temperature drops to +10 (+15) degrees.
Depending on climatic conditions, the timing of vaccination work may differ for different regions.
Grafting apple trees in spring for beginners into cleft step by step: diagram, description
For grafting, take a cutting that is about 2 times larger than the size of the rootstock. Next, perform the following manipulations:
- Cut down the branch using a sharp hacksaw. From the bend, the size of the branch should be 15 cm, if from the trunk, then the size should be 30 cm.
- Split the branch lengthwise in the central part or on the side. It all depends on the thickness of the branch itself.
- Prepare the cuttings in advance, it is better to take a couple of cuttings. Leave 3 buds on the cutting and make a wedge cut on it. The length of the size should be 3 cm.
- It is ideal for the branch to have hangers or ledges.
Reproduction
- To make working with thick branches more comfortable, take a wedge.
- Insert the cutting into the place where it matches.
- Using a varnish, treat all joints.
- Wrap the film very tightly around the joint.
- If you get several vaccinations, after a certain time, keep the one you think is the best.
This method allows you to obtain excellent survival rates over time. With the help of such a grafting, you can place a young branch next to an adult tree. Use the method in spring, around April.
What materials and tools are needed
The following materials and tools are required for work:
- A copulating knife with a “bone” – separates the bark from the wood.
- Secateurs - cutting cuttings.
- Garden saw - cut thick branches.
- Flat-head screwdriver - push apart the dissected trunk of the rootstock.
- Garden varnish - the cuts are processed.
- Electrical tape - isolate the vaccination site.
- Alcohol - disinfects garden tools.
Tools must be clean, sharpened, and disinfected.
Grafting apple trees in the spring for beginners into the trunk step by step: diagram, description
This method is based on the following: a cut is made in the bark of the rootstock, as a result of which both parts grow together much faster. The method is used to rejuvenate the crown of the apple tree. The most ideal time is when the tree has not yet begun to produce sap and the buds on it have not begun to swell. As a rule, this happens around the month of April.
In order for your apple tree to give a good result after grafting, you must strictly follow these steps:
- Make a wedge at the bottom of the cutting. Cut both sides of the wedge to create an acute angle.
- Make a sharp cut on the side of the rootstock too. The length of this cut should correspond to the wedge on the scion. Try to cut off more wood along with the bark, but not much.
Fruit grafting
- Insert the cutting, lubricate the joint using garden varnish.
- Wrap film over the joint.
- Shorten the cutting by about 10 mm so that the cut is above the 2nd bud. Seal the cut using garden varnish.
How to care
Grafting is a complex process for a tree; it is important to provide good conditions for growth and development at first. There is nothing complicated in care, but if you do not follow the recommendations, the likelihood of death increases significantly. Remember the following:
- Inspect the bandage; if ants or other insects appear, destroy them.
- When the grafting site begins to thicken, loosen the bandage so that it does not press on the wood and deform it.
- If it is clear that the cutting has taken root well, you can remove the reinforcing part.
- Water the tree during dry periods. Do this approximately once every 10 days.
- Apply complex phosphorus-potassium fertilizers 2-3 times per season; if there is a shortage, splicing worsens.
- In the first winter, insulate at least the grafting site. It’s better to wrap the entire trunk with agro-canvas in several layers to protect it from frost.
Advice!
All branches located below the grafted part must be removed. They are wild and will not produce normal fruit.
For columnar apple trees, wild apple trees cannot be used as a rootstock. It is better to purchase a special version. If the plant is small, install a fence to protect it from damage by pets.
Grafting apple trees in the spring for beginners into stumps step by step: diagram, description
You may have encountered a situation where:
- There is an old apple tree in the garden, but it no longer bears fruit.
- There is an apple tree stump in the garden, but it is still alive.
Grafting into a stump
You can also use it to vaccinate.
- Prepare the stump in advance. If you don't have one, cut down an old apple tree or freshen up a cut you already have.
- Clean the stump carefully.
- Choose any grafting method.
- Take the cutting, prepare it, insert it into the existing cut.
- Wrap the correct area with film.
- Treat the area where the graft is located with varnish.
Think in advance about what is best to make protection for the stump so that it is not disturbed by animals and birds.
Growing wild apple trees from seeds
- Collect seeds from hardy apple trees that grow in your area.
- Collect seeds in the fall from the largest apples.
- Rinse them and dry them.
- After January 15 to 25, start stratifying them.
- Sprinkle them with sand and put them in the refrigerator.
- You can also sow the seeds in the garden in the fall to a depth of 3-4 cm. Then they will be covered with snow all winter, and will sprout in the spring. By autumn, healthy, strong seedlings will grow.
Growing apple tree sprouts.
Grafting apple trees in the spring for beginners under the bark step by step: diagram, description
This method is used to graft a tree. The diameter of the branches allows you to place several cuttings at the same time. The method is used when active sap flow occurs in the tree.
So, you need to perform the following manipulations:
- Prepare several cuts in the tree bark at once.
- Make oblique cuts on each cutting, the length of which should be approximately 3 cm. Clean the back side of the cuttings in advance so that they match the cuts of the tree as closely as possible.
- Cut off the top of the rootstock. The cut should be above the kidney. Place the scion behind the tree bark.
- The top of the cutting should protrude 0.3 cm. Secure everything with a rope.
Grafting in the spring
It will take a very long time for the cuttings and the tree to grow together. During this period of time, constantly protect the branches to prevent them from breaking. Next year, leave the strongest branch untouched and shorten the remaining ones. After 3 years, remove excess branches.
What to graft on and preparing the tree for grafting
What is a rootstock?
Gardeners call the material on which the cutting will be grafted a rootstock . Often, summer residents graft the varieties they like onto wild apple trees - young twigs grown from an apple tree seed.
It is considered more correct to graft onto special clonal rootstocks for apple trees. They are created specifically for vaccination. Typically, clonal rootstocks for apple trees with different characteristics are designated by alphanumeric names (62-396, MM-106, 54-118, etc.).
It can be dwarf, semi-dwarf, medium-sized or vigorous material.
IMPORTANT! Not all apple varieties are well compatible with different rootstocks.
You can also regraft an adult tree or a young, but unsuitable seedling. In this case, grafting is usually carried out into a suitable skeletal branch.
How to choose rootstock for an apple tree Video:
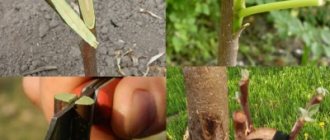
What is a scion? A scion is a grafted cutting. For the scion you need to take one-year-old shoots. The cuttings for grafting are cut immediately before grafting. Usually this is a small section of a branch with 3-4 buds.
Healthy branches of one-year growth without signs of disease or damage to the bark are suitable for grafting.
Scion cuttings must be alive. This means that on the cut of the cutting you should see a green border, not a brown color.
When grafting, gardeners strive to ensure that the diameter of the rootstock branch and the diameter of the scion cuttings coincide, but most often when re-grafting already mature trees, this is impossible to achieve. Therefore, the gardener uses different grafting methods: bark grafting, split grafting, parasitic grafting and others.
How to do budding step by step: diagram, description
This grafting method is as follows: only a bud taken from another tree can be grafted onto the rootstock. For grafting in the spring, as a rule, a bud that was left last year is used. The most ideal time for work is April, the end of the month. At this time, the bark is already beginning to peel off, and the cambium is actively growing. Consequently, the scion will take root quite quickly.
Budding
Tree grafting using the budding method is carried out in the following sequence:
- Cut a bud from the main cuttings prepared in advance.
- Cut the bark of the rootstock at the internode in a "T" shape.
- Bend back the bark, drive the bud into the formed base.
- Lubricate the area with varnish and wrap it with twine.
How to make copulation step by step: diagram, description
The most difficult thing you will encounter using this method is cutting the rootstock. It must be done carefully, the first time. Hence, practice beforehand. Vaccination is carried out in April or early summer.
- Wipe the area where the cut of the rootstock will be located.
- Make a cut. You should end up with an acute angle towards you.
- Make an identical cut under the lower bud on the scion.
- Connect both parts.
Copying
- Fix the place where the connection is located, and apply an overlapping bandage.
- Cover the area with varnish, thereby protecting it from environmental influences.
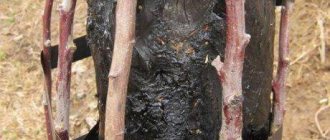
Strapping and putty
How successfully the graft will take root depends on how well the grafting site is properly protected.
It is extremely important to protect the vaccination site from external influences. To do this, you definitely need to bandage it well. The material for strapping also has its own requirements - it must be clean and easy to use.
As a rule, cling film, electrical tape, rubber or perfol are used to protect the vaccine. But the best material, as many gardeners say, is polyvinyl chloride oilcloth. It is quite thin, but at the same time durable, transmits light well and does not allow moisture to evaporate.
Open grafting sites must be covered with garden varnish. It will not only protect them from drying out and precipitation, but will also save you from the need to tie the cuttings with a plastic bag.
The greenhouse effect created under cellophane can cause premature bud break, which will have a very detrimental effect on the graft. Treatment with garden varnish prevents this.
How to make an apple tree ablation step by step: diagram, description
Many gardeners use this method, using it to save a damaged apple tree. It is held in May, no later. To get excellent results, follow these steps:
- Make a cut on the scion and a cut on the rootstock. Please note that the resulting cuts must be identical. If necessary, you can remove a small layer of wood.
- Place the cuts next to each other, they must match.
- Lubricate the joint with var.
- Wrap with film.
Ablation
After some time, when the graft has grown together well, remove the winding and cut off the growth from the shoot. Then cut off a branch of the rootstock.
Why is this method good?
The method has many advantages and disadvantages:
- suitable for trees with different bark conditions;
- For rootstocks, not only young cuttings are used, but also old fruiting ones;
- the work can be easily completed by novice gardeners;
- there is no extensive preparatory work;
- takes little time.
For apple trees, rootstocks of pears, quinces, and plums are taken. Apple tree cuttings are grafted onto rowan, cherry, and hawthorn.
Caring for a grafted apple tree after grafting: description
- Do not remove old branches after grafting. This can weaken the roots of the apple tree.
- To protect the inoculation from birds, install the bar by covering it with colored tape.
- Constantly check the place where the cut is located, as well as the branch. If after 2 weeks the grafting cannot take root, remove the dried cuttings and treat the cut area with varnish. Feed the tree itself with fertilizers.
- If the grafting is successful, you will notice a thin cambium on the scion, plus new shoots. Remove the leaves so that they do not form a shadow for the grafting.
- After the grafting has taken root, prune it. Remove the lower shoot if you have at least 4 shoots on the scion. Trim those shoots that have formed on the side, almost to the skeletal branch of the tree itself.
- Have you noticed that the graft has begun to grow actively? Stop its growth by pinching off the tops.
- Tie the rootstock, which is 25 cm long, and point it upward so that it grows correctly. Make the next garter when the branch is 50 cm in size.
- For 2 years, water the grafted tree, especially in summer, and feed it. After 2 years, remove the ropes, ribbons and film.
Preparing the rootstock and scion
The rootstock is the wild one on which the scion will be grafted - a cutting from a varietal apple tree. Both elements are equally important; they must be prepared or grown if there is nowhere to get a wild plant. Remember simple recommendations for choosing or preparing materials so as not to harm them.
Rootstock
The easiest way is to dig up a wild bird in the forest, in a neglected garden or somewhere else. Choose smooth, strong trees without damage or frostbite. Self-seeding that grew under an apple tree is suitable. If you couldn’t find a seedling, grow it yourself, it’s best to use seeds from Antonovka apples, but there may be other options. The work should be done like this:
- Prepare seeds in the fall. Take large, ripe fruits, remove the planting material from there and dry it a little on newspaper. Place in a paper bag and store at room temperature and normal humidity.
- Start stratification in mid-January. To do this, first rinse the seeds well and place them in a container with wet sand and a small amount of crushed activated carbon. Keep in the refrigerator or room with a temperature of about 0 degrees for about 2-3 months.
- After sprouts appear, transplant the seeds into separate cups. When the cotyledon leaves appear, prick the plants, when replanting, carefully pinch the taproot, and stimulate the development of lateral shoots.
- Plant small plants in open ground or in containers, then there will be a seedling with a closed root system. When growing, no special care is required, but if the apple tree is in a container, it should be periodically watered and fed with a complex composition.
Advice!
After collecting the seeds in the fall, plant them in the ground to a depth of 3-4 cm. Then they will undergo natural stratification during the cold period, and in the spring they will begin to sprout immediately after the onset of favorable conditions.
You can graft on a one-year-old seedling, sometimes it can be grown longer, there are no restrictions. The easiest way is to sow the seeds in a corner of the garden or somewhere else and use the plants when needed, then you won’t have to look for wild ones or grow them and wait a whole year.
Scion
Most often, cuttings are prepared. If you plant in winter or spring, then the work should be done in the autumn. The most favorable time is before the onset of cold weather or immediately after the first night frosts; during this period, sap flow completely stops. When preparing, remember a few recommendations:
- Choose healthy, well-bearing apple trees that are not susceptible to disease. Determine in advance where the south side is, since it is preferable to take scions there. Cut the material from the outside of the crown, no need to go deep inside.
- Examine the plant, determine which shoots are suitable. Use annual varieties with a thickness of 5 to 8 mm. Select only straight twigs without damage to the bark.
- Length from 30 to 40 cm. It is important that the cut part has 5 buds or more, and 3 of them should be located close to each other.
- Inspect the wood as it is cut. Healthy twigs are white, with a small green layer under the bark. If the core is brown or darkened, this indicates freezing or disease.
- Prepare with a reserve, as some of the cuttings will die. Gather each variety into a bundle, tie it with twine, label it and secure it so as not to mix it up later.
- Place in a container with damp sawdust and store in a cool, dark room, occasionally moistening the filler. The second option is to dig it into the soil under the snow.
- If stored in a cold room, transfer to a warm room a day before starting work. If the cuttings were under the snow, this must be done 3 days in advance. Be sure to check which cuttings survived. To do this, update the cut from the bottom and place the twig in a container with water for 3-4 hours. The liquid remained clear - everything is fine; it became cloudy or colored, which means the scion was frozen.
If you carry out work in the summer, then use the cuttings on the day they are harvested so that they do not dry out. You cannot carry out work too early in the fall, since the movement of sap has not yet stopped, and the stored material will be much worse. During storage, the temperature should not rise above 3 degrees.