Description and photo
- Is he early? Dill "Gribovsky" is an early variety. The first harvest can be tasted 30 days after the seeds germinate. Technical maturity occurs on the 70th day.
- What time of year is best to plant? The variety begins to be sown in spring in April and continues planting until July. Planting is carried out several times per season. It is possible to sow the variety before winter.
- Are there other names? The variety "Gribovsky" is called padanets because of its ability to scatter seeds around itself. New plants growing from them are more resilient.
- Description of appearance. Dill has large erect leaves 15-25 cm long. The surface of the leaves is smooth, waxy, dark green with heavily dissected segments. Standing leaf rosette. The inflorescences are multi-rayed, convex, have a diameter of about 20 cm. The weight of one plant ranges from 12 grams. up to 30 gr. in technical maturity.
Below are photos of dill variety “Gribovsky”:
Harvest and storage
Green mass suitable for consumption is formed quite quickly in dill of the Gribovsky variety, so the assembly period is limited in time. It is recommended to cut dill after 6-7 branches appear. During this period, green leaves are collected for fresh consumption, freezing or drying.
Next, the crop begins to actively flower, which makes harvesting the greenery difficult. Now you can collect seeds for planting next year or umbrellas for making marinade.
For storage, all fresh greens are collected, selecting leaves with defects, and thoroughly washed under warm water and then dried. Now the dill is ready for freezing or further drying (it is in these two types that the crop is stored). Some gardeners also practice pickling greens by alternating layers of twigs with salt.
Following simple rules for planting and caring for Gribovsky dill will allow the gardener to soon get an excellent harvest. The taste and aroma of timely and correctly collected and prepared greens will delight you all year round.
0
0
Copy link
Main differences from other varieties
Gardeners fell in love with “Gribovsky” for its unpretentiousness, bright aroma, pleasant spicy taste and the presence of large green mass on the bush. These qualities make dill stand out from its counterparts.
Read about the best varieties of dill for growing in the garden here.
Advantages and disadvantages
Advantages:
- Disease resistance.
- Ability to withstand low temperatures.
- The ability to quickly recover from stressful situations.
- Intense aroma.
- Taste qualities.
- Unpretentiousness to external conditions.
Disadvantages: Tendency to self-seeding.
Advantages and disadvantages
Early varieties, which include the Gribovsky species, are distinguished by rapid emergence, rapid growth and good quality of green mass growth. The advantages of the variety include:
- short ripening variety;
- resistance to various types of diseases and pests;
- good taste;
- good frost tolerance;
- unpretentiousness to growing conditions;
- high content of vitamins, minerals, essential oils.
The Gribovsky variety feels great when grown in outdoor conditions, greenhouses and even indoors. This crop is ideal for fresh use and goes well with fresh vegetables, adding richness of flavor to salads, first and second courses.
Dill is considered a valuable source of minerals and vitamins. This product is recommended to be included in the diet in case of deficiency of vitamins and minerals, during periods of exacerbation of respiratory diseases to maintain the immune system. Dill seeds are widely used in the medical and cosmetology field; this ingredient is present in many traditional medicine recipes for the prevention and treatment of many diseases.
See also
Description of the Alligator dill variety, features of cultivation and careRead
The disadvantage of the variety is the ability of the plant to disperse spontaneously throughout the garden area. In this case, the crop grows everywhere and requires periodic removal from places where its presence is not required.
Benefits and contraindications
Dill contains:
- Vitamins A, B1, B2, B5, B6, B9, C, E, PP.
- Macroelements: potassium, calcium, magnesium, sodium, phosphorus.
- Microelements: iron, manganese, copper, zinc.
Benefit
- Increases immunity.
- Prevention of kidney diseases.
- Helps with hypertension.
- Strengthens the cardiovascular system.
Read more about the benefits of dill here.
Contraindications
- Individual intolerance.
- Ulcer.
- Hypotension.
- Diabetes.
- Threat of miscarriage in pregnant women.
Preparing the bed and seeds
Using the knowledge of how to grow dill correctly, you can get a pleasing look and a bountiful crop harvest with the least investment of effort.
Soil requirements
When growing dill in open ground beds, it is advisable to choose a well-lit area. It will grow in the shade, but in the light the volume of greenery will be larger and its color will be richer.
The plant loves neutral, loose soil, well ventilated and hygroscopic. The vegetable does not require fertility, being content with the fertilizing received last year by its predecessors - almost any vegetables except celery.
It is recommended to prepare the beds in the fall, digging them up and applying fertilizer a week or two before the arrival of frost:
- organic matter - humus or compost, a bucket per square meter of area;
- mineral preparations - superphosphate, 2 tablespoons for the same area);
- potassium salt, a tablespoon is enough.
If melt water stagnates on the site in the spring, it is advisable to make the vegetable beds high.
Seed preparation
Pre-winter sowing of dill is carried out with dry seeds (in the fall they do not need to germinate, but in the spring there is enough moisture in the soil), and for effective spring and summer sowing you should know how to prepare it for planting.
Relevant work aimed at making dill sprout faster begins six days before sowing time:
- put in a thin cloth or gauze and soak the seeds in hot water (50°C) for 3 days. Change the water to fresh water at least 5 times a day;
- spread the seeds on a cloth moistened with water, lightly sprinkle with damp sawdust and leave for another 4 days at room temperature +20°C;
- Dry it a little and start sowing.
Treating seeds with additional hydrogen peroxide not only promotes their accelerated germination, but also disinfects, strengthens the immune system and the ability to withstand temperature changes, and increases germination. A tablespoon of 3% peroxide solution is diluted in half a liter of water. The seeds are wrapped in cloth and dipped in the solution for 12 hours. It is advisable to change it to a fresh one every 4-6 hours.
This preparation allows you to speed up germination and get seedlings within 5-6 days, and knowledge of how to plant dill will allow you to do this correctly and effectively.
Spring sowing technology
When planting dill seeds in open ground, make grooves about 2 cm deep on a prepared, flat surface. Leave 20 cm between them. To make caring for the vegetable easier, it is better to make the grooves wide and lay the seeds in a zigzag. For quick germination, sow in moist soil.
To avoid excessive thickening, no more than 1 g of seeds are consumed per square meter, and even less for late varieties. Sprinkle with loose soil and do not water for the first 2 days, so as not to wash away and deepen the sown material with streams of water.
How long it takes for dill sprouts to sprout after planting depends on the depth of their planting. If you follow agrotechnical rules, they will appear in 5-10 days.
Pre-winter sowing of dill
Even beginners in gardening know how to sow dill correctly before winter: they do it with dry seeds in open ground in the fall, at the very end. There is no exact date for pre-winter planting of dill - you need to finish it before frost. Shoots appear among the first in the spring, giving an early harvest of greenery.
A few secrets of growing dill before winter, which will speed up germination and increase harvest volume:
- the seeds are planted in the soil a little deeper than in the spring, deepening them by 3-3.5 cm;
- their consumption is increased by a quarter;
- After sowing, the beds are mulched with loose material.
How to plant seeds and seedlings?
Planting "Gribovsky" can be done with seeds and seedlings. It can be grown both in open ground and at home.
- Before sowing, the seeds can be soaked for 2-3 days. At the same time, change the water every 5 hours. This procedure will speed up the appearance of young shoots.
- Seeds are planted to a depth of 1.5 - 2 cm in previously prepared soil.
- Dill seedlings are grown from seeds, which are planted in small pots of 1 piece. to a depth of about 2 cm. Next, water the seeds abundantly and carefully monitor the soil moisture.
- After the seeds germinate, the seedlings are grown for about 2 weeks so that the plants can gain a foothold in the soil. And then they are transferred to open ground along with a lump of earth.
- When planting, the distance between the bushes in the garden bed is about 25 cm.
Landing rules
Dill is an unpretentious plant, but to obtain the desired result it is recommended to follow the rules for seed preparation, planting and care.
Time
Sowing time to ensure continuous harvest: April to July. Grows in open and closed ground. Therefore, if the necessary conditions are provided, you can sow in August.
Seed selection and preparation
Planting material must be reviewed and damaged or spoiled seeds removed. Before planting, it is recommended to place the seeds in gauze or weave and soak for 3 days. Change the water at least five times. Dry the seeds before planting to make sowing easier.
Soil and site
It is grown indoors and outdoors. When planting, preference is given to sunny areas. The variety is not picky about soil, but it is worth considering that dill does not like acidic soil. Prefers black soil, humus-enriched sandy loams or light loams.
See also
What to plant after dill next year, recommendations and rules of crop rotation
Read
Sowing patterns and depth
To obtain the desired yield, it is recommended to sow seeds in furrows five centimeters wide. The sowing depth is 2 centimeters, the distance between rows is up to 20 centimeters. Such a scheme will also facilitate the care and collection procedure.
Recommended density is 30 seeds per meter.
Favorable and Undesirable Neighbors
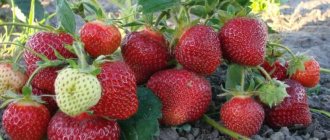
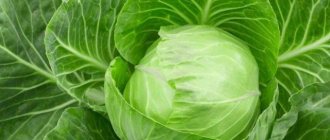
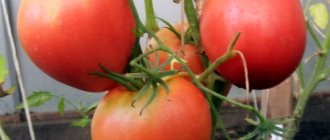
It is not recommended to sow near carrots and celery. These plants often cause dill to be damaged by various diseases. Tomatoes, legumes, cabbage, cucumbers are recognized as the best predecessors and neighbors.
How to care outdoors?
- Temperature. The plant can withstand air temperatures down to -4 degrees, seed germination begins at +3 degrees. The green mass is formed at +18 – +20.
- Watering. On hot days, watering is done at least 2 times a day. At the same time, about 2 buckets of water are consumed per square meter.
- Light. If you choose the right place for planting, the variety will have enough natural light.
- Priming. It is better to plant dill in neutral, light soil. Acidic soil is detrimental to it.
- Feeding. If the plant is grown in fertilized soil, then it does not need additional feeding. Nitrogen-containing fertilizers can be added to depleted soils. For this purpose, it is recommended to use fermented nettle infusion.
- Place. It is better to choose a sunny or slightly dark place for planting.
- Weeding. Weeding of the crop is carried out as necessary.
- Loosening. Loosening of the soil is carried out between the rows of the beds.
- Hilling. Hilling up dill is contraindicated.
We talk about growing dill in open ground here, and read about the best varieties for growing in the garden here.
Growing at home
The choice in an apartment is usually small, but if possible, you should choose a window on the sunny side. Dill needs long daylight hours, so additional lighting needs to be organized. It is good to use fluorescent or LED lamps. It is important that the height of their location is regulated - it will need to be changed as the crop grows.
For dill, proximity to heating devices is undesirable. If there is no window without a battery, then the window must open.
Different containers are suitable for dill:
- plastic containers;
- wooden boxes,
- pots for indoor plants,
- peat pots, seedlings from which will need to be transplanted.
It is important to take into account the size of adult plants so that they are not cramped in the chosen container. The height of the tray or pot should be at least 10-15 cm. The optimal volume of pots is 1-2 liters.
A prerequisite is the organization of drainage. To do this, you need to make holes in the bottom of the selected container.
If you plan to place several containers with dill on one window, you should organize one large tray where excess moisture will fall. When growing in pots, special stands or saucers are sufficient.
Features of home care
A decent harvest of dill can be grown at home on the windowsill. This requires compliance with certain conditions:
- Soil – a mixture of loose garden soil and neutral store-bought soil for indoor plants is suitable.
- Regular watering - dill loves moisture. Regular watering is especially important during seed germination.
- Feeding – once every 2 weeks it is necessary to feed the bushes with mineral fertilizers.
- Proper lighting - dill grown at home often needs additional lighting. If the place with the “home garden” is located away from the window, then additional light will be needed for 16 hours a day.
- Compliance with temperature conditions - dill is best grown at a temperature of +18 degrees. When young shoots appear at night, it is advisable to lower the air temperature. If the temperature exceeds 20 degrees, then it is good to use additional lighting, otherwise the bushes will stretch out without forming a dense mass of leaves.
- For faster germination, seeds should be soaked for 2 days before planting .
- Plant the seeds on the surface of the soil , sprinkling a layer of humus on top. The approximate seeding rate is 0.3 g. per 1 sq. dm. Cover the container with the crops with film and put it in a warm place.
Characteristics of the variety
Dill Gribovsky has the following characteristics, which make it a favorite of gardeners:
- Dill Gribovsky is a cold-resistant and frost-resistant variety. Its leaves can withstand frosts down to –3˚C, and the plant itself does not stop development during prolonged cold spells. Although it grows green mass best at an air temperature of +15˚+20˚C.
- The Gribovsky variety is a drought-resistant variety and can go without watering for a long time. But you should not experiment in this case. With a prolonged lack of moisture, the plant itself will not die, but the leaves will become hard and lose some of their taste.
Pests and diseases
“Gribovsky” variety is resistant to diseases. But there are diseases that he can contract. This:
- powdery mildew;
- Phomasis;
- cercospora blight
To prevent diseases, do not plant dill next to carrots and celery. Dill is most often infected from these crops. You should also follow the rules of crop rotation. The best predecessors are tomatoes, cucumbers, and legumes.
Dill greens may be attacked by:
- aphids;
- leafhoppers;
- carrot fly.
The root system may be threatened by:
- caterpillars;
- May beetle larvae;
- mole cricket;
- wireworm
The fight against insects is carried out using folk remedies. The use of chemicals can cause poisoning in humans, since the plant is used as food in its natural form without heat treatment. Tobacco decoction and tobacco dust are well recommended.
Those who grow dill may be interested in materials about harvesting dill for the winter, about the Alligator variety and the differences from caraway, as well as about which animals can and cannot be given dill.
Description of dill Gribovsky
The Gribovsky dill variety is an early variety; its greens are suitable for consumption a month after the appearance of the first shoots. Since early varieties differ from later ones in that their foliage is less dense, the Gribovsky variety related to them is recommended to be grown for the purpose of early production of greens, seeds and umbrellas for canning.
According to the description of the Gribovsky dill variety, we can say that this plant is unpretentious and has its own characteristics, its leaves are dark green with a bluish tint and a rich aroma. This plant can retain its taste and aromatic qualities even after freezing and drying. The shoots are smooth and erect, reaching a height of up to 25 cm. With strongly dissected segments. The inflorescences are convex, multi-rayed, their diameter varies from 18 to 30 cm.
For spices, the Gribovsky variety is harvested 55-70 days after sowing. The weight of one mature plant can range from 40 to 53 g.
Productivity
The yield of dill of the Gribovsky variety is quite high; it is used as fresh herbs and in the form of spices for canning. When harvesting greens from 1 sq. m you can collect up to 3 kg, and for spices - up to 5 kg from 1 sq. m.
Sustainability
The resistance of the Gribovsky dill variety to diseases is average, so it is recommended to follow a number of rules for planting it:
- In order to protect the crop from diseases, it should not be planted next to carrots and celery.
- The best predecessors for planting are legumes, cucumbers or tomatoes.
Also, the plant of this variety is susceptible to attack by pests, so it needs to be treated with insecticides.
Important! Since dill is most often consumed fresh without heat treatment, the use of chemicals to combat insects is strictly not recommended; you can use folk remedies.
Advantages and disadvantages
From the general description, as well as a photo of the Gribovsky dill variety, you can understand that this plant has many advantages over other types of dill:
- early ripening;
- good taste and aroma qualities;
- ability to withstand temperature fluctuations;
- unpretentiousness in cultivation;
- versatility of use (both fresh herbs and as a spice for preservation);
- a large amount of essential oils, vitamins and minerals.
The only disadvantage of this variety is that the plant is prone to self-sowing.
Growing and caring for dill
The technology for growing dill requires that the gap between the rows and the plants in the row be at least 15 cm. When planted more densely, the plants are suppressed and do not form a crown, stem growth slows down, which negatively affects crop rotation. Proper cultivation of dill includes: weeding, loosening the soil after watering, fertilizing, thinning. When it reaches technical ripeness, the plant looks like a bush.
The technology for growing dill in the initial phase of development requires weeding and loosening the soil. When 3-4 leaves appear, when active growth of the stem begins, the cultivated plant is able to grow next to the weeds and form a thick carpet of green mass. But when harvesting, the plants have to be sorted manually, removing weeds in order to give the cut dill a marketable appearance.
You can thin out plants as their mass increases, removing overgrown plants and leaving oppressed stems to grow. With this technology, plants later form a peduncle, and for about 1.5 months. You can pluck side branches from them for greenery.
Dill - spicy herbs for the table and umbrellas for pickling vegetables
The uses of dill are very diverse; all parts of this aromatic plant are used except the roots:
- young leaves, fresh and dried, are used as a spicy herb for the table;
- during flowering and setting seeds, the stems along with the umbrella inflorescences are added as a seasoning for pickling and pickling mushrooms and vegetables, especially cucumbers;
- mature dried dill seeds are used as a spice and for medicinal purposes.
Dill uses the entire above-ground part of the plant - leaves, stems, inflorescences, seeds
Dill sowing time
Upon the onset of biological ripeness, dill is divided into early, middle and late varieties. When regulating the production of fresh greens by varieties, use the following technique:
- in March-April and July-early August (depending on the region), sow only late varieties at the accepted frequency,
- at the end of May - beginning of June, switch to sowing early varieties.
This strategy, coupled with the varietal feature, will help to have fresh greens on the table and inflorescences for use in processing products throughout the warm period. Moreover, self-seeding, even with the onset of cold weather, will provide another harvest of greenery.
How to get a lot of dill greens?
Many, in the old-fashioned way, believe that there is no need to specifically look for and sow dill varieties, because the garden is already full of self-sown dill from fallen seeds. In our conditions, only early-ripening plants can produce full-fledged seeds. But they have a short (7–10 days) period from the start of harvesting greenery to flowering, so even such a small crop must be harvested quickly and new seeds must be sown every 2–3 weeks. With the advent of new varieties that do not bloom for up to 10 weeks, frequent reseeding is no longer necessary. It is enough to sow dill in early spring and a second time in early July, and you will have fresh herbs before frost.
How to grow dill on a windowsill in winter: step-by-step instructions
For the purpose of growing dill at home, the early ripening variety Gribovsky is most often chosen. This variety of dill does not require care, is resistant to temperature changes, is characterized by high yield and resistance to disease. Its greens have a strong aroma. In order for Gribovsky dill to produce a good harvest at home, it is enough to sow it in fertile soil and prevent the appearance of weeds.
The main trick to homemade dill is to have time to collect and eat it before the plants begin to wither.
The following varieties are also suitable for growing on a windowsill:
- early maturing Grenadier;
- mid-season Richelieu with bluish-green fragrant leaves;
- late-ripening Kibray with beautiful wide leaves.
Southern varieties are also cultivated at home, which have a more spicy taste, but are more finicky.
Note! Since there is no special variety of dill intended for growing on a windowsill, when choosing seed, the main attention should be paid to the ripening time.
It is important not to make a mistake here: although early varieties produce green mass in a very short time, they quickly stretch into peduncles and are less leafy than late-ripening varieties. And late bush varieties (Gurman, Salyut, Russian size) do not have time to ripen in the beds over the summer, but are perfect for growing at home
Such dill on the window forms dense, well-leafed bushes, from the axils of which new shoots are formed.
Table: comparative characteristics of the best varieties of dill
| Name | Ripening period | Period from germination to harvest (days) | Productivity (kilograms per square meter) | Originating company | ||
| on greens | for umbrellas | on greens | for umbrellas | |||
| Gribovsky | Early | 35–45 | 60–70 | 1,0–1,5 | 1,5–2,0 | VNIISSOK |
| Vologda lace | 40–45 | 65–75 | 2,0–3,5 | 4,0–5,2 | Aelita | |
| Magician | Average | 45–50 | 75–80 | 2,4–3,4 | 4,0–5,0 | KH "Volnoe" |
| Lesnogorodsky | 40–50 | 70–80 | 1,5–2,1 | 4,5–5,5 | VNIISSOK | |
| Amazon | Mid-late | 43–46 | 90–100 | 1,4–2,7 | 2,8–6,2 | Gavrish |
| Kibray | 40–55 | 70–85 | 1,3–3,0 | 2,7–6,4 | VNIISSOK | |
| Firework | Late | 50–65 | 95–110 | 2,8–4,5 | 4,6–6,0 | VNIISSOK |
| Alligator | 45–60 | 105–115 | 1,6–2,9 | 3,0–5,5 | Gavrish |
In the garden, dill can grow in almost any soil, but successful cultivation of dill at home is only possible in a fertile soil mixture, which must be prepared in advance. To do this, you should prepare loose garden soil in the fall and mix it with purchased neutral soil for indoor plants before sowing. Select a container for sowing of a sufficient size so that the dill is not crowded, and do not forget about the drainage layer at the bottom of the container.
Dill seeds contain essential oils that slow down their germination, so seedlings will appear earlier from soaked and washed seeds.
Since dill seeds take a long time to germinate due to their high oil content, before sowing they need to be soaked for 20 hours in warm water through which oxygen continuously passes (for example, using a compressor from an aquarium). Another option is to simply place the seeds in warm water for two days and change it to fresh water every six hours.
You can sow seeds directly on the surface of moist soil, without grooves or holes, sprinkling peat mixed with humus on top. A sufficient seeding rate is 0.3 g per 1 square decimeter of soil. For the best result, you can make grooves a centimeter deep in the ground, fill them with water and place the prepared seeds on the bottom. From above, dill seeds are sprinkled with dry soil from the edges of the grooves, so that a dense crust does not form on the soil surface, preventing the emergence of seedlings. Cover the container with the crops with cellophane and put it in a dark place with a temperature of about +20 degrees for a week.
Note! The stems and leaves of dill do not grow back after cutting: to continuously cut fresh herbs, sow the seeds into the freed area of your micro-garden every three weeks.
How to prepare dill for future use
Wash, dry and finely chop the dill. And then select any of the options:
- Place in individual silicone molds and freeze. Dill can be stored in the freezer for months and does not lose its beneficial properties;
- mix with salt at the rate of (4:1) (250 g of salt per 1 kg of dill), place tightly in a jar. Let the juice stand out, and when the greens settle, add new ones to the top, seal and put in the refrigerator. Can be stored for about 10 months;
- Dry in sunny, cloudless weather under a canopy or in a ventilated area until brittle. Or in the oven: line a baking sheet with parchment, spread the chopped herbs in an even layer and keep on the middle shelf at +60 °C for several hours. Dried dill can be stored in glass jars in a dry, dark place for up to 1 year.
Useful properties of dill
Dill contains a large set of vitamins (A, B, C, E), nicotinic acid, carotene, thiamine, essential oils, calcium salts, potassium, iron and phosphorus. Thanks to such a rich composition, dill effectively regulates the functioning of the gastrointestinal tract, lowers blood pressure and has a beneficial effect on cardiac activity, relieves the symptoms of cystitis and kidney diseases. Dill has diuretic and choleretic properties. In addition, it is also used as a means of enhancing milk secretion in nursing mothers.
Dill does not interfere with the growth of turnips, radishes, and cabbage. Does not like fennel and carrots (it shares common pests with them). Planted along the edges of beds in greenhouses with tomatoes, peppers and cucumbers, it attracts pollinating insects. Dill is also good because it can be grown all year round, sown on a windowsill.
The best varieties of dill for growing in the garden, in a greenhouse or at home
If you also decide to start growing healthy herbs, it will undoubtedly be useful for you to learn about the best varieties of dill. After all, not every variety produces lush and fragrant greens with excellent taste. It would be a shame to spend time sowing and caring for dill, and end up with frail bushes with virtually no odor.
The best early ripening varieties of dill
Scented dill is very popular in Russia - it is grown in garden beds, in greenhouses and even on the windowsill at home. Of course, in most cases, dill is used simply as an aromatic seasoning in the preparation of various dishes, but some gardeners also value this plant for its many healing properties, using its greens and seeds to improve health.
Scented dill is very popular in Russia - it is grown in garden beds, in greenhouses and even on the windowsill at home
Dill varieties can differ in leaf shape, rosette, bush height and color, as well as in the timing of stem formation. Classification by ripening time will help you better navigate the main varieties and choose seeds so that you can harvest greens throughout the season.
This group includes varieties that produce green mass already 35 days after germination. True, they are slightly less leafy than late-ripening ones, and begin flowering almost immediately after the formation of five or six leaves. Therefore, it is advisable to grow early varieties if you want to quickly collect the first fresh greens from the garden, as well as to obtain umbrellas and seeds for preservation.
Gribovsky
An incredibly popular variety among domestic gardeners, it is great for growing on a windowsill and in open ground. Gribovsky dill is undemanding to the weather, and even in cold summers it produces good greens. The advantages of the variety also include disease resistance, intense aroma and decent taste. The leaves have a beautiful dark green color, the height of the standing rosette reaches 25 cm. Gribovsky dill can be sown several times during April-July; winter sowing is also allowed.
You can sow Gribovsky dill several times during April-July
Further
The Dalniy dill variety is perfect for obtaining early fresh herbs, for drying, freezing, pickling and pickling. It is valued for its high yield, resistance to lodging and early formation of greenery. After sowing the seeds in the ground, after 38 days, a semi-raised rosette of about 25 cm in height with medium green leaves with a slight waxy coating is already formed. The Dalniy variety is resistant to pests and diseases.
Aurora
Of the new varieties, early ripening dill Aurora deserves attention. After the appearance of young shoots, the greens can be collected already on the 25th day. The variety is distinguished by a dense rosette of raised green leaves, very fragrant and juicy, as well as a powerful bush with close internodes, due to which the foliage is less dirty after rain. Other advantages of the Aurora variety include: resistance to diseases and pests, good yield. In order to obtain an earlier harvest, seeds are sown before winter.
After the appearance of young shoots, the greens can be collected already on the 25th day
Mid-season varieties of dill
Stem formation in varieties with average maturity occurs 5-10 days later than in early varieties, as a result of which more leaves are formed on the bushes and the yield of greenery increases. In addition, in addition to greens, the plant has time to form umbrellas and seeds suitable for seasoning.
Lesnogorodsky
The peculiarity of this variety of dill is that even in the fall, when its seeds are filled, you can continue cutting the greens. The Lesnogorodsky variety is high-yielding, is not afraid of diseases and pests, and its leaves contain large amounts of provitamin A and vitamin C. The leaves grow large and fragrant.
Leafy
The economic suitability of Abundant-leaved dill lasts for quite a long time. Distinctive features of the variety: powerful, well-leafed bush, late initiation of inflorescences and large dark leaves. Dill has excellent commercial qualities; its leaves are juicy, tender and aromatic. Good fresh, suitable for pickling and pickling. Multiple sowings are possible during spring and summer, as well as winter sowing.
Bushy
From 30 to 40 days passes from the moment the bushy variety emerges to the first cutting of the greens; dill for spices can be harvested after 70 days. Bushy dill belongs to the abundant-leaved type; greens can be collected from it repeatedly, gradually starting from the lower leaves. It is no coincidence that the Bushy variety is considered one of the best for obtaining high-quality greens in large volumes. The strongly dissected leaves are very fragrant, juicy and tender, good both fresh and dried.
The most popular late-ripening varieties
In garden beds, some late varieties do not have time to fully ripen over the summer, but they are best suited for obtaining lush greenery from spring until autumn, especially when grown at home on a windowsill. Some late-ripening varieties (Buyan, Salyut, Alligator) have very close internodes on the stem, which makes them look like dense bushes, and they are called “bush”.
Late-ripening varieties have greens that are more fragrant, beautiful and rich in vitamins.
Bush dill is remarkable in that it allows you to collect fresh herbs all season long without re-sowing the seeds in a conveyor belt manner. First, you use young plants when thinning out the seedlings, then you tear off the lower tier of dill bushes, pluck out the side shoots of their leaf axils, and then collect all the greens from the plant. So, to provide one family with dill throughout the entire season, twenty root dill plants are enough. In addition, late-ripening varieties have greens that are more fragrant, beautiful and rich in vitamins.
Alligator
Alligator dill is especially valued by domestic gardeners, ideal for obtaining a large harvest of fresh herbs, since it can be grown both in a greenhouse and in open ground, harvesting several times a season. Green leaves with a bluish tint and a waxy coating form on the raised rosette. Umbrellas appear only towards the end of summer.