As absolutely everyone knows, greenhouses are necessary for growing crops and maintaining their vital functions. And they can vary in size from the smallest to the largest plantations. Naturally, not the same heating source will fit all sizes. The larger the greenhouse, the more powerful the source will be needed. And it is even more desirable that heating be available all year round.
But those who run a business can afford to install industrial heating in huge greenhouses. What should those who want to install a small heating system in a greenhouse at their dacha do? You can safely do this yourself! Let's take a closer look at which heating to choose and how to install it in a greenhouse?
What's included in the system
Solar panels.
We wrote about how to collect them in this article (opens in a new window). You can buy a ready-made set of solar panels for your home, but to save money, you can purchase polycrystalline solar cells and assemble solar panels for your home with your own hands. Inverter. Solar panels produce direct current close to 12 or 24 volts (depending on the connection), the inverter converts it into alternating current 220 V and 50 Hz, from which all household appliances can be powered.
Battery. Even their system. Solar energy is not produced constantly. During peak hours there may be an excess of it, and with the onset of dusk its production stops altogether. Batteries accumulate electricity during daylight hours and release it in the evening/night. How to choose a battery for a solar power plant is written in this article (opens in a new window).
It is important to know. It is not recommended to use ordinary car batteries for these purposes - they become unusable after 2-3 years of operation (this is the service life they are designed for). Controller
Provides a full charge to the battery and protects it from overcharging and boiling. We wrote about which controller to choose in this article (opens in a new window)
Controller. Provides a full charge to the battery and protects it from overcharging and boiling. We wrote about which controller to choose in this article (opens in a new window).
Heating air in a greenhouse
In addition to heating the soil, heating in a greenhouse with your own hands can be organized using classic air heating. Everything here is the same as in a regular room, the same technologies and methods are used.
Stove and water heating equipment
The first most obvious option is a conventional heating system with radiators, pipes, water as a coolant and a boiler or furnace for heating it.
The heater can operate on:
- gas;
- fuel oil (working off);
- solid fuel (coal, wood, peat).
There are no restrictions on the choice of fuel for such heating of the greenhouse in winter and throughout the rest of the year. The only question is the availability of one type of fuel or another. You can simply install a wood stove. This is the simplest method, but it is only suitable for small greenhouse structures or greenhouses.
Option for heating a greenhouse using a potbelly stove and a floor fan
In addition to the classic installation of batteries along the walls, it is possible to lay chimney pipes not directly from the boiler to the street, but in a snake through the room. In this case, before reaching the street, the stove smoke will give up most of the heat to the internal air, and radiators with pipelines are not needed here.
Advice! The absence of pipes with heated water means considerable savings during installation. But such a greenhouse will have to be heated continuously.
Installation of electric convectors
Convection electric heaters (heat guns) due to air circulation are capable of heating even very large greenhouses. Moreover, with minimal energy consumption. During operation, the air convector dries the air, reducing its humidity, and this is extremely harmful for greenhouse plants. To get rid of this problem, it will be necessary to provide humidifiers.
The heat gun heats the air perfectly
Methods for heating greenhouses in winter are slightly different from heating options in spring. In the first case, more heat is needed, so heating systems are selected with the appropriate power, but all of them can be equipped with your own hands.
A wide variety of heating devices are now produced for private greenhouse farms, the installation of which into a single heating system is more reminiscent of assembling a construction set. You just need to correctly select the devices for the given greenhouse volumes and climate.
Cost of installing solar panels
The approximate cost of one panel is 90 rubles per 1 W.
That is, one module with a maximum power of 200 W will cost you 18,000 rubles. It is clear that one such module is not enough for the normal functioning of all networks and communications at home. You'll have to buy more than ten of them. Your own solar power plant for your home with a total capacity of 1 kW will cost you approximately 250 thousand rubles. not counting the cost of installation and additional devices (inverter, batteries, charge controller). Solar batteries based on monocrystalline or polycrystalline silicon will ensure complete autonomy of your home from central power grids, both during warm periods and during frosts. The main thing is to choose the right photocells and calculate their required quantity, based on the area of the house and the required power. It would also be a good idea to take care of savings: replace light bulbs with energy-saving ones, insulate walls and roofs, install high-quality doors and window systems. Then your home will be warm and cozy, regardless of the weather.
What else is suitable for accumulating heat for seedlings?
Water is the best heat storage device, but not the only one. There are other materials that can be used to protect seedlings from frost:
Clay and stone heat up well and release energy for a long time. This property is inherent in the design of Russian and other folk stoves. For guaranteed results, you can combine water and stone batteries.
“Lezheboka” is not omnipotent, but it is capable of raising the night temperature in the greenhouse at soil level by 8 degrees. In other words, during frosts of minus 5 degrees, the air around the seedlings will maintain a positive temperature. Place a couple of plump couch potatoes in your greenhouse, and you won’t have to flinch when you look at the thermometer in the evening twilight.
Solar panel performance
Many people doubt the effective operation of these installations, because the weather in our country is not always sunny. And in winter, cloudy days are almost constant, and severe frosts contribute to the rapid waste of accumulated energy
Today's solar power plants are very powerful (from 200 W for one module). They produce energy all day long and capture light even in thick clouds or precipitation. True, in bad weather their power is reduced by almost half. Their advantage is that they are able to accumulate energy for future use. and if there is a lack of sunlight, they will give away what they have already accumulated.
In winter, the installations operate at full capacity, but their productivity is reduced due to the short daylight hours. A generation of batteries made from amorphous silicon don't even need to be pointed at the sun. They work great even in moderate clouds. The disadvantages of this type of modules include the fact that they require a large area for placement.
The effectiveness of their work depends on the region. For example, in St. Petersburg or Moscow, productivity will be slightly lower than in the southern regions. But this does not mean that their use in the northern regions is not advisable. Moreover, they have long been used there all year round and quite effectively.
WSPV solar panel technology for greenhouses
Placing regular solar panels on a greenhouse is actually not a good idea because the panels do not allow the sun's rays to pass through, without which plants cannot thrive.
Therefore, a new solar technology called WSPV (Wave Selective Photovoltaic) was developed.
Experiments on efficiency are currently being conducted, so there is no clear answer to this question right now; better let's look at the results of the experiments.
The study was conducted using new WSPV technology.
This technology generates electricity more efficiently and cheaper than traditional photovoltaic systems.
These panels have a bright luminescent purple color.
WSPV absorbs some of the blue and green wavelengths of light but allows the rest to pass through, allowing plants to grow without any problems or restrictions due to lack of sunlight.
20 varieties were grown, including tomato, cucumber, lemon, lime, and strawberry.
- 80% of grown products did not change their performance after installing solar panels.
- 20% grew better than in conventional greenhouses.
Greenhouse heat accumulator
Those who like to grow vegetables and fruits at any time of the year should understand and know that there are additional products, including a heat accumulator for greenhouses and greenhouses, thanks to which this activity becomes easier and brings real pleasure.
What is a greenhouse battery?
This is a unique, very useful energy storage device, but not one that everyone confidently uses in vehicles, boilers, as well as in many other devices that need to be provided with electricity for a certain period of time. This is a kind of device that can accumulate energy from the sun, and then distribute it to the right places.
Greenhouse heat accumulator: how it works
The heat accumulator for greenhouses has its own operating principle, which is simple and convenient.
If we are talking, for example, about a water accumulator, then it is necessary to pour plain water into one or another device, over time it is heated by the sun, and at night the heat accumulator for greenhouses gives off heat to the beds with plants, thereby providing them with heat and simplifying the process of growing zucchini and other vegetables and fruits in a greenhouse.
If you are wondering how a greenhouse heat accumulator works, then you should understand that there is nothing complicated in this process. The only factor to consider is that the device must be dark in color, because it is dark colors that attract the sun’s rays the most.
What types of greenhouse batteries are there?
Of course, among the most effective options that can be used to heat a greenhouse structure is a stove, as well as a certain heating part. But it is worth noting that not every person has the opportunity to use such devices, because the greenhouse may not be located near the house, or even far away in the country.
Thus, among the large number of products on the market, there are special ones that are made from black films about 250 microns thick. Water is poured into the product and it begins to work.
These are effective devices that can be easily placed on the beds in the required order and provide complete heating. In the daytime, such devices heat the air temperature to 25 degrees, when it’s even -5 below zero outside. This means that the seedlings will not be able to freeze.
Do-it-yourself heat accumulator for a greenhouse
You can make such a device yourself. In order to make a heat accumulator for a greenhouse with your own hands, you use only the means that are at hand.
The main requirement is that the product can independently collect water and also release it in conditions of low temperature. In such cases, no metal containers are used, since this material heats up very quickly and releases thermal elements only for a short time.
Thus, you can make a heat accumulator for a greenhouse with your own hands from the following materials:
Everyone has seen that in the summer, stones quickly gain temperature, and can release heat for a long time
That is why it is important to think about whether the selected device can store energy. As an example, let us note heating stoves that are made of steel, brick
By the way, the latter type takes a very long time to cool down.
It is important to understand that the larger the diameter, the better it will serve. Typically, you can find devices with a diameter of 50 and 100 mm
One side of such a product must be sealed, which will eliminate the risk of water leakage. Specialized stores sell special plugs of one diameter or another, with which the pipe is securely fastened.
The other one is also characterized by tightness, but you should not close it tightly, because it is in this side that you should pour water, and also control the liquid level. There are quite a lot of implementation options, including the use of simple plastic bottles.
Types of greenhouse batteries:
- Mermen
- Stone
- Ground
We have already talked about the water version, we also figured out the stones. Now let’s consider a situation where the soil can act as an energy accumulator.
This is the cheapest heating method, but it has a small effect and is significantly inferior to the two above methods.
The soil is characterized by low heat accumulation, so it is worth using one or another mechanical device for heating the greenhouse.
How to accumulate energy for a GREENHOUSE!
Reviews:
Mikolo Isidorovich Palyga
writes: SUPER OVEN Mikolo Palygi for heating the GREENHOUSE.
Ruslan Bulatov
writes: What is the total volume of the greenhouse and what is the total volume of the heat accumulator?
Mikolo Isidorovich Palyga
writes: SUPER OVEN Mikolo Palygi for heating the GREENHOUSE.
Ruslan Bulatov
writes: What is the total volume of the greenhouse and what is the total volume of the heat accumulator?
You can improve heating efficiency by installing a huge number of small closed aqua heat accumulators. They should be placed sparingly over the entire area of the greenhouse. This will allow them to warm up faster and, in the future, give off heat more moderately.
Alternative heating sources and prospects for their development
Among the large number of different types of heating systems, alternative energy sources occupy a special place. In addition to traditional sources such as gas and electricity, all possible heating methods are used today. Among them are the following types of alternative energy sources:
- solid fuel – today, most heating systems use energy obtained from burning solid fuels such as wood and coal. Such systems are capable of solving all problems related to heating and hot water supply;
- a heat pump that uses the energy of soil and reservoirs is a very promising system that often requires large financial investments;
- wind generators that use wind power. In some countries where this issue is being addressed at the state level, such systems have great prospects and are already working quite effectively;
- solar panels powered, as you might guess, by solar energy. The design of such systems is usually of great interest. In some countries, such as Germany, solar panels provide heat and hot water to entire areas.
Solar heating system
Before imagining how the coolant is heated, it is worth considering what a solar battery is and what the principle of its operation is. A solar battery is nothing more than several photovoltaic converters combined into one unit, or a semiconductor device that uses sunlight and converts it into electricity. Everything happens in close connection with the basic laws of physics, which do not make much sense to consider. Today, solar energy attracts not only the views of scientists, but also ordinary people who are trying to solve problems related to water supply and heating.
Kinds
The standard device has the form of a metal plate, which is placed in a plastic or glass case. The surface of this plate accumulates solar energy, retains heat and transfers it for various household needs: heating, water heating, etc. Integrated collectors come in several types.
Cumulative
Storage collectors are also called thermosiphon collectors. This DIY solar collector without a pump is the most profitable. Its capabilities allow you not only to heat water, but also to maintain the temperature at the required level for some time.
This solar heating collector consists of several tanks filled with water, which are located in a thermal insulation box. The tanks are covered with a glass lid, through which the sun's rays shine through and heat the water. This option is the most economical, easy to operate and maintain, but its effectiveness in winter is practically zero.
Flat
It is a large metal plate - an absorber, which is located inside an aluminum case with a glass lid. A do-it-yourself flat-plate solar collector will be more efficient if you use a glass cover. Absorbs solar energy through hail-resistant glass, which transmits light well and practically does not reflect it.
There is thermal insulation inside the box, which can significantly reduce heat loss. The wafer itself has low efficiency, so it is coated with an amorphous semiconductor, which significantly increases the thermal energy accumulation rate.
When making a solar collector for a swimming pool with your own hands, preference is often given to a flat integrated device. However, it copes just as well with other tasks, such as heating water for household needs and heating a room. Flat is the most widely used option. It is preferable to make an absorber for a solar collector from copper with your own hands.
Liquid
From the name it is clear that the main coolant in them is liquid. A do-it-yourself water solar collector is made according to the following scheme. Through a metal plate that absorbs solar energy, heat is transferred through pipes attached to it into a tank with water or antifreeze liquid or directly to the consumer.
Two pipes approach the plate. Through one of them, cold water is supplied from the tank, and through the second, already heated liquid enters the tank. Pipes must have inlet and outlet openings. This heating circuit is called closed.
When heated water is directly supplied to meet the needs of the user, such a system is called open-loop.
Non-glazed ones are more often used to heat water in a swimming pool, so assembling such thermal solar collectors with your own hands does not require the purchase of expensive materials - rubber and plastic will do. Glazed ones have higher efficiency, so they are able to heat the house and provide the consumer with hot water.
Air
Air devices are more economical than the above-mentioned analogs that use water as a coolant.
The air does not freeze, does not leak, and does not boil like water. If a leak occurs in such a system, it does not cause as many problems, but it is quite difficult to determine where it occurred. Self-production does not cost the consumer much. The sun receiving panel, which is covered with glass, heats the air that is between it and the heat-insulating plate. Roughly speaking, this is a flat-plate collector with space for air inside. Cold air enters inside and, under the influence of solar energy, warm air is supplied to the consumer.
A fan, which is attached to the duct or directly to the plate, improves circulation and improves air exchange in the device. The fan requires the use of electricity to operate, which is not very economical.
Such options are durable and reliable and are easier to maintain than devices that use liquid as a coolant. To maintain the desired air temperature in the cellar or to heat a greenhouse with a solar collector, just this option is suitable.
DIY solar heating system
Today, the production of solar panels is already reaching an industrial level, but anyone can assemble a solar battery that can meet the needs of small house construction. Making solar panels with your own hands today is not much more difficult than assembling a simple electrical circuit. But for this you need to have everything you need, namely the solar energy converters themselves (monocrystalline solar cells), the necessary hardware, silicone sealant and soldering equipment. After this, you need to arm yourself with a soldering iron and get to work.
Before starting work, it is necessary to assemble the frame in which the solar cells will be located. It is a glazed box. For this purpose, you can order a metal-plastic double-glazed window made to the required size. Then we proceed directly to preparing the solar battery elements for assembly. To do this, contacts, or current-carrying tracks, are soldered to each of them. Then the system is assembled, consisting of four rows of nine elements in each row, for a total of 36 elements. The distance between assembly elements should be 5 mm.
During assembly, one condition must be observed - each adjacent row must be rotated 180 degrees, which will allow all elements to be assembled into one single chain. After this, it is necessary to attach a diode to each bundle consisting of six modules, although it is preferable to do this to each individual element. At the output, another common diode is installed, which is supplied complete with monocrystalline ones. After this, all contacts are finally bonded, and all voids are filled with silicone.
Upon completion of assembly, the internal surface is processed. To ensure the functionality of the device, you can cover the device with aluminum foil. Naturally, it is necessary to convert the received energy to obtain the required voltage. To do this, the solar energy is accumulated using a charging controller and the 12V battery is charged. After this, using a special inverter, this voltage can be converted into the required 220 Volts. As a result, 36 elements, 0.5 Volts each, ultimately allow us to obtain the required voltage.
However, hearing it is one thing, but seeing it with your own eyes is quite another. In this case, a lot of questions that usually arise after reading any material will immediately disappear. In the video presented, the process of assembling a solar battery seems very clear and intelligible. Many people can make a solar radiator if they have at least some skills in electrical engineering.
Collector Stanilova
Engineer Stanislav Stanilov presented the world with the most versatile solar collector design. The main idea of using the device he developed is to obtain thermal energy by creating a greenhouse effect inside the collector.
Collector design
The design of this collector is very simple. Essentially, this is a solar collector made of steel pipes welded into a radiator, which is placed in a wooden container protected by thermal insulation. Mineral wool, polystyrene foam, and polystyrene can be used as thermal insulation materials.
A galvanized metal sheet is placed at the bottom of the box, on which the radiator is mounted. Both the sheet and the radiator are painted black, and the box itself is covered with white paint. Of course, the container is covered with a glass lid, which is well sealed.
Materials and parts for manufacturing
To build such a homemade solar collector for heating a house you will need:
- glass that will serve as a lid. Its size will depend on the dimensions of the box. For good efficiency, it is better to select glass measuring 1700 mm by 700 mm;
- glass frame - you can weld it yourself from corners or put together from wooden planks;
- board for the box. Here you can use any boards, even from dismantling old furniture or plank floors;
- rental corner;
- coupling;
- pipes for radiator assembly;
- clamps for attaching the radiator;
- galvanized iron sheet;
- radiator inlet and outlet pipes;
- tank with a volume of 200−300 liters;
- aqua chamber;
- thermal insulation (sheets of polystyrene foam, expanded polystyrene, mineral wool, ecowool).
Stages of work
Stages of making a Stanilov collector with your own hands:
- A container is made from boards, the bottom of which is reinforced with beams.
- A heat insulator is placed at the bottom. The base must be especially carefully insulated to avoid heat leakage from the heat exchanger.
- Afterwards, a galvanized plate is placed at the bottom of the box and a radiator is installed, which is welded from pipes, and secured with steel clamps.
- The radiator and the sheet underneath are painted black, and the box is painted white or silver.
- The water tank should be installed under the collector in a warm room. Between the water tank and the collector you need to install thermal insulation to keep the pipes warm. The tank can be placed in a large barrel into which expanded clay, sand, sawdust, etc. can be poured. and thus insulate.
- An aqua chamber must be installed above the tank to create pressure in the network.
- Do-it-yourself solar collector installation should be done on the south side of the roof.
- After all the elements of the system are ready and installed, you need to connect them into a network with half-inch pipes, which must be well insulated in order to reduce heat loss.
- It would be a good idea to build a controller for the solar collector with your own hands, since factory devices do not last long.
Technical and electrical parameters of installations
- High resistance
- Efficiency from 20%
- Strained glass
- Water permeability of the case
- Resistance to bad weather conditions
Most often, an electrical system is used to heat a house that receives energy from solar modules.
But sometimes water heating is also carried out. which is supplied to the electric boiler. The heating circuit and installation in this case differ only in that additional space will be needed to accommodate batteries and a DC-DC converter. When using solar energy, it is more efficient to heat large areas (for example, heated floors) to small values. In such a system it is easier to change the temperature. if the weather changes, it’s easier to mount it. than others. In addition, the appearance of the interior will not be spoiled by bulky radiators.
Solar Heating Options
At the moment, the number of people who use solar heating, especially in greenhouses, is quite large. And this is absolutely not surprising, because this is a very profitable and quite economical option that will soon pay for itself.
Typically, these types of heating are done by professional farmers and gardeners in order to grow fruits and vegetables according to the rules and send them for sale.
And of course, it is simply physically impossible to grow plantations in the fresh air all year round, since winter is coming. And it is for this reason that greenhouses, greenhouses and similar structures are built. And if greenhouses are used only in warm seasons, then greenhouses are designed for year-round use.
And if we consider a greenhouse, then we need to take into account all the subtleties in order to create the best possible conditions for growing crops. But we move straight to the next question - what is the best heating system to connect to greenhouses? And we will consider the solar one!
Let's start by figuring out which heating option to choose? Well, if we consider it from the category of inexpensive and simple, then, of course, heating using solar energy will come first.
And in order to use it, you will need to install a greenhouse in the best place, where there is a lot of sun throughout the day. Do not forget that the material from which the structure is built is also extremely important.
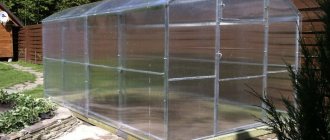
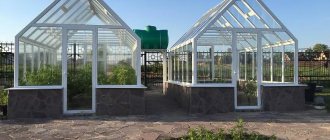
- Polycarbonate is primarily used for the construction of greenhouses. Why he? Because it gives an excellent greenhouse effect due to its cellular structure.
It turns out like this: in each of its individual cells there is air, which acts as an insulator.
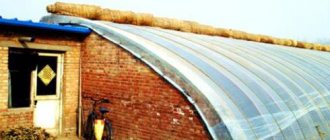
- There is also another material that can be used - glass. It is with its help that you can create both a greenhouse and the sun's rays will pass through the glass. About 95% of the sun's rays will enter through the glass. And in order to collect as much of this energy as possible, you can make a structure in the form of an arch. Moreover, to make the structure more prepared for winter, you need to install it along a line from east to west.
Water solar collectors for greenhouse heating
For a number of reasons, water heating of greenhouses is more preferable, although the cost of such a system is significantly higher than the cost of an air heating system. In essence, the solar water heating system of a greenhouse is no different from the solar heating system of a country house itself.
The differences lie only in the shape and location of the heating elements. In greenhouses, instead of the usual heating radiators for the room, pipes are laid along the walls in which warm water circulates. Pipes are also laid in the earthen floor of the greenhouse at a depth of 30 to 50 cm. This ensures both air heating and soil heating in the greenhouse.
Solar water heating diagram
In a water heating system, the coolant can be heated both in flat-plate collectors and in collectors on vacuum tubes. In a flat-plate collector, a flat coil is attached to the absorber, the manufacture of which requires a copper tube. This copper tube is first filled with salt, and only then can it be bent without fear of kinks.
When the tube takes the desired shape, the salt is easily washed out of it with running water. The coil is attached to the absorber and painted black with heat-resistant paint. The inlet and outlet pipes are brought out, and the holes through which they were brought out are sealed.
Scheme of a flat solar collector
Manifolds have a different design, built using vacuum tubes, which are connected with their tips to the coolant circuit pipe. Vacuum tubes are a glass cylinder, inside of which a copper tube with a low-boiling liquid is placed. The upper end of the copper tube is slightly expanded and sealed.
The space between the outer and outer tubes has been evacuated to create the maximum possible thermal insulation. The liquid inside the copper tube heats up and evaporates when exposed to solar radiation. Steam rises to the tip and heats it. Giving off heat, the steam cools, condenses and flows down the walls. At the tip the temperature can reach 270°C – 300°C.
Vacuum tube diagram
Vacuum manifold
The liquid heated in solar collectors is supplied by circulation pumps to a heat exchanger installed in the boiler. The water heated in the boiler enters the heating system. This tank must have strong thermal insulation to retain heat in the dark.
To prevent the water in the boiler from cooling too much, another heating element of the backup heating system is provided. This system turns on when necessary at night and can be powered from the home's solar power supply batteries.
Solar energy is increasingly becoming part of our everyday life. Its possibilities are inexhaustible. The sun gives us light, heat, electricity. And it would be simply unforgivable not to take advantage of this source of free energy. published econet.ru
We offer to buy heating for greenhouses from the manufacturer Solar B energy in Moscow and throughout Russia
The solar collectors offered by our production company, the price of which is quite affordable, meet all quality standards. We also guarantee high productivity and efficient functioning of the collectors. Our assortment includes our own products. Thanks to the introduction of the Solar-B energy solar collector in the greenhouse, it promotes faster ripening of crops and reduces heating costs for out-of-season visits.
How to order?
To order solar heating for greenhouses, simply call the indicated phone numbers or fill out the feedback form. Our managers will contact you to clarify the nuances and will be happy to give comprehensive answers.
Where to begin
Calculation of electricity costs. To determine the required power of a solar panel system, you need to calculate how much electricity you use. Much in this matter depends on whether a private house is used constantly or only as a summer house in certain seasons of the year. To calculate, take electricity payment receipts for the year and determine the total number of kilowatts spent during this period, then divide by 12 (the number of months) - you will get the average monthly electricity consumption.
Calculation of average monthly electricity consumption
As experience and reviews from real consumers show, in central Russia the result must be multiplied by a factor of 16 to obtain the required battery power in Watts.
Let's look at an example. In a year you spent 1625 kW, divide this figure by 12 months and multiply by a factor of 16 - it turns out 2166 watts. Those. a solar panel system will provide such a house if its power is at least 2200 Watt/hour
Role of greenhouse design
The presented option for creating a homemade collector is not the only one. There are other different designs of solar collectors that differ in their cost and operational efficiency. Any solar collectors that are manufactured independently are cheaper than factory-made options.
If you take a professional approach to growing various crops in greenhouses, then a self-designed solar collector will not be able to provide the required temperature conditions. In this case, a professional collector is purchased. There are various options available for sale. They are quite expensive, but the efficiency justifies the money spent.
Experience shows that extruded polystyrene foam can be used as a greenhouse insulator. The advantages of its use lie in its strength, it is not afraid of moisture and does not deform, and at the same time provides good heat retention.
DIY solar collector
The design of the greenhouse plays a big role. Due to working with asymmetrical structures, the heating efficiency of the greenhouse increases by 25% compared to conventional structures.
Ideas for heating greenhouses with your own hands
Many summer residents install greenhouses or greenhouses on their plots to grow seedlings in them and get an earlier and richer harvest. But if such a structure is equipped with a heating system, then you can harvest vegetables, herbs and even strawberries all year round. But to make heating in a greenhouse, you will need preparation and some construction skills.
Methods of heating greenhouses
There are several types of heating for indoor structures for growing vegetables all year round. Each of them has its pros and cons.
Possible types of heating and their advantages:
- Stove heating is characterized by high efficiency, simple construction technology, availability of fuel and the ability to regulate temperature. Installing a furnace or boiler will not require large financial costs.
- Air heating can quickly heat any area, and its construction technology is quite simple.
- The water system is reliable, safe and temperature adjustable. When using such devices, the greenhouse will always have air humidity suitable for growing plants.
- Solar panels are a natural, affordable, simple and cheap heating process. On a sunny day, the heat transfer from them is gradual.
- Gas heating is practical, relatively low cost, and provides fast and uniform heating when using a heater.
- Electric heating of greenhouses and greenhouses is practical, simple and effective. The devices can be used around the clock, and portable equipment can be installed in any convenient place.
But each of these heating systems has its drawbacks. Among them:
- Stove heating requires constant monitoring.
- In an air system, the heating process must be constantly maintained.
- For water heating, you may need electrical equipment for heating water or even installing an entire boiler room. All this is not cheap.
- Solar panels are only effective in good sunny weather. When using them, it will not be possible to regulate the air temperature.
- The gas system requires constant monitoring as there is a risk of fire. To install it, permission from special services is required.
- Electrical equipment requires a power source, dries the air and is quite expensive to use (electricity costs).
A specific heating system is suitable for each building. For example, for standard greenhouses with a small area, you should not choose expensive equipment. And in large industrial greenhouses, infrared coolants, heat pumps and other advanced technologies can be used.
Let's summarize
As you already understand, each of the systems is quite good, but not every one is suitable for harsh climates. So before you buy right away, it’s better to analyze well and understand which collector is best for you? And only then go shopping!
And in general, in the lives of many modern farmers and gardeners, greenhouses and greenhouses have taken root very much and this is not at all surprising! After all, these are such unique buildings that allow you to grow crops using all technologies! So you can safely go ahead and purchase heat and install solar heating on it!
Heating of greenhouses with solar air collector
Such a collector is the main element of this heating system. Depending on the location of this collector, heating can be carried out either by natural air circulation in the system or by using fans.
In the first case, the outlet pipe of the manifold should be located below the socket of the inlet in the greenhouse. Then the air heated in the collector, according to the laws of convection, will rise through the air duct and enter the greenhouse. The displaced cooled air enters the collector through the return air duct, heats up and returns to the greenhouse. This cycle is continuous and lasts throughout the entire sunny day.
In the second case, the location of the solar collector does not matter, since air circulation is supported by fans installed in the greenhouse at the warm air inlet
This method ensures uniform distribution of warm air masses throughout the heated volume, and, what is very important, uniform heating of the soil
Naturally, air ducts (especially hot ones) must be covered with thermal insulation so that the air cannot cool down quickly. At night, the air in a greenhouse without hot feed can cool quite quickly. Therefore, to maintain thermal conditions, it is necessary to provide a backup heating circuit. These can be fan heaters, air heaters.
The airborne solar collector itself is an extremely simple design. You can assemble it yourself from scrap materials in less than an hour. This is a sealed wooden box 10–15 cm high. The bottom is made of fiberboard. For strength, the side walls are connected with wooden blocks with a section of 5x5 centimeters.
A heat insulator is placed on the bottom - polystyrene foam or mineral wool. An absorber, for example, galvanized iron sheet, is placed on top of the heat-insulating layer. To increase the heating area, additional fins can be attached to this sheet.
All seams on the inside of the box are carefully treated with “Sealant”, after which the inside of the box is coated with black heat-resistant paint. Depending on where and how the collector will be installed, pipes for air inlet and outlet are built into its sides. After all the preparatory work, the box is closed with tempered glass, the joints of the glass with the body are sealed with “Sealant”.
Solar air collector diagram
All that remains is to put the collector in place and connect the air ducts to the greenhouse. In this case, the outlet pipe of the collector should be located above the inlet pipe. The dimensions of the collector are determined only by the dimensions of the metal sheet and glass. Depending on the size of the greenhouse, there may be several such collectors.
The air in such a collector is heated to a temperature of 45°C - 50°C. The heated air not only maintains a comfortable temperature for plants in the greenhouse, but, giving off its heat, also heats the soil, which creates the most favorable conditions for the development of the plant root system.
Solar batteries for greenhouse production. Greenhouse heating: types, methods and how to save
Heating greenhouses helps create a favorable climate for plant development in autumn and winter. Heating a greenhouse in winter maintains the required level of heat (+17...+20°C) inside the greenhouse naturally, protecting seedlings from death due to hypothermia or freezing.
Proper heating in a greenhouse: norms
Heating of winter greenhouses is regulated by the norms and regulations of SNiP 2.10.04-85 “Greenhouses and greenhouses”, which state:
- heating of winter greenhouses and greenhouses is carried out using secondary energy resources, heat from geothermal waters, if the listed sources are not available - from thermal power plants, nuclear
- power plants and combined heat and power plants or own heat sources;
- Heat supply and ventilation of greenhouses are organized based on taking into account the heat received by the soil during the day (in the cold season) and from solar radiation (in the warm season);
- The greenhouse heating system is designed with the condition that the coolant temperature is not higher than 150 °C.
Greenhouse heating: types
Ways to organize heating of a greenhouse in winter are based on the use of:
- gas;
- electricity;
- solar energy;
- infrared radiation.
Heating of greenhouses with gas works using gas heaters. The gas is burned directly inside the greenhouse.
During the operation of gas generators, carbon dioxide and steam necessary for plants are produced. The disadvantage of the system is that there is a high probability of oxygen burnout. This leads to the death of plants.
Electric heating of industrial greenhouses is carried out using the following methods:
- the use of convectors (in this case the ground does not warm up enough);
- use of air heaters (causes dry air);
- heating using cables (overheating of the plant root system is possible);
- water heating of industrial greenhouses (disadvantages: high cost, complex installation, need for constant monitoring).
With the help of infrared heating, the soil, the location of the plants, and the structure of the greenhouse are heated. The system uses heating and control devices. Disadvantages: high cost and high energy costs.
Heating greenhouses with solar energy
The types of greenhouse heating listed above do not make it possible to eliminate operating costs. Heating, based on the operation of devices that accumulate free, publicly available solar energy, solves this issue.
The equipment is now used in Europe, the USA, and Canada. It is also represented on the Russian market. Heating greenhouses with solar energy eliminates the need to pay for heating with gas or electric appliances.
The equipment is easy to install and operates autonomously in spring, winter, summer and autumn.
The principle of operation of solar panels
Modules that capture solar energy are electricity generators based on photovoltaic reactions.
Electric current is generated according to the principle of emission (emission of electrons) of heated bodies. The basis for the panels is silicon. The efficiency of one such module is not too high - about 30% with a power of up to 300 W. To obtain better results, the developers combined several dozen solar cells in circuits. And this method gave better results; some installations can fully operate even in moderate cloudiness. To create a comfortable temperature all year round in a house of 30 square meters. m. in the central zone of our country, the total surface area of the modules should be at least 100−120 sq. m. m. Inside the house there must be a room for batteries and distribution equipment.
What does heat storage provide?
The operation of a greenhouse is based on the entry of solar energy into the shelter and its accumulation there due to the properties of the covering materials. However, even in winter, the amount of this energy far exceeds the needs of plants. The excess is simply reflected into space and does not bring any benefit from it.
If we use the accumulation of solar heat in a greenhouse, then the resulting reserves can then be successfully used for heating. The advantages are obvious: the temperature in the greenhouse is maintained at the desired level without consuming expensive energy resources for artificial heating.
Thermal accumulator
Ivanovich Ivanov
writes: Look, don’t even think about arranging such a structure in the basement of a residential building.
Miskinis
writes: Have you considered how much battery capacity is needed per square meter of house?
Maxim V
writes: Thick thermal insulation is great, but you can make a structure with air gaps between the layers. Those. 20 cm foam plastic (mineral wool), 20 cm air, etc. So, at low cost, it is possible to double the thermal insulation layer. In this case, in the intervals, water leakage from the container will be immediately visible, the thermal insulation will be ventilated, and will not become wet in the mass if there are hidden holes.
Stas Mac
writes: Tell me, how does this structure hold the entire column, so to speak, the mass of water? The video doesn't seem to show any metal frames, or is there something like a welded skeleton inside? Or some other solution? It’s just that foam doesn’t hold tons of water?
Alexander Vasilenkov
writes: Let the fish in, feed them bread, potatoes and onions, and cook the fish soup so that everyone can eat.)
We are talking about a device that is capable of accumulating thermal energy from the Sun for a certain time, and then releasing it evenly to the surrounding area. To put it simply, in our case the most common means are used as a heat storage: