Preparing the soil and container
Broccoli, like any other variety, prefers nutritious and loose soil, through which moisture and air penetrate well. To prepare a soil mixture of the correct composition, it is necessary to mix rotted manure or compost with turf soil in equal proportions. In addition, fertilizers containing micro and macroelements are added to the mixture. To do this, you can use wood ash at the rate of 1 tbsp. l. per 1 kg of soil.
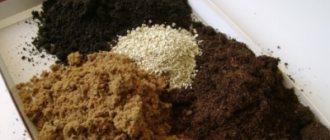
The soil for broccoli seedlings should be nutritious and loose, for which turf soil and rotted manure are used.
In the process of preparing the soil mixture, you can replace the turf soil with peat with the addition of sand. If you don’t want or have the opportunity to prepare the substrate yourself, you can buy a ready-made one.
To reduce the likelihood of young plants becoming infected with various diseases, it is not recommended to take soil from the garden, especially from the place where cruciferous crops (radishes, radishes, cabbage) were cultivated. The fact is that such soil most likely contains pathogens characteristic of these plants (fusarium, black leg, gray rot, etc.).
Preparing the soil for growing seedlings also includes a disinfection stage. To do this, 2 weeks before the intended sowing of seeds, the soil is steamed in the oven at a temperature of +200˚C for 15 minutes. After the substrate has cooled, it is spilled with potassium permanganate (1% solution). For these purposes, you can use other drugs, such as Fundazol, Gamair.
For growing broccoli seedlings, homemade wooden boxes, plastic containers, and special cassettes are suitable. If you plan to sow in large volumes, then such containers will be the best option. For a small number of plantings, you can use plastic cups or bottles, pots, etc. The main thing is that there are drainage holes on the bottom of the containers. Before sowing seeds, it is recommended to treat the container with potassium permanganate.
Homemade boxes or special cassettes are suitable for growing seedlings
Growing Tips
Broccoli seedlings are grown in the same way as white cabbage. Before the emergence of seedlings, the temperature in the room where the containers with the crops are located is maintained at 20 ºC, but after hatching it is halved for a week. Then the temperature regime is set as follows: on sunny days – 16 ºC, at night – 9 ºC, on cloudy days – 14 ºC.
When the seedlings are two weeks old, during the initial sowing in a seedling box, the plants are picked. It is best to do this in peat pots, in which the seedlings can then be planted in the garden without any problems. After picking, the seedlings are protected from the sun for several days by constructing a paper shelter, and the room temperature is raised to 21 ºC.
Broccoli is a popular vegetable that is rich in nutrients. If you correctly calculate the sowing date and plant strong seedlings in the beds in a timely manner, further cultivation will not take much effort.
Preparing broccoli seeds for sowing
Broccoli seeds need to be processed before sowing, which is carried out for the purpose of disinfection, acceleration of germination and sorting of low-quality seed material.
Sorting
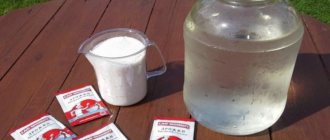
For sowing, it is advisable to select only large seeds, but medium ones can also be used. Small and damaged grains must be removed. Calibration can be carried out using a mesh of suitable size (about 1.5 mm). There is another way: the seeds are placed in a 3% saline solution for 5 minutes. Everything that remains on the surface is thrown away. Seeds that have settled to the bottom are considered suitable for sowing. After this solution, they are washed in clean water.
Broccoli seeds are sorted before sowing, selecting only large and medium grains
Disinfection
To treat seed material against various pathogens, it is soaked in a solution of potassium permanganate for 20 minutes, after which it is washed. Many gardeners use this method, but there is an equally effective method of disinfection - thermal. To do this, the seeds are poured into a thermos and filled with hot water (+60˚C) for 25 minutes, after which they are washed with cold water.
To disinfect, broccoli seeds are placed in a solution of potassium permanganate for 20 minutes.
Germination
You can germinate seeds both in ordinary water and in growth stimulants, for example, Heteroauxin, Kornevin, etc. It is possible to prepare a nutrient solution based on wood ash (1 tablespoon per 1 liter of water), in which the seeds are soaked for several hours . After processing, they are washed, placed on the bottom shelf of the refrigerator for a day, and then dried and planted.
Cabbage seeds are germinated in plain water or in growth stimulants for faster germination
Choosing a proven broccoli variety
Like any vegetable crop, broccoli yields vary depending on the variety. If in the homeland of asparagus cabbage you can choose from two hundred varieties, then in our country, at best, there are about three dozen. And let's face it, the store will most likely only offer you 1-2 pieces of broccoli. Moreover, no one guarantees that these will be champion varieties. The choice, frankly speaking, is small!
This is what broccoli seeds look like
If you have the opportunity to look for seeds from different distributors, we advise you to stop at this list of high-quality varieties and hybrids that boast low maintenance:
- Batavia F1 (early hybrid, inflorescence weight can reach 2 kg);
- Curly head (early variety, inflorescences weighing up to 0.5 kg);
- Marathon F1 (late-ripening hybrid, bears fruit until November);
- Monterey F1 (large-fruited hybrid - inflorescences weighing up to 2 kg);
- Moscow souvenir F1 (early ripening hybrid, inflorescence weight up to 0.5 kg).
Caring for broccoli seedlings at home
The health and quality of the plants, as well as the future harvest, depend on how well the seedlings are cared for. Therefore, seedlings need to be provided with appropriate conditions in which they will feel as comfortable as possible.
Temperature and lighting
Temperature is one of the main factors for the proper development of seedlings. After sowing the seeds, containers with seedlings should be in a warm place with a temperature of +18–20˚С. When seedlings appear, these values must be lowered: in sunny weather to +15–17˚С, in cloudy weather – +12–13˚С, and at night the indicator should be about +8–10˚С.
When growing broccoli seedlings, it is important to observe the temperature regime: in sunny weather up to +15–17˚С, in cloudy weather – +12–13˚С, and at night the indicator should be about +8–10˚С
Video: what to do with broccoli sprouts
Broccoli is a light-loving crop. First of all, it is worth considering that seeds for seedlings are sown in March, when daylight hours are quite short. Therefore, it will be necessary to organize additional lighting, which can be used as phyto- or LED lamps. It is believed that fluorescent lamps are not suitable for cabbage due to a different light spectrum. Young seedlings should be illuminated for 15 hours. The light source is placed above the plants at a height of 20 cm.
With a lack of sunlight, broccoli seedlings need additional lighting
Watering
Any variety of cabbage loves moisture, the lack of which leads to the death of plants. However, waterlogging of the soil contributes to the occurrence of dangerous diseases such as clubroot and blackleg. This suggests that irrigation should be carried out as the top layer of soil dries, and the room with seedlings should be periodically ventilated.
Recent Entries
Lilac perennials that are beautiful, compact and do not crowd out other plants Why when buying seedlings you should not take the sellers’ word for it and how to determine the age of the plant using 3 signs Tomato seedlings have turned purple or whitish: why the color has changed and how to save the plants
To water broccoli seedlings, use only settled water at room temperature.
Broccoli is moisture-loving, so the soil should not be allowed to dry out, but there is also no need to flood the plants.
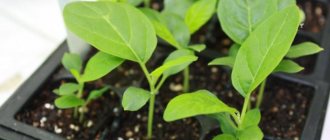
Picking
Seedlings are picked at the age of two weeks. As a container, you can use any suitable sized pots, cups, cut plastic bottles, etc. However, peat pots are considered the most convenient option, since the plants from them do not need to be replanted. When diving, special care should be taken to avoid damage to the roots. Otherwise, the growth and development of seedlings will be slow.
Picking is the process of transplanting seedlings from a smaller container to a larger one, which promotes the normal development of the above-ground and root parts.
When picking broccoli seedlings, the plants are transplanted into a separate container for the normal development of the leaf and root parts
Containers with seedlings are pre-watered to make the plants easier to remove. The rest of the process boils down to the following steps:
- As a soil for picking, use the same soil mixture as when sowing seeds, pre-moistening it from a sprayer.
- Make holes for plants.
- Using a special spatula or a flat wooden stick, remove the sprout from the nursery and place it in a separate container, compacting the soil and spraying it.
Until the broccoli seedlings take root, you need to protect them from direct sunlight and provide a temperature of +20–22˚С.
Video: how to pick broccoli seedlings
Top dressing
Full development of young plants is impossible without additional nutrition. Seedlings can be fed 2–3 days after planting with a solution of nitroammophoska. To prepare a nutrient solution, dissolve 1 tbsp in a bucket of water. l. fertilizers 50 g of the substance is poured into one container with a plant. After this, the temperature during the day is lowered to +16–18˚С, at night it is maintained at +8–10˚С.
Hardening
Before planting broccoli seedlings in open ground, the plants must be hardened off. They do this so that they get used to conditions as close as possible to open ground. The procedure begins two weeks before the cabbage is planted in the garden. First, the seedlings are taken out onto the balcony or loggia for several hours. Gradually the time is increased, and in the last days the plants are left overnight.
In order for broccoli seedlings to adapt to external conditions, a hardening procedure is carried out
When can you plant broccoli?
This variety of cabbage ripens early: the entire growing season (from germination to harvesting the head) is just over two months. When growing seedlings, only 30–35 days pass from planting in the ground to harvesting. Broccoli is not as fastidious as regular cauliflower and grows in all soils. It can be sown directly in open ground, or it can be grown through seedlings, like any cabbage.
If you grow cabbage through seedlings, you must take into account that the seedlings stay at home for 35–40 days until they develop 6–8 true leaves. Such seedlings can usually be planted in the garden on May 10–20. Thus, it turns out that sowing seeds for seedlings in a city apartment occurs around the end of March - beginning of April.
Broccoli seedlings should have at least 6 healthy leaves at the time of planting in the ground.
In most areas of our country, the seedless method is possible. In this case, the timing of sowing broccoli seeds directly into the garden bed is counted from the end of April. The last date for sowing is approximately the beginning of July; later sowings may not have time to produce a good harvest.
Buy seeds from trusted manufacturers:
- Curly broccoli (gavrish) is a late variety, characterized by a low single-stem plant with no side shoots and without the formation of secondary heads.
- Broccoli cabbage Marathon F1 (prestige) - a mid-early productive hybrid with dark green dense heads of medium size weighing up to 1 kg
- Broccoli Fiesta F1 (Prestige) is a mid-early hybrid with beautiful, very dense dark green heads.
- Broccoli Monaco F1 is an early hybrid variety that is grown by sowing seeds in open ground or using seedlings.
- Broccoli cabbage Emerald magic (Ural summer resident) - Delicious cabbage of high dietary and taste qualities. The head is large, round, gray-green, dense, without covering leaves, weighing up to 0.6 kg.
- Broccoli Absinthe F1 (search) is a vegetable rich in vitamins and microelements that is not demanding on growing conditions. Large heads of rich green color reach 1.2 kg in weight.
Possible problems when growing broccoli seedlings
When growing broccoli seedlings, problems sometimes arise that, one way or another, affect the growth and development of the plants, and in the future their quality. If young seedlings turn yellow, this is a clear sign of a lack of nutrients in the soil or an excess of them. So, with potassium deficiency, the tips of plants turn yellow. In addition, yellowing can be caused by infections in the soil, which was not treated before sowing.
Broccoli seedlings are stretched due to lack of light or non-compliance with temperature conditions
If rotting of seedlings is observed, this indicates infection with fungal diseases. If it is a black leg, then the planting first turns brown, and then the lower part of the stem rots and becomes thinner, which leads to the death of the seedling. Quite often you can see cabbage seedlings stretching out. The main reason for this phenomenon is lack of light, incorrect temperature conditions, and high planting density. In this case, it is necessary not only to thin out the plants, but also to provide the necessary conditions for their normal growth.
Black leg is one of the main diseases of cabbage seedlings, in which the stem at the bottom rots and becomes thin, which leads to the death of the plant.
If your seeds have not sprouted at all, then there are not many reasons: poor-quality seed material or non-compliance with temperature and humidity. We can conclude that the bulk of the problems that arise when growing broccoli seedlings are caused by improper preparation of the soil and seeds, as well as non-compliance with the conditions for normal plant development.
Pests and diseases of broccoli
Insects
- Aphids are insects about 2 mm long that suck juices from plants. When attacked by aphids, broccoli leaves turn pink and curl.
- Cruciferous flea beetles are both dangerous bugs and their larvae. Insects feed on plant leaves, causing them to die.
- Snails and slugs eat all parts of the plant. For prevention, you need to scatter eggshells around the broccoli.
- The cabbage butterfly (“cabbage butterfly” popularly) is a white or yellowish butterfly with black dots on its wings. Lays eggs on the lower part of the leaf blade. The emerging caterpillars eat the broccoli leaves.
- The cutworm is a nocturnal moth whose caterpillars also feed on cabbage leaves. The leaves become holey and the plant is stunted in growth.
- Cabbage fly - can begin laying eggs as early as early May. The emerging larvae are visible to the naked eye; they feed on the roots of the plant and cause its death. Initially, the plant lags behind in growth, the leaves acquire a purple tint.
Fungal infections
- Powdery mildew - caused by fungi, can affect seedlings. Characteristic signs are the appearance of blurry yellow or white spots on the upper part of the leaf, and a grayish coating on the underside, similar to ordinary dust. Appears as a result of high humidity, excessive watering, and soil rotting.
- Clubroot is a highly contagious disease; diseased plants must be immediately destroyed. Affects cabbage roots. With this disease, heads of cabbage and inflorescences practically do not form, the plant looks weakened, and is easy to pull out of the soil. Growths are observed on the roots, sometimes they are visible on the lower part of the stem.
- Black leg - often observed with dense plantings, improper preparation and fertilization of the soil. Affects the lower part of the stem. The area bordering the root collar becomes black and the plant rots.
- Alternaria blight is a fungal disease often observed during a combination of warm weather and frequent rains. Black spots appear on the leaves.
- Dry rot - often transmitted to seeds from the mother plant if it has been infected. Light spots with specks are observed on the leaves.
Bacterial infections
- Mucous bacteriosis - caused by bacteria that infect the stem and leaves. Manifests itself in the form of rotting of the named parts of broccoli.
- Vascular bacteriosis - bacteria affect the vascular system of cabbage. Manifested by the presence of black veins on the leaf.
Viral infections
- Black ring spot is a viral disease, the signs of which are dark spots on the leaves.
To prevent diseases and pest attacks, it is important to take preventive measures:
- Hardening and pre-sowing treatment of seeds.
- Proper soil preparation.
- Using the best varieties and hybrids with good immunity against diseases
- Hardening of seedlings.
- Preventive treatment with special agents against diseases and pests.
- Proper watering, loosening and weeding
- Compliance with recommendations from predecessors.
- Ventilation of film shelters and greenhouses.
It's hard to find a healthier vegetable than broccoli. Its cultivation does not cause difficulties even for a novice vegetable grower. Despite the fact that this cabbage comes from Italy, it feels great in our climate. Try growing valuable broccoli too!
Further care for broccoli
Caring for broccoli is not much of a hassle. One of the features of the culture is the need to shade young plantings from direct sunlight. To do this, you will need to build a shading structure made of fabric. As for watering, they are carried out once a week, of course, taking into account weather conditions. The soil should not be allowed to dry out or become waterlogged. Plants are irrigated directly at the root, and also resort to spraying. The main thing is that watering should be done in the morning or evening.
The soil in the cabbage bed must be loosened after each watering or rain. This will promote better oxygen penetration to the root system and the setting of inflorescences. Loosening also helps remove weeds, which not only attract harmful insects, but also increase soil moisture, which leads to the development of fungal diseases.
Loosening the soil in cabbage beds improves air exchange and helps fight weeds
Broccoli in open ground needs additional nutrition. During the growing season, 3 feedings are carried out:
- The first time fertilizer is applied 2 weeks after planting the seedlings (1 cup of mullein and 1 tsp of urea per 10 liters of water).
- The plants are fed a second time 2–3 weeks after the first (1 tablespoon of ammonium nitrate per 10 liters of water).
- The third time the plants are fertilized at the end of the summer period (40 g of superphosphate, 10 g of potassium sulfate and 20 g of ammonium nitrate per 10 liters of water).
During the ripening period of the inflorescences, the cabbage stem becomes weak. Therefore, plants need to be helped by adding a nutrient solution, which is similar to the third feeding. In addition, it is necessary to promptly respond to the appearance of pests and the occurrence of diseases, resorting to folk remedies or using bio- or chemical preparations.
Video: caring for broccoli and preventing flowering
To grow high-quality broccoli seedlings, it is necessary to create comfortable conditions for the plants. In many regions of the country, cultivation of this variety of cabbage is possible by direct sowing of seeds in open ground. However, to get an early harvest, the seedling stage is mandatory. Compliance with all the rules and recommendations will allow you to grow strong seedlings and painlessly transfer the transplant to open ground.
- Author: Vladimir Dolzhenkov
Rate this article:
- 5
- 4
- 3
- 2
- 1
(0 votes, average: 0 out of 5)
Share with your friends!
Planting seedlings in open ground
It is worth planting seedlings in open ground only after 2-4 full-fledged leaves appear on it. Another sign is a mature root system. The roots look stronger. There are no signs of rotting or the development of other diseases. The soil preparation process is as follows:
- the depth of the hole is equal to 85% of the length of the plant;
- 300 g of complex fertilizer is placed in each recess;
- immediately after immersing the seedlings, water it.
Agrotechnical manipulations are carried out in warm and windless weather. It should not rain 3 days before transplantation.
Pre-planting work with seeds
So, the seeds have been purchased, the container and soil have been prepared, the place for seedlings has been selected and arranged. The long-awaited moment of landing is approaching. Let's look at the action plan point by point:
- 4 days before the selected day, fill a jar with a sufficient amount of tap water and leave it for 48 hours. The water must settle; the chlorine contained in it is not the best thing that the seeds can taste when they begin to wake up.
- Open the packets of seeds 2 days in advance. If damaged or too small grains are found in them, it is better to discard them immediately. The seeds are quite large and easy to see.
- We pour out some of the water, put it in the refrigerator for a while and cool it to 10°C. We heat another part of the water to 50°C.
- Place the seeds in a jar of hot water for 15-20 minutes. Then we filter through cheesecloth, take out all the grains and immediately lower them into cold water for the same time. It happens that several seeds float. They should be thrown away immediately, as they have spoiled and will not sprout anyway.
- We take out the seeds again and dry them lightly on a piece of cloth or towel.
- Soak the grains for 6-7 hours in a biostimulant solution. Heteroauxin, IMC or Epin will do. And if a purchased stimulant is not available, you can try replacing it with an infusion of wood ash (2-3 tablespoons per liter of settled water). Sometimes a solution of potassium permanganate and boric acid is used, 1 g per liter of water, but in this case the seeds are kept in it for 2-3 hours.
- Rinse under running water, wrap in a damp cloth and place on the refrigerator shelf for 48 hours. This process is called hardening, or stratification.
- Dry until fluffy.
That's it, the seeds are ready for planting!
Preparing boxes with soil
While the broccoli grains are hardening in the refrigerator, you can prepare the boxes of soil. It is possible to use drainage, but gardeners are divided on its use. You can use expanded clay, crushed brick or pebbles as it.
Fill approximately 1/3 of the container. However, you can imagine how heavy the container will be. This can create serious problems both when caring for seedlings and when transporting them.
The soil prepared in advance should be poured into boxes or pots so that about 2-3 cm remains to the top. There is no need to compact it, the soil should be quite loose
The final part is hydration
Sowing broccoli
We make grooves or mini-holes 1-1.5 cm deep. It is advisable to lightly pour these grooves with a slightly pink solution of potassium permanganate and wait 30-40 minutes. Now you can take out the seeds and place them.
You can sow broccoli seedlings thickly, but in this case you will need to pick, and cabbage really doesn’t like this. It is best to place the grains at a distance of 4-6 cm from each other, moving them with a stick or match if necessary.
Sprinkle the seeds with soil, cover the top with glass or plastic wrap and leave at a temperature of 18-20°C in a room with diffused lighting. After 3 days you can check whether the first shoots have appeared.
As soon as 50-70% of sprouts appear, the seedlings should be provided with a temperature of about 10°C, as mentioned above.
Watering
The soil needs to be moistened regularly, but the main thing here is not to overdo it: stagnant water often causes a disease known as blackleg. This is a fungus that can easily and in a short time destroy entire seedlings.
Watering is usually done once every 3 days, and it is worth using settled water. The best time is evening or early morning.
Advice for beginning gardeners who constantly have doubts about the sufficiency of soil moisture: you can make a hook out of wire and use it to scoop up a lump of earth from a depth of 3-5 cm. If it feels dry to the touch and easily crumbles under your fingers, then it’s time for the next watering.