Characteristics of the tomato variety Linda F1
The Linda F1 tomato cultivar was bred by Japanese breeders in 2009. It is a hybrid. When buying seeds, pay attention to the name, as there is another type of tomato called Linda , created by Russian scientists. This is a type of cherry tomato that is grown on the balcony.
Both varieties have earned a good reputation for their early maturity and yield volumes. Now let's talk in more detail about the tomato variety Linda F1.
Features of hybrid fruits
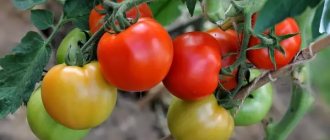
Linda F1 tomatoes are medium-sized fruits, from 80 to 150 g , the weight of some reaches 300 g. The color is juicy red. The variety is suitable for fresh use and in homemade preparations for long-term storage, including in whole form.
The shape of the fruit is slightly flattened, round, the skin is dense. The taste is rich, but unobtrusive, pleasant, slightly sour. The appearance of tomatoes is attractive and “tasty” , so for gardeners preparing the crop for sale, this will be a significant advantage.
Advantages and disadvantages
Linda F1 tomatoes quickly gained popularity among gardeners. This is one of the most common varieties of tomatoes grown on our plots. Why do experienced gardeners choose this species?
The undeniable advantages of the variety:
- Large fruits, approximately equal in weight and general appearance.
- Tomato variety Linda F1 is not whimsical.
- Tolerant of temperature fluctuations.
- Easily tolerates heat.
- The thick skin protects against cracking.
- It is immune to diseases such as verticillium (fungal infection, when the leaves turn yellow below, then dry out and fall off) and fusarium (dark spots appear on the leaves, followed by drying out and loss of leaves). Also, the plant is not affected by Alternaria stem blight (damage to brown stems in the form of rings) and gray leaf spot (small spots on black-brown leaves).
- High yield - about 2 kg of fruits are obtained from each bush.
- Minimal care.
- In 100 days of life, Linda produces several crops. You will taste the first fruits in mid-June, and at the end of September you will collect the last ones.
- High yields are harvested with long daylight hours and high temperatures of 22-25 C°.
Among the disadvantages of the Linda F1 tomato, according to reviews from amateur gardeners, are:
- high cost of Linda F1 seeds;
- some summer residents noted a slight plastic taste, but this is rather a subjective assessment.
The advantages of tomatoes in terms of characteristics largely outweigh the disadvantages.
Reviews from gardeners
Ekaterina, Kyiv
Linda was my favorite. If there were seeds, I would sow them again.
Source: www.sadiba.com.ua
Evgeniy, Grodno
Linda is a very sweet hybrid, almost no acid, with a good aroma. Identical to tomatoes grown in Turkey for retail chains in early summer (suspected to be a related hybrid). The pulp is dense, but the last tomatoes in the season are somewhat mealy.
Source: forum.vinograd.info
Features of cultivation
The ideal place for growing is open ground. Tomatoes will also be comfortable in greenhouses, and the bushes will produce a good harvest. Gardeners usually plant 4 seedlings per 1 m². Young seedlings are planted after the end of frost. In warm regions, seeds are immediately sown in the ground without first growing seedlings.
Seed preparation
The preparation of seeds of this variety is similar to other types of tomatoes: exclude defective, empty and moldy seeds.
To improve growth, professionals recommend treating the seeds with growth stimulants and, to increase resistance to infections, disinfecting them with a solution of potassium permanganate in a ratio of 1 g per 1 liter of water. The seeds are kept in the solution for 20-30 minutes, after which they are washed with running water and placed in growth stimulants for 12 hours.
Planting seeds and care
The next stage after preparation is planting the seeds in seedling cups or boxes. The ideal soil is considered to be a mixture of turf soil, peat, black soil and a small amount of sand. Gravel is poured into the bottom of cups or boxes to serve as drainage. Expanded clay is also suitable here.
2 or 3 seeds are planted in cups, and one seed per 7 cm² in boxes. The plantings are covered with polyethylene and placed in a room with a temperature of at least 25°C. Water with a moderate drip method. Light is provided up to 12 hours a day. If there is not enough daylight, lamps are used.
When the seeds sprout, the plastic film is removed and the temperature is reduced to 20°C.
After the formation of 2-3 leaves, a pick is made. When the seedlings grow to 10-15 cm, they are planted in the ground.
How to care for a tomato after planting - general recommendations
Caring for tomatoes is easy. Main:
- Water regularly after sunset.
- Do not fill. Excessive moisture will lead to the death of the bush. Before the fruits appear, it is enough to water 1-2 times every two weeks.
- Feed the soil. You can plant plants between the rows that improve the composition of the soil - peas, clover, mustard.
- Weed and hill up the soil after planting.
- Tie up bushes. Although many gardeners say that the stems are strong enough and behave well without tying them up, professionals say that this must be done so that the plants do not break under the weight of the ripe crop.
- Protect from insect pests.
- To prevent diseases: spray with a solution of wood ash or nettle tincture.
Popular fertilizers
Despite the unpretentiousness of the variety, the soil needs to be fed 5 times per season with organic and mineral fertilizers:
- Before planting seedlings, gardeners fertilize the soil with manure and compost.
- 3 weeks after planting the seedlings, phosphorus, potassium and nitrogen or a solution of bird droppings are added to the soil.
- When the ovary is formed, the soil is fertilized with ready-made mineral fertilizer: “Ideal”, “Nitrophoska”, “Agricol-Vegeta”. Potassium chloride and sodium humate are also used.
- During the next feeding, when flowers form on the third cluster, mineral fertilizers are also used, including potassium sulfate and superphosphate.
- Gardeners carry out the last feeding 14 days after the previous one, mainly using superphosphate.
How to sow correctly
Linda tomato is best sown in neutral, fertile and well-drained soil. The growing technology looks something like this:
- Soak the seeds in a special solution that stimulates their germination. After some time, they are laid out on a plate and covered with a damp cloth.
- In a few days they will have small roots. This means that the seeds can be sown in the soil. It's a pretty easy process. Tomato seeds are simply laid out and covered with a layer of earth, the thickness of which should not exceed 1 cm.
- The container or bed is covered with plastic wrap until the first tomato shoots appear. After this it is removed. When it comes to growing tomatoes in boxes, special attention is paid to temperature conditions.
- Throughout the entire growth period, seedlings need to be fed with mineral fertilizers. After planting, fertilizing is carried out once every six months.
When growing a plant, it is worth considering some rules. So, for irrigation you should use only warm water. Also, grown seedlings need to be provided with a place without drafts.
Ripening time and yield
The first fruits are harvested around mid-June. If the seeds were planted in March, after about 100 days, summer residents try their tomatoes. Linda F1 bears fruit until late autumn. It is noted that the more often the fruits are removed from the bush, the more fruit it bears.
Productivity reaches 2 kg per bush. Fans also point out that all the fruits of this plant turn red quickly and at the same time, so some gardeners treat the bushes with a magnesium solution so that they do not turn red longer.
The best time to harvest is early in the morning. First, remove the ripe tomatoes. For long-term storage and sale, it is recommended to remove brown tomatoes; they will ripen on their own in a dark place.
Care after landing
During the cool season, you should not water the bushes often; dry soil will be considered a signal for this. In the summer, it is enough to perform this procedure at intervals of two to three days.
Like all tomatoes, Linda loves warmth, for this reason it must be placed on the south or east side. If the bushes begin to stretch upward, and internodes begin to form between the leaves, then this is a sign that the plant is very hot.
If you grow Linda on a glassed-in balcony, and it is hot outside, then you need to control the temperature around the plants, which should not exceed thirty degrees. To lower it, you can hang light curtains on the windows and keep the frames slightly open. Some owners even take containers with bushes into a room where it is a little cooler.
There is one inconvenience - you will have to do the pollination of plants yourself. As soon as the inflorescences open, the brushes should be gently shaken in the morning. At this stage, it is allowed to use the drug Ovary, which helps in the formation of fruits.
Hand pollination
The Linda tomato does not need pinching, and there is no need to tie its branches to support posts. During the flowering period and after a couple of weeks, the plants can be fed with mineral fertilizer compounds containing potassium, phosphorus and nitrogen. Wood ash is also used for the same purposes, diluting one spoon with water in an amount of 500 ml.
Methods for obtaining seeds
According to reviews from experienced professionals, it is better not to use Linda f1 tomato seeds from last year’s harvest . Each season, new seeds are acquired, just as with other hybrids. But if you still decide to try to get seeds at home, here’s what experienced tomato growers advise you to do:
- Choose the largest, undamaged, ripe fruits. If you choose brown or pink ones, in any case, wait for them to ripen, for example, on a windowsill. The first ripened fruits are best.
- Wash the tomatoes and carefully cut them in half.
- Use a spoon to scoop out the seeds and place them in pre-sterilized jars with boiling water.
- Cover the jars with gauze and secure with a rubber band.
- At a temperature of 23-25°C, leave the seeds to ferment in their own juice for two days, no more, otherwise they will germinate.
- Remove and wash the seeds through several layers of gauze, removing any mucus.
- Remove pop-up and empty ones.
- Allow the seeds to dry for up to 7 days at a temperature of 25C°, using glassware or a cloth. You cannot use paper!
- Rub the resulting seeds between your fingers and let them dry for up to 2 days at a temperature of 35°C, for example, in the attic.
- Place the received seeds in a paper envelope and sign.