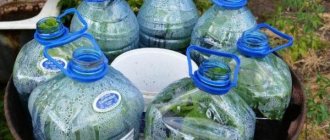
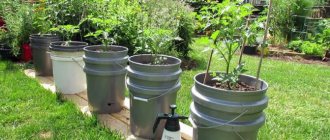
Tomatoes in plastic bottles
A completely new, unique way of growing seedlings has emerged in Japan.
With the help of this technology, environmentally friendly products are cultivated at home, which are so valued by all residents of Japan. The Japanese originated this idea because they have very small areas for planting. The shortage of land in Japan is due to the high price. Thanks to T. Hasegawa, it became possible to grow tomatoes in five-liter bottles. The student was the first to create a device from a plastic container and grow delicious vegetables in it. Then this method of cultivating vegetables migrated to post-Soviet countries, and an ordinary five-liter eggplant began to be used as a device. Moreover, the bottles are suitable not only for growing tomato bushes, but also for picking them. Let's find out in more detail how to grow tomatoes in bottles (plastic).
Advantages and disadvantages
The advantages of such cultivation include:
- efficiency of space used;
- favorable environment for germination;
- sprouts do not interfere with one another;
- no damage to roots when diving;
- easier to grow at home;
- there is no need to purchase soil;
- maintaining cleanliness in the room where tomatoes are grown;
- hygiene of the method.
At the same time, modern gardeners have not yet identified the disadvantages of such cultivation.
Brief description of the method
Growing tomatoes in a greenhouse in 5 liter bottles is both economical and effective. The method is that the seeds are sprouted not in the ground, but in toilet paper. The seedlings are clean, without lumps of earth, which makes it easier to remove side shoots from the plants and subsequent planting of the sprouts in the soil. Another advantage of this method is its hygiene. So, even when sowing seeds in an ordinary apartment, soil will not be scattered anywhere, and there will be no need to constantly remove dirt from the window sills.
Tomatoes in plastic bottles
On a note! This method of growing seedlings is suitable not only for tomatoes, but also for such flower crops as marigolds and petunias, as well as for sowing eggplants and cucumbers.
Advantages and disadvantages of the method
The drip system for watering plants has proven itself well, since even novice gardeners enjoy its benefits.
It is easy to make a device with your own hands without special knowledge. The irrigation system does not require large financial costs. The design is reliable in operation, reduces water consumption and improves uniformity of watering.
A do-it-yourself drip system is not without certain disadvantages. It is not used for watering a large area occupied by tomatoes.
Water supplied pointwise affects the development of the root system, causing its compaction and dysfunction. It is not recommended to use the system on loamy soils, since the holes in the bottles become clogged with soil.
Some gardeners are afraid of the interaction of harmful substances with the soil, so they do not use plastic jars for irrigating tomatoes.
The use of drip irrigation gives the gardener many advantages, and experience in its use allows him to obtain high yields of tomatoes.
Preparatory stage
First of all, in order to grow tomatoes in five-liter bottles, the seeds must be sorted and disinfected, for which a solution of potassium permanganate is used. You need to soak the seeds in it for a quarter of an hour. Next, you need to prepare the material in which the plant seeds will be sown. For this you need:
- polyethylene bags (it is better to use garbage bags);
- toilet paper;
- 1.5 liter plastic bottle with pre-cut neck.
The following steps must be taken:
- Cut plastic bags into strips 10 centimeters wide, then do the same with toilet paper - its pieces should be equal to the length of the strips from the bags.
- Each piece of paper must be placed on plastic strips and sprinkled with water.
- The seeds are laid out on damp paper, the gap between the seeds should be about 4 cm.
- Next, roll the strips into a roll, the diameter of which should match the bottle.
- Pour 30 ml of water into a container and dip the resulting roll into it.
- The bottle should be placed on a windowsill or other place with plenty of sunlight. Sprouts will appear within a few days.
Tomatoes are also germinated using the horizontal method.
Grow tomatoes in a greenhouse in 5 liter bottles
A 5-liter bottle will serve as a container, which must be cut longitudinally.
- Cover both halves of the bottle with toilet paper, laying it out in several layers.
- Seeds must be placed between the layers.
- The paper must be moistened by sprinkling it with water.
- All that remains is to tightly cover the containers with film to obtain a greenhouse effect and wait for germination.
Containers must be placed in a sunny place. Watering is not required with this method.
As soon as 2 leaves appear on the seedlings, the sprouts are transplanted into separate pots. Usually 2 plants are placed in one container. However, this rule applies only to tall varieties of tomatoes, and for low varieties, each sprout needs an individual pot.
Advice! Experienced vegetable growers recommend using peat pots as containers; they help avoid injury to the root system of plants when transplanting into the ground. But this requires certain financial investments.
Step-by-step care instructions
Watering and fertilizers
Frequent watering is not required for balcony tomatoes; they are carried out as the earthen ball dries out, since, unlike plants planted in open ground, they do not receive as much solar heat. Before the ovaries form and during the formation of fruits, the soil should be kept moist, and when the tomatoes begin to ripen, the soil should not be over-moistened, this will promote rapid ripening.
It is better to use mineral fertilizers, apply according to the instructions, in no case exceeding the dose, otherwise the plant may begin to intensively gain green mass and not bear fruit.
Trimming, pinching and pinching
The shoots that form in the axils of the leaves deplete the tomato bushes, since all their energy is spent on the formation of green mass. Pruning is carried out when the shoot reaches two to three centimeters. The stepsons are simply broken off, and the broken area is sprinkled with wood ash or crushed activated carbon. The procedure must be carried out throughout the growing season.
The lower leaves are also cut off so that the air under them does not stagnate, increasing the risk of infectious diseases.
Supports and hanging
Considering that supports are required mainly for tall varieties of tomatoes, and such options are not suitable for growing in plastic bottles, you don’t have to worry about organizing support structures.
Tomatoes are a plant that tends to adapt to many conditions, so hanging, where the trusses fall out of containers of soil, is quite suitable for growing.
The suspended structure is made according to the following scheme.
- A two-liter plastic bottle is washed and the bottom is cut off.
- The bottom is placed at the top of the bottle so that it is directed towards the cork.
- Next, you need to drill a hole in two parts of the bottle and several drainage holes in the bottom.
- The seedlings need to be removed from the container in which they grew along with the earthen lump and cover its upper part with a coffee filter.
- Carefully pass the tomato sprout through the neck of the bottle.
- Add soil mixture to the bottle, turn it over and fill it completely with soil.
- After this, insert the bottom and secure it with wire.
- The structure is ready, you can move it to the loggia and hang it in a convenient place - near the railing or on the wall.
This is interesting: Septoria of tomatoes: we tell you in order
Growing tomatoes in bottles
Tomato seedlings in bottles can even be grown in greenhouses. However, no matter where the plant is planted, it requires proper care.
In order to grow tomatoes in greenhouse conditions or on the balcony, it is necessary to plant seedlings 50-60 days after germination. Since the plants are grown at room temperature, they do not need to be hardened off. Planting tomatoes in five-liter plastic bottles in a greenhouse and on a balcony does not require much effort, the main thing is to do everything correctly.
The first step is to prepare the container. To do this, the bottom is cut off from a 1-liter bottle; its height should be about 1/3 of the total height of the container. For planting, a cut off part of the bottle with a neck is used. The tomato bush is placed in a container. The tops should be outside, and the roots should be in the container. Next, the bush must be covered with soil and watered. The resulting pot with the plant is hung like a flowerpot.
Important! Don’t get too carried away with watering; indoors, moisture evaporates slowly, and high humidity is an excellent environment for the proliferation of microbes.
Seedlings can also be transplanted into 5-liter bottle containers, in which the tomatoes will grow until harvest.
Disadvantages of growing tomatoes with their roots up
Of course, we cannot help but mention them, although they are few in number:
- the suspension for such tomatoes must be strong and durable;
- sometimes tomatoes “don’t listen”, they still like to grow in a more familiar way - because of this, the trunks may not have a very beautiful shape;
- At the beginning of growing, tomatoes do not get enough sun: to form a good tomato bush, the sun must “work” 7-8 hours a day, and at the beginning of the bush’s growth, the container hangs above it, creating shade.
The last drawback is easy to correct: you can use 5 liter plastic bottles, the tapering neck of which is directed downwards.
Popular varieties for growing on balconies and in greenhouses
Balcony miracle. This variety is low-growing and resistant to fungal diseases. Does not require removal of side shoots; it develops well even on cloudy days.
Room surprise. The variety is characterized by its compact size, excellent germination and high yield.
Mystery. The variety belongs to low-growing crops with a ripening period of only 85 days. The weight of the fruit reaches 100 g. The plant is resistant to a lack of sunlight and to the most common diseases.
Balcony bonsai. The most compact plant with a height of no more than 30 cm. Small round tomatoes with excellent taste are located on an attractive bush.
When cultivating tomatoes in bottles, you must remember that, just like in open soil, they require regular watering and fertilizing.
Growing tomatoes in a greenhouse and on a balcony in 5 liter plastic bottles was appreciated by both agronomists and summer residents. With the right approach, you can grow a good harvest even on the balcony, providing the whole family with healthy vegetables.
The advantages of this method of watering
Now let’s look at the advantages of do-it-yourself drip irrigation from plastic bottles for tomatoes:
- The most important thing is that you don’t need to spend money, the method is accessible to absolutely everyone.
- Simplicity. Installing an irrigation system in this way will take very little time and effort.
- You can organize the flow of fertilizers dissolved in water directly to the roots.
- You don’t have to constantly water the plants; you can safely leave them for a week and not worry.
- Protection against fungal diseases that form due to excess soil moisture.
- There is no need to loosen or soften the soil.
- Watering will take place with warm water, since while in the bottle the liquid will warm up to ambient temperature.
- The watering method is universal. It is great for cucumbers, cabbage, tomatoes, peppers, and eggplant.
Please note that you do not need to use this method for plants whose roots are fruits. When using watering tomatoes through plastic bottles in greenhouses, you should not completely forget about manual watering, since sometimes it is still worth irrigating the leaves, this is useful.
Prepare bottles before use
Advantages of this option:
In five-liter drinking water containers you can fully grow tomatoes
- Cheap and accessible . There are plastic bottles in every home and you don’t need to buy them specially; you get free containers that are ideal for growing seedlings. The main thing is to decide in advance on the number of bottles and collect them, so that by the time the seeds are sowed, you have as many containers on hand as you need.
- Ease of preparation . You can use two options: in classic bottles the top part is cut off, and in square bottles you can cut off one of the sides and you get a kind of elongated container. It is best to use water bottles; you do not need to prepare them in any way, just rinse them before use.
- Ease of use . There are so many options that you can choose the right size container for any conditions. From small half-liter bottles to five-liter bottles and even more. You need to choose so that they fit normally on a windowsill or other place where the seedlings will be grown.
- Versatility of use . The container can be used both for preparing seedlings and for growing tomatoes indoors or on a balcony. Or you can take the plants outside during the warm season, and then bring them back and grow tomatoes further.
- Long service life . Plastic perfectly resists deformation and does not break upon impacts or falls. It is also not afraid of water, which allows you to use the same container for at least several years. The material loses its properties over time from sunlight, but this happens after 4-5 years of use.
- Safety . The bottles are made of food-grade plastic, which does not release harmful substances into the air and soil. Therefore, healthy and environmentally friendly seedlings are grown.
It is easy to germinate seeds in a bottle and grow plants before planting; this method requires minimal time investment
Care
The main principle of caring for seedlings and tomatoes on the balcony in general is regularity. Absolutely all procedures are carried out according to a clear scheme - thereby increasing the percentage of successful and abundant harvest.
Pest Prevention
Tomatoes have many diseases and pests. Since this is a heat-loving, capricious plant - even in the conditions of an insulated balcony - they are very sensitive to all procedures and atmospheric influences.
Insect pests can enter from open windows, with soil, or as a result of insufficient disinfection of seeds. The first signs of the disease are not immediately visible; gardeners usually begin to notice drying out of the leaves and the appearance of spots on the surface.
Unfortunately, this is already a progressive process, meaning that the insects are already firmly attached to the back of the leaf.
Wilting leaves indicate the presence of diseases
One of the ways to prevent pests is regular spraying with soda or soap, alkaline solution from a spray bottle.
Before planting, we recommend treating the soil, for example, with Trichodermin or a mixture of Gamaira and Alirin. Find out about the characteristics of the Benito tomato variety at this link.
Watering
By the appearance of greenery, it is easy to determine whether there is enough moisture, whether there is an excess or lack of it. Poor watering affects the color and direction of the fibers on the leaves. The greenery itself becomes dark in color with drooping hairs.
With an overabundance, a different picture is observed: the foliage becomes light green, very pale, and the trunk itself is fragile and easily vulnerable.
When there is an excess of moisture, the foliage becomes light green, very pale, and the trunk itself becomes fragile and easily vulnerable.
Temperature, humidity
The optimal range for keeping Kumato, Agata and others tomatoes is from +18 to +30 degrees. When temperatures are violated relative to the lower or upper limits, development is inhibited. Self-sterilization of pollen is also possible. All these problems lead to reduced yields.
Comfortable humidity for tomatoes is quite high - 50-60%, it is achieved by periodically ventilating the room, as well as irrigation and installing humidifiers and steam convectors on the balcony. This material will tell you about Dutch varieties of tomatoes.
When growing tomatoes on the balcony, you need to carefully monitor the temperature to prevent the crop from freezing
Harvesting
When the first frost occurs, tomato cultivation should be stopped and the entire harvest should be harvested. Green. I place unripe fruits on newspapers on the windowsill, and cover them with newspaper to prevent sunburn.
The best temperature for reddening tomatoes is considered to be +25 degrees with a relative humidity of 70%.
If cherry tomatoes grow on the balcony, then there will be no issue with ripening, since their life cycle is shorter than that of classic tomatoes, and the ripening process occurs in all tomatoes at the same time.
Close the bottle tightly until the seeds germinate
Bottle, it is best to choose a square version. It will be stable, but simple round containers will do.
Toilet paper. You can cut it in advance into strips about the length of a bottle. Use the cheapest options without fragrance or additives.
Scissors. They carry out all the main work
Cut the bottle lengthwise . This does not need to be done for the entire length; leave the bottom intact so that the halves hold well and close; this is necessary for growing seedlings.
Fold the paper in half, as in the photo . Make cuts almost all the way to the end, almost the entire width. Do not reach about 1 cm from the edge
Uncover the cut strips and arrange. The main thing is that the pieces are separate and not caked together.
The stripes do not have to be whole. If they break, no big deal.
Open the container and place a layer of paper approximately 1 cm thick on the bottom. Distribute it evenly over the entire surface.
Soak the paper with warm water. Carefully add water and press the paper with your fingers until it is completely saturated. Don't pour too much, the water shouldn't stand
Open the package of seeds and place them on a flat surface. This is necessary to ensure convenience during the work process.
Place the seeds one at a time. Leave 2-3 cm between seeds, and make row spacing about 3 cm. Seeds easily stick to a wet finger, so work is done easily and quickly
Place a small layer of paper on top of the seeds . There is no need to cover the seeds too much, 1-2 layers are enough.
Gently press the paper . It will be saturated with moisture, which is what we need. There is no need to add water, there will be enough moisture as is.
Wrap the bottle in plastic. It is important to ensure tightness so that there are no gaps on the sides. You can screw a cork onto the neck.
Place in a bright, warm place. There is no need to water, as all moisture is retained inside. After the stems grow, transplant them into separate containers. Planting is carried out as usual, and thanks to the paper you will not damage the root system when picking
The video shows the growing process clearly from start to finish.
Planting options
How to plant tomatoes using a new method? There are several known methods for growing tomatoes in plastic bottles.
Option No. 1, also called vertical, does without land. For tomato seedlings, a 2-liter bottle, which is divided into two parts, is useful.
The part with the bottom will be useful:
Wide strips of about 10 cm are cut along the entire length of the prepared plastic bag. Toilet paper is cut to the same length as the bag strip. Several pieces of paper moistened with water are carefully spread on a strip of the bag. The seeds begin to be laid out, retreating from the edge 1.5 cm, at a distance of 5.5 cm. The grains are again covered on top with several more layers of paper and one plastic strip. The strip of all layers is carefully twisted. Approximately 3 cm of water is poured into a glass made from a bottle and twisted rolls are placed there.
Option number 2 is a horizontal method of growing tomatoes in toilet paper, which is carried out without soil:
- The plastic bottle is cut crosswise to create two parts.
- Toilet paper is placed in the recess of each half and sprayed with water.
- The seeds are laid out at a distance of 3.5 cm. If they have germinated, then they are laid with the sprouts facing up.
- The bottle halves are covered with film or a bag.
- Several holes are made in the film surface to allow fresh air to flow inside.
- After all work, the container is moved to a warm, dark place.
Tomato seedlings planted using these methods do not need to be watered, since the greenhouse effect remains under the film.
As soon as two leaves appear, the seedlings begin to be transplanted into separate containers. To do this, simply unroll the roll or remove the sprouts from a horizontal container.
How to grow tomato seedlings in a plastic container, there is also option No. 3, which involves preparing the soil.
Many vegetable growers choose plastic containers for seedlings. Reviews about such an experience are only positive: “In recent years, I have been growing seeds only in five-liter plastic bottles, which I cut in half. I don’t make holes in the bottom, since the container is transparent, and you can see how long the moisture drains when watering. I use the crushed shells of several eggs as drainage, then add a layer of sand and soil suitable for the variety.
I always disinfect the soil by pouring boiling water over it. After the earth has cooled, I make holes into which I place the planting material. I sprinkle compost on top, cover the container with film and move it to a warm place. The film retains heat inside, creates a greenhouse effect, seedlings will appear simultaneously and quickly. After the shoots emerge, I remove the film and lay out the seedlings on the windowsill.
This way you can see that growing a tomato in a plastic bottle is simple and convenient. The container does not need picking, water does not flow out when watering, so there is no need for pallets, and the grown bushes quickly take root in any place.
Prepare the soil before sowing seeds
You can use soil instead of toilet paper, in which case the work looks like this:
- Cut off the top of the bottle . The height is arbitrary, but it is important that the soil is at least 5 cm below the edge.
- Pour boiling water over the soil for seedlings . Before planting the seeds, the soil is disinfected; the easiest way is to use boiling water. If you purchased a ready-made version for seedlings, then you do not need to scald it.
- Plant the seeds . Sprinkle the soil with water and spread the seeds in 3 cm increments. This is most conveniently done with tweezers or a stick. No need to go deep.
- Cover with a layer of compost . Use the sifted version, cover the crops with a layer of about 1 cm. There is no need to water, there is moisture in the soil on which the planting material lies.
- Cover with polyethylene . Place in a warm place and keep there until shoots emerge. After the sprouts appear, the polyethylene is removed and the containers are moved to the windowsill. Water the seedlings as needed.
- Dive after the appearance of two or more true leaves . If you are growing tomatoes in a five-liter bottle, then plant one plant per container.
Dwarf tomato breeds grow especially well in bottles
Care
Caring for growing vegetables coincides with greenhouse and garden work. First, the plants are watered with warm water, and after 2 weeks they switch to fertilizing. Cucumbers feed on the composition:
Ammonium nitrate
Pour the liquid carefully, avoiding getting it on the leaves. After 10 days, vegetables are fertilized with manure
For weekly watering, prepare grain fertilizer:
- To do this, a large bucket is filled 2/3 with bread crusts, the rest is added with water and the mixture is infused in a warm place.
- Water is then added again and used for irrigation.
- Add 500 ml of nutrient to each bottle of cucumbers weekly.
When yellowness appears on the leaves (a sign of damage by spider mites), the cucumbers are sprayed with garlic tincture (5 cloves of garlic are left in boiling water for 6 hours). Also tincture of onion peel. The films are collected in a liter jar until half full, filled with hot water and left to infuse. The resulting product is diluted with clean water 1:2.
Reviews from gardeners
Svetlana, Ufa
Last year I grew tomatoes for the first time, and the strongest plants came out in bottles and milk bags. The rest grew in large plastic glasses, which was inconvenient. This year I started saving used bottles in advance.
Olga, Moscow
This year we used ordinary plastic bottles for seedlings, cutting off the neck. Such containers do not need to be stored from year to year, and this saves space, especially convenient in city apartments.
Watering tomatoes in open ground
The rate of watering tomatoes in open ground depends on weather conditions. Both excessive and insufficient moisture are harmful to these plants. To prevent tomato leaves from turning yellow, it is necessary to water the bushes as the soil dries.
Why do the leaves of tomatoes turn yellow in greenhouses and open ground? A detailed description of the causes of yellow spots on tomato leaves and a guide to action.
On average, irrigation can be carried out 1-2 times a week. For one bush, 5 liters of water is usually enough.
To water tomatoes in open ground, you can use rainwater, since its degree of hardness, saturation with microelements and oxygen are optimal for plants. Of course, there are exceptions: for example, if you live near industrial enterprises or if you collect water from roofs whose materials contain copper, lead, asbestos and other substances that can have a negative impact on plant and human health. Under no circumstances should such water be used for irrigation.
Collecting rainwater is a real saving of effort, money and time. Rainwater is a renewable resource that many gardeners simply ignore. And completely in vain.
How to sow seeds in bottles and get sprouts quickly
- calibrate and disinfect the seeds you will plant with a manganese solution;
- cut plastic bags into strips 10 cm wide along the entire length of the bag;
- also cut the toilet paper into strips;
- Place toilet paper on polyethylene and place prepared tomato seeds on top;
- first spray the paper with water from a spray bottle, and place the seeds in the middle, with a distance of 4 centimeters between them;
- roll the strip into a tight roll so that the diameter of the roll matches the diameter of the bottle with the neck cut off;
- if the diameter of the roll is smaller, then you can additionally wind a layer of polyethylene;
- put the roll in a bottle and pour three centimeters of water;
- place the container with the seeds in a sunny place;
- The seedlings will appear in a few days.
Variety selection
Is it possible to grow tomatoes on your balcony? You can successfully grow tomatoes on the balcony if you choose the right type. Requirements to consider when choosing seeds.
- The ideal option is to choose low-growing seeds; the height of the bush will be approximately 60 cm. They are simple and easy to care for, since there is no need to install a support for tying, there is no need to pinch and cut off the side branches.
- It is better to choose varieties with early fruit formation boundaries.
- It is convenient to choose varieties of tomatoes for growing on the balcony that form hanging trusses.
- We must not forget such a criterion as resistance to diseases and pests.
To determine which tomato varieties are suitable for balcony growing, you need to learn more about the description of each proposed variety. If the balcony is spacious, then low-growing or tall-growing tomato varieties are suitable.
Tall varieties of tomatoes for the balcony necessarily require additional vertical support. You must not miss the time when the side branches are cut off and should be formed into two or three stems. Such varieties are especially demanding of care, but the grown crop will give large and juicy fruits.
Oak is characterized by early fruit ripening; only 85 days pass from the moment the seeds are planted. The stem stretches up to 55 cm and bears a small number of leaves. The plant exhibits high resistance to many diseases. Bushes grown at home need to be artificially pollinated. The round fruits weigh about 70 g.
You can also grow special varieties designed for placement on the balcony, for example, Balcony Miracle. The self-pollinating variety has early fruit ripening and grows only up to 60 cm in height.
What other variety can I choose? Such low-growing varieties of tomatoes for the balcony as Pearl, Bonsai, Ballerinka, Minibel, Pinocchio, Caramel red or yellow feel great. They are also suitable for a window sill in a room. It is best for a novice vegetable grower to choose these types of tomatoes.
The height of the Bonsai stem is only 30 cm and accommodates 3-4 brushes. Despite its small growth, you can collect about 3.5 kg from one bush. Refers to mid-season varieties, fruit ripening occurs after 110 days. The weight of one red-scarlet tomato is about 28 g.
Indoor varieties are replenished by Minibel. The height of the strong bush is about 40 cm. The fruits begin to ripen after 82 days. Smooth, round red fruits weigh approximately 23 g. They can do without sufficient lighting and are unpretentious to the composition of the soil.
We suggest you familiarize yourself with: Choosing a variety and proper cultivation of red cabbage
Potted Pinocchio culture begins to bear fruit after 90 days. It grows only up to 30 cm in height. Sometimes it is necessary to install a support, since the stem may break under the weight of the fruit. The reddish round fruits weigh about 20 g.
Among balcony tomatoes, these varieties are also popular.
The Balcony Duo tomato is distinguished by its ultra-short ripening period. Fruits begin to form after 76 days. The bushes are not very branched, so they do not take up much space; they grow up to 35 cm in height. Looks beautiful in a flower pot, the branches are strewn with small red tomatoes.
Tiny tim grows to a height of only 40 cm. The Tiny Tim variety tolerates cool weather well and does not need staking, as the stem is strong and powerful. During the ripening period, the plant is strewn with red tomatoes 2 cm in diameter. Fruits begin to form early. It is best to plant Tim in a flower pot.
Variety Tim prefers a sunny place, without drafts. The soil should be fertile and well drained. Regular watering is required.
The Mini Star hybrid is a very early variety of balcony tomatoes. The tomato harvest can begin after 80 days. The sweet red fruits have an oblong shape and weigh only 15-20 g. They are stored for a long time and do not crack.
How to grow seedlings in plastic bottles
Previously, I poured tomatoes into sour cream cups or 1.5-2 liter plastic bottles cut into two halves. It was convenient to transplant the grown tomato seedlings into bottles; they are the right size, but because you need to pierce holes in them to drain excess water, the water flowed out onto the windowsill. It is very uncomfortable. We had to put the cups on pallets. But on my narrow window sills this is quite problematic.
The same plastic 1.5 liter bottles came to the rescue. I just use them a little differently:
- I cut off the bottom of the bottles just below the middle of the bottle,
- I turn the top parts upside down,
- I insert the upper part into the lower part,
- I fill it with soil
- I plant or plant seedlings in bottles.
The results are excellent pots with trays of the same size and with holes for excess water. In addition, they are convenient for planting seedlings in the garden: unscrew the lid, push the lump with your finger, and it comes out easily. Next, plant the tomato seedlings in the garden bed or greenhouse.
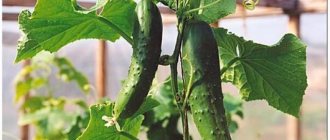
You can do the same with seedlings of peppers, eggplants, and cucumbers. In general, cucumbers can be grown in large, 5-liter containers and get good yields.
Available materials
Growing tomatoes in plastic bottles on the balcony came to us from Japan. Due to land shortages, few people can afford a plot of land to grow natural vegetables.
The essence of the method is simple: instead of standard pots, plastic bottles of various sizes are used. The top part of the bottle is removed, and a hole is made in the bottom so that excess water comes out.
You can grow any home crops in such containers. The main advantage here is the absence of high costs associated with the purchase of ceramic or wooden pots for growing.
Tomatoes in five-liter bottles
Seedlings in five-liter bottles are planted a little differently. You need to lay the bottle flat, cut off part of the bottle from the top, like a cap. Make holes at the bottom to drain excess water. Fill it with nutritious soil for seedlings and plant the seeds. It is good to grow flower seedlings in such five-liter bottles.
What to plant in 30 liter plastic bottles:
- Ampelous flowers will look very good in them;
- You can also make vertical flower beds for petunias and strawberries from them (you need to cut holes in the sides and plant flower seedlings along the entire height of the bottle);
- Tomatoes and cucumbers will grow well from vegetables in 30-liter bottles. Don't forget to make drainage holes at the bottom of the bottle so that the water doesn't stagnate.
How to make drip irrigation from bottles with your own hands
First of all, we need to take and prepare ordinary plastic bottles through which the plants will be watered. Two-liter bottles are best suited for this purpose, but one and a half liter bottles can also be used.
In each lid it is necessary to make several small holes, about 2 mm in diameter, through which water will flow directly to the roots of the tomato. The number of holes depends on the soil in your garden or greenhouse. If it is sandy and absorbs moisture well, then two are enough, and if it is clayey, then 4.
We cut off the bottom of each bottle (you can cut off the bottom not all the way, it will serve as a lid that will prevent water from evaporating) and proceed to installation. Of course, the best time for installation is directly during planting of seedlings, but do not be upset if your tomatoes are already growing in a greenhouse or garden, and you have just learned about this method of watering.
At a distance of 15-20 cm from the stem of the plant, carefully dig a small hole 10-15 cm deep. Next, insert the bottle into this hole with the lid down at an angle of 30 to 45 degrees and dig in. When installing the plastic bottle, be careful not to damage the tomato root system.
Another great way to grow seedlings in plastic bottles
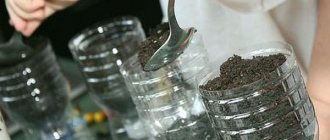
Whoever tries this method of growing seedlings will never use another. Plastic bottles with a capacity of 5 liters need to be cut in half. There is no need to make holes for drainage. When watering, you can see in the container how deep the water is spilled. Place a 2 cm layer of egg shells, 2 cm of sand on the bottom, and 10-12 cm of good soil on top.
Steam the soil for seedlings with boiling water (moderately, without pouring), let it cool and use tweezers to evenly distribute 20 seeds into five-liter bottles.
If the bottle is larger, then you can put more seeds. Sprinkle lightly with sifted compost, cover with a plastic bag and place five-liter bottles on cupboards where it is warmer.
When to plant seeds for seedlings:
Seeds of celery, pepper and eggplant should be sown in mid-February, tomatoes should be sown on the 20th of March.
Various methods of growing without picking
The initial stage is completely traditional. The seeds undergo pre-planting treatment, the substrate is prepared and disinfected, and containers are selected. The choice of container affects subsequent actions.
Peat tablets
The method requires material costs, but saves the gardener from hassle with the substrate. Tablets are taken of medium diameter, soaked and seeds are sown. When the roots begin to break through the protective shell, the seedlings are transplanted into pots, greenhouse beds or under film covers if climatic conditions allow growing tomatoes in open ground.
The cost of peat tablets is reduced by using tea bags - the seeds only need heat and moisture for successful germination.
Plastic cups
Such containers are inexpensive. If necessary, food packaging and plastic bottles from various drinks are collected during the winter. The standard recommendation is that the volume should be 0.5 liters. If the tomatoes will grow in a heated greenhouse, make do with smaller containers.
The glasses are disinfected and drainage holes are made in them. Fill one third of the volume with soil and plant 2-3 seeds. When the first shoots appear, the strongest ones are left. The weak ones are trimmed with nail scissors, the normal ones are transplanted to get more seedlings.
As the seedlings grow, soil is added to stimulate the development of additional roots.
Similarly, seeds are sown in special cassettes sold in stores. The small volume of the cells does not cause difficulties, since the soft walls make it easy to remove seedlings and transplant them into the ground.
Planting in bags
Thick plastic bags, homemade or from dairy products, are used. They are thoroughly washed and disinfected beforehand. At the sowing stage, the edges are folded, then they are gradually straightened and soil is added. Before planting seedlings, the bags are carefully cut, and the plants, along with a lump of earth, are placed in planting holes.
Large containers
If the required container is not available, they are sown in ordinary seedling boxes made of wood or plastic using standard technology. The difference is in the distance between the seeds - 10 x 10 cm. When the first grains germinate, they are separated by partitions made of cardboard or plastic. Such walls prevent the roots of seedlings from intertwining.
Pots made of peat or pressed cardboard
The method is expensive; it is usually used to germinate seeds of exotic, expensive or especially productive varieties at home. Sowing is carried out in the usual manner. The main difference from plastic containers is that there is no need for drainage holes. Before planting seedlings in the beds, it is enough to carefully remove the bottom so that the tap root can freely go deeper into the ground.
Planting tomatoes upside down and caring for them
The process of planting and caring for upside down tomatoes is simple and includes several stages. The main thing is to follow simple rules and recommendations, and the result will not be long in coming.
Selection of capacity
In order to grow tomatoes upside down, you first need to decide where exactly this will be done. With the classic growing method, this issue has long been resolved - tomatoes grow either in a garden bed or in a greenhouse. But in this case, they will grow “upside down”, and you must first somehow place the soil at the required height and the required amount. This will require some kind of container. These can be special containers, ordinary plastic bottles or buckets.
Container for planting tomatoes upside down
The volume of buckets can be 5 or 10 liters. It's okay if the bucket is old and not very attractive in appearance. It can then be wrapped with film. Since the practice of growing various garden crops did not appear yesterday, you can purchase special containers for these purposes in stores. They are called “Topsy Torvi”, which means “upside down”.
Tomatoes “upside down” in 2-liter bottles will grow well if you choose varieties with a not very wide root system. If the root of the selected variety is branched, it is better to choose a larger container, for example, 10 liters
It is very important that the root system has the opportunity to branch out well and strengthen. After all, it will be subject to enormous loads. The container must be suspended after planting
Since the weight will increase over time as the fruits begin to ripen, maximum reliability is required. It is better to use strong wire for this
The container must be suspended after planting. Since the weight will increase over time as the fruits begin to ripen, maximum reliability is required. It is better to use strong wire for this.
You can hang the container in the vegetable garden, garden, courtyard, balcony, loggia and even indoors. In places where there are children and small animals, this issue should be approached as responsibly as possible, so that the fastening can withstand loads and the container does not come off or fall on anyone’s head.
Be sure to have a cover to prevent the soil from drying out. If there is no lid, film will do. It needs to be secured by bandaging it, otherwise the wind will blow it away. At the bottom of the container, if it is not a special store-bought one, a hole is made with a diameter of 3-5 cm. To ensure that excess moisture does not come out through this large hole, additional ones need to be made using an awl. They are located on the bottom and also on the sides.
Soil preparation
The soil can be purchased ready-made, or you can prepare it yourself in the required proportions. Take equal parts: compost, humus and peat. For one bucket of this mixture add 1 tbsp. a spoonful of ammonium nitrate and superphosphate.
Growing seedlings
To grow tomatoes upside down, you need seedlings. The technology of its cultivation does not differ from the classical one. Seeds can be sown in pots, separately in plastic cups or peat tablets. The last option is considered the most suitable in this case, because it will be possible to see when the root system completely envelops the earthen ball. Around this period, the length of the plant’s stem will reach the required 25-30 cm.
One of the advantages of growing tomato seedlings upside down is that you don't necessarily need to provide enough light. It is known that when growing seedlings classically, it is impossible for the plant to stretch out, because the stems will be weak and will not be able to stand on their own. Here, on the contrary, it is necessary.
Planting seedlings in containers
In order to minimize or completely reduce all losses to zero, you need to do everything carefully from the very beginning. Place the container on two stools or something else at the same level, leaving a distance between them so that there is access to the hole from below. You will need an elongated piece of foam rubber, with sides 3-4 cm. It is necessary to fix the seedling. The seedling's root system is threaded upward. Cut off a small piece of foam rubber and wrap it around not the root, but the stem above it. In this case, the root system remains at the top, above the “ring” of foam rubber. Therefore, the plant will no longer fall out of the pot. Then the earth is poured. There is no need to fill the entire container with soil. You can leave 4-5 centimeters short. Afterwards the earth is watered. You need to water it so that droplets of water appear from below. This indicates that the soil is completely moistened. The main thing is not to overdo it. Then, the lid is closed and the container is hung in the right place.