Tomatoes are a vegetable crop that loves warmth and careful care that does not tolerate errors. Therefore, many inexperienced gardeners make various mistakes when growing it. A particularly significant stage is planting tomato seedlings in open ground, since this process is a huge stress for the plant. In order not to provoke the death of seedlings, it is important to take into account a number of key points.
When to plant tomato seedlings in open ground
If you miss the moment of transplantation, you can end up with overgrown seedlings, and if you do it too early, you may end up with the fact that it will not take root due to unsuitable conditions or will die if frost returns.
When choosing the timing of transplanting tomato seedlings, you need to take a closer look at the appearance of the plant, focus on weather and climatic conditions, the recommended timing from the manufacturer, and you can also do the transplant according to the lunar calendar.
First of all, you should focus on weather conditions. The soil should warm up by about twenty centimeters to 12-15 degrees Celsius (a regular thermometer will help you measure t). It is very important to start the event when you are absolutely sure that frost will not return and the temperature will not drop to 0-+2 degrees. Otherwise, this is fraught with the death of seedlings.
The appearance of the seedlings will also help you understand that it is time to transplant them into open ground:
- the height of the plant should be approximately 25-35 centimeters (height measured from the root collar);
- plants should have eight to ten true leaves;
- and young tomatoes should have a well-developed root system.
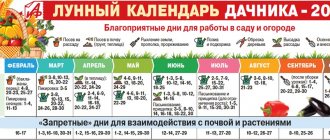
According to the lunar calendar
Whether to adhere to the lunar calendar is a personal matter for each gardener. There is nothing wrong with following it. But those who are not firmly convinced that a good harvest cannot be obtained without looking at the Moon, and who still have doubts, are advised to pay attention to this fact. Planting tomato seedlings in open ground by large farms is carried out based on:
- ground and air temperatures;
- weather forecasts;
- age and readiness of seedlings for transplantation.
It is believed that transplanting tomatoes should be done on the waxing Moon. The most favorable days in 2020 are:
- May – 1-6, 15, 19, 24, 31;
- June – 1, 11, 16, 20.
For different regions
Tomatoes are planted in open ground when weather conditions permit. In different years, the time may differ for one region. You can rely on the weather forecast and the following dates:
- south - in early or mid-May, in early spring - even in the third ten days of April;
- Middle zone - from late May to mid-June;
- in cool regions, on the border of the crop growing zone, tomatoes can be planted no earlier than the beginning of June, even if the weather is warm in May - there is a threat of return frosts.
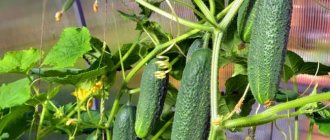
Harvest and storage
Depending on the purpose of further use of the fruits, they can be collected at different degrees of ripeness, given that unripe tomatoes can ripen during storage.
Table: degree of ripening of tomatoes depending on the purpose of use
| Maturity level | Characteristic signs | Ripening period | Application |
| Immature | Fruits are firm, green | Not ripened, not eaten | |
| Dairy | The skin is light, the flesh is pinkish or yellow | 20-30 days | For salting, pickling and long-term fresh storage |
| Blanzhevaya | Fruit color is brown, may begin to turn red | 7-10 days | |
| Biological | Rich color characteristic of the variety | Fresh consumption, canning, short-term storage | |
A novice gardener should take a closer look and study all the methods of tomato agricultural technology. But they should be used with caution in practice. To begin with, it is better to master old, proven methods and techniques that do not require large expenses for the acquisition of various technical innovations. And after some experience has been gained, more advanced technologies can be gradually introduced.
- Author: Pyotr Vladimirovich Sadovnikov
Hello! My name is Pyotr Vladimirovich. I am 63 years old. By education, he is a mechanical engineer. Rate this article:
- 5
- 4
- 3
- 2
- 1
(25 votes, average: 4.3 out of 5)
Share with your friends!
Preparatory stages
The success of the future harvest directly depends on the correct planting of tomatoes in open ground. Among the main preparatory measures for planting tomatoes, soil preparation occupies a special place. Tomatoes for open ground begin to be prepared long before planting procedures, in the fall.
Selecting a location
To plant tomatoes in open ground on a personal plot, choose a place illuminated by the sun's rays and not in the shade.
When choosing a bed, it is important to adhere to the principles of crop rotation: do not plant tomatoes in a row in the same place for several years. This will protect tomato seedlings from late blight.
Potatoes will also be a bad predecessor for tomatoes: they are capable of accumulating and transmitting plant diseases through the soil. The predecessors after which tomatoes are planted in open soil are beets, carrots, corn and beans.
Fertilizers
It is recommended to fertilize the soil before winter by adding rotted manure or humus at the rate of 1 bucket per 1 sq. m while digging the soil. m of sown area. If there is not enough fertilizer, it can be applied locally 7 days before planting the seedlings directly into the holes, adding a handful of ash powder or humus with your own hands.
Disinfection
Approximately 7 days before the planned time of planting tomato seedlings in open ground, the ground is treated with copper sulfate, which protects future plantings from fungal infectious diseases.
Digging
In the spring, immediately before planting young tomatoes in open ground, the soil layer that has compacted over the winter is dug up and loosened.
How I chose seeds for seedlings: a review of popular varieties
There are a lot of varieties of tomatoes: more and more new ones appear every year. When choosing a bag of seeds, I first look at how suitable this species is for our climate zone. Let me introduce you to gardeners' favorites:
- Early maturing: Augustine, Red Rooster, Riddle, Abundant, Raja, Agatha, First-Grade, Family, Red Arrow, Aphrodite.
- Fruitful: Djinnah, Snow Leopard, Wonder of the World, Wild Rose, Astrakhan, Pudovik, Crimson Giant.
- For open ground (low-growing, but high-yielding): Eldorado, Golden Flow, Supermodel, Anastasia, Red Fang, Bobcat, Rio de Grande.
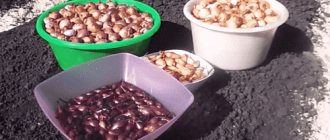
Before soaking, I discard misshapen, small seeds. Then I wrap them in a paper napkin envelope or gauze and place them in a bowl with water at room temperature.
tomato varieties
Preparing tomato seedlings for planting
The first thing you need to do with tomato seedlings as preparation before planting in open ground is to harden them off. It is optimal to do this 2 weeks before the expected date of transplanting to the garden bed. For example, you can take it out to a balcony or a heated greenhouse, where the temperature does not drop below +8-10 degrees. On the first day, a half-hour stay in the new, harsher conditions will be quite enough for the seedlings. Next, increase the time proportionally and gradually build it up to a full day.
You should not allow the seedlings to get sunburned from too bright spring sun, so try to place the planting containers with the seedlings in partial shade or somehow shade them.
7 days before planting in the ground, tomato seedlings can be fed; it is optimal to do this in the morning or evening hours. Experienced gardeners advise using foliar feeding (spraying the foliage with a spray bottle.) This is explained by the fact that the foliage is already able to absorb nutrients and microelements. For example, for better survival, you can spray tomato seedlings with a solution of growth stimulant Epin or Zircon .
Root feeding is also allowed. For example, you can feed with a fertilizer such as Gumistar or any other fertilizer based on liquid vermicompost. In principle, such a fertilizer is also suitable for spraying the leaf surface of tomato seedlings (foliar feeding), but in this case the amount of the drug should be reduced by 2-4 times.
If you are growing tall tomato seedlings or they have simply become very elongated and the lower leaves have turned yellow, then in 3-5 days you need to remove all the lower leaves (including cotyledons), and then also feed them.
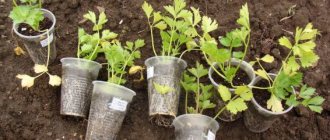
The appearance of tomato seedlings ready for planting in open ground should be as follows:
- 25-35 centimeters in height (measured from the root collar),
- from 6 to 10 true dark green leaves, first buds.
If possible (if you have a lot of seedlings), it is worth discarding all non-standard seedlings that stand out from the crowd. For example, they are too small or too tall. Most likely, there is something wrong with them.
You can also treat tomato seedlings from pests in advance (the day before planting) . It is optimal to do this long before the fruits appear, so that by the time the harvest occurs, all the drug has long been removed from the plant. According to experienced vegetable growers, the drug “Antikhrushch” works well, which protects against beetles, wireworms, mole crickets, and whiteflies in the greenhouse.
The procedure for treating seedlings with an open root system (if your seedlings are growing in a common container) is as follows: simply immerse the plant roots in the solution for 1 hour.
With a closed root system: water each glass or pot of seedlings with 30-50 ml of solution. In this case, the solution is prepared at a lower concentration.
The influence of different temperatures on seedlings
Tomato seedlings are very sensitive to the slightest temperature fluctuations. Low and high temperatures are equally harmful to tomato seedlings.
Violation of the temperature regime leads to:
- to a decrease in yield;
- deterioration of immunity.
Low temperatures make the plant stem thick and short, high temperatures make it thin and long.
Maximum
Reaction of seedlings to high temperatures:
- Early flowering and fruiting, which subsequently leads to a decrease in yield.
- At temperatures above +28 °C, seedling growth stops. When the temperature rises to +40 °C, the seedlings die.
Minimum
Reaction of seedlings to low temperatures:
- At temperatures below optimal, the growth of seedlings slows down, but in the future this has a positive effect on the yield (provided that the temperature drop is not critical).
- If the temperature drop is critical, the tomatoes bear fruit late and there are fewer fruits than expected. Tomatoes turn out tasteless - they have little sugars and fruit acids.
- At temperatures below +13 °C, seedling growth stops. Pollen sterilization is observed.
- If the temperature drops to +5 °C, the plant stops developing and is on the verge of death.
Planting technology
You need to pour a little water into the pots with seedlings, wait until they are absorbed and only then replant.
When the hole is ready, you can plant the seedlings. You need to pour a little water into the pots with seedlings, wait until they are absorbed and only then replant. This is done so as not to damage the roots when the plants are removed from the pots.
Now you can remove the seedlings. You should lightly tap the box or pot in which the plant sits, tilt the container slightly and carefully remove the seedlings, holding them by the roots with your hand. You need to try to take the plant along with the soil.
The plant is lowered into the hole, the stem is held near the base with one hand, and the hole is filled with earth with the other hand. Next, you should carefully compact the soil near the stem, but do not press too hard. After these steps, you can water the tomatoes with a small amount of water. If the ground is moist enough, you can do without it.
It is better to plant overgrown seedlings a little deeper than normal ones. But you can’t place the roots too deep, as this can cause the plant to rot.
Overgrown plants can also be planted horizontally. Then for such a plant they dig another hole, not vertical, but at an angle of about 30 degrees. The top must be directed north so that the plant can then rise to the sun on its own. This method of planting does not harm the plant at all, but rather promotes the formation of a powerful root system. The stems of such a plant will be thicker and the leaves will be larger.
Ungrown seedlings are buried to the same depth as they were in the pot. If you dig deeper, you will have to wait 1-2 weeks longer for the harvest.
After all the above steps, a small depression is formed around each plant with your hands, in which water will collect when watering. This will make watering better.
Disembarkation scheme
Since tomatoes love the sun, they do not need to be planted close to each other. Subsequently, when the plants are in the active growth stage, their branches and leaves will shade each other.
And yet, there are different standards for different varieties of tomatoes. Thus, for low-growing species, it is advised to leave a distance between plants of at least 30-40 cm, and between rows - 50-60 cm. High varieties need more land, so the distance between plants should be at least 50 cm, and between rows - 70-80 cm.
But what should those who have space that does not allow them to plant tomatoes according to the rules do? Other schemes can be used!
- Line diagram. Tomatoes are planted in one or more rows, while maintaining the same distance both between plants and between rows;
- The pattern is chess. Everything is simple here - seedlings are planted in a checkerboard pattern in several rows. The distance between plants and rows is determined directly by gardeners, but it is recommended to leave at least 40 cm;
- The scheme is tape. This scheme is ideal for small areas. Tomatoes are planted in parallel rows. The distance between plants in a row is about 40 cm, and between rows - 20-40 cm.
How does a tomato reproduce?
There are several known methods for propagating tomatoes.
Seeds
The main method of propagating tomatoes is by seeds. There is a huge industry all over the world for developing new varieties and producing tomato seeds. All other methods of propagation are used only in exceptional cases, for example, if it is impossible to purchase seeds of the desired variety or their high cost (relevant for rare varieties). This method is implemented in two versions - seedlings and non-seedlings - which have already been described above.
Cuttings
This interesting method is used for propagating hybrid varieties, since in this case the varietal characteristics will be preserved. It consists of the following:
- In the fall, before frost, the shoots and tops of tomatoes with thick stems are cut. They should have 2–4 leaves and a length of 10–15 cm.
- Place the cuttings in a jar of water, 5-6 pieces at a time, so that 7-10 cm are immersed in water.
It is easy to root sections of stems, tops and stepsons of tomatoes simply in water
- After some time, the underwater part of the cuttings begins to grow roots, and the stems begin to grow.
- After this, cut off the upper part (about 15 cm) and again place it in a jar of water (throw away the lower part with the roots) and place it in a warm place. At the same time, additional illumination with phytolamps is provided for 12–14 hours.
- Around the end of December - beginning of January, the underwater part of the cuttings with roots is cut off again and thrown away, continuing to grow the remaining part in water.
- At the beginning of February, this operation is carried out for the third and last time.
- At the end of February, the plants are finally planted in pots with soil, after removing 2-3 lower leaves and deepening the stems to the remaining leaves.
- Next, seedlings are cared for according to the usual rules.
Tops and stepsons
As has already become clear from the previous section, parts of tomato stems placed in a humid environment quickly take root. Using this property, you can obtain additional seedlings, especially in cases where they have outgrown. There is a so-called Chinese (some call it Japanese) method of growing seedlings. It consists in cutting the elongated seedlings into two parts. The lower part remains in the pot with a pair of true leaves and, emerging from the axil of one of them, the stepson forms a new stem. And the lower end of the top is placed in a damp substrate or simply in water, where the stem grows roots and as a result a new seedling bush is obtained. Stepchildren can be rooted in the same way.
The tops of the tomatoes are rooted in water, and stepsons appear from the axils of the uterine part of the bush
Aftercare
Initial care comes down to monitoring the condition of the transplanted young shoots.
Shelter
Ambient temperature is important in the first days. In bright sunshine, seedlings are shaded. Tomato plantings must be protected from night frosts.
Watering
It is not recommended to water tomato seedlings planted in open soil during the first 10 days. Excessive moisture before the plants have taken root and started to grow leads to rotting. After this period of time, watering the tomato bushes is required as needed. Typically, the frequency of watering is once every 10 days. During the dry season, watering becomes more frequent up to once a week.
Mulching
Tomato seedlings that have taken root in a new place can be mulched. This is done using sawdust or straw. Mulching the soil will save time on loosening the soil and reduce watering.
Stepsoning
The pinching procedure is necessary to dilute too thick plantings and increase their productivity. Stepchildren are also removed so that the plant does not waste energy on growing green mass, but directs all the nutrients to the formation of fruits.
Caring for tomatoes after planting
To get a rich harvest of tomatoes, it is not enough to know how to plant tomatoes in a garden bed. At the next stage, you will need proper feeding, watering, loosening and protecting the seedlings from diseases and pests.
Plant garter
Tall tomatoes are characterized by indeterminateness (unlimited growth), so long stems lie on the ground under the weight of ripening fruits. To prevent such an oversight, gardeners prepare materials for tying up plants in advance.
There are different ways to garter seedlings:
- A peg 1–1.5 m high is installed near each plant at a distance of 10 cm from the stem. As the tomatoes grow, they are tied with pieces of twine to a stick in 2-3 places.
- For tomatoes planted in rows, pegs are placed every 3–4 m. Thick twine is pulled between them on both sides of the plantings to support the growing bushes.
Tying is carried out at the very beginning of planting, so as not to injure the plant. The garter makes it possible to protect the fruits from fungal spores in the ground.
Watering and loosening
Tomatoes require moderate watering. Excess moisture often causes fungal and bacterial diseases of the crop. Therefore, watering is planned no more than once a week.
Tomatoes require more moisture during the flowering period, when root watering and sprinkling are allowed. Such events are carried out in the evening so that the sun's rays do not burn the leaves.
After each watering or rain, the row spacing is loosened. 10 days after planting in the garden, the seedlings are hilled up by sprinkling tubercles around the stems. This procedure activates the growth of additional roots and strengthens the seedling in the soil. Repeated hilling is carried out two weeks after the first in order to increase the stability of the bush under the load of the ovary.
Caring for tomatoes after planting: Pixabay
Feeding tomatoes in the ground
To obtain high-quality fruits and increase productivity, tomatoes will need several feedings:
- 10–12 days after planting in the ground, the tomatoes are watered with a solution of mullein with superphosphate (0.5 liters of mullein, 20 g of superphosphate per 10 liters of water). Take 0.5 liters of fertilizer for each bush.
- The second feeding is carried out during the period of bud emergence with potassium-phosphorus fertilizers, using wood ash (200 g per 10 l of water) or potassium monophosphate (10 g per 10 l of water).
- During the period of flowering and active formation of fruits, yeast feeding is used. The yeast is fermented for a whole week (100 g of yeast and granulated sugar per 2.5 liters of water). 250 ml of yeast mixture and 200 g of wood ash are diluted in a bucket of water for root watering.
From mid-July, feeding tomatoes and abundant watering is stopped in order to direct the main forces of the bush to ripening the fruits.
Bush formation
During the period of active growth of green mass, gardeners are engaged in the formation of tomato bushes. Tall varieties of tomatoes especially need this.
In June, excess greenery on the bushes is removed using proven technology:
- Shoots growing from leaf axils are completely removed. Pruning is carried out once every two weeks, preventing the bush from becoming overgrown with unnecessary growth.
- Tall tomatoes leave 1–3 shoots, while low-growing tomatoes practically do not shoot.
- The lower leaves on the bushes are removed until the distance between the ground and the leaves is 30 cm.
- After the formation of 6–7 flower clusters on the stem of a tall tomato, pinch off the top.
Determinate varieties of tomatoes practically do not require the formation of bushes in the garden bed. The growth of the main stems stops on its own when 4–5 brushes have formed on the bush.
Forming a tomato bush: Pixabay
Protection from diseases and pests
Tomatoes growing in an open garden bed quickly develop enemies: aphids, thrips, whiteflies, Colorado potato beetles, etc. If the conditions for growing tomatoes in the garden bed are disturbed, you will notice fungal diseases:
- late blight, which leads to damage to the green parts and fruits;
- Fusarium wilt, when the leaves wither and the stem turns black and cracks;
- Alternaria blight (dry spotting), affecting the above-ground part of the plant.
To grow organic vegetables, from the tenth day of planting in the ground, preventive folk remedies are used:
- baking soda solution (200 g per 10 liters of water);
- whey (1 liter per 9 liters of water) with the addition of 20 drops of iodine;
- two-day infusion of celandine (1 kg of herb per bucket of water);
- hydrogen peroxide (200 ml per 10 liters of water).
The beds are sprayed every 4–5 days with infusions of herbs (wormwood, tansy, dandelion, etc.). If traditional methods do not help, use “heavy artillery” - fungicides, Bordeaux mixture, copper sulfate. The rules for their use are indicated on the packaging.
Gardeners who know how to plant tomatoes in an open bed get decent harvests. We must not forget that planting tomatoes in the ground is only the first step in effective farming. Without carefully planned care for tomato beds, all efforts will go to waste.
Original article: https://www.nur.kz/household/garden/1849657-kak-sazat-pomidory-v-grunt/
Feeding and fertilizing
Tomato fertilizers help achieve a more luxurious and abundant harvest. Root feeding of tomatoes is carried out in the following order:
- The first feeding should be done ten days after the event. As a fertilizer, you can use a solution of Nitrophoska (15 ml) and mullein (0.5 liters), mixed with ten liters of water. Fertilizers should be applied in the following proportions - 500 milliliters per bush.
- The second feeding is carried out 20 days after the first application of fertilizers. For feeding, you can use a mixture containing the following ingredients - a teaspoon of potassium sulfate, a tablespoon of superphosphate, 400 grams of chicken manure, the components are mixed with ten liters of water. One liter of fertilizer is applied per plant.
- The third feeding is carried out two weeks after the 2nd feeding. To prepare the fertilizer, potassium humate (15 ml), nitrophoska (15 grams), 10 liters of water are mixed, and when watering, 5 liters of the substance are added per square meter. Also, after 14 days, it is recommended to add a solution of superphosphate, which can be done like this - a tablespoon of the substance is mixed with 10 liters of water, one bucket is poured per square meter of bed.
Before fertilizing, it is imperative to water the plants abundantly with plain, clean water. If you don't do this, you can burn the roots.
In addition to the root fertilizing described above, foliar fertilizing can also be done. During one harvest season, you can do about three to four fertilizing, but this can only be done in the evening and in dry weather. You can prepare fertilizer for such feeding as follows: one gram of potassium permanganate, 15 grams of urea, 10 liters of water.
How to properly tie tomatoes
Let me introduce you to the main rules of garter:
- Use only disposable garter materials (to prevent fungal diseases).
- Before use, all supports are disinfected with a solution of potassium permanganate (0.02 g of the drug per 1 liter of water).
- Do not squeeze the stem with a bandage - this will disrupt the metabolism in its tissues.
- Tying is necessary at the stage when the bushes begin to bend to the ground under their weight.
I use hemp rope as a garter material. Wire, fishing line, ropes are not suitable for this. But old nylon tights work well. You can buy special clothespins and clips.
As for the support itself, there are several options:
- Individual. These are wooden stakes, iron rods, plastic tubes, which are placed next to each bush. The support should be approximately the same height as it. The device is not suitable for tall varieties.
- Horizontal trellises. Wooden stakes are driven between the rows at a distance of 1.5-2 meters. A wire or twine is stretched along their height at a distance of 30-40 cm. Tomatoes are already tied to it with scraps of fabric.
- Net. Between the rows, mesh sheets are installed, to the rods of which the tomatoes are attached with garter material or special clothespins.
There are also special store accessories: wire frames for each bush or pyramid caps.
garter pins
Features of beds for tomatoes
If you plan to prepare garden beds for tomatoes, you need to take into account some important nuances. Thus, preparatory work must be carried out from the beginning of autumn - during this period, a plot of land is selected for planting a crop, and the soil is carefully dug up before the start of winter.
In the spring, the soil is dug up again - doing it the second time is much easier physically. Carefully remove weeds and apply fertilizers. Only after this can you begin to prepare high or warm beds.
Benefits of a raised bed
Summer residents from the northern regions constantly face difficulties in growing heat-loving crops. In short summer conditions, it is almost impossible to get a good tomato harvest. Spring is long, the ground takes a long time to warm up, and recurrent frosts are often observed in early summer. It is possible to plant seedlings in open ground only closer to mid-June; tomatoes do not have time to ripen before the first autumn cold, which arrives here at the end of September.
Attention!
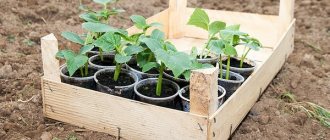
Growing tomatoes in boxes is important for areas where the soil remains cold for a long time. In regions with early, warm springs and hot summers, the roots in the box will burn; planting in recesses is popular here.
To install a large greenhouse you need a lot of money and a sufficient amount of free space on the site. It is even more difficult for those who have a vegetable garden located on a slope; it is impossible to place a greenhouse in such conditions. Box beds (soil raised above the main level of the garden, framed by high sides) allow you to solve several problems at once:
- the soil warms up faster, tomatoes can be planted earlier;
- It is easy to install pegs or arcs on the structure and cover them with polyethylene (to protect plants during cold periods);
- boxes allow rational use of free space in a small area, since they do not take up much space;
- installation is possible both on flat and flat areas. On the slope, the boxes should be placed in the form of terraces. When arranging, you should take care of the paths and level the upper sides strictly horizontally;
- It is easier to care for plants and it is convenient to approach them;
- the soil always remains inside the structure and is not washed away during watering, during rains or after snow melts;
- Tomato roots do not like stagnant moisture, so they are not planted in places with high groundwater levels. In a high bed, water does not stagnate, it can be installed in a problem area, and crops can be grown without the risk of rotting;
- the box is easy to install and dismantle; the structures can be permanent or portable.
Let us also note the aesthetic side of such structures. The tall mini-garden is a geometrically regular figure that looks very attractive on the site. Even an inexperienced summer resident can make a box bed with his own hands, based on his own wishes and capabilities; there are no complicated plans or strict calculations. There are 2 options for tall structures:
- Narrow (for planting tomatoes in 1 row) - width no more than 50 cm. It is possible to cover the bushes using a tent method, install supports in the middle of each edge of the box, connect them at the top with a crossbar on which to throw the canvas.
- Wide (for planting tomatoes in 2 rows) – width up to 120 cm. You can install arcs for shelter, the canvas will be easy to lift on each side of the box.
Both options are good in their own way, it is difficult to clearly determine which will be more successful, it all depends on the goals and free space on the site. One thing is for sure, boxes are better and more convenient than classic beds. After rains and waterings, you don’t have to walk through the mud. Paths can be overgrown with weeds, but they do not penetrate into the beds from behind the sides, and weeds that have sprouted inside the structure can be easily removed without weeding.
Problems when growing ground tomatoes
Late blight affects ground tomatoes very early, especially when adjacent to potatoes. To prevent disease, the distance between crops should be at least 200 m. But in a small area this is almost impossible to do.
The only preventive measure is spraying both crops with copper preparations (HOM, Oxychom, Ordan). Copper-containing preparations are alternated with Previkur or Consento. Treatments are carried out at intervals of 10-12 days throughout the entire growing season, alternating chemicals. Solutions of these drugs are spilled on the soil under the tomatoes.
Phytophthora later appears where copper is present, so tomato stems are wrapped with copper wire. Wire can also be inserted between potato hogs.
But, despite all the measures, late blight will still appear in the open ground. The only question is timing. The later the disease appears, the greater the harvest you can get.
Cladosporiosis severely affects soil-grown tomatoes in the south. In the middle zone in open ground, the disease is rare. Since the disease begins with the lower leaves, their timely removal reduces the risk of the disease. For prevention, treating bushes with Pseudobacterin is a good option. Treatments are carried out 3-5 times per season with an interval of 7-10 days.
When the first signs of the disease appear, the affected leaves are removed and the tomatoes are treated with copper-containing preparations.
In the middle zone, it is much more difficult to get a good harvest of ground tomatoes than with greenhouse cultivation. Often the efforts are not worth it. Therefore, greenhouse cultivation is preferable here. In the south, on the contrary, it is better to grow tomatoes in open ground, covering them with spunbond on cold days. With the right selection of varieties and proper care, two harvests are harvested here per season.
- Schemes for feeding tomatoes in a greenhouse and exhaust gas
- Growing tomatoes Bull's heart
- The most dangerous tomato diseases and methods of treating them
- What to do if tomato leaves curl
- How to pick tomatoes correctly and why to do it
- Rules for planting tomato seedlings in a greenhouse
- Caring for tomatoes in a greenhouse
- How to protect tomatoes from late blight
Examples of beautiful beds for tomatoes
Vertical beds for strawberries
Tomato beds can be not only useful, but also beautiful.
Summer residents with imagination plant vegetables in a wavy, V-shaped, spiral, or round bed. For warm beds, you can make triangular or trapezoidal boxes, arrange them in the shape of a flower, and in the center there is a round flowerbed with marigolds or nasturtiums. These flowers are good for tomatoes and repel pests.
An example of beautiful beds
Flowers can be planted in hanging tomato beds. From such a neighborhood the vertical bed will become more beautiful.
Hanging beds of beautiful flower pots and pyramid beds also decorate the summer cottage.
High warm beds can be fenced with a beautiful fence. Place garden sculptures on the site for aesthetics.
The beauty of a vegetable garden is neat bushes with a bountiful harvest of different colors, shapes and sizes.
Tips and tricks for gardeners
If there is no manure during the construction of a warm bed, you can replace it with bales of straw, which must be filled with a solution of chicken manure (a bucket of manure with 50 liters of water);
Good neighbors for tomatoes are basil, sage, peppers, onions, garlic and lettuce;
You should not make wide beds. Narrow ones with wide paths are more convenient. In a narrow bed you can reach all the plants without trampling the soil. On a wide path it is easy to stretch a hose for watering.
Advice! If you make the southern side of the plot a little lower, it will be evenly illuminated by the sun;
Rotted manure in warm beds attracts small rodents. It is worth putting a fine-mesh metal mesh on the bottom to keep pests out.
Growing tomatoes is painstaking, long work, but the result is worth it. So many varieties of tomatoes have been bred, different in taste, color, processing, it’s worth the effort to then enjoy the harvest.
5 1 vote
Article rating
At what depth to sow seeds?
Before you start sowing tomatoes, you need to prepare a special container. Cups, cassettes or shallow boxes are suitable for this. Pour moist soil into the container and make furrows about 1 cm deep, the distance between them should be about 3 cm. If the seeds are not planted very close, then the sprouts in the future do not need to be pricked.
There is another landing option. You can place tomato seeds on pre-prepared soil and then sprinkle with a 1 cm layer of soil.
Landing Features
The depth of seed placement also depends on the plant variety. Tall varieties are planted 1.5 cm deep to help them take root better. Low-growing species can be sown to a depth of up to 8 mm. This will improve seed germination. The type of soil must also be taken into account. If it is heavy, the seeds will sprout later, and if it is fluffy, the sprouts will emerge in 2-4 days.
If you sow tomato seeds shallow, they may become bare during watering. In such a situation there are 2 options:
- add 1-1.5 cm of soil;
- Instead of watering, spray the seedlings with a spray bottle.
After sowing the seeds, it is necessary to constantly keep the soil moist. As the bushes grow, the amount of water is reduced.
Tatyana Orlova (candidate of agricultural sciences):
The soil in the seed boxes should be slightly compacted before sowing. This is done to ensure that the seeds fall to the same depth, otherwise the germination rate (germination energy) will be low. Some seeds will sprout earlier, others a little later, and the degree of development of the seedlings and their readiness for picking will vary.
Diseases and pests of tomatoes, control methods
There are quite a few pests that can harm tomatoes, the most common of which are:
- The mole cricket is an insect that settles on well-fertilized and moist soils. To combat it, strong insecticidal preparations are used, including infusions of vinegar and red pepper.
- Wireworms are larvae that are covered with a dense shell and damage the root system of the plant. For prevention, during autumn site preparation, acidic soils are alkalized.
- Gnawing cutworms - these caterpillars are considered the most dangerous enemy of vegetable crops. For prevention, it is recommended to carry out deep mechanical tillage and timely weeding. If caterpillars appear in large numbers on tomatoes, they must be collected and destroyed manually.
Mole cricket - a pest of tomatoes
Wireworms: these larvae cause damage to the root system
Gnawing cutworms are dangerous caterpillars
Tomatoes can suffer from the Colorado potato beetle, thrips, spider mites, whiteflies and melon aphids. To combat these types of pests, it is worth using insecticidal preparations.
It is recommended to carry out preventive spraying of tomatoes every 5-7 days, alternately using onion infusion and Bordeaux mixture. If the plant has been affected by a dangerous infection, serious treatment is required.
Tomatoes are often subject to diseases such as blossom end rot, mosaic, late blight, wild spot, anthracnose, fomoz, etc. In this case, it is necessary to treat the plants with special potent fungicides, and the affected parts of the plant must be removed.
If the tomatoes are severely damaged, complete destruction of the planting is required. To minimize the likelihood of re-development of the infection, before the new season the soil must be treated with disinfectants, for example, watered with a solution of copper sulfate, a hot solution of potassium permanganate, and deep digging is performed.