If you plant onions in the spring, you can get a good harvest of vegetables in the fall, but for this you need to correctly determine the timing of sowing work and organize proper care for planting. This process is not labor-intensive, but requires compliance with certain agricultural techniques and rules for growing vegetables. Read about all this below.
When to plant?
In order to determine the optimal timing for planting in the spring, you need to take into account both specific weather conditions and suitable dates according to the Lunar calendar.
Climatic conditions
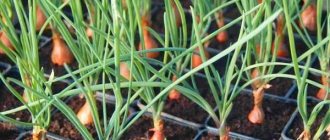
Onions can be planted only after the frosts have subsided and stable warm weather has established. In this case, the soil must warm up to a depth of 5-8 cm to +12...14°C, otherwise the onion will sprout into the arrow, and the greenery will grow more than the turnip itself.
As a rule, suitable weather sets in at the end of April - early May. The exact timing depends on the specific region:
- southern regions - second ten days of April;
- regions of central Russia and the Moscow region - the third ten days of April;
- Siberia and the Urals - the first ten days of May;
- Altai Territory - from early to mid-May.
Residents of central Russia are starting to grow the bird cherry flowering vegetable.
If onions are grown in a greenhouse, planting can be done 2-3 weeks earlier than indicated.
Regardless of the region of residence, you should not delay planting onions, otherwise, due to high temperatures and lack of natural moisture, the onion will develop slowly, which can lead to a decrease in the intended yield.
According to the Lunar calendar
To accurately determine the dates of planting, many gardeners rely on the Lunar calendar, according to which the following favorable periods for planting onions in the spring are:
- April 25 and 26;
- from May 10 to May 20;
- May, 23rd.
Onions planted these days produce large bulbs and juicy greens.
What affects planting times?
In the spring they are planted in April, starting in the middle, and winter onions - in early October, so as to simultaneously avoid frost and allow it to take root. In case of early or suddenly returning frosts, it is necessary to cover the plantings with straw or film. In the “loop” phase, the seed does not tolerate negative temperatures. In spring, onion seedlings can be transplanted into open ground at the stage when 2-3 leaves have hatched.
Onion variety
In the spring, early and mid-season varieties of onions should be sown in order to have time to harvest before the cold weather. Nowadays you can buy many types of planting material. Each has its own varietal characteristics, advantages and disadvantages. To choose the right one, study the characteristics of several varieties.
Brief description of popular types:
- Chalcedony is an unpretentious and early ripening variety (seeds planted in early May can be started to be dug up already in July). The lightest of those listed.
- Romi - the entire growing season is 85 days. The bulbs are medium (100-110 g), juicy, with bright red scales. Juicy and keeps for a long time. It can be grown from “chernushka” (seeds), then you should organize the planting of onions in April.
- Hercules is undemanding to climatic conditions and sowing methods, so it can be planted in open ground throughout the entire agricultural season.
- Carmen - slightly flattened golden onions, spicy and not too juicy. They are stored for a long time.
- Yukont is the most common variety in markets and stores due to its good keeping quality and fast (60-70 days) growing season.
These are not all varieties; in fact, there are a lot of them.
Growing region
Even with the most astronomically accurate lunar calendar, allowances must be made for weather conditions. Most varieties of onions at the age of “set” can die from sudden frost and need at least relatively stable temperature and water conditions, which are easier to maintain if they are planted in time and covered in time.
Regional features:
- In the middle zone and in the Moscow region, you can plant onions in greenhouses from the end of March. In open ground - from late April to early May.
- In Siberia and the Urals, the start date for sowing is delayed by an average of a week and a half. At the beginning of May, when there is confidence that there will be no sudden cold snap at night, you can begin planting.
- In the southern regions, the planting season begins at the end of March - in open ground, and onions can be grown in greenhouses and on window sills from the beginning of February.
In rainy and windy weather, they do not work in the open garden.
What varieties can be planted?
For spring planting, a medium-fraction onion with a diameter of 14-21 mm is preferable, since this shape does not produce shooters and takes root more easily. As for specific varieties, suitable ones are:
- Centurion F1 . An early-ripening hybrid that bears fruits that are aligned and slightly elongated in shape, weighing up to 175-180 g. Their taste can be sharp or semi-sharp. The variety is highly resistant to disease and has good shelf life.
- Stuttgarter Riesen . A mid-season variety that is characterized by high yield - from 1 sq. m produces up to 5 kg of large bulbs of round and slightly flattened shape. Their average weight is about 150 g, but there are specimens weighing 200-250 g. The taste of the fruit is bright and distinctly pungent.
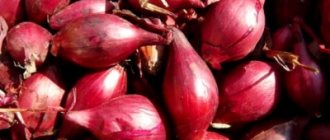
- Red Baron . An early variety with a yield of up to 3 kg per 1 sq. m. It bears round fruits of red-violet color and weighing up to 150 g. Their taste is pleasant and semi-sharp.
- Sturon . An early ripening variety Sturon with stable and high yields, which produces medium and large sized bulbs. They have a mild semi-sharp taste.
- Hercules . A mid-early hybrid with high productivity, bearing fruit with bulbs weighing 155-160 g. They have a wide elliptical shape and a spicy, islandy taste.
- Stardust . A mid-early variety that has good germination and high yields. The fruits are large in size, smooth and round in shape, with a pleasant and slightly semi-sharp taste.
Bow Centurion F1
Bow Stuttgarter Riesen
Bow Red Baron
Bow Sturon
Bow Hercules
Bow Stardust
Experienced vegetable growers choose these varieties for their quality characteristics and ease of cultivation.
Processing of planting material
What preparation to carry out depends on what is used as planting material - seeds or sets. We will consider each option separately.
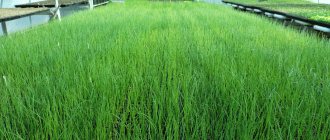
Seeds
To grow onions for feathers, you need to plant them with seeds. You can start processing them 25-28 days before sowing. It is produced in this order:
- To check onion seeds (nigella) for germination, they need to be placed in a gauze bag and immersed in hot (+45...+55°C) water for 12-16 minutes. Discard unsuitable specimens.
- For hardening purposes, after the first stage, immediately dip the seeds in cold water for 1.5-2 minutes.
- In order for the seeds to swell and free themselves from substances inhibiting germination, wrap them in damp natural fabric and keep them in this form for 22-26 hours, while regularly moistening the package. After this procedure, soak the seeds in water at room temperature and keep for 2-3 days in the lower compartment of the refrigerator or in another cool place. Change the water every day.
- After soaking, drain the water, dry the nigella on a paper towel and mix with sand or sawdust.
After this treatment, you can get strong, small onion seeds that will be suitable for uniform sowing.
Onion sets
When growing onions per head, planting should be done in sets. They can be purchased at a garden store or grown independently from nigella, giving preference to zoned varieties. In any case, bulbs with the following characteristics are suitable for spring planting:
- have dimensions of 14-21 mm;
- are dry and elastic;
- have good density and a pleasant onion smell.
Bulbs that have the following characteristics are not suitable for planting:
- wet;
- covered with mechanical damage and rot;
- smells musty;
- have white roots or green sprouts that have hatched.
In order for self-grown seedlings to be suitable for planting in the spring, they must be properly stored in winter - at a temperature of 15°C and a humidity of 70%.
Direct processing of the sets should begin a month before planting. It consists of carrying out the following manipulations:
- Throw away dry and rotten onions, and sort the remaining ones by size - large, medium and small. Planting should begin with small and medium-sized bulbs so that by autumn they produce a harvest of heads. Large sets should be planted with a break of at least 2 weeks so that they do not go to seed early. At your discretion, you can use them green or leave them for nigella.
- If the seedlings were stored in a cellar or other cold place, you need to warm them up and dry them 2-3 weeks before planting, otherwise they will rot in the soil or go to waste. The sorted sets should be spread in a thin layer and kept in direct sunlight, for example, on a windowsill on the south side. An alternative option is to keep the seeds for 3-4 days near a heating source at a temperature of +35..+42°C.
- After drying and warming up, immerse the seeds in hot (70°C) water for 4-5 minutes, and then in cold water for the same time.
- To quickly germinate, soak the seedlings for 8-10 hours in a weak solution of complex fertilizers or nitroammophosphate (15-20 g per 10 liters of water).
- After a mineral bath, in order to disinfect and protect the planting from fungal diseases, soak the seedlings for 10-15 minutes in a solution of potassium permanganate (1 tsp per 10 liters of water) or copper sulfate (10-15 g per 10 liters of water). If, when growing seedlings in the garden, diseases were observed or pests multiplied, the planting material should also be kept in an ash solution (1 tablespoon per 1 liter of water).
- Rinse the seedlings under running, non-cold water, dry and plant in the ground.
If you plan to grow feathers, then before planting you need to cut off the tops of the bulbs.
Growing onions from seeds yourself
Growing onion sets from seeds on your own is a rather labor-intensive process.
Obtaining seeds
Sequence of self-production of onion seeds:
- Choose 7-8 large, high-quality bulbs of the same variety
- In May, plant them in the ground at a distance of 50 cm from each other, placing 150 g of compost under each bulb
- Periodically loosen the soil and hill up the plantings
- Fertilize with nitrogen twice
- Place a peg next to the bow arrow and tie it to it
- Create bird protection
- Cut off flower stalks that have begun to turn yellow and hang them to ripen in a dry, warm place.
- Knock out the finally ripened seeds from the flower cap and place them in a paper bag for storage.
Processing and soaking
When using purchased seeds, no additional processing is required. Seeds collected independently are subjected to a soaking procedure , which increases the percentage of germination and ensures their full development. Soak onion seeds in one of several liquid options:
- for a day in warm water;
- for 24 hours in a weak solution of potassium permanganate (replacing with a new one every 3 hours);
- for 1 hour in a solution of potassium permanganate, followed by moving for 20 hours into a solution prepared from 2 drops of Epin and 100 ml of water.
Important! To speed up the emergence of seedlings, it is recommended to germinate the seeds by spreading them between two pieces of cloth soaked in water and leaving them for a couple of days.
Before planting, the seeds are dried and mixed with a small amount of chalk powder. Sowing seeds is recommended only in previously prepared soil; for this, wood ash or rotted humus is added to it. Carrots, calendula and dill are planted around the formed beds to repel onion pests.
Selecting a site and preparing beds
You need to choose a place to plant onions in the fall. This should be a well-lit area, as bulbous plants grow hard in the shade and need plenty of direct sunlight. If the onion grows without them, the heads will turn out to be very small.
It is equally important when choosing a site to take into account the rules of crop rotation:
- The best predecessors of onions are those crops that loosen the soil with their roots and enrich it with nutrients. These are: rye;
- pumpkin;
- peas;
- beans;
- peppers;
- eggplant;
- zucchini;
- cabbage;
- tomatoes;
- potato.
As for the soil, it should be loose and low acidity. Onions grow well on chernozems or loams that allow air and moisture to pass through well.
The selected area with suitable parameters must be properly prepared. This procedure can be divided into two stages:
- in autumn. Dig up the bed using a spade, without breaking the clods. This is a good treatment for pests and diseases - the ground will freeze deeper, so fewer larvae will survive until spring. In addition, when snow melts, moisture will remain in the soil longer. When digging, the soil needs to be fertilized - add it per 1 square meter. m 5 kg of rotted manure or compost. From mineral fertilizers per 1 sq. m it is worth adding 30 g of superphosphate and 15 g of potassium chloride.
By spring, all applied fertilizers will dissolve and soil fertility will be restored.
- In the spring . A week before planting, evenly distribute ammonium nitrate over the surface of the bed at the rate of 20 g per 1 square meter. m and carry out shallow loosening followed by harrowing. Immediately before planting, for the purpose of disinfection, water the dug up beds with a dark pink solution of potassium permanganate.
The onion bed is not simple, but with fertilizers!
Many summer residents and gardeners consider onions to be an unpretentious plant - they do not fertilize the soil, do not disinfect the planting material, and in the end the harvest is small or, worse, absent altogether. In this regard, the question may arise of how to grow large onions. To begin with, experienced summer residents and gardeners recommend preparing a good garden bed. Since the composition of the soil in each garden is not the same, it is necessary to focus on the type of soil and its mechanical composition.
For high acidity, add chalk, wood ash or dolomite flour; lime works well. After digging, scatter 2 cups of the substance (to choose from those listed above) over an area of one meter square. For slightly acidic soil, you can use a smaller amount of alkalizing products (1 cup per 1 m²).
Indicator paper will help you find out the acidity of the soil; you can buy it at the pharmacy. We take 20 grams of soil for examination, dilute it in 50 ml of distilled water, let it sit for an hour and carry out an analysis. Dip litmus into the mixture and look: red - soil acidity is high (up to 4), orange - medium (up to 5), yellow - weak (up to 6.5), greenish - neutral (up to 7.5), green-blue - alkaline (up to 8.5).
preparing a bed for onions - in the photo
Clay soil requires good drainage. To improve water permeability and increase the overall quality of the soil, you can add 1 bucket of river sand per square meter. An excellent addition would be peat (5 kg per 1 m²) - the fertilizer has a porous structure that allows the roots of the plant to be supplied with moisture without oversaturating, which is important for the life of the onion.
Loam is considered favorable for planting onions. In the fall, after digging up the soil, add manure, compost or humus (in the amount of 3-4 kg per m²).
Soddy-podzolic soil is widespread, and although it contains most of the nutrients, the addition of organic matter will have a positive effect on the composition of the soil. If you use manure during autumn digging, then it should take a walk, lie in the sun, air out and only then go to the garden bed. For one square meter of such soil, add 1-2 kg of manure, humus or compost and dig it up. In spring, instead of organic matter, you can add minerals (per 1 m²): nitrogen - 1 tbsp. l. (for the growth of the green part of the plant), phosphorus 7.5 g (for the mass of the onion turnip) and potassium 18 g (to strengthen the root system).
Sandy soil does not retain moisture, so it is recommended to add clay for compaction. Peat is great. You can feed the soil with manure at the rate of 2 buckets per square meter. In spring, use nitrogenous fertilizers (urea 70 g per 10 m²). Since sandy soils are loose and have a high loss of liquid, it is better to fertilize them in the spring, using less fertilizer, but more often.
Sandy loam soil is well suited for planting onions. Has a high degree of air penetration and retains moisture. For fertilizer, use peat, preferably together with manure: a bucket of each nutrient component per square meter.
Calcareous soil requires constant loosening and heats up quickly, which leads to drying out. It is better to fertilize such soil with humus or compost, and put mulch on top, in the form of weeds picked from the garden, fallen leaves. Wood ash is suitable; it is added throughout the year at a rate of 200 grams per square meter. Potassium for such soil is necessary in the autumn; when digging, sprinkle 2 tbsp. l. per square meter of area.
If you follow the advice of experienced agronomists, you can understand how to grow good onions in the country by fertilizing the soil in accordance with its type. Of course, it is worth taking care of the proper preparation of planting material.
Planting onions in the ground
The planting scheme depends on the planting material through which the vegetable crop is cultivated.
Sowing seeds
It is produced according to the following scheme:
- width between holes – 1.5-2 cm;
If you keep less than 1 cm between holes, you will be able to get a good feather - the greenery will grow larger than a turnip.
- distance between rows – 12-18 cm;
- embedment depth – up to 1.8-2 cm.
After sowing, the soil must be watered and mulched using sawdust or straw. The planting itself must be covered with a dark film to prevent it from drying out.
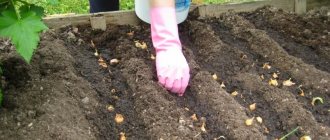
Planting sets
Before planting, you need to prepare the beds at a distance of 25-30 cm. The distance between the grooves depends on the size of the heads:
- large – 10-12 cm;
- medium – 8-10 cm;
- small – 6-8 cm.
Sevok should not be immersed too deeply in the ground. With the appearance of roots, it will be drawn even deeper into the soil, so you will have to wait even longer for seedlings, and the harvest will be small and weakened. The optimal depth for planting bulbs is 4.5-5 cm, so that a layer of soil of 2.5-3.5 cm remains above the onion hangers.
After planting, the bed should be watered and mulched with straw or sawdust so that moisture remains in the soil longer before the bulbs germinate.
The intricacies of sowing onion sets throughout May are described in the video below:
How to grow onion sets per head: planting diagram and technique
The bulbs are planted at a distance sufficient for their normal development and agricultural work (hilling up, weeding, watering). The recommended planting scheme is rows with an interval of 20-25 cm, in which the bulbs are placed 6-10 cm apart, depending on the size of the set.
The correct planting depth is important: bulbs located too close to the surface will not receive adequate nutrition, and bulbs that are too deep will find it difficult to develop in dense soil. As a rule, the depth of the grooves is 5-7 cm. The bulbs are planted in them, deepened to the shoulders (neck), and then covered with a 2-3 cm layer of earth.
Caring for spring planting
To get a good harvest, you need to follow the rules for planting care. They consist in the timely implementation of a number of agrotechnical measures.
Watering
Lack of moisture in the spring will cause the feathers to acquire a bluish or white tint, and the tips will dry out and bend. At the same time, excess moisture should not be allowed, otherwise the feather will turn out pale and thin, and the quality of the grown onion will deteriorate. So, it is extremely important to organize moderate watering of the crop, adhering to the following scheme:
- In May-June, water the beds no more than 1-2 times a week at the rate of 7-11 liters of water per 1 square meter. m.
- During the ripening period of the bulb heads, reduce watering to once every 1.5-2.5 weeks. However, in dry weather, onions should be watered more often, while reducing water consumption.
- By the time the turnips begin to ripen, reduce watering to a minimum, just to keep the soil moist. Excess moisture will stimulate leaf growth and delay the ripening of large onions.
- At the stage of cutting the bulbs, do not water. However, in case of severe drought, the planting can be slightly moistened, otherwise the onion feathers will lose color, bend and turn white at the tips.
Loosening
At least once every 2-2.5 weeks after watering or rain, you need to loosen the soil. This is an important procedure that should not be neglected for the following reasons:
- gives the onion turnip a lot of air and light, and therefore strength to “get out” to the surface;
- improves air-moisture conditions, preventing the soil from becoming excessively compacted;
If you allow an impenetrable crust to form on the surface of the soil, the onion will begin to suffocate and lag behind in development, and the feather will turn pale and even turn yellow.
- helps keep the planting clean - fights weeds that grow rapidly as the roots and leaves of the bulb slowly grow.
Top dressing
If the pre-sowing soil fertilization was done correctly, then only poor soil needs to be additionally fertilized. However, even with proper preparation, onion growth can be sluggish. In this case, summer feeding of the planting will help to stimulate feather growth. It is produced using a solution prepared from the following substances (in a bucket of water):
- 15-20 g of urea;
- 250-280 g of organic matter (mullein or bird droppings).
This composition must be applied at the root of plants at the rate of 3-3.5 liters per 1 square meter. m. After 12-16 days, fertilizing can be repeated.
If after fertilizing the greens begin to actively grow and shoot out, they will need to be removed immediately.
Protection from diseases and pests
In order to prevent the development of fungal diseases, when the onion reaches a height of 12-16 cm, it is necessary to carry out preventive treatment - sprinkle the beds with a solution of 5-8 g of liquid laundry soap and 15-20 g of copper sulfate per 10 liters of water.
If the vegetable crop is not treated, it can be affected by the following pathogenic fungi:
- Downy mildew . It is carried by wind, insects and even humans. Appears as light spots on feathers. If such signs are found, the plant should be sprayed with a Polycarbacin suspension or 1% Bordeaux mixture. This treatment should be carried out 3 times with a break of 10 days. The last of them should be carried out 20 days before harvest.
- Rust disease . Leaves swollen orange round spots on the stems. To prevent the development of this pathological process, you need to regularly weed the bed. When growing massively, onions should be sprayed with a solution of copper oxychloride at the rate of 30 g per 10 liters of water. You can add a little liquid soap to it. Spray the planting with the composition twice with a break of 7 days.
- Fusarium rot . Manifested by rotting of feathers and turnips. To prevent the development of the disease, it is advisable to treat the soil with Iprodione before planting, and soak the seed in a solution of potassium permanganate. In addition, you cannot plant onions in the same area for 2 seasons in a row.
As for pests, the most dangerous among them are:
- Wire beetles . To scare them away, you need to follow proper agricultural practices.
- Onion fly . Creolin will help in the fight against it.
- Onion weevil (secretive proboscis) . Against it, onions can be sprayed with insecticides that contain nicotine sulfate.
To protect the onion bed from attacks of any pests, you need to thoroughly clean the garden of plant debris and other debris.
Diseases and pests
Diseases and pests equally affect any crop, regardless of growing conditions. The most common onion pathologies:
- Powdery mildew. A common disease that can be caused by a bacterial infection. It is characterized by a change in the shape of the bulb, cessation of development, the leaves become covered with a yellow coating and begin to dry. To avoid this problem, it is recommended to use potassium and phosphorus fertilizers, carry out preventive treatments of the area, avoid dense planting, and remove weeds in a timely manner. At the first signs of powdery mildew, fertilizing with nitrogen fertilizers is excluded.
- Gray rot. It is considered a dangerous disease for this culture, which gradually affects the cervix. Early ripening varieties are rarely subject to rot. The infection thrives in high soil moisture and can be carried by pests. To combat gray mold, high-quality planting material is used and the area is fertilized with nitrogen fertilizers.
- Fusarium. This disease is characterized by the fact that the bulbs become soft and the root system dies off. The greenery turns yellow. The diseased plant is immediately removed from the garden, and other bushes are treated with special preparations or folk remedies.
- Jaundice. All onion varieties are susceptible to this disease. Characteristic signs are yellowing of the bulb and greens, and the appearance of spots. It will not be possible to save the plant in this situation. To save the crop, it is necessary to promptly remove the infected crop and weeds, and obligatory treatment of the area with drugs.
Common pests:
- Onion fly. This insect attacks the underground part of the plant. Penetrates into bulbs like larvae. The crop stops growing and developing, begins to rot, the greenery gradually fades and turns yellow. The fight against flies is as follows: treating the soil with saline solution for 10-12 days. Almost all varieties are susceptible to this pest.
- Root mite. It is observed in almost all varieties. Refers to moisture-loving insects. The mite provokes rotting of the bulbs and the spread of fungal infection. After infection in this area, it is not recommended to plant onions and other favorite crops of the tick for three years. It is necessary to carry out heat treatment of the bulbs and spray the plant with a keltan solution.
- Onion moth. This insect likes to eat the ground part of the plant, thus making passages in the onion. After this, the culture gradually begins to die. In order to avoid encountering onion flies, preventive measures are carried out - spraying with special preparations, removing plant debris from the site, plowing and loosening the soil.
From all of the above, we can conclude that growing onions by head is not so difficult, the main thing is to take into account all the nuances, choose the right variety and promptly carry out preventive measures regarding pests and diseases.
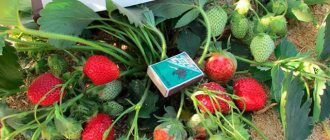
Harvest and storage
You can start harvesting onions from 2-3 weeks of August to early September. The following signs will indicate the ripeness of the crop:
- the greenery stopped growing;
- the feather died;
- new feathers stopped forming;
- the leaves have turned yellow and dry;
- heads with a characteristic color and ripe-looking scales were formed.
Harvesting cannot be delayed, otherwise the heads will begin to grow again and the onions will become unsuitable for storage.
You need to start harvesting on a sunny day or cloudy but dry weather. If you cannot tear off the stems, you can pull out the onions and sets by hand. To avoid damaging the onion turnips, you should carefully dig them up with a pitchfork.
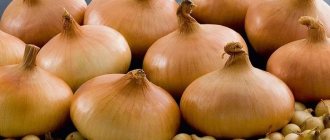
The harvested onion and sets need to be dried. In sunny weather it can be spread directly on the beds. An adult turnip will dry out in natural conditions in 7 days, and a set will dry out in 3-4 days. If the weather is cloudy, the harvested crop will have to be dried under a canopy with good air circulation.
After drying, the bulbs need to be cut off, leaving necks 3-4 cm long. Next, they need to be sorted correctly so that large specimens can be eaten, and small ones (up to 3 cm in diameter) can be saved as seeds for green feathers.
How to care
Regular watering is important for this crop. It should last from the beginning of planting until July. Moreover, after each irrigation the soil must be loosened. Approximately 10 liters of water will be needed per 1 m2. Watering is best done in the evening or during the day. It is enough to water the plant 2 times a week. If it is very hot outside, then increase the amount of moisture.
Fertilizer application
Before fertilizing onions, it is worth removing weak and sickly plants.
At this time, the onion lacks nitrogen and phosphorus. For a normal growing season, it is necessary to apply phosphorus and potassium fertilizers as soon as the plant has 5-6 leaves. To do this, take 10 liters of water, add 20 g of superphosphate and 20 g of potassium. The resulting solution should be applied in dry weather. If the weather is humid outside, it is best to sprinkle dry fertilizer between the rows and work them a little into the soil.
But you shouldn’t use fresh manure for fertilizer. The fact is that it decomposes slowly and at the initial stage of development the plant will not receive the nitrogen it needs so much. But in the summer there will be quite a lot of nitrogen, as a result of which the onion will produce abundant and green feathers, but the bulbs will receive insufficient nutrition. But this description will help you understand how to care for onion sets Centurion.