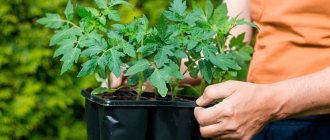
When to plant onion sets, family onion in the spring?
How to plant onion sets on a head in the spring?
Planting of sets should be carried out in the spring after the cessation of frost and the likelihood of night frosts.
- If the spring was early, then you can plant onions on the head from mid-April (if frost hits after sowing, the onions may go into decline).
- In order not to take risks, “garden masters” plant onions on the head in mid-May, focusing on the gardener’s calendar.
The planting date also directly depends on the size of the set..
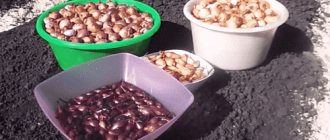
- On the eve of sowing, it is recommended to calibrate the bulbous heads. In other words, planting material must be distributed into small, medium and large heads.
Planting is carried out in an incremental manner.
- Small sets are planted first, in early to mid-May.
- It is customary to stick a medium onion (from 1 to 2 cm) into the ground half a month after the small one.
- Large sets must be planted last to prevent them from growing into feathers.
Very often among the planting material you can find quite small bulbs (no more than 1 cm) - such sets are recommended to be planted only in greenhouses.
- The family onion “Kushchevka” or the so-called “shallot” is considered more resistant to frost, so it can be planted from mid-April.
Variety selection
The correct choice of onion variety determines the quantitative and qualitative characteristics of the future harvest. When choosing a suitable variety, be sure to take into account the intended purpose of the crop and the climatic conditions of a particular region.
All existing types and varieties of crops differ from each other in a number of characteristics:
- ripening period;
- color;
- form;
- taste qualities;
- duration of crop storage.
What are black onion and onion sets?
Nigella is an onion seed that gets its name from its color. Nigella ripens after the plant has finished flowering: in place of each flower, a seed is formed in a small triangular box. From the sown nigella, an ordinary onion set grows, used in garden plots next year or for planting before winter.
The most common varieties: Neman, Centaur, Myachkovaty, Crimson Ball, Sterling.
Onion sets are small bulbs with a diameter of 1.5-2 cm, grown from seeds. There are several varieties of it, depending on the size:
- wild oatmeal – up to 1 cm;
- first grade - up to 1.5 cm;
- second grade – up to 3 cm;
- samples – from 3 cm.
Important! From the numerous varieties of onion sets, it is recommended to choose the one most suitable for cultivation in a particular region.
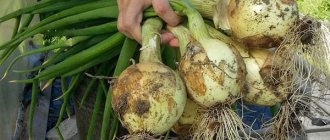
Onion
The optimal variety for cultivation should be unpretentious in care, produce an abundant and high-quality harvest with a long shelf life. Among these varieties of onions are:
- Aleko;
- Heroic strength;
- Timiryazevsky;
- Golden;
- Carmen;
- Orion;
- Sturon.
A type of onion is the family onion . This is a multi-bud onion, which gardeners usually call “family” or simply “family”. One head holds several small bulbs, hence the name.
For growing onions, loose, fertile soil with a neutral acidity level, an air temperature of + 15°C and good light are preferable.
Leek
Leeks are a biennial herbaceous plant that differs from onions in the absence of a large bulb. Therefore, the stem and long (up to 1 m), wide leaves of the crop are eaten.
As a rule, leeks are grown in seedlings, planting seeds in the soil from late February to early March. Adult seedlings are planted in May. The optimal soil for leek development is loam. Leek varieties grown from seeds:
- Kamus;
- Vesta;
- Tango;
- Bastion;
- Goliath;
- Bluewing;
- Mercury.
The harvest of this type of onion is stored together with green leaves, otherwise the stem loses its juiciness over time.
shallot
A distinctive feature of shallots is that several small bulbs of an oblong shape are formed at the base of the nest. Many fine feathers grow from them. This is a perennial onion.
How to properly plant onion sets and family onions in the spring?
Preparing the sets
Preparation of planting material
Planting onions in the spring always begins with calibrating the planting material. (described above)
- If onion heads were purchased and not grown last year, then they must be dried.
- If the planting material is left over from last year, then in winter it must be stored correctly - at a temperature of +18 degrees.
An important condition before planting your own material is to warm it up.
Warming up the sets
Warming up the seed before planting
Method No. 1
- On the eve of planting, place the onion heads in conditions with a temperature of +20 degrees.
- We maintain this temperature regime for about 20 days.
- After the specified time has passed, we create conditions for sowing at +30-40 degrees for 10 hours.
- We make sure not to overexpose the planting material to fairly high temperatures.
- On the eve of planting the seed, heated in this way, we treat it with growth stimulating agents (read below).
Method No. 2
- Place the seeds in hot water (+40-50 degrees) for 10-15 minutes.
- After the specified time has passed, transfer the onions to cold water for the same 10-15 minutes.
- At the end of 15 minutes, immerse the seedlings in a solution of complex mineral fertilizer for onions for 5-6 hours.
Planting onions
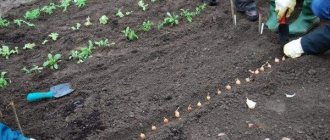
Planting onion sets
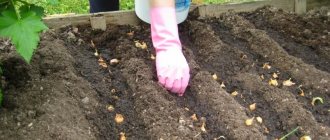
- Before planting onions, it is necessary to make furrows up to 4 cm deep in the prepared area (in general, the depth directly depends on the size of the set) at a distance of 15-25 cm from each other.
- It is necessary to stick the bulbs into the prepared furrows at a distance of 7 cm from each other so that after they are buried, the dry part of the set is barely visible on the surface.
Some experienced gardeners recommend watering the onions thoroughly after planting, and then making mulch from straw or sawdust..
The need to treat onions when planting in spring
Despite the unpretentiousness of onions in cultivation, experienced gardeners do not neglect the preliminary preparation of seeds. They understand that such events:
- accelerate germination;
- increase productivity;
- prevent bolting;
- They disinfect onions, which protects them from rotting, diseases and pests.
During storage of seed, some bulbs deteriorate from the inside, which is completely invisible from the outside. Pre-sowing treatment allows you to identify unsuitable seeds and qualitatively strengthen healthy grains.
Against shooting
During soaking in hot water (60-70 °C for 2 minutes), the bulbs experience temperature stress. This activates the production of substances that prevent the formation of buds and the onset of bolting.
Dry heating of onions causes similar reactions. It is important to strictly observe the indicator and duration of the temperature regime.
Pest treatment
Most often, Fentiuram or TMTD solution is used to protect against parasitic insects. In case of damage to seedlings by onion fly, use ash and charcoal powder. According to the rules, the product is sprinkled on the soil around the sprouts.
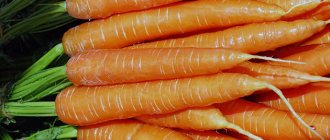
The method of joint planting works well against pests. When you grow carrots, chamomile, tomatoes, and celery next to onions, you don’t have to worry about onion fly infestation. The smell of ammonia and kerosene also repel insects. Rags soaked in these products are pulled over the pegs around the plantings. Farmers protect cabbage and potatoes in the same way.
Preparing a bed for onions in the spring
Preparing a bed for sowing onions in the spring
To plant onions, you need to choose open, well-lit and ventilated areas of land .
- As a rule, preparing a site for planting onions is carried out in the fall, so you need to take into account that the piece of land allocated for these purposes should not be located in a lowland, where water stagnates for a long time in the spring.
- Water can become a dangerous enemy for onions , and their heads will begin to rot in the ground, thereby ruining the entire harvest.
- Sevok does not like acidic soils . If the soil in the selected area is highly acidic, you can add lime to it, which neutralizes the acid.
- It is not recommended to plant sets in an area where the same onion was grown the day before - the area should be given at least three years for rehabilitation.
- Potatoes, tomatoes, cabbage, cucumbers, beans, zucchini, peas, and pumpkin are considered good predecessors for onions
- A scheme that has proven itself very well is when carrots are planted close to onions - the smell of carrots drives away the onion fly, and the smell of onions neutralizes the carrot fly.
- During the autumn preparation of the site, it is recommended to dig up to a depth of a shovel (15-20 cm) and level it.
- The best option is to fertilize the soil for onions in autumn with manure , peat manure compost or superphosphate mineral fertilizers.
Important! It is strictly forbidden to fertilize the soil immediately before planting, since the onion will go to the arrow and not to the head.
Types of soil and how to make it suitable for growing onions
Black soil would be ideal for onions. But even this will need to be fertilized. Peat bogs and loams are also suitable, but subject to systematic proper care. Sandstones are not suitable for this purpose. If the loam is not fertilized, then the onions grown on it will not be tasty and will not be able to be stored for a long time.
The soil should be moderately moist. Excess water will not benefit this plant, but drought will also be dangerous. Therefore, open sun is so necessary so that excess moisture evaporates naturally.
How to treat onions before planting in the spring and what to soak them in?
Processing onions before planting
In addition to heat treatment, which was described in the article above, other antiseptic and nourishing procedures are also applied to onion sets before planting:
Processing in potassium permanganate
- To achieve an antiseptic effect, a week before planting, soak the seeds for 20-30 minutes in a light solution of manganese (30 g of potassium permanganate per 10 liters of water).
- After soaking, thoroughly wash and dry the onions (if you are not going to plant them right away).
- There is an option to plant in the ground immediately after potassium permanganate without rinsing.
Wood ash treatment
- Treatment with a solution of wood ash can help prevent the rotting process.
- To prepare a solution, dilute 500 g of ash in 10 liters of water.
- Before lowering the seed into the solution, put it in a net and immerse it in water with ash for five hours.
- After the specified time has passed, we take out the onion and send it to dry in the sun for a couple of hours.
- We immediately plant the dried planting material in the ground, it is protected from rotting and receives fertilizing for powerful growth.
Fertilizing with complex fertilizers
- We dilute a tablespoon of complex fertilizers for onions in 10 liters of water.
- Dip the seeds in a fertilizer solution for 8-10 hours
Copper sulfate treatment
This manipulation will protect the crop from fungal diseases.
- Add a teaspoon of copper sulfate to 10 liters of water.
- Dip the seeds into the solution for 10-15 minutes
- Remove the onion from the solution, wash it thoroughly and dry it
“Grandma’s” method of treating seedlings with salt against stem nematodes
- For a week we dry the bulbs indoors at a temperature of +25 degrees.
- Dilute 2 tbsp in 2 liters of water. salt
- Soak the seeds in saline solution for 3 hours
- Remove the onion from the solution, wash it and dry it
Treatment with saltpeter
- In 10 liters of warm water (+40 degrees) we dilute 1 tbsp. saltpeter
- Soak the seeds in the solution for 20-30 minutes
- It is best to use saltpeter treatment when planting onions early to prevent diseases and for better growth of the head and feathers
Treatment against fungus with Fitosporin
- Dissolve approximately 35-40 grams of Fitosporin in a 10 liter container and soak the onion planting material in this solution for about 30 minutes.
- Immediately plant the onions in the garden bed.
In addition to the described methods for processing onions, there are also industrial growth activators and chemicals for processing onions; they are used only when planting onions in spring and cannot be used when planting before winter.
- Biostim or Silcom - these activators are sold with detailed instructions. Your task is to strictly follow these instructions, warming up the onion beforehand, as mentioned above.
- Epin-Extra - dissolves a couple of capsules in a 10 liter container of water for no more than 15 minutes. The bulbs will receive powerful nutrition for the root system, which will increase the growth and yield of onions.
When choosing a processing method, you should choose only one of them.
Preparing onion sets for planting in the fall. The best varieties of winter onions
When planting onions before winter, pay attention to the regionalization of the variety. Southern heat-loving varieties are not suitable for these purposes. Typically, onions grown from their own seeds, the so-called nigella, are perfectly adapted to winter sowing.
Varieties suitable for planting before winter:
- Stuttgarter Riesen – sharp in taste, keeps well, a little small.
- Shakespeare is not as spicy, it stores a little worse, but the onions are larger.
- Senshui – spicy, large, for long-term storage.
- Arzamas - spicy, fits well, a bit small.
- Danilovsky - sharp, well stored, smallish.
- The radar, or Raider, is sharp and well stored.
- Red Baron – spicy, for long-term storage.
- Strigunovsky is sharp and stores well, but is small.
- Sturon is sharp and stores well.
- Ellan is sweet in taste and stores well.
Feeding onions in the spring on the head
Feeding onions in the spring on the head
- Fertilizing, or rather fertilizing the soil for onions, is best done in the fall with manure.
- It’s worth saying right away that if the land in which onions grow is fertile, or if it was sufficiently fertilized in the fall, then it may not need spring feeding at all.
If the soil fertility leaves much to be desired, then the onions can be fertilized in the spring.
- The first feeding of onions is carried out when its feathers reach a height of 10 cm.
You can fertilize onions with a herbal infusion of weeds..
- To do this, you need to collect any herb in a jar, fill it with chicken droppings, yeast or fresh mullein and leave it in the sun for a week.
- The strained fertilizer must be diluted in water in a ratio of 1:10 and fertilized with it on the onions.
You can also feed the onions with nitrogen-containing fertilizers.
- To do this, you need to dilute 10 g of fertilizer in 10 liters of water.
- This amount of feeding is enough for 1.5 sq.m. beds.
Some gardeners recommend adding superphosphate and urea to the soil when feeding onions for the first time.
The second stage of feeding occurs 30 days after the planting date.
- At this time, you can fertilize the onions with any phosphorus and potassium fertilizer .
- To do this, you need to dilute 25 g of sulfate and superphosphate in 10 liters of water.
Treating onions against onion flies
Many farmers have to see plant feathers eaten away from the inside in their beds. This is how the onion fly manifests itself - the main pest of all varieties of the crop in question. Unprotected plants are often attacked by wireworms and mole crickets.
Birch tar from onion fly
The main way to treat onions and other types of onions from parasites is to soak the seeds in a solution of birch tar on the eve of planting. But it should be remembered that this composition does not act on viruses.
To prepare the solution, you need to mix 1 tbsp. l. products with 1 liter of water. Onion seeds are immersed in the resulting mixture for 15 minutes.
Considering that the smell of tar is intolerable to the onion fly, seeds treated according to this scheme will be reliably protected from pests. For the same purpose, farmers water their crops with a solution of birch tar during the growing season.
How to feed winter onions in the spring, planted in the fall?
Feeding winter onions in the spring
Spring work on caring for winter onions begins with removing the covering material that warmed it all winter and loosening the soil.
The first fertilizing can be carried out with the first shoots of the plant .
- As a fertilizer, you can use highly diluted mullein, chicken manure or nitrogen fertilizers , which are applied to the ground along with watering.
The second stage of feeding occurs at the moment the leaves appear (two weeks after the first feeding).
- For these purposes, you can use the same mullein or chicken droppings.
- As well as mineral fertilizers, immunomodulators, antistress agents and other growth stimulants. For example, Biona, Vegeta, Agricola-2, Effecton-O for garlic and onions. They are sold with detailed instructions.
Note! Onions are a crop that is better under-fed than over-fed. Therefore, add fertilizers in very small portions, or avoid using additional fertilizers.
Options for spring planting onion sets
For planting work, choose a warm and dry day. Compliance with all the rules of agricultural technology allows you to get a high yield of high-quality large onions.
Landing on a turnip (on the head)
To get large onions, you need to adhere to the following algorithm for planting onions on turnips:
- prepare furrows about 10 cm deep and 20 cm apart;
- for disinfection purposes, spill with Fitosporin solution (1 tsp / 10 l of water);
- Carefully press the bulbs into the furrows approximately 2/3 of the way, then sprinkle them with ash;
- fill the furrows with previously loosened substrate, creating a layer 2 cm thick.
Important! To simultaneously ripen the crop, small bulbs are planted 14 days earlier than large ones.
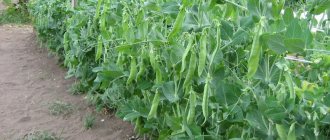
Planting on greenery (on a feather)
Almost all onion varieties intended for producing greens are unpretentious and frost-resistant. However, when growing them, one important condition must be observed - providing good lighting .
The length of daylight affects not only the color, but also the taste of the feather. In addition, lack of light provokes excessive elongation of leaves.
To save on the garden bed when growing, planting onions on greens is done in one of two ways:
- Pavement - the bulbs are laid shallow, but so that they fit together as tightly as possible. Afterwards they are covered with a 2-3 cm layer of soil. On average, for planting using the bridge method per 1 sq. m. m requires up to 13 kg of sets.
- Ribbon - onions are laid out in pre-prepared furrows with a distance between heads of 1-4 cm, and between rows - 20 cm. When thinning, a distance of 3.5 to 5 cm is left between shoots.
Mixed fit (simultaneously on the feather and on the head)
This technology is relevant for those who want to get a harvest from bulbs and herbs, but do not have sufficient space for this. The seedlings are planted in the formed grooves quite often and in a checkerboard pattern. As a result, a turnip will grow from one part of the seedlings, and the other can be used as fresh greens.
How to plant a bow correctly so that it doesn’t shoot
The withdrawal of onions into the peduncle occurs due to a number of factors:
- storage at the wrong temperature;
- lack of adaptation before planting;
- violation of agricultural technology during the care process.
To prevent the onion from going into arrows, it is stored at a temperature of +10-15°C . In cold conditions, the plant automatically goes into self-preservation mode and strives to produce offspring as early as possible. For this reason, seedlings planted from the cold begin to form flower stalks in which the seeds ripen.
That is why planting material purchased in a store must go through an adaptation period . For this purpose, it is placed in a warm place for 2 weeks, and then stored in the dark at room temperature until planting. This prevents its premature growth.
If it is not possible to warm up the set for 2 weeks, it is placed in a container filled with water at a temperature of 40-45°C for 8 hours. To maintain the required temperature, warm water is periodically added. At the end of the procedure, the heads are well dried and stored.
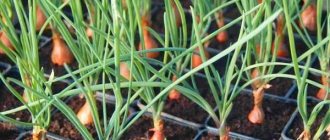
How to plant onions on a feather in the spring?
How to plant onions on a feather in the spring?
The procedure for planting onion sets on a feather in the spring is no different from the procedure for planting an onion set on a head.
- The only difference is the distance between the bulbs in the garden bed.
- The furrows for planting sets should be placed 15-20 cm apart from each other, and the bulbs themselves should be placed at a distance of up to 10 cm from each other.
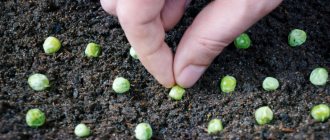
A more budget-friendly and less expensive way to plant onions is to sow them with seeds. With this method of sowing, you can get a continuous harvest all summer long.
- To do this, you need to sow onions in the same place with an interval of two weeks.
- In order to sow onion seeds on a feather in the spring , you need to make furrows at a distance of 15-20 cm from each other.
- In the resulting furrows, you need to sow the seeds to a depth of 2-3 cm - it is advisable not to spare the seeds and sow thickly.
- After sowing, the furrow must be filled and watered.
You can sow onion seeds when the severe frosts have ended and the temperature remains above zero during the day. By the way, small night frosts for sown onions are not as bad as for sets.
We hope that all the information given in the article will help beginning gardeners get a wonderful harvest of onions in the fall, and enjoy delicious, aromatic green onions in the summer.
Features of care
The rules for caring for and growing onions in open ground must be strictly observed, because onions are an extremely demanding crop. The vegetable needs careful care in the early stages of the growing season before the turnip sets and develops. It is important to regularly inspect plants for pests, diseases and signs of nutritional deficiency.
Watering
On average, in one season with rare natural precipitation, onions are watered up to 8–12 times. The plant needs more moisture in the first month after planting, when it grows roots, green mass and forms a turnip. Artificial watering is completely stopped a month before harvesting. This encourages the plant to stop producing new feathers and focus on ripening the turnip.
Loosening and weeding
Weeding and loosening are also important in the first month of the growing season. Do not allow a dry crust to appear on the soil surface, which interferes with the natural aeration of the soil. Weeds are removed regularly; onions react poorly to their proximity.
In July, when loosening, the soil is raked away from the top of the bulb, opening the “hangers”. This is a mandatory step in onion care and the key to a good harvest. A deep-rooted root crop develops worse, the turnip grows small, and if harvested untimely, it begins to grow again, which affects the taste and storage.
Top dressing
How to grow a good onion crop? Maintain a regular supply of nutrients. On average, 3 feedings per season are enough for onions. The first is carried out in May. This is nitrogen in ammonium form. It is enough to scatter it on the garden bed, embed it in the soil and water it. You can use specialized fertilizers for onions. An alternative to mineral fertilizer is mullein infusion.
The second and third feedings are complex with a lower dose of nitrogen and a predominance of phosphorus and potassium. Elements such as zinc and copper are also important for onions. They are applied a month before harvest to increase the shelf life of turnips.
Pest and disease control
No matter what farming method is chosen, pest control and disease prevention are part of the battle for the harvest. Onions are susceptible to diseases and pests such as:
- downy mildew;
- Alternaria blight;
- thrips;
- onion moth and mite.
To prevent and combat them, treatments are carried out every 2–3 weeks, alternating biological and chemical preparations. The former are used for prevention, and in case of disease development and pests, fungicides and insecticides are used, for example “Ordan”, “Borey”, “Break” and others.
Do I need to prepare onion seeds before planting in open ground?
Experienced gardeners remember the times when there was no talk of preparing onions for planting. It was believed that onions are a fairly unpretentious plant that does not require special attention . They only made do with a bulkhead to remove damaged bulbs.
Given the current ecology and the vagaries of climate in different regions, it is not worth dreaming that the crop will grow on its own.
In addition, each stage of the preparatory process endows the planting material with advantageous qualities:
- stimulating growth;
- destruction of harmful bacteria through disinfection;
- strengthening immunity (resistance to a number of diseases and pests);
- prevention of turnip rotting;
- increasing resistance to weather disasters.
A rich onion harvest depends on preparing the sets before planting.
Harvesting a generous onion harvest depends not only on proper care. The lion's share of success depends on the quality of preparation of the seedlings for planting.
Preparing planting material for planting
Preparing onion sets for planting consists of the following steps:
- sorting
- warming up
- hardening
- pruning
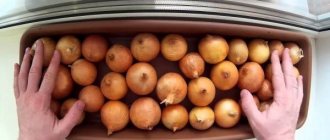
Bulbs are selected for planting based on the climatic characteristics of the region and soil characteristics. In the middle zone, the most suitable varieties for planting are those that require moderate humidity and average temperature. If the selected variety does not tolerate humidity well and is not resistant to temperature changes, this will certainly affect the quality of the crop.
Seed material should be stored in winter in cardboard or a wooden box, or in a canvas bag in a dry room at a temperature of about +12-18 degrees. With high humidity and in a warm room, the seedlings germinate quickly.
When purchasing planting material, you should pay attention to its smell - the bulbs should have a characteristic aroma. If there is, even a slight, smell of mold or rot, such sets are not suitable for planting.
Healthy bulbs should have dry husks with a characteristic rustling sound. A healthy set will be smooth and firm.
Healthy bulbs should have dry husks with a characteristic rustling sound. A healthy set will be smooth and firm.
About three weeks before planting, the seedlings are calibrated. Small and medium bulbs give a higher yield. Large sets are planted on a feather.
To prevent the vegetable from bolting, it needs to be warmed up in the spring. If the planting material was stored indoors at a temperature of +18, then there is no need to warm it up additionally. It is enough to expose the bulbs in a box to the sun, covering them with a dark cloth.
The purchased planting material must be warmed up. Warming is carried out 4 days before planting. The temperature when warming up should be about +35 degrees. To do this, the onions are laid out in a thin layer next to the heating device. To prevent the set from drying out, it is covered with a cotton cloth. Heat the onions for 10 to 70 hours.
If there is no time to warm up, pour hot water into the senchik for 15 minutes. Then the onions are immediately watered with cold water. This treatment also helps to avoid bolting.
Hardening helps increase a crop's resistance to many diseases. Hardening also helps to avoid bolting. Hardened heads last longer and are harder. The procedures should be carried out at the very beginning of spring. To do this, the selected onions are placed in a thin layer in a wooden or cardboard box and sent to the basement or cellar. The main thing is that the planting material is kept at a temperature of +1 to +8 degrees for 10 days. Then the seedlings are transferred to a warm room.
If there is no cellar, you can carry out express hardening. It is necessary to water the heads with ice water before planting, dry them and warm them in the sun. This procedure is carried out only after soaking.
How to grow Exhibition onions from seeds
Since warm summers in many regions of Russia are quite short, and giant onions require at least 80 days to ripen, this variety requires mandatory planting of seedlings. Prepare fertile soil, you can buy it ready-made in the store. Purchase seeds only from trusted sellers. They are produced by the Dutch company Bejo Zaden.
Seed preparation occurs in the manner described above; we will not repeat it. The soil should be warm and moist, at least 20 degrees. The seeds are lowered to a depth of 1 cm. After planting, cover the container with plastic wrap and leave for about 7 days, until the first sprouts appear. There is no need to water during this period. Then remove the film and place the container in the light. Since planting occurs in February, there is not enough daylight for seedlings. It is necessary that the sprouts be exposed to light for at least 12 hours a day. Therefore, think about artificial lighting in advance. As the plants grow, fertilize the soil with minerals.
In order for onions to take root well after transplanting into open ground, they need to be hardened. To do this, on the first warm days, take the containers with seedlings out for a couple of hours, first on the balcony, and then in the open air. In April, when the night frosts have passed, you can replant the plants in the garden. Plants should be between 50 and 60 days old. Since this variety grows large, the distance between the furrows of the bed should be at least 30 cm. If the weather is still cold, then cover the seedlings with film or plant them in a greenhouse. Dutch seeds are not designed for black soil, so sandy or sandy loam soils are considered the best soils for such onions.
How to do pre-sowing treatment of seedlings in spring
You can strengthen the immunity of the seeds to resist pests and diseases by soaking . There are quite a lot of recipes for solutions for the pre-sowing procedure; you can easily make them and choose a convenient option.
Among the popular components:
- salt;
- potassium permanganate;
- copper sulfate;
- baking soda;
- ammonia;
- Birch tar.
Soaking in a salt solution helps fight pests.
The main enemy of onions is the onion fly . Treating the seedlings with a saline solution will help prevent its invasion of the beds. The same method will protect the crop from thrips and mites .
potassium permanganate has proven itself well in the fight against fungal spores . Soaking in a weak solution will help destroy microorganisms on the planting material; the main thing is to drain the solution in time.
To obtain rapid seedlings, various growth stimulants are used. Preplanting treatment accelerates shoot germination by 3-6 days. Among the effective means are solutions of zircon and humate, Energen .