How long can you store apples for the winter?
Rule one. Select only winter varieties of apples for long-term storage. If you want to enjoy fresh apples all winter and spring, winter apples with a thick skin and a natural waxy coating are your favorite. Such varieties can remain fresh for 5-8 months.
Interesting materials:
How does jasmine reproduce? How to propagate raspberries from cuttings? How do marigolds reproduce? How do pythons reproduce? How to propagate juniper from cuttings? How to propagate currants by layering? How to propagate hosta by leaf? How to propagate garlic from bulbs? How to propagate mock orange from cuttings? How to propagate wild grapes in spring?
If the loggia is insulated, glazed
The ideal option for storing apple harvests in an apartment is a glazed, insulated balcony.
The air temperature in such a room in winter does not fall below +3-5C, which protects the apple from freezing and spoilage. There are several ways to store apples on an insulated balcony:
We use plastic bags
Carefully sorted apples are packaged in plastic bags of 2-3 kg. Afterwards, the bag is tightly tied and sent for storage.
Be sure to make several holes in the bag (you can use a toothpick). This is necessary so that ethylene gas comes out of the bag, accelerating the process of spoilage and rotting of sweet fruits.
Store apples in a plastic bag at a temperature of +1-4°C for one to three months.
Flexible container
This special fabric bag, consisting of several layers of insulating material and a heating element along the contour, is an excellent apple storage solution for those who do not have a large balcony area.
The flexible container is quite spacious (up to 300 l), if necessary, when the supply of apples is eaten, it can be easily folded and hidden on the shelf until the next harvest.
paper
The simplest, most accessible and often used way to store apples is in a box, wrapped in paper.
As a wrapper you can use:
- paper towels,
- napkins,
- writing paper.
It is better to discard old newspapers and magazines, as printing ink may remain on the apple peel.
Despite its simplicity, this method is most effective if the apple harvest is small.
Wooden boxes, cardboard boxes
Such containers are only suitable if the loggia is glazed and insulated. The sorted fruits are carefully placed in boxes or boxes, trying to ensure that they do not come into too much contact with each other.
The apples are laid out in no more than two or three layers. Experts recommend sprinkling each layer with dry sawdust or shavings, straw or sand (necessarily calcined for several minutes in the oven).
Storage boxes or boxes must be dry, clean, with ventilation slots, and free of foreign odors.
Thermal box
This storage method allows the housewife not to worry that the apples will freeze on the balcony at sub-zero air temperatures outside the window.
Thermal box is a special design consisting of two boxes of different sizes. The boxes must be selected in such a way that when inserting one into another, there is a gap of 10-15 cm between them.
Subsequently, it is filled with any insulating material: foam balls, shavings or sawdust, cotton wool, rags. The easiest way is to fill the gap with foam.
After the insulated box is assembled, a sheet of foam plastic is placed on the bottom. The thermal box is closed with a lid, also lined with foam. Additionally, after the fruit is laid, the thermal box is covered with an old cotton blanket or tarpaulin.
Tuber preparation
To prevent the harvest from spoiling, you need to properly prepare it for subsequent storage.
You should pay attention to the following recommendations:
- Drying and washing. The dug up tubers should lie in the sun for 3-4 hours and dry thoroughly. After this, they should be placed in a cool room where the sun's rays do not penetrate, so that the peel of the vegetables becomes rough. If the weather is rainy, the tubers need to be thoroughly washed to eliminate various pathogenic microorganisms. You need to wash the tubers in cool water and then lay them out in the fresh air to dry.
- Sorting. The resulting harvest must be sorted, placing the tubers separately for consumption, spring planting, and feeding to domestic animals and poultry. Potatoes that are affected by diseases must be removed and destroyed. Vegetables intended for food are also sorted into short (small, damaged, unripe tubers), medium (largest vegetables) and long (ripe medium-sized vegetables) terms of use.
- Spraying with antifungal drugs. This event concerns seed potatoes, which are planned to be planted in the spring. Tubers can be treated with Maxim or Zircon, Alirin-B. At home, it is also permissible to use potassium permanganate or brilliant green dissolved in water.
- You need to make sure that the tubers left for storage are undamaged, dry, healthy and clean, free of sprouts and foreign odors.
This video explains how to properly prepare tubers for long-term storage:
Storage rules
Properly selected containers can increase the shelf life of the crop. You can't just dump apples on the basement floor. They are placed on racks, in boxes or in bags. Fruits will be stored in boxes for 3 to 6 months.
In boxes
Vegetable boxes are one of the most popular options for storing crops. They can be made of plastic or wood. The bottom of the box is lined with paper or cloth.
The apples are not piled up, they are placed in a checkerboard pattern. When laying, you need to act carefully, trying not to scratch the healthy skin with the stalk.
It is not recommended to put the entire harvested crop in one box. Otherwise, the lower fruits will wrinkle and spoil. The optimal weight is 25 kg.
To save space, you can stack the boxes on top of each other, but not close together.
In packages
Gas exchange takes place inside the hermetically sealed bag, due to which the shelf life of apples increases.
They ripen slowly, gaining flavor and juiciness. No more than 4 kg of fruit is placed in one bag. You cannot tie the bags right away. They are left uncovered for 7 hours to allow the apples to cool to cellar temperature. Only after this can you pack the fruit.
For ventilation, 4-5 holes are enough. They are made with a toothpick or a match. In bags, apples will remain edible until the weather warms up. Winter varieties can be stored in them for up to 7 months.
On the racks
If the harvest is not too large, then it can be compactly placed on racks. Shelves need to be covered with clean paper. The fruits are laid out in 1 layer, cuttings up.
There should be a gap between the apples so that they do not touch each other. They are covered with cardboard on top and another layer of fruit is laid out.
This placement allows you to control the safety of the crop and promptly remove spoiled fruits. On the shelves, fruits remain fresh for up to 4 - 5 months.
In paper
To prevent the apples from touching each other and rotting, you can wrap them in paper. Regular white napkins or newspapers are suitable for this purpose.
Each fruit is wrapped in several layers, after which it is placed layer by layer in a suitable container.
The paper will absorb excess water and retain ethylene inside the container. Fruits are perfectly stored in it for 4-6 months.
In the ground or in the sand
Apples packaged in plastic bags can be buried in the ground. The hole is dug to a depth of 0.5 m. Spruce or spruce branches are placed at the bottom. Their smell will repel rodents. The bags are cooled in the cellar, after which they are lowered into the ground, covered with spruce branches and another layer of earth. You can insulate the pit with fallen leaves.
Some gardeners store their crops in sand. It is heated to kill microbes. They fill the bottom of the container with it, lay out the apples in an even layer, on top of each other.
The gaps are filled with sand. In this way, the harvest is stored in barrels, boxes and boxes. Cover the filled container with a lid.
Apples are stored in sand for about 4 months. In the ground, in bags, they can lie for up to 5-6 months.
In bags
Apples are stored in bags in the same way as in bags. The only difference is that the bags themselves “breathe”, so there is no need to make additional holes in them.
If a bag is designed to hold 25 kg, this does not mean that it needs to be filled to the top. There should not be more than 10 kg of apples in one container.
It is better to place the bags on the floor or on shelves, rather than placing them near the wall. This method allows you to extend the shelf life of apples to 4-5 months.
Advice from experienced gardeners
Experienced gardeners, based on many years of experience, advise:
- Before winter planting, be sure to harvest the ripened crop in dry weather. After this, dry the vegetables (but not in the sun), sort them and treat them with fungicides to prevent fungus.
- Sort the potatoes, getting rid of damaged and diseased tubers.
- It is better to first put it in the shed and keep it there until the air temperature drops to about +5°C. Only then transfer the vegetable to the cellar or basement.
- Potatoes are stored better if they are topped with onion peels or mint.
- Mixing tubers with dried wormwood or common wormwood will protect against rot.
- Potatoes can be stored much longer with ginger root.
- If you sprinkle the potatoes with crushed garlic, they will not rot. For 1 ton of potatoes - 1 kg of garlic.
- The tubers will be better preserved if you put fern or elderberry in the boxes.
Preparing the cellar
The best place to store potatoes in winter is underground, for example, a basement or cellar. But, unfortunately, it is not always possible to preserve the root crop until spring. Potatoes contain a lot of starch and liquid, so they start to spoil pretty quickly. Experienced experts recommend adhering to certain conditions, then the potatoes will last until spring.
First of all, you should think about possible temperature changes. If you make high-quality insulation, then the risk of both freezing of the potatoes and their overheating will be eliminated. It is recommended to prepare the premises before the harvest season.
Preparing the cellar should include several important activities.
It is advisable to arrange a cellar above the basement, which is a special structure that allows you to protect the room from various external factors. As a result, the temperature in the cellar will be stable even in frosty conditions. The doors should be insulated as they must be airtight. For insulation, you can use various materials, for example, foam. It is worth adhering to a certain temperature regime, then the potatoes will be stored until spring. The optimal temperature is +2-3 degrees. If the cellar is quite deep, then it is advisable to make another hatch. The presence of two hatches will create a vacuum space that will protect the crop from freezing. If necessary, additional heating can be done using special lamps. They need to be placed in the corners of the cellar. When the temperature drops, they will need to be turned on. It is worth paying attention that the lamps must be painted dark. There are even lamps on sale with sensors that turn on automatically when the temperature drops. You can use special split systems to cool the room, but they are quite expensive, so not everyone can make such a purchase. If you need a cheaper analogue, you should pay attention to the compressor from an old refrigerator. If the room is quite cold, then it is recommended to store potatoes in boxes or crates. They must be insulated. You can use old clothes in several layers or blankets - this way the potatoes will be protected from freezing. Good ventilation must be provided to prevent the crop from rotting. The moisture level should be maintained between 60-70%. For this purpose, special moisture-absorbing substances are used.
For example, around the perimeter you can place containers filled with lime in powder form. It is very important to dry the cellar, throw out all garbage and treat the room with disinfectants, providing protection against fungus, mold and various parasites. The premises will need to be treated twice within 7 days.
The cellar should be whitewashed from the inside. To do this, you will need to prepare the following mixture: for 10 liters of water you will need 1 kg of copper sulfate, 2 kg of slaked lime and 150 grams of table salt. All wooden pallets and boxes need to be thoroughly dried, but before this it is necessary to treat them with a solution of potassium permanganate.
Rules for storing apples in the cellar
When deciding how to store apples in the cellar, you need to remember that placing them next to potatoes, onions, carrots and other vegetables is highly not recommended. Fruits from such proximity acquire an unpleasant specific or starchy taste, and vegetables begin to sprout ahead of time.
A peculiarity of this crop is that ethylene is released during its storage, so it is better to keep apples in a separate room. If this is not possible, you should try to maintain the greatest possible distance between apple stocks and other crops. Pears are considered the best companion for keeping apples in the cellar in winter, since they require the same storage conditions.
The more carefully you prepare the room and the fruit before storing it, the longer the apples will last. Periodically, at least once every 10-15 days, the entire crop must be carefully inspected and rotten or damaged specimens must be rejected.
Optimal humidity and storage temperature
The following indicators are considered optimal for this culture:
- The temperature for storing apples should be within -1...+3°C. This indicator may vary depending on the variety of fruit. Early ripening varieties are suitable for higher temperatures, since their skin is delicate and thin.
- Humidity should be maintained at 85-95%. Their keeping quality greatly depends on the humidity at which apples are stored. If the air is too dry, over time they will lose their juiciness and wrinkle.
Storage containers
The selection of containers for storing the crop is an important component of a competent storage process. It can be made of various materials, but regardless of this, it must be durable and clean
To store apples in cellars and basements for the winter, you need to use containers with holes for ventilation and air access.
Fruits are stored:
- in lattice wooden and plastic boxes, the bottom of which is lined with paper;
- in boxes made of thick cardboard (corners can be reinforced with tape);
- in wicker baskets;
- on racks covered with linen, burlap or paper.
Storing potatoes in the cellar in winter
Despite the fact that potatoes can be stored in a garage, on a balcony or even in a city apartment, the most suitable room is considered to be a cellar, in which it is much easier to create conditions suitable for preserving tubers from harvest until spring.
However, in order for storage to be successful and crop losses to be minimal, you need to properly prepare the tubers themselves and create conditions under which they will not rot, dry out, or sprout. We will consider the main nuances of winter storage of tubers in winter below.
Preparation
The preparatory stage of storage concerns not only the tubers themselves, but also the room in which they will be located in the winter.
First you need to properly prepare the cellar itself. Storage walls must be disinfected to destroy fungal spores and other pathogens that can lead to crop loss. To do this, it is enough to whitewash the walls with a solution of slaked lime and copper sulfate (for 10 liters of water you will need 2 kg of lime, 1 kg of vitriol and 150 grams of table salt). After whitewashing, you need to thoroughly ventilate the room.
Separately, you need to treat and disinfect shelves and drawers for storing vegetables. If possible, they should be taken outside, treated with a strong, hot solution of potassium permanganate and dried in the sun.
In addition to preparing the room, attention should be paid to the tubers themselves. First, they need to be dried in the sun for several hours, and then transferred to the shade for two to three days, leaving them in the fresh air for ventilation. Before planting, all tubers must be inspected: damaged, rotten or specimens with signs of disease should be removed, since during storage they will deteriorate first and can lead to rotting of other vegetables
Before planting, all tubers must be inspected: damaged, rotten or specimens with signs of disease should be removed, since during storage they will deteriorate first and can lead to rotting of other vegetables.
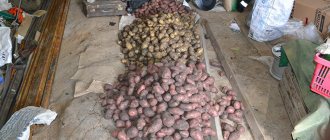
Figure 3. Sorting potatoes before storing
It is also recommended to sort potatoes by variety (Figure 3). The varieties that last the longest are placed in the far part of the cellar, and the species with the shortest shelf life are placed last, since they should be eaten first. In addition, it is necessary to sort the potatoes by size: small ones can be poured into one box, regardless of the variety, medium-sized ones can be left in a separate box for planting next year, sorted by type, and large ones can be set aside for one’s own consumption.
Temperature conditions and timing
In winter, tubers enter a period of vegetative dormancy and, in order to prevent their early awakening, special conditions of temperature and humidity should be created.
To prevent potatoes from starting to sprout and maintaining their density and taste, you need to take into account the following nuances:
- Lighting: the cellar should be dark, since when exposed to light, the tubers begin to produce solanine and the vegetables become unsuitable for consumption.
- Temperature: in this case, you need to strictly adhere to the recommendations of specialists, since when the optimal indicators increase, fungi begin to develop on the surface of the tubers, and when they decrease, freezing of the tubers may begin. The optimal indicator is considered to be a temperature from +2 to +4 degrees. To accurately control the temperature, it is advisable to install a thermometer in the room.
- Humidity: Should be between 75 and 85%. Regardless of the deviation of these indicators, the tubers become unsuitable for food: when the humidity decreases, they become flabby due to loss of moisture, and when the humidity rises, they begin to rot.
If you are not sure that the indicators described above in your cellar do not correspond to the norm, we recommend periodically inspecting the harvest stored for storage. This will allow you to remove damaged tubers in a timely manner and prevent loss of the rest of the crop.
Spring sprouts
The rest period lasts on average until March. With the arrival of spring, the tubers will inevitably begin to awaken and sprout. As a rule, the timing of their formation depends on the variety. Early potatoes are covered with sprouts already in February, and late ones can remain unchanged until April.
Figure 4. Formation of sprouts on tubers
If the time for planting has not yet come, and the tubers have already begun to be covered with young shoots, such shoots should be removed mechanically, and the temperature in the room should be reduced to +1+2 degrees (Figure 4). In addition, bottles or containers with ice can be placed in the room, which will help create an optimal cool microclimate.