Features of planting potatoes
Choose a place for planting that is illuminated by the sun, without shade from trees . Potatoes prefer loose soil and do not tolerate excess moisture and stagnant water. If there is such a problem, drainage ditches are constructed and soil is added to raise and level the area.
When planting, take into account soil temperature . Planting work begins when the earth warms up to +10°C, in late April - early May, depending on the climatic characteristics of the region.
Before planting, soil preparation activities are carried out:
- In the fall, after harvesting (August - October, depending on the region), they dig, loosen, and apply fertilizer. It is better to use potassium-phosphorus mixtures, which will remain in the soil for a long time.
- In the spring, they dig it up again and feed it with complex mineral fertilizers containing nitrogen.
Field plowing equipment
A walk-behind tractor, also known as a motor-cultivator, is widely used to facilitate heavy manual agricultural labor.
Before purchasing equipment for plowing a field, you must choose:
- walk-behind tractor;
- trailer equipment.
Choosing a walk-behind tractor
A mechanical self-propelled device with an engine is simply indispensable today for the following earthworks:
- plowing;
- landing;
- hilling;
- alignment;
- loosening.
When choosing a walk-behind tractor, it is necessary to take into account the area of the area being processed.
The modern equipment market offers the following popular types of cultivators:
| Photo and title | Peculiarities |
| Cultivator |
|
| Motor cultivator |
|
| Light walk-behind tractor |
|
| Medium walk-behind tractor |
|
| Heavy walk-behind tractor |
|
Choosing trailed equipment
To plant potatoes using a walk-behind tractor, you need trailed equipment.
Trailed equipment for walk-behind tractors:
- Adapter. It is most convenient to operate a walk-behind tractor while sitting in a chair. There is an adapter for this - a special seat for small tractors.
- Plow. This trailed equipment is used for cultivating hard soil or opening virgin soil.
- Harrow. It is better to harrow the plowed area in order to level the field from large earthen lumps and prepare it for cutting furrows.
- Disc hiller. It will help loosen the soil between planted rows of potatoes and hill up the stems. Another use of the hiller is cutting furrows for sowing vegetable crops.
- Double row hiller. Indispensable for gardening and processing seedling rows.
- Potato planter. The purpose of the potato planter is to plant vegetables on previously prepared arable land. Trailed equipment allows you to plant potatoes at a specified depth and width.
Planting under the plow
Features of using a plow when planting potatoes:
- high speed;
- versatility of technology;
- low-cost trailed equipment.
You can plant potatoes using a plow in the following way:
- Plow the field with a plow.
- Chop the ridges.
- Place potato tubers in the furrow.
- Cover the furrow with soil, pointing the plow in the opposite direction.
The video shows how to plant potatoes with a walk-behind tractor under a plow. The video was filmed by the City& Country Style channel.
Planting with a disc hiller
Features of the disc hiller when planting potatoes:
- tall potato ridges;
- there is no need to add soil;
- possibility of connecting a plow;
- high-cost trailed equipment.
Application of potato planter
The potato planter consists of the following set of structures:
- furrower;
- conveyor;
- potato tuber distributor;
- disk hiller.
Features of using the potato planter:
- high landing speed;
- ease of operation;
- Potatoes are planted in one pass along the ridge of the plot.
Using a two-row hiller
Features of using a two-row hiller when planting potatoes:
- cutting arable land into two rows at the same time;
- high speed of potato planting.
Planting schemes and technology
Knowledge of planting schemes and correct technologies determines the quality and quantity of the harvest . Each technology has nuances that need to be taken into account.
Why determine the distance between rows
The width of potato rows affects the volume and quality of grown tubers and the rational use of the usable area of the garden plot. The ease of access to each bush when caring depends on the selected distance.
If the distance between the rows is insufficient, the bushes do not receive nutrients , grow weak, and produce a small harvest.
The abundance of free space from row to row leads to a redirection of plant forces : all the force is directed to the growth of tops; few large tubers grow.
At what distance to plant tubers?
Depending on the variety, they determine at what distance to plant potatoes from each other:
- early varieties - 25-30 cm;
- late – 30-35 cm.
The specified parameters are suitable for standard potatoes . For small seed, the distance between tubers is reduced to 18-20 cm. Large tubers are planted at a distance of 45 cm from each other.
To what depth
The correct depth of the holes is considered to be within 7-10 cm . These parameters allow the tubers to warm up faster and sprout.
Important! When planting late, the depth of the holes is increased to 13 cm.
When choosing the optimal depth, they are guided by the quality of the soil . If the substrate is loose, plant deeper. Dense and moist soil favors slight burying of tubers.
Sowing potatoes using a walk-behind tractor ensures the hole depth is within 12 cm.
How to make a furrow
Loose soil saturated with oxygen is suitable for forming furrows . To do this, dig up the soil with a shovel or plow to a depth of 25 cm. Then the plantings will have free access to air.
When preparing furrows, preference is given to the direction from north to south , as this allows for proper lighting of the bushes at sunrise, at noon and at sunset.
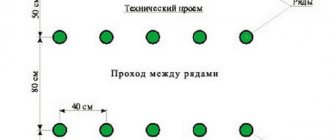
Row spacing
To obtain a high yield, they choose row spacing 90 cm wide . The generally accepted distance among gardeners is 70 cm.
When forming beds in small areas, a distance between them of 19-26 cm (the width of one shovel) is used, and the seed is sown in two rows.
The optimal distance between two rows of potatoes varies depending on the variety used:
- 60-75 cm – for early ripening varieties;
- 70-90 cm - for late ripening.
The generally accepted method of planting in rows is 30×80 cm.
When to plant potatoes in open ground: optimal timing and temperature
Important! Tubers can be planted in open ground when the risk of return frost has passed.
In many regions of Russia, the weather is unstable: one week it can be warm, and the next the temperature can drop to zero. And even minimal frosts will simply destroy the tops.
Interesting! Not only the air, but also the soil must be heated, since at soil temperatures below +8 degrees, potatoes are damaged by rhizoctonia.
It is best to plant tubers when the daytime air temperature is within +15..+20 degrees, and the soil has warmed up to +8..+10 degrees
Advice! When planting early, potatoes should be covered with foam stretched over arches, and the ridges should be made smaller so that the earth warms up faster.
You can also focus on natural phenomena:
- The leaves have blossomed on the birch tree.
- The bird cherry blossomed.
- The dandelion has bloomed (a ball has already appeared).
Interesting! Planting potatoes too late is also bad, as they will not have time to ripen before the end of the warm summer period.
By region
- In the South - in April.
- In the middle zone (Moscow region) - from May 10.
- In the North-West (in the Leningrad region), the Urals and Siberia - from May 20.
According to the lunar calendar 2022
You can also choose a favorable planting date according to the lunar calendar. Lunar sowing calendar for 2022
Favorable days for planting in 2022 are:
- March - 10-12, 21-25, 27-30;
- April - 6-9, 15-17, 20, 21, 24-26, 29, 30;
- May - 1-4, 8-10.
Important! Plants should not be planted during the new or full moon, otherwise they will be weak and stretched out.
Landing
There are many ways to plant a crop . We offer the most popular options that have proven themselves well.
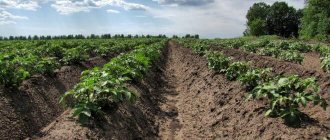
On the ridge
The ridges for planting tubers are prepared according to the instructions:
- The rows are arranged from north to south, marking them with a stretched rope from each other at a distance of 70-75 cm.
- 30-35 cm are retreated from the rope and a groove is made, which subsequently serves as a path.
- The ridges are identified using a shovel or glander, without digging out the soil from the paths. The ridges are formed by the top layer of soil, which has warmed up at the time of planting.
- The comb is created in the form of a trapezoid, with the narrow side (up to 15 cm in size) facing up. The height of the mound is 20-31 cm.
- The holes are made by hand, moving away some of the soil.
- After laying the tuber, fill the hole with loose soil.
Basic rules for planting in ridges:
- light sprouts for seed potatoes - no more than 5 mm;
- planting depth – 4-8 cm;
- the distance between tubers is 30-35 cm.
Under the shovel
There are two ways to plant seed under a shovel.:
- in a checkerboard pattern;
- in line.
Linear planting assumes a distance between rows of 60 cm (70 cm for late-ripening varieties), between holes - 30 cm.
The holes are made shallow due to the cold lower layers of the soil . It is optimal to plant the tubers to a depth of 10 cm. In case of late planting dates or the presence of clay soil, this figure is reduced by 4 cm.
Planting process : dig holes, place potatoes in them with sprouts facing up and cover them with soil. The land remaining between the rows will be needed for further hilling of the seedlings.
In the trench
When grown using this method, up to a ton of potatoes are harvested from one hundred square meters . The advantage of the method is that there is no need to use fertilizers.
Preparing trenches in the fall:
- The trenches are located from north to south, and a cord is pulled for evenness.
- The length is determined in accordance with the size of the plot, the width is about 40 cm. The distance from one to the other is 65-70 cm.
- The excavated soil is placed on one side of the trench.
- Fill the grooves with organic matter - weeds, tops, food waste, husks, and mown grass.
- Fallen autumn leaves are compacted in the fall. Cover with earth.
In the spring, before planting, a bedding of onion peels, dry bird droppings and ash is laid in the trenches. Seed potatoes are placed on the prepared litter and sprinkled with soil from the ridges.
Important! To prevent infection of planting material, tops of potatoes and tomatoes are not used, as infections may remain on them.
In a container
The essence of the method is to use containers for planting with the possibility of increasing the walls as the bushes grow.
Four pillars (rebar, stakes) are dug into the ground. The walls of the container are built from boards by attaching them to poles with wire. The walls are built up gradually as the potatoes grow.
The bottom is made ventilated, so first a few bricks are laid, and boards are laid on them. The distance between the boards will ensure ventilation.
After preparing the first floor of boards, the resulting niche is filled with a light organic composition . Ideally, humus with expanded clay screenings, taken in equal parts. Then the sprouted tubers are laid. When sowing early, cover them with film.
When the tops reach the “second floor,” a second level of boards is completed and soil is added.
The construction of walls and the addition of soil continue until the buds appear . To delay their appearance, the soil in the container is watered with manure compost, and the container is protected from overheating. After the buds appear, the addition of floors is completed. Further care consists of feeding, watering, and protection from diseases.
Harvesting begins by disassembling the container.
Row spacing
To get a good potato harvest, when planting, you should take into account the distance between rows, as well as the distance between tubers. It is necessary to start planting potatoes only when the soil temperature reaches up to 8 degrees at a depth of 10 cm. Often these conditions arise in May (with a dry and warm spring, planting can be done already at the beginning of this month).
You should know that well-sprouted tubers can be planted a little earlier - at a temperature of 5 or 6 degrees in the soil. Some gardeners claim that such planting, on the contrary, helps to obtain a higher level of yield.
Typically, potatoes are planted on a flat surface. But in heavy or waterlogged soils - on ridges (beds). This allows the soil to warm up better and also improves its aeration.
You need to start planting by determining the distance between the rows. To do this, you should do the following:
- mark the entire area;
- The markings are made using a marker (in this case this means a shovel, stick, etc.). They draw a shallow furrow. Later planting is carried out along these furrows;
- A string is pulled along the first furrow between the wedges, which will act as a guide;
- the tuber can be planted directly under a stretched cord. But this is a very labor-intensive process that will take a lot of time;
- After planting potatoes in a row, to increase yield, you should mulch the soil. Mulching is carried out with peat, which is poured in a layer of two to three centimeters.
If the ridge planting option is used (beds are formed), then as many as two rows are placed in one bed. In such a situation, the rows are placed at a distance of 19-26 cm. Each subsequent two rows are separated by a groove having the width of one shovel. The walls of this groove should be sloping.
The best distance between two adjacent rows for potatoes is determined by its variety:
- early ripening varieties should be grown at a distance of 60-75 cm;
- Late-ripening varieties should be planted in rows, the distance between which should be no more than 90 cm (minimum 70 cm).
Potatoes are usually planted in a row according to a 30x80 cm pattern. Here, adjustments should be made for the plant variety. Early potatoes produce less dense tops, so they can be planted more densely, with smaller distances between rows. Some gardeners claim that simultaneous planting of early and late varieties will give a better harvest.
Recommendations and advice from experienced gardeners
Experienced gardeners begin preparing to create beds immediately after harvesting . In the fall, fertilizers are applied, soil and bedding are prepared from organic substrates. In the spring, the beds are dug up and fertilizers are added if necessary.
Farmers are of the opinion that the north-south direction of the beds is necessary to obtain a rich harvest.
Recommendations from experienced gardeners:
- Before planting, potatoes are germinated: left in the light for 20-40 days or placed in a container with wet sawdust, moss, and humus for 15 days.
- For planting, use only healthy tubers without damage, cracks, rot or mold.
- To speed up the harvest, potatoes are grown under black film or non-woven material. The area is fertilized (per 10 liters of water - 30 g of potassium chloride, 1 g of copper sulfate and 60 g of superphosphate) and covered with film. Holes 10x10 cm are made in it and sprouted tubers are planted.
- After harvesting in containers, the area is planted with green manure. Next year you can plant potatoes in this place again.
- To be sure of a rich harvest, furrows are prepared in the fall, and potatoes are planted in them in the spring.
Variety selection, pre-planting preparation of tubers
Breeders have worked hard over the past decades and have developed several hundred varieties of potatoes. Each of them differs in color, size, shape, taste, and starch content.
There are 4 degrees of boilability of tubers: A , B , C , D , where A - minimally crumbles, B - suitable for making chips and soups, C - used for deep-frying, D - used for purees.
Universal varieties suitable for most regions of the country have been developed. And there are those that are planted specifically in the northern and Ural latitudes, where the summer is quite short and not too hot.
The most productive potato varieties:
- Bellarosa;
- Gala;
- Aurora;
- Zhukovsky (early);
- Adretta.
For variety or as an experiment, you can plant several varieties at once.
Preparation of tubers for planting begins in advance.
- First of all, the best seeds are selected according to preferred varietal characteristics, cleaned of dirt, and air-dried in the sun.
- Then they are placed in a box in one layer. Seed tubers must be smooth, hard, without cracks, and not frozen. Green potatoes are allowed. They are not suitable for food, but are ideal for planting.
After selecting the seeds, it is necessary to determine the germination method. Main types:
- Dry. The storage temperature of root vegetables starts at +18-20°C, light is required. When the sprouts reach a size of 1-1.5 cm, they are sent to a room where it is maintained at +10-13°C and there is no light.
- Wet . To do this, use a container or box, at the bottom of which wet sawdust or humus is placed. Storage is carried out in a cool basement with a temperature not exceeding +15°C.
- Mixed . In this option, the tubers are stored warm and in the light until small sprouts appear. Afterwards, the seeds are grown in moist soil for several more weeks.
If desired, you can additionally treat the vegetable with mineral fertilizers, consisting of the following mixture in proportion 1:1:1:
- urea,
- superphosphate,
- potassium sulfate.
Dilute with water and add the solution during wet germination.
Immediately before planting, the seeds are poured with a disinfection solution. It consists of a mixture:
- potassium permanganate (on the tip of a knife),
- copper sulfate (1 tbsp),
- water (about 8 liters).
Sprouted potatoes are soaked in it for half an hour and then dried in the sun, after which they can be planted.