Optimal timing of seed sowing and soil preparation
To grow excellent tomatoes in your summer cottage, you must comply with the sowing dates. Overgrown and elongated seedlings, which are deliberately restrained in growth due to premature and early sowing, lead to a significant reduction in the quality and quantity of the harvest.
In the Urals and Siberia, including Minusinsk, and in many regions of central Russia, tomato seeds are sown on March 15-17. In the southern regions, Kuban, Astrakhan, Volgograd, Rostov regions, Krasnodar Territory, the time for sowing tomatoes for seedlings falls in mid-January, due to the climatic characteristics of the cultivation zone.
If you take into account the lunar calendar, you need to take into account that on the day of the new moon and full moon, 12 hours before the moment of occurrence and after it, nothing is sown or planted.
High-quality soil largely determines the growth and condition of seedlings. Natalya Shcherbinina uses vermicompost, which contains soil microorganisms, and there is no need to use additional fertilizers. When it is not possible to purchase soil mixture in the store, then you can prepare it yourself at home.
tomatoes by Natalya Shcherbinina
In autumn, you need to take one part of forest soil or good fertile soil from the garden, add the same amount of humus and sand.
All components are mixed, a glass of wood ash and 200 grams of sawdust are added to a bucket of the finished soil mixture. Please note that only old and rotted sawdust is taken. Fresh shavings cannot be placed. The soil mixture is thoroughly mixed, after which it is folded and compacted into ordinary thick plastic bags, which are taken outside and left in the fresh air until spring. It is worth noting that the ash is added in the fall so that by the time the seeds are sowed, it has time to transform into a digestible form for plants, since the root system of tomato seedlings is quite weak at the initial stages.
Preparing seeds and sowing seedlings
The next step is preparing the tomato seeds for planting in the ground. Don't forget to label the varieties so you don't get confused in the future. Take a small piece of ordinary bandage, fold it three times, put the seed in the middle, tie it with a thread and be sure to make a tag with a mark on the variety. It is better to make tags from plastic film and sign them with a ballpoint pen.
in the photo - preparing tomato seeds for planting
Now the tomato seeds need to be disinfected (disinfected). Take ordinary potassium permanganate and prepare a strong dark solution, lower the prepared bags with planting material into it. The disinfection time is 20-25 minutes, this time period will be sufficient for etching.
in the photo - disinfection of tomato seeds in potassium permanganate
As a rule, the seeds become colored and acquire a dark shade, do not be alarmed, this is a natural process that should occur this way. We wash the seed material under running water and proceed to the process of stimulation for good and friendly shoots.
If you grow or have aloe at home, take a couple of leaves, squeeze out the juice and immerse the tomato seeds for 4-5 hours. If there is no plant, you need to purchase sodium humate (a stimulant that promotes good root formation and growth of seedlings), immerse the planting material in liquid for 4 hours. No rinsing is required after stimulation.
We remove the seeds and put them in a warm place for a day, keeping an eye on them to prevent them from drying out. Once warm, place it in the refrigerator on the bottom shelf for another 24 hours. Now the seeds are prepared, you can plant them in the ground.
in the photo - preparation for sowing tomato seeds
For planting, take shallow boxes, pour the soil mixture in a layer of 10-15 cm. Using a wooden stick or a regular pencil, grooves are cut. The furrows are shed with a dark solution of potassium permanganate and immediately begin sowing tomato seeds, planting them to a depth of 1 cm, keeping a distance of 1-2 cm between the seeds.
in the photo - the process of cutting grooves for seeds
in the photo - soil treatment with potassium permanganate solution
When the seeds are spread out, carefully cover the top with earth. After that, with the palm of your hand you need to compact it a little and pat the soil mixture so that the seedlings come to the surface without a cap. The boxes with plantings are covered with film and put in a warm place where the temperature is within +23 ° ... + 25 ° C. In such conditions, seedlings will begin to appear in 5-6 days.
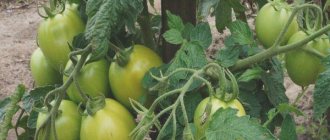
Excellent tomato seedlings - Natalia Shcherbinina’s step-by-step method
Good tomato seedlings should be healthy and strong; Natalya Shcherbinina (Balueva) from Minusinsk is happy to share her information and experience so that every gardener can find himself in tomato heaven on his own plot.
Optimal timing of seed sowing and soil preparation
To grow excellent tomatoes in your summer cottage, you must comply with the sowing dates. Overgrown and elongated seedlings, which are deliberately restrained in growth due to premature and early sowing, lead to a significant reduction in the quality and quantity of the harvest.
In the Urals and Siberia, including Minusinsk, and in many regions of central Russia, tomato seeds are sown on March 15-17.
In the southern regions, Kuban, Astrakhan, Volgograd, Rostov regions, Krasnodar Territory, the time for sowing tomatoes for seedlings falls in mid-January, due to the climatic characteristics of the cultivation zone.
If you take into account the lunar calendar, you need to take into account that on the day of the new moon and full moon, 12 hours before the moment of occurrence and after it, nothing is sown or planted.
Trending Wisteria for the middle zone: dreams come true!
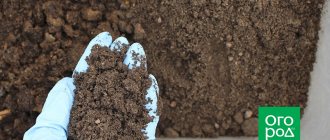
High-quality soil largely determines the growth and condition of seedlings. Natalya Shcherbinina uses vermicompost, which contains soil microorganisms, and there is no need to use additional fertilizers. When it is not possible to purchase soil mixture in the store, then you can prepare it yourself at home.
In the fall, you need to take one part of the forest soil or good fertile soil from the garden, add the same amount of humus and sand. All components are mixed, a glass of wood ash and 200 grams of sawdust are added to a bucket of the finished soil mixture.
Please note that only old and rotted sawdust is taken. Fresh shavings cannot be placed. The soil mixture is thoroughly mixed, after which it is folded and compacted into ordinary thick plastic bags, which are taken outside and left in the fresh air until spring.
It is worth noting that the ash is added in the fall so that by the time the seeds are sowed, it has time to transform into a digestible form for plants, since the root system of tomato seedlings is quite weak at the initial stages.
Preparing seeds and sowing seedlings
The next step is preparing the tomato seeds for planting in the ground. Don't forget to label the varieties so you don't get confused in the future. Take a small piece of ordinary bandage, fold it three times, put the seed in the middle, tie it with a thread and be sure to make a tag with a mark on the variety. It is better to make tags from plastic film and sign them with a ballpoint pen. Now the tomato seeds need to be disinfected (disinfected).
Take ordinary potassium permanganate and prepare a strong dark solution, lower the prepared bags with planting material into it. The disinfection time is 20-25 minutes, this time period will be sufficient for etching.
As a rule, the seeds become colored and acquire a dark shade, do not be alarmed, this is a natural process that should occur this way. We wash the seed material under running water and proceed to the process of stimulation for good and friendly shoots.
If you grow or have aloe at home, take a couple of leaves, squeeze out the juice and immerse the tomato seeds for 4-5 hours.
If there is no plant, you need to purchase sodium humate (a stimulant that promotes good root formation and growth of seedlings), immerse the planting material in liquid for 4 hours. No rinsing is required after stimulation.
We remove the seeds and put them in a warm place for a day, keeping an eye on them to prevent them from drying out. Once warm, place it in the refrigerator on the bottom shelf for another 24 hours. Now the seeds are prepared, you can plant them in the ground. For planting, take shallow boxes, pour the soil mixture in a layer of 10-15 cm. Using a wooden stick
ki or a regular pencil, grooves are cut. The furrows are shed with a dark solution of potassium permanganate and immediately begin sowing tomato seeds, planting them to a depth of 1 cm, keeping a distance of 1-2 cm between the seeds. When the seeds are spread out, carefully cover the top with earth.
After that, with the palm of your hand you need to compact it a little and pat the soil mixture so that the seedlings come to the surface without a cap. The boxes with plantings are covered with film and put in a warm place where the temperature is within +23 ° ... + 25 ° C.
Interesting on the topic:
Convenient garden shelves made from simple plastic boxes
Feb 2, 2022
Green dressing from fresh nettles: composition, preparation,…
Feb 2, 2022
In such conditions, seedlings will begin to appear in 5-6 days.
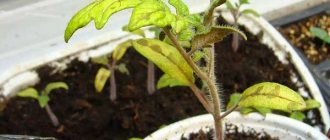
Caring for tomato seedlings As soon as the first loops appear, the film is removed, and the boxes with the crops are placed in the brightest place, usually on the windowsill. Lack of light causes the seedlings to stretch out, become thin and weak.
In the case when there is not enough sunlight, the weather is gloomy and cloudy outside the window, use additional lighting, lamps for seedlings. In the first week after germination, the temperature for tomato seedlings is +10°...+15°C at night, +15°...+20°C during the day. When the seedlings have two true leaves, start picking.
But Natalia Shcherbinina’s own experience shows that it is better to pick tomatoes if they have four true leaves.
By diving tomatoes, you thereby provide the plant with more space to grow, good nutrition, and the possibility of better lighting
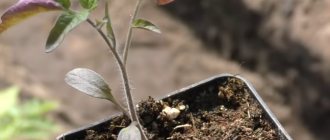
. Seedlings grown in pots stretch much less and grow stronger and stronger. Pour the soil mixture into prepared pots (cups), compact them a little, make a depression in the center and pour in a dark solution of potassium permanganate to avoid the common disease of blackleg. Using a knife (not sharp), pick up a seedling from the box, find the central root and carefully pinch it.
This technique allows the seedling to grow a larger number of roots, due to which the seedlings become stronger. The seedling is placed vertically in a pot, buried down to the cotyledon leaves, pressing well with earth. Water with a solution of potassium permanganate.
Picked seedlings must be shaded from sunlight for 2-3 days with newspapers, paper, etc. Growing tomato seedlings require care and attention; the plants should be inspected daily. When the first signs are detected, the affected sprout is removed.
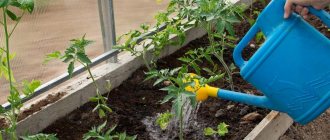
Watering seedlings should be regular but moderate to avoid various diseases associated with excess moisture in the soil. It is advisable to water right up to the root, avoiding getting it on the leaves.
When the seedlings grow a little and take root after picking (about 7-10 days), treat the plantings with Energen or Bud (dissolve 5-6 drops in a liter of water, spray the plants) against fungal and infectious diseases.
Natalya Shcherbinina >>> https://ok.ru/profile/512346656247
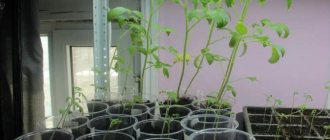
Caring for tomato seedlings
As soon as the first loops appear, the film is removed, and the boxes with the crops are placed in the brightest place, usually on the windowsill. Lack of light causes the seedlings to stretch out, become thin and weak. In the case when there is not enough sunlight, the weather is gloomy and cloudy outside the window, use additional lighting, lamps for seedlings. In the first week after germination, the temperature for tomato seedlings is +10°...+15°C at night, +15°...+20°C during the day.
in the photo - prevention of tomato seedlings with wood ash against diseases
When the seedlings have two true leaves, start picking. But Natalia Shcherbinina’s own experience shows that it is better to pick tomatoes if they have four true leaves. By planting tomatoes, you provide the plant with more space to grow, good nutrition, and the possibility of better lighting. Seedlings grown in pots stretch much less and grow stronger and stronger.
Pour the soil mixture into prepared pots (cups), compact them a little, make a depression in the center and pour in a dark solution of potassium permanganate to avoid the common disease of blackleg. Using a knife (not sharp), pick up a seedling from the box, find the central root and carefully pinch it.
in the photo - caring for tomato seedlings
This technique allows the seedling to grow a larger number of roots, due to which the seedlings become stronger. The seedling is placed vertically in a pot, buried down to the cotyledon leaves, pressing well with earth. Water with a solution of potassium permanganate. Picked seedlings must be shaded from sunlight for 2-3 days with newspapers, paper, etc. Growing tomato seedlings require care and attention; the plants should be inspected daily. When the first signs are detected, the affected sprout is removed.
Watering seedlings should be regular but moderate to avoid various diseases associated with excess moisture in the soil. It is advisable to water right up to the root, avoiding getting it on the leaves. When the seedlings grow a little and take root after picking (about 7-10 days), treat the plantings with Energen or Bud (dissolve 5-6 drops in a liter of water, spray the plants) against fungal and infectious diseases.
If you have any questions after reading the article, or want to learn more about growing tomatoes, leave your wishes below in the comments, Natalya Shcherbinina will definitely answer.
- Sale!
LiveInternetLiveInternet
PLANTING TOMATOES IN OPEN GROUND!!! You all know that the tomato is a heat-loving plant, and therefore it needs a warm place! We choose the sunniest, most open and well-ventilated area for the tomatoes (this is a good prevention against many diseases in the future) The width between the rows of tomatoes in our garden bed is 60- 70 cm, and the distance between plants in a row is 40-50 cm. We begin to make holes, dig a hole 30-40 cm deep with a shovel, add 5 kg of humus, a handful of superphosphate, a handful of ash into each hole...! Attention: all this needs to be mixed very well with the soil in the hole so as not to burn the young roots of our pets! Attention: Do not apply fresh manure under any circumstances, this is a breeding ground for diseases for tomatoes!!! We pour each prepared well well with warm, this is important, warm water with potassium permanganate (dark solution), if manganese. no, use phytosporin (make the solution according to the instructions)
So, the seedlings are ready!
Attention: wilted seedlings take root poorly and then lag greatly behind in growth, so before planting they must be well watered several hours before planting. If your seedlings are tall, i.e. overgrown, you must put it down and cover the stem with soil, of course this will give rise to the formation of more roots, but this method has a minus - this planting greatly delays the flowering of the first cluster. But we have stocky seedlings (not overgrown) and therefore, carefully take a lump with the plant and put it in a hole. Sprinkle the stem well and make a hole for watering. Attention: if the lower leaves come into contact with the ground, they must be plucked off. After planting, water well with 5 liters per plant! We also water with potassium permanganate and do not forget that our solution is dark! When planting, I immediately hammer in a stake and tie up the tomato. If the day after planting the weather is hot and sunny, then the plants need to be shaded (at worst, make caps from newspapers), The most important thing now is to take care of the top on which the first flower brush!
Attention:
I recommend watering with potassium permanganate 2-3 more times every 10 days. And then you will see your children beautiful and healthy!
Attention: I do not recommend planting tomatoes next to potatoes, since the diseases of these two crops are the same!!! 10 days after planting, the plants need to be fed with a solution of mullein diluted 1:10! The soil near the birch tree is good, black and rotten, we scoop it into bags and go home to our plot! We use this land!
Attention:
Be sure to make a compost pit on your site, it is needed like air. Put all the waste from the garden there. And grass and leaves and tops and even leftover food. All this must be shoveled and watered with slurry, here you have ready-made humus for the future!!
WHY LEAVES TURN YELLOW
?From a botanical point of view, this is a lack of nutrients and, above all, nitrogen. We find a nitrogen-containing fertilizer and fertilize it. Attention: 1 matchbox per 10 liters of water, and most importantly, after any root fertilization, spill it with plain water a few minutes later!!
FIRST AID FOR DRYING LEAVES!!!
There are several reasons: fungal diseases, lack of nutrients, poor ventilation, temperature changes (night and day) If it is very hot in your greenhouse, about 35 degrees, then the temp. soil temperature is 45-50 degrees, and this means increased evaporation of moisture and, as a result, the leaves begin to wither and dry out! To cope with this and stop the leaves from drying out, you need to water or spray with “Biovit”, or “Biostim”, you can also use “Riverm”! Do not allow the soil to dry out.
Do not water during hot weather (or immediately after it.) We water either in the morning or in the evening! And do not overwater!!!
How and when to start planting tomatoes?
Our tomatoes have grown, become stronger, have blossomed, in some places they have put on curls and this, of course, makes us happy! It’s time to think about forming a bush. A stepson is an additional branch that forms in the axil between the stem and the leaf.
Attention!
The sooner you remove the stepson, the less time it will have time to take nutrients from the bush!
Attention!
You need to remove the stepsons in the morning in sunny weather. In cloudy weather, you should do this because the wound does not heal longer and infection penetrates through it!
Attention!
If you don’t remove the shoots at all, you will end up with “Jungle” tomato thickets and the fruits in such thickets will be very small! For yourself, you should note how many stems you need on the bush! I form the bushes into 2 stems! If we form them into 2 stems, then we attach the stepson to the main shoot, which is located under the first flower cluster in the leaf axil. We do not touch it. It subsequently will be the second stem! If you form one stem, which is often done by people who grow tomatoes in greenhouses, then you must save one main shoot and remove everything nearby from the side axils!
We carefully inspect the bush and remove the stepsons that are located in the lateral sinuses, between the stem and the leaf!
Attention!
When you remove the stepson, try to leave a small stump of 1 cm, then the stepson will not appear in this place a second time!
Attention!!!
TOP ROT!!! How to help with this disease??? You need to regularly and well water your pets! If you have already had the disease, urgently dilute calcium nitrate (5-10 g per 1 liter of water) and spray the plant 2 times a week, spray it either in the evening or not in cloudy weather in the morning!!!
LATE BLHATH!!!
Control measures: Urgently spray all tomato plantings with garlic infusion, treat with Bordeaux mixture, or you can treat with a 10% solution of table salt.
HOW TO PREPARE A GREENHOUSE FOR THE NEXT SEASON!
In any greenhouse, a lot of favorable conditions are always created for the development of various diseases. Of course, in order to achieve a good harvest, it is necessary to thoroughly disinfect our greenhouses. Attention!!! We need to suppress infections both in the above-ground and underground parts of the greenhouses.
1. Carefully remove all plant debris. 2. Be sure to remove all twines, ropes, garters (all this must be burned), and disinfect the twine wire with the flame of a blowtorch. If the area in the greenhouse is not very large, you can also disinfect the soil with a flame. 3. Wash the glass, pipes, racks with laundry soap, adding table salt (steep solution), and then disinfect all these structures with a formaldehyde solution.
There is one cunning way that kills a large number of pathogens. At the end of August in September, when the days are still hot and we are already cleaning the greenhouse. After you have removed all the remains of your plants, you need to cover the ground with a dark film and close the greenhouse for 2-3 days. The temperature during the day under the film will rise to 60 degrees and will destroy a lot of infection, remove the film, dig up the ground, and do this 3-4 more times, this will destroy most of the diseases.
5, In the spring, before planting in a greenhouse, I spill phytosporin all over the soil!!!
THE TOMATO LEAVES DRY AND TURN YELLOW!
There can be many reasons for the leaves of tomatoes to dry out: a mosaic viral disease, waterlogging of the soil, underwatering of the soil, lack of nutrients, as well as climatic conditions. Let’s say it’s a hot day, the air temperature is 30-35 degrees, what do you think? degrees under a tomato bush??? that's it, that's it - and there it's all 45-50 degrees! This leads to increased evaporation of moisture. And the end result is drying out of the leaves. That would protect the plants from adverse factors and stop drying out and yellowing of the bushes should be watered at the root with “Biostim” or “Biovit”. And in the evening you can spray the bushes with “Riverm”
Do not allow the soil to dry out, do not water in the heat or immediately after it (you can get burns on the roots). Water later in the evening or in the morning before the sun is bright. And also Attention!!! If the bushes have already turned very yellow and simply begin to dry out from the bottom to the top , don’t be sorry, tear it out and burn it, and immediately treat the soil with phytosporin or a dark solution of potassium permanganate!
HOW TO CORRECTLY PINCH THE TOP OF A TOMATO!!!
So today we will break or pinch the top of anyone’s head in any way! We find the main stem, (And we have 2 of them - as I taught you, form them into 2 stems) From these 2 stems you need to remove the top-crown. The top will still not have time to at the end of the season, to form a harvest. On the main stems we pinch off the young flowering cluster and all the leaves. And your bush will begin to devote all its strength to bearing fruit.
Attention!!! After some time, after pinching, stepsons will appear again from the axils of the previously removed leaves, which naturally takes away the strength of the bush. They will need to be removed urgently!
samozvetik.ru/blog/43381631216/VYIRASCHIVAYEM-RASSADU-PO-METODU-NATALI-SCHERBININOY-IZ-MINUSINS?utm_campaign=transit&utm_source=main&utm_medium=page_0&domain=mirtesen.ru&paid=1&pad=1