Advantages and disadvantages of cuttings
Red currant bushes are distinguished by long-term fruiting, but over the years the berries become small and sour, old plants are more often affected by diseases. Regular renewal of bushes obtained by cuttings allows you to constantly maintain crop productivity at a high level.
Advantages of the method:
- the ability to harvest large quantities of planting material without causing damage to the mother plant;
- effective renewal of berry fields with minimal financial costs;
- young seedlings retain the varietal qualities of their parents;
- Harvesting and planting cuttings can be carried out at a time of year convenient for the gardener.
Disadvantages of shrub cuttings:
- some varieties of red currant do not take root well;
- the method is labor-intensive, young seedlings require constant care;
- winter storage of cuttings requires the creation of special conditions.
The survival rate of red currant cuttings is slightly lower than that of black currants, on average 75-85%.
The benefits of red currant
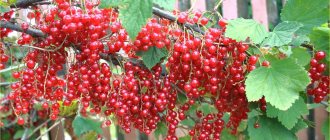
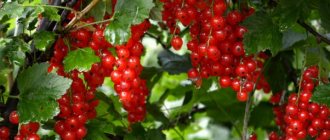
This crop is valued by gardeners for its resistance to frost and productivity - up to 17 kg of fruits are harvested from one bush, which contain a set of vitamins C and P, ascorbic acid, sugars (4–11%), pectin and tannins necessary for humans.
Red currant berries are consumed fresh, frozen or processed into jam. Gelling properties allow you to prepare marmalade and marshmallows.
Red currants make a very tasty jelly, which can be eaten as an independent dessert or used in other dishes.
In addition, it is a honey plant that has medicinal properties: antipyretic for colds, anti-inflammatory and hemostatic effects.
Red currants are unpretentious and easy to care for. In order to get a bountiful harvest every year, the plantings are periodically renewed.
Timing and features of cuttings
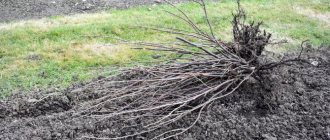
To prepare planting material, the mother plant is carefully selected. Preference is given to productive bushes aged 4-6 years, having at least five skeletal branches (shoots from young bushes take root faster). Only healthy stems are used for propagation. Daughter plants can inherit viral diseases - doubleness or striped mosaic.
Cuttings of red currants at different times of the year have their own characteristics and are performed using different technologies.
In summer
The optimal period for harvesting green cuttings is the end of June-beginning of July. During this period, the currant is at an active stage of growth, and the shoots begin to become woody and take root more easily.
Green cuttings are not stored for a long time; they are immediately planted on a previously prepared bed and greenhouse conditions are created.
Spring and autumn
Woody annual redcurrant cuttings are harvested in spring or autumn, when the plant is dormant.
In spring, cuttings are cut in March during the swelling of the buds. Planting material is rooted in water or substrate; if weather permits, it is planted in open ground under a film cover.
The time for autumn harvesting of red currant cuttings is the end of August to mid-September. The shoots are planted in the soil, favorable conditions are created for rooting before the onset of frost, and they are covered for the winter.
In regions with harsh weather conditions, cuttings with a weak root system often freeze out. It is advisable to save them until spring and plant them in the ground when the soil warms up enough.
Storage conditions:
- shoot cuts are treated with garden varnish;
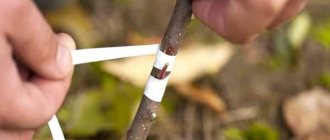
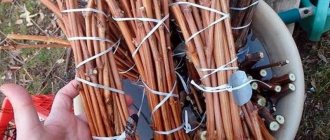
- the cuttings are tied into bundles, wrapped in burlap, and a plastic bag is put on top;
- the trimmings are stored in the lower part of the refrigerator, in cold weather - under a thick layer of snow.
During the winter, the cuttings are inspected several times and moldy specimens are removed.
Alternative propagation methods
In summer cottages, black currants are successfully propagated not only by cuttings. Gardeners practice vegetative propagation methods such as layering and dividing the bush.
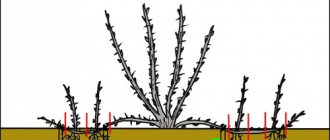
When propagated by layering from the mother bush, a 100% survival rate is obtained. Types of layering:
- Horizontal layers along the entire length are laid in a groove and secured with pins.
- Vertical - grow from the buds of the lower part of a young bush.
- Aerial - formed on a stripped ring of a strong branch placed in a plastic container with fertile soil.
- Arc-shaped - formed from a lignified shoot. It is bent in an arc, the bark of the middle part is cut with a jigsaw, the shoot is placed in a groove, leaving the top above the surface of the ground.
Horizontal layers are often used. The method is used if the lower branches are curved and branching. This method of propagation is good because with minimal care you can grow currants on your site and get 4-5 seedlings from one shoot.
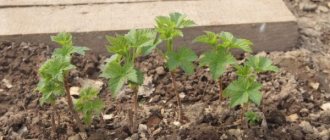
In spring or autumn, you can quickly propagate currants by dividing the bush. The rhizome of the dug out bush is carefully divided into fragments with developed roots and young branches using a sharp, clean knife. The separated parts are treated with a pink solution of potassium permanganate and planted on the prepared area. The size of the planting hole should allow the roots to fit freely. The root collar of the plant is buried 2-3 cm. The ground around the seedlings is mulched with peat. In a year, the summer resident will try the first berries from the young bushes.
Propagation by seeds is practiced only in experimental breeding plots. A bush grown from seeds may not retain its varietal qualities.
Any method of propagation will give a result that will please the gardener with a harvest. Subject to careful care of the seedlings and compliance with the agricultural techniques for growing black currants: regular watering, timely fertilizing, weeding, loosening the soil.
Previous CurrantsVarieties, planting and care of golden currants Next CurrantsPossible diseases, pests of currants and methods of combating them
Preparation of cuttings
For work you will need: garden knife, pruning shears, scissors. The blades of the instruments are sharpened to make thin, even cuts, and disinfected in a solution of potassium permanganate and hydrogen peroxide.
Green cuttings
Planting material is harvested early in the morning in cool weather, when the plant tissue contains the maximum amount of moisture.
Sequencing:
- Strong shoots are selected from the current season's growth - those that begin to become lignified from below, but which retain the flexibility of the upper part.
- Remove the lower end and tip of the shoot.
- Cut cuttings with 3-4 internodes 12-15 cm long.
- The upper cut is made straight at a distance of 1 cm from the kidney.
- An oblique cut is made at the bottom, 0.5 cm away from the sheet.
- Using scissors, remove the two bottom leaves, leaving small petioles.
- The remaining foliage is cut in half to reduce moisture evaporation.
Green cuttings wither quickly; immediately after cutting, they are placed in water or wrapped in a damp cloth.
Lignified cuttings
Cuttings are prepared from annual lignified shoots; they are easily recognized by the light brown color of the bark:
- choose a strong healthy branch with a diameter of at least 5-7 mm with well-formed buds;
- from the middle part of the shoot, cuttings are cut 20-30 cm long, with 5-6 internodes;
- the upper part is cut at a right angle, 1 cm away from the bud;
- the lower part is cut off obliquely under the eye;
- If there are leaves on the pruning shoot (harvesting in the fall), they are removed.
Depending on the gardener’s plans, cuttings are rooted at home or prepared for planting in open ground.
Reproduction in summer
Summer cuttings of red currants are carried out in the second half of summer, mainly in the middle or second half of August. For successful rooting, it is necessary that the air temperature drop below +25ºС, and that it is possible to maintain high humidity inside the greenhouse.
It is also necessary that the soil temperature in the greenhouse be higher than the air temperature, at least by a few degrees.
To root red currant shoots, build a greenhouse, a covered bed, or use a greenhouse.
How to prepare a shelter for rooting?
For planting and rooting red currants, prepare a bed and a greenhouse. This can be a small shelter 10-20 cm high. You can also propagate currants (root cuttings) in the shaded part of a large greenhouse.
The space in the rooting zone should be constantly moist. The moisture content in the soil should be 80-90%, and in the air - 90-95%. The presence of a shelter makes it possible to create and maintain the necessary conditions for the rooting of currant cuttings.
Note: individual currant branches can be rooted under plastic bottles. However, mass rooting of a large number of chibouks requires the construction of a greenhouse or greenhouse.
In summer, a shaded place is chosen for propagation of currants by rooting. This could be the thick shadow of a large tree (walnut), the shadow of a house wall or a fence.
Under the shelter, the soil is prepared - fertilized, loosened, and, if necessary, dug with sand to ensure air flow to the developing roots.
After the preparatory work, they begin to plant the prepared red currant cuttings.
Rooting red currants: choosing cuttings
Red currants are propagated by cuttings in the summer using vegetative shoots of the current year and annual shoots of the previous year. For successful rooting, it is necessary to take a strong, healthy young shoot with a sufficient amount of cambium and mature wood.
For rooting, take the middle part of the shoot. They do not take the poorly matured top and the lower part that has managed to coarse. Young green shoots and old perennial shoots are also not suitable for rooting.
So, the best cuttings for rooting are:
- A one-year-old shoot - its bark is brown and smooth (unlike 2-year-old and older shoots, which have a rough bark).
- This year's young shoot - usually, such shoots are formed in the upper part of the main skeletal branches; they have light brown, smooth, shiny bark.
The shoot thickness for rooting must be at least 5 mm. The optimal cross-sectional dimensions of the cuttings are 6-8 mm. Such a cutting has enough cambium - the substance from which roots will form. As well as an adequate supply of nutrients.
Technology for preparing cuttings
The preparation technology is as follows:
- Cut annual shoots 6-8 mm thick. You can also cut the current year's shoots to a suitable thickness.
- Leaves are cut from the prepared branches.
- Cuttings from 4 to 6 buds long are cut from the middle part of red currant shoots. The upper edge of the cutting is cut at a distance of 0.5-1 cm from the uppermost bud. The lower edge is 2 cm from the lower bud.
- The upper cut is made perpendicular. The lower one is oblique. This increases the cutting area and the root formation area. An oblique cut will produce more roots and a more powerful root system.
The prepared cuttings are soaked in a solution of a root formation stimulator and planting begins.
How to plant cuttings?
The technology for planting red currant cuttings is as follows:
- The cuttings are buried into the ground by 2-4 buds. There should be 2 buds above the soil surface.
- The direction of deepening the cuttings is at an angle to the ground surface of about 45º (diagonally).
- If the soil is loose, the cuttings easily sink into the ground. If planting material is planted without digging up the soil, then the recesses for the cuttings are made with a metal rod of suitable diameter.
- The soil under the planted branches is well watered.
- The bed is covered with polyethylene. When planting in a greenhouse or greenhouse, additional cover is not used. Limited to watering.
Rooting methods
Planting pre-rooted seedlings allows you to get strong plants that can withstand wintering easier and begin to bear fruit earlier.
In containers with soil
The method is suitable for lignified cuttings, allowing you to preserve plants for a long time before planting:
- select plastic glasses or containers with a capacity of 0.5 liters;
- 2-3 cm of drainage (vermiculite, perlite) is placed on the bottom;
- prepare the soil mixture by mixing garden soil, peat and sand in equal proportions;
- the cuttings are buried into the soil in two buds, lightly compacted, preventing the formation of voids;
- Before rooting, seedlings are shaded;
- When the first leaves appear, the containers are moved to southern windows, or illuminated with phytolamps so that the plants do not stretch.
Two weeks before transplanting into open ground, the seedlings begin to harden: during the daytime they are taken out into the fresh air or placed in a greenhouse. When the soil warms up, the plants with a clod of earth are planted in seedling beds.
In water
Cuttings cut in autumn or early spring easily take root in a liquid medium:
- 3-4 cuttings are placed in a container with opaque walls;
- pour settled or distilled water, the liquid should cover the two lower buds;
- a crushed tablet of activated carbon is added to the water to prevent the development of putrefactive processes;
- After about a month, the cuttings begin to develop roots 3-4 cm long.
Rooting will occur faster when adding aloe juice (5-7 drops) or 1 tsp to the water. honey per liter of water.
In sphagnum
Sphagnum moss has high hygroscopicity (the ability to retain moisture) and antibacterial properties, and is perfect for rooting lignified cuttings.
Procedure:
- roll out a strip of black film 30 cm wide, lay sphagnum on it in a layer of 3-4 cm;
- currant cuttings are laid out in a row at a distance of 3-5 cm from each other;
- the film is rolled into a roll, tucking the bottom edge, and tied with a rope;
- the upper parts of the shoots are left open.
The roll is placed in a bucket or flower pot and stored in a cool place until spring.
Methods for propagating red currants
You can propagate garden berry crops in several ways. Domestic gardeners prefer to propagate red currants by cuttings. It is necessary to propagate the popular garden berry crop through lignified cuttings in the autumn.
It is recommended to plant pre-cut cuttings at a distance of 10 or 15 cm from each other. Be sure to leave two buds above the soil level
After planting, it is necessary to carefully compact and compact the soil, and then carry out abundant irrigation measures and mulch the plantings using a relatively thin layer of humus or compost
A slightly less popular method of propagation is the use of layering. With the help of horizontal layering, the plant reproduces even before the active leafing phase. The parent bush must be completely healthy, with the best varietal qualities, including annual and high productivity, excellent quality harvest characteristics, increased resistance to diseases and frosts.
Landing
Red currant cuttings are not planted immediately in a permanent place; for ease of care, they are placed in a special bed (in a school garden). The soil surface is freed from weeds and plant residues. For each m² of bed, add 3-5 kg of humus, 60 g of superphosphate, 30 g of potassium sulfate. Sand is added to heavy soils, and wood ash is added to acidic soils. The soil is dug up to the depth of a spade bayonet.
Rooted cuttings are planted directly in open ground; planting material without roots takes root only when greenhouse conditions are created.
Summer cuttings
To plant green shoots, set up a small greenhouse located in a shaded place (near the fence, under the crown of a tree). The soil in the greenhouse should be fertile, loose, without large lumps. A layer of sand or peat is poured on top.
Before planting, cuttings are soaked for 2-3 hours in a biogrowth stimulator - “Kornevin”, “Epine-Extra” or “Heteroauxin”. The shoots are planted obliquely, at an angle of 45˚ at a distance of 7-10 cm from each other. The two lower buds are placed below ground level for a larger area of root formation. The upper part of the shoot with one bud and a trimmed leaf remains outside.
Caring for cuttings before rooting:
- seedlings are watered daily, preventing the top layer of soil from drying out;
- sprayed with a spray bottle to ensure a humidity level of 80-85%;
- Ventilate the greenhouse every day for 2-3 hours.
After 2-3 weeks, check how easily the shoots are pulled out of the soil. If you need to make an effort for this, rooting has occurred safely and the film can be removed.
Lignified cuttings
Planting material harvested in August-September is immediately planted in the ground. Before the onset of frost, the shoots have time to take root. In regions where winter begins early, cuttings are stored in the cold until spring or rooted at home. Spring planting is carried out when the soil warms up to +12-15˚С and the danger of return frosts has passed.
Step-by-step instruction:
- Cuttings are renewed and treated with root formation stimulants.
- Furrows are made in the garden bed in increments of 30 cm.
- The shoots are planted in rows at a distance of 25-30 cm from each other.
- The cuttings are placed obliquely in the soil, the two lower buds are buried.
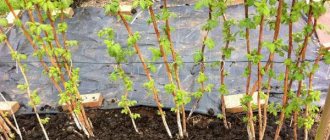
For successful rooting, shoots need a microclimate with high air humidity. A mini-greenhouse is built on the garden bed using arcs and covering material. If there are few cuttings, each is covered with a cut plastic bottle. The seedlings are regularly watered and the shelter is periodically ventilated.
In favorable conditions, red currant cuttings take root within a month, after which the film is removed.
Rooted cuttings
Planting is carried out in late April-early May, when the daily air temperature reaches positive values.
Sequencing:
- make holes in the garden bed with a diameter of 20 cm according to a 30x50 cm pattern;
- the holes are spilled with water;
- shoots are planted with the root collar deepened by 5-6 cm at an angle of 45˚;
- above the surface of the ground there should be a section of the cutting with 2-3 buds directed upward for the correct direction of shoot growth;
- the soil around the cuttings is compacted, preventing the formation of air pockets;
- The planting site is moistened abundantly.
Rooted cuttings quickly take root and grow. In autumn, young currant bushes are planted in a permanent growing area.
How to propagate currants from cuttings at home
If you have never tried vegetative propagation, you will like growing currants from cuttings. After all, you give life to new plants with your own hands, and there are quite a few ways - currants take root quite easily.
In water
Dip cuttings with treated cuts into water ⅓ of their length, add liquid as it evaporates, and after about 14 days the first roots will hatch.
In prepared soil mixture
Prepare a special substrate; in this case, there will be no need to temporarily transplant rooted blackcurrant cuttings until spring. Choose from three blend options:
- Peat and sand (1:1);
- Humus or turf soil with soft wood sawdust (1:3);
- Sawdust and peat (1:1).
The sawdust should be steamed, then it will fully release its beneficial substances to the cuttings. Although in the practice of natural farming they rarely resort to heat treatment, because not only harmful, but also beneficial microbes die. An alternative is to use old, weathered sawdust, so to speak.
Next, prepare the container, place sand or vermiculite on the bottom, pour the soil mixture onto the cushion and cover it with a layer of regular soil on top. Now you can insert the prepared cuttings, leaving 2 buds on the surface and watering them generously.
The substrate with cuttings should be stored at a temperature of 19–20°C and watered periodically; the soil should always be moderately moist. On each cutting that starts to grow, buds will bloom, flowers may even hatch, it is better to pluck them.
Rooting currant cuttings in newspaper (burrito method)
Prepare newspaper, plastic and water. Wrap the cuttings completely in paper, moisten the bundle, but do not over-moisten it, and place it in polyethylene, maintaining a vertical position. At the same time, try to wrap the cuttings so that air enters the package, and at the same time the contents of the polyethylene are closed. Send the bundle to a dark, cool place and after 3 weeks active root formation will begin.
Care
The first time after planting, red currant cuttings need careful care:
- Before rooting, the seedlings are watered every other day with settled water, keeping the soil moist. When the plants take root, watering is done as needed, avoiding drying out and waterlogging of the soil.
- Regularly loosen the rows and weed the weeds as they grow. Loosening prevents the formation of a crust on the soil surface and facilitates oxygen access to the root system of plants. Mulching with peat reduces moisture evaporation and makes it easier to care for plants.
- For accelerated growth and the formation of a full-fledged root system, seedlings are provided with nutritional elements. The first feeding is carried out three weeks after planting. Plants are watered with complex mineral fertilizer (1 tbsp per 10 liters of water). In the future, the application of organic and mineral fertilizers is alternated.
- In September, the strongest seedlings are transplanted to a permanent place, the weaker ones are left in the cuttings until next year. Before the onset of cold weather, the soil around the plants is mulched with sawdust or leaf litter, and the shoots are covered with agrofibre.
In spring, the branches of seedlings are shortened by 10-15 cm to stimulate the growth of new shoots.
Propagating red currants by cuttings is a reliable way to increase the number of young berry bushes on the site. It is important to prepare planting material on time and provide the necessary conditions for shoot survival. The main advantage of the method is the production of seedlings with the characteristics of the mother plant, which allows you to preserve the variety you like.
Reproduction of currants by layering
Another method often used when breeding red currants is propagation by layering. Unlike cuttings, when propagated by layering, the planting material is not separated from the main bush and can receive the necessary nutrients from the mother plant.
Only developed shoots without branches are suitable for the formation of layering. In this regard, the number of seedlings obtained by propagation by layering will be less than by cuttings.
To propagate red currants using this method you need:
- loosen the soil near the original currant bush and add fertilizers (ash, humus, superphosphate);
- dig trenches up to 15 cm deep;
- Place shoots suitable for layering into dug holes and secure with wooden pins;
- shorten the upper part of the cuttings to speed up the growth of the remaining buds;
- Cover the cuttings with soil, leaving the top on the surface.
The layering remains in this state throughout the summer. During this time, they must be periodically hilled and watered.
In the fall, the rooted cuttings are separated from the mother plant and each cutting is divided into separate seedlings, after which they are dug up and grown.
Stages of planting cuttings in open ground
Cuttings of currants in the fall and planting on the plot should be carried out in several stages. First you need to choose a place for planting and properly prepare the soil. Currants grow well in sunny areas.
You need to maintain a distance of at least 2-3 m between shrubs. This is worth taking into account if you plant cuttings immediately in a permanent place. The distance to the fence should be at least 1.5 m. Often gardeners plant bushes right next to the fence to make a hedge. It looks beautiful, but it does not have the best effect on productivity.
On a note!
Currants should not be planted in the shade of fruit trees. Shrubs grow poorly under apple and pear trees. Due to lack of light, the berries turn out small and sour.
After choosing a location, the area for currants needs to be dug up. If the soil is acidic, dolomite flour should be added to it at the rate of 200 g per 1 sq. m. m or ash (1 cup per 1 sq. m). Ash is also an excellent source of potassium and phosphorus. But you need to choose only high-quality wood ash, and not what remains after burning newspapers. Printing ink can be toxic.
The soil must be loosened and depressions made in the area if the cuttings already have roots. You can simply bury the branches and embed them with their beveled ends into the soil to a depth of about 10 cm. The soil should be lightly compacted, but not overdo it. A top layer that is too dense prevents oxygen from reaching the roots.
The cuttings should be stirred at an angle and in a circle. If you plan to plant them immediately in a permanent place, you can place up to 3-4 branches nearby. Subsequently, a bush will form from them. You can plant one cutting at a time. In this case, growth to a certain limit will have to wait longer.