Tomato seedlings are planted if they have reached a height of up to 35 centimeters and have up to 10 leaves. The plant looks healthy and has a good root system and strong shoots. Tomatoes are planted in a greenhouse in March in beds fertilized with mineral fertilizers. After planting, you should follow some care rules. 5 basic rules for caring for seedlings of this vegetable are described below in the article.
Preparing the greenhouse for planting in spring
Before planting tomatoes, the greenhouse is completely disinfected so that existing diseases and pests do not harm future plantings.
Plant debris is removed from the premises. If the greenhouse is film, then it must be opened and the polyethylene thoroughly washed with soapy water on both sides. Next, the film is disinfected with copper sulfate. After rubbing the frame with lye, it is usually doused with boiling water.
In glass greenhouses the same manipulations are carried out, only the frames are treated with lime milk. Broken glass is replaced, cracks are filled with sealant or putty to prevent drafts.
The following drugs are used to disinfect greenhouses:
- Slaked lime. The solution is prepared from copper sulfate, lime and water. It is used for processing frames, walls, ceilings and other structural parts.
- Sulfur checker. Use according to the attached instructions, however, according to reviews from many gardeners, this treatment is completely useless for some diseases. In addition, it heavily pollutes glass and film. The alarming fact is that after using such bombs, a fairly large amount of sulfur ends up in the ground, and, naturally, ends up in vegetables and herbs.
- Biological products. They are more in demand because, in addition to destroying fungi, they perfectly and permanently suppress the development of pathogenic microflora.
Why do tomato leaves turn yellow, causes and treatment?
There are several reasons for yellowing of tomato leaves:
- the root system is damaged.
Occurs due to planting already overgrown tomato seedlings with an open root system in the ground, as well as when deep loosening the soil. The lower leaves turn yellow and then fall off. This is caused by the inability of damaged roots to deliver nutrients to the entire plant, so it is forced to get rid of some of the leaves.
- water balance is disturbed.
Cold water harms the plant. You only need to water warmly, without getting on the leaves, in the evening or early in the morning.
They also turn yellow due to lack of water (in this case, we water rarely, but abundantly.
- inappropriate temperature conditions.
Tomatoes in open ground do not survive sudden temperature changes (more than 10 degrees). You can avoid yellowing by covering the plants with material at night.
If the temperature is predicted to drop at night, then it is better not to water the tomatoes in the evening (schedule watering until the morning).
- pests and diseases.
Often insects damage the roots of the plant, which leads to a change in the color of the leaves. You can get rid of them using traditional methods or using commercial medications.
So, the drug “Grom” saves from mole crickets, “Nemabact” saves from the larvae of the cockchafer, as well as “Zemlin”. Against wireworms - “Bazudin”.
- lack of nutrients.
Feeding will help avoid the problem. The main thing is to understand how microelements are missing.
| trace element | Sign of deficiency |
| Nitrogen | Yellow spots appear, the lower leaves turn white or yellow, and the upper leaves become small |
| Copper | Lower leaves are pale yellow |
| Manganese | Leaves turn yellow, then dry out and fall off |
| Sulfur | The upper leaves turn yellow, become thicker, harder; after that the same thing happens with the lower ones |
| Calcium | The upper foliage turns yellow, and the lower foliage takes on a dark green hue. |
| Magnesium | Leaves are yellow, veins are green |
Tillage in a greenhouse
Once every 2-3 years, the top layer of soil in the greenhouse is replaced. Many pests and pathogens usually gather there for the winter.
Having removed the top layer of soil, the beds are dug up to the height of a spade bayonet, simultaneously introducing the granular preparation Grom. After digging, you can treat the ground with a Bearcutter. Acidified soil is enriched with dolomite flour or chalk.
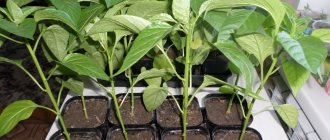
Seedling
After planting and before the seedlings emerge, the temperature is set to +25 degrees; after the sprouts emerge, the boxes are transferred to a lighted place. The temperature regime is maintained as follows: +15 °C during the day, +10 at night. After a week, the temperature is increased - 25 degrees during the day, 15 at night. The room is periodically ventilated, but drafts are not allowed.
For irrigation, a fine spray with water at room temperature is used. Irrigation is carried out no more than once a week. After 5 true leaves appear, the watering period is halved.
For better development of seedlings, additional lighting is used. Daylight hours can last up to 16 hours a day. If it is impossible to provide this, fertilizing with low concentration potassium fertilizer is carried out. After the seeds germinate, a layer of substrate up to 15 mm thick is poured into the boxes for better stability of the sprouts.
After sowing the material into a moistened substrate and before the first true leaf appears, watering is not recommended.
Agricultural technology for growing tomatoes in a greenhouse
To protect tomatoes from possible pests when planting seedlings in a greenhouse, you must adhere to generally accepted rules for the crop:
- Warm soil. In cold soil, the roots of a heat-loving plant stop absorbing food, freeze, and begin to rot.
In greenhouses, stoves, potbelly stoves or other heating means are installed to warm the soil.
Gardeners advise pouring boiling water over the beds and covering them with dark film for a while. The main thing is that the minimum soil temperature does not fall below +15...+18 °C.
- Shallow landing. Heavily buried stems take on new roots, slowing down the growth of the seedling. It is better to plant according to the old level.
Landing dates
Before planting in greenhouses, seedlings are kept at home for 40 days. Its height usually reaches 30 centimeters or more. For another ten days of the month, the plants are hardened, periodically taking them out onto the veranda or balcony.
Tomato seedlings are planted in greenhouses in early May. If climatic conditions at this time suggest night frosts, then the top of the greenhouse is covered with a second layer of film. This will raise the temperature significantly.
If the greenhouse is equipped with a heating system, then planting seedlings is possible at an earlier date.
Read more in the article: How to grow tomato seedlings at home
Planting scheme
The most common planting method is in rows. Leave 0.5 meters between rows.
What’s interesting: if row spacing is left at 0.6 m, the tomato yield per linear meter decreases.
- Based on the dimensions of the greenhouse, the tomatoes are arranged in a checkerboard pattern.
- Hybrids and low-growing varieties are usually compacted by planting at a distance of 40 cm.
- Compact planting is often practiced, but this reduces the passage.
Before planting, the soil is shed with manganese.
Compacted tomato planting scheme - video
Compatibility with other crops
It is not practical to plant a greenhouse with tomatoes alone. You can add other crops to it as neighbors. Since the tomato is capricious to growing conditions, neighbors should be selected with similar requirements.
- Cucumbers. Many gardeners plant them next to tomatoes. This should not be done because these crops have different growing conditions. For example, cucumbers like sprinkling, high humidity, carbon dioxide, and tomatoes like root watering, moderate humidity and fresh air. Only if there is nowhere else to plant cucumbers, you can place them at the opposite end of the greenhouse from the tomatoes.
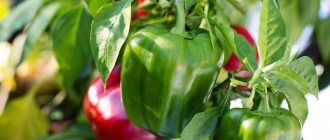
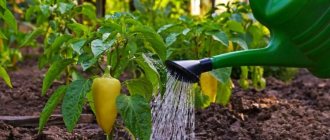
- Peppers. The nightshade plant, like the tomato, has similar maintenance conditions, only there is a difference in the microclimate. In greenhouses you can grow tomatoes close to each other.
- Salads go well with tomatoes. They can be planted between bushes.
- Onions, garlic, radishes, basil. This is a mutually beneficial neighborhood, only onions are planted on the greens. In addition, garlic protects tomatoes from late blight.
You should not plant near tomatoes: fennel, turnips, peas, dill, kohlrabi.
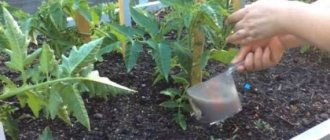
Watering
Watering begins after the seedling begins to grow. If it begins to rise and develop branches, this means that rooting was successful and the plant now needs water. Watering is not advisable until rooting is complete, as it can cause root rot.
Young plants are watered sparingly, as needed. More developed bushes require an increase in water intake.
By the beginning of flowering, approximately a bucket of water is required per 1 m², and in hot and dry periods - 15 liters per the same area.
When watering tomatoes, you should do this in the evening or early in the morning. This should not be done during the day, under scorching rays. To prevent tomatoes from getting stressed, the water should be warm.
An excellent irrigation option is drip irrigation. After the procedure, the greenhouses are ventilated to reduce humidity. The next day should be devoted to loosening.
Mulching
An effective way to increase the yield of tomatoes is mulching. Be that as it may, fruit collection increases by almost 25%.
- Mulch reliably protects the upper layers of soil from the formation of crusts, covers the rhizomes of tomatoes from the sun's rays, and drowns out weeds.
- A layer of mulch in the soil reliably conserves moisture. Gradually rotting, mulch of natural origin turns into humus.
- Mulching tomatoes improves soil structure and increases its aeration.
- Mulch prevents the lower leaves of the plant from coming into contact with the ground and prevents them from rotting in wet soil.
Mulching replaces some preventative work, making caring for tomatoes simpler and easier:
- Protection of roots from low temperatures;
- Loosening and weeding.
The following are used as mulch for tomatoes: sawdust, pine needles, bark, grass, scrap, cardboard.
Among all the components, straw is considered the best option. It allows air to pass through very well, protects against anthracnose, spotting, and early rot. It is important to ensure that the thick layer of straw is not favored by insects or rodents.
The grass used for mulch will need to be renewed frequently as it decomposes quickly. When lining layers of foliage, care should be taken to ensure that it is sufficiently dry, but it is recommended to water the sawdust with urea.
Feeding
During the growing season, the crop consumes a large amount of nutrients. The fertilizers provided during planting for the season are not enough, so tomatoes need additional feeding 3-4 more times. They provide plants with organic matter and minerals.
Mineral fertilizers should be given to tomatoes only in early spring and a little during the first feeding, since they cause nitrates to accumulate in the fruits. The rest of the time, tomatoes are given organic fertilizers.
Before fertilizing, the crop must be watered. In the phase of flowering and fruit set, the plant needs increased nutrition: every 2 weeks, each bush is given 0.5 liters of organic stock solution.
Feeding tomatoes in the fruiting stage - video
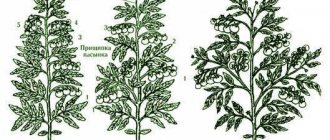
Formation and pinching of bushes
Greenhouse tomatoes are mostly indeterminate, requiring formation. The procedure begins as soon as the seedling takes root.
The first garter is done to tomatoes after a week of rooting.
Depending on the planting pattern, tomatoes are formed into one or two stems.
- When forming into one stem, all stepsons are removed.
- When forming into 2 stems, leave one stepson under the first brush.
Pruning is done in the morning so that the wound on the stem dries out before night.
Tall tomatoes shoot from 5 to 8 fruit clusters, then the top of the bush is pinched off and the lower foliage is torn off.
Low-growing varieties are left with 2-3 stems and several strong lower shoots.
Tying tomatoes
It is not necessary to garter low-growing and early-ripening tomatoes. However, most tomatoes need it.
Do not use thin twine, thread, fishing line, or wire for tying - they can easily cut the plant stem.
The best choice would be fabric tape, which is pre-washed with laundry soap and scalded with boiling water for disinfection. As the bush grows, its branches and brushes are tied with ribbons to the trellis.
The central stem is wrapped with ribbon and tied to a support, crossing the ends with a figure eight. There is no need to tighten the knots, since the growing bush is always tied higher, removing the previous bandage.
Pollination
The presence and quantity of crops depends on pollination. Tomatoes produce a lot of pollen to pollinate their own and neighboring flowers. Under natural conditions, pollination of tomatoes is facilitated by insects and wind.
In greenhouse conditions, wind pollination is also possible during the period of ventilation. The quality of pollination is greatly influenced by weather. At low summer temperatures, the anthers become deformed, and in hot weather, pollen grains may lose viability. High humidity also prevents pollination, causing pollen to clump together.
For pollination to be successful, the crop requires special conditions. Tomatoes are pollinated in two ways
1.Natural pollination
Attract insects, especially bees and bumblebees. To do this, honey-bearing flowers are planted between the tomatoes in advance. Both beautiful and useful. If you sow marigolds or basil, the taste of the fruit will increase. Indoor flowers are also brought into greenhouses.
During the flowering period, create a draft in the room so that pollen can fall on neighboring flowers.
2.Artificial pollination
The weather is not always kind to gardeners; There are also days when there are no insects or wind. Then pollination of tomatoes is carried out independently, by hand. The procedure is carried out early in the morning as the pollen ripens at night. Having chosen one of the methods, the entire flowering period is carried out only with this method.
- Brush. The most primitive way of transferring pollen. Having smeared the brush in pollen, touch each pistil.
- Fan. You can create artificial wind with a fan, carrying it between the rows.
- Shaking. Holding the tomato by the bottom of the trunk, lightly shake the bush, and if it is tied to a trellis, then tap on the ropes. Pollen falls and pollination occurs.
For better pollination, it is recommended to spray tomatoes with ovary preparations.
Fertilizer application
During the growing season, tomatoes should be fed at least four times. The first feeding is carried out 20 days after planting the seedlings. Make the following feeding: 500 g of liquid mullein are diluted in a bucket of water, add 1 tbsp. a spoonful of nitrophoska. 1 liter of solution is poured under the bush.
The plants are fertilized a second time after 10 days with the following composition: 1 teaspoon of potassium sulfate per bucket of water. Apply five liters per 1 sq. meter.
After another two weeks, add the following composition: two tbsp. spoons of superphosphate and wood ash into a bucket of water, you need to add six liters of solution per 1 square meter. meter.
During fruiting, tomatoes are fed with a mixture of two tablespoons of liquid sodium humate and the same amount of superphosphate per bucket of water. For 1 sq. meter is enough for 5 liters of solution.
In addition to feeding, caring for tomatoes after planting includes mulching the soil with mown grass and straw. It won't hurt to populate the soil with earthworms. Planting between rows of legumes, which will enrich the soil with nitrogen, will have a positive effect.
Harvest and storage
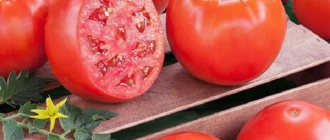
When harvesting, in order to produce more of it, they begin to remove the fruits, which begin to turn brown. They will then ripen on their own in the sun.
The harvest time depends on the tomato variety, climate, weather forecasts and many other factors. Some varieties require long ripening, others are distinguished by early ripening.
Harvesting is carried out with the stalk, so the tomato will retain its elasticity and useful microelements longer. In any case, harvesting is carried out until the night temperature remains above +8ºС. Tomatoes that have cooled after a late harvest quickly begin to rot. Tomatoes should not be left to ripen on the branches, as they also do not last long.
Unripe fruits are placed in a warm, bright place. The stalk of ripe tomatoes is separated and then stored without it, in wooden boxes.
To prevent tomatoes from turning black, they are preheated. To do this, a batch of tomatoes is immersed in a bucket of water +60ºС and kept for 2 minutes. Next, the tomatoes are wiped and dried in the sun.
Wrapping with dry peat, paper, or fresh sawdust extends the shelf life of tomatoes.
The degree of keeping quality of a vegetable can be determined during the harvesting period: if it is easily picked, it will not last long. But a fruit that is difficult to pick will last a long time.
Description of virus infections with photographs
Tomatoes, if infected seeds are planted, can develop viral diseases. Since there are no effective control methods, you need to keep them in a 1% manganese solution before planting. It is also necessary to disinfect the soil - 2-3% of the same solution.
Aspermia
A bush that suffers from aspermia does not develop correctly. In appearance it becomes similar to corrugated paper. Its coloring is randomly patterned. There are few fruits, they are small.
Necrosis
Leads to necrosis:
- lack of light;
- abundant watering;
- excess nitrogen fertilizer.
The first signs are the appearance of small dark green cracks on the lower part of the stem; later, sprouts of aerial roots form in them. Then the leaves wither, the plant falls and dies. The fruits on it do not ripen.
The source of infection is diseased soil and seeds. The bushes need to be destroyed and the ground treated with a 0.2% Fitolavina-300 solution.
Mosaic
The danger of this disease lies in the fact that there is no treatment; prevention is needed. The reason is the use of infected seeds and planting seedlings in diseased soil. A symptom of mosaic is a patterned color in the form of dark and light green, intensely increasing spots.
As soon as they appear, the bush must be pulled out and disposed of, and the area must be treated with a special solution.
Procuring your own seeds
It happens when purchased seedlings or seeds cause disappointment during cultivation. You can avoid such situations by collecting your own seeds. You just need to collect them from varietal crops, and in no case from hybrids. In addition, homemade seeds have advantages over purchased goods:
- The agricultural technology of this variety has been tested through personal experience. The gardener has an idea of disease resistance and yield.
- Crops grown from domestic seeds are adapted to certain conditions.
- Self-collected seeds are of higher quality, as they are selected for themselves.
- The gardener is completely confident that the exact variety that is planted will grow.
Timing for seed procurement
In order for the seeds to be of high quality, they need to be harvested on time. This is done depending on the tomato variety, and in the middle of fruiting:
- Early varieties - end of July;
- Mid-ripening tomatoes - second half of August;
- Late tomatoes - early September.
These are approximate dates, since tomatoes ripen at different times in each region.
How to choose the right fruit for seeds
The most important thing is to accurately select the fruits. The first fruits will produce frail seedlings and the plants will yield a meager harvest. Last tomatoes can produce diseased plants. When choosing fruits, you should consider some nuances:
- The fruits are taken from the strongest and most productive crops;
- The selected specimens must correspond to the characteristics of the variety;
- The fruit must be formed from the main stem;
- The tomato on the bush should ripen completely.
Seed procurement technology
Having selected a high-quality fruit, you need to be able to prepare the seeds correctly:
- Make a cross cut on the tomato and remove the seeds with a spoon;
- Place the seeds in a glass vessel with a small amount of water, cover with a lid or film, and leave in a warm place for fermentation;
- After a couple of days, when mold forms on the surface, it is removed. Add water to the vessel and mix all the contents well. Pop-up pacifiers are removed;
- The settled seeds are washed and laid out to dry.
Seed storage
An equally important point is the correct storage of seed material. To preserve vitality, germination, and varietal qualities in grains, you need to learn the rules:
- Long-term storage of seeds involves placing them in paper bags. They can display all the necessary information.
- The packaged grains are placed in a box and stored in a dark, cool room.
There is no need to accumulate tomato seeds and store them for a long time - their shelf life is no more than 4 years. Further, the seeds lose their quality.
Bacterial diseases of tomatoes
Often, diseases of tomatoes in a greenhouse are caused by bacteria. The infection affects the entire crop in a short time. It is impossible to save the harvest.
Prevention of bacterial growth
Growers involved in growing tomatoes in greenhouses recommend taking the following preventive measures annually:
- seeds must be disinfected and treated before sowing;
- remove the topsoil every year and further disinfect the soil;
- if diseased plants were found in the greenhouse, they must be removed from the area and burned;
- Disinfect all tools that were used when harvesting diseased plants.
Tomatoes grown in a greenhouse may be infected with bacterial black spot or cancer. These infections, if control is not started in time, can destroy the entire crop. How to recognize bacteriosis?
How to identify black spot
Tomatoes can develop bacterial black spot during the hot season. Seedlings that have contracted this bacteriosis suffer greatly. The bacterium develops rapidly in hot weather; as the temperature drops, it freezes, but is not destroyed.
Black spot starts as small black spots on leaves
The disease affects the entire plant and manifests itself on the leaves. On their surface you can see many shapeless small brownish dots and spots. Over time, the spots turn black, merging into a large spot, and tissue necrosis begins. The plant, gradually turning black, dies, curling up and throwing off its leaves. Convex watery dots first appear on the surface of the tomatoes, which then turn into ulcers.
Tomato cancer caused by harmful bacteria
Cancer, caused by a harmful bacterium, is one of the common types of tomato diseases in the greenhouse. It is vascular. Infection begins with yellowing, wilting and curling of the lower leaves. Gradually, the bacterium rises and destroys the entire culture. Approximately a month after infection, the seedling dies. This is a characteristic feature of tomato cancer. Even an inexperienced gardener can identify the disease.
The fruits of affected plants become ugly, their seeds darken. Numerous dots and bubbles are visible on the tomatoes. Ulcers appear on the petioles, stems, and stalks, which eventually cause death and the fruits fall off.
If the bacterium has attacked an already mature tomato plant with ripening fruits, the harvest can be harvested. The disease will not affect the taste or appearance of tomatoes.
Infected tomatoes become covered with numerous dots and blisters
It is possible to save the harvest of tomatoes grown indoors if appropriate treatment is started in time. But it is better to prevent diseases of tomatoes in the greenhouse and carry out disinfection measures before planting, and inspect the bushes daily after germination. It is easier to fight a disease if the virus, bacteria or fungus is just beginning to develop.
Tomato blossom end rot, photos, causes and treatment
With insufficient humidity and excess hot air, liquid evaporates from the trunk and leaves. If the access of moisture through the roots is closed, then the plant begins to receive moisture from the fruits - this is how the disease develops.
Causes also include high soil acidity, excess nitrogen, and lack or excess of calcium.
Affected fruits should be removed immediately. The spread of the disease is prevented by saturating plants with calcium: calcium nitrate (10 grams per 10 liters of water) or potassium chloride (30 grams per 10 liters of water).
For greater efficiency, you can add boric acid (10 g per 10 l) to the solution.
Traditional methods:
- Spray with wood ash extract. You need 1 glass of ash, which is poured with boiling water and left for a day, then topped up with 10 liters of cold water;
- soda solution (20 grams of soda per 10 liters of water).