Description of the variety
The variety is early ripening, parthenocarpic (does not require insects for pollination), high-yielding. The stem of an adult bush during the fruiting period resembles a New Year's garland, densely dotted with greenery. All this, plus tolerance to cold weather, determined the name of the cucumber.
The bush is powerful, the internode is shortened, the leaves are medium in size. Zelentsy are small, from 5–8 cm, finely tuberculate, covered with non-thorny spines and white fluff. The color of the skin is dark green at the base, gradually becoming lighter towards the top of the fruit. It has a pleasant taste, without bitterness, the flesh is crisp and juicy, with a small seed chamber. The fruits do not outgrow.
In a node, in place of one flower, three or more ovaries are formed. The yield of the variety, with proper shaping of the bush, reaches up to 400 fruits per bush or up to 40 kg per 1 sq. m.
The first green plants appear 40–45 days after germination. When planted in late April or early May, cucumbers are harvested in mid-June.
The variety is excellent for cultivation throughout Russia, Ukraine, Moldova and Belarus. The main condition: not too cold weather, moderate climate, short drought, abundant watering and fertilizing.
Table: advantages and disadvantages of the Siberian Garland F1 variety
| Advantages | Flaws |
| High yield | High price |
| Early ripening and self-pollinating | When pollinated by insects, fruits are deformed |
| Long-term fruiting | Correct shaping of a bush into one stem |
| Doesn't outgrow | It is necessary to remove cucumbers once a day, otherwise fruiting will be inhibited. |
| High yield | |
| Great taste and versatility | |
| Adapts well to weather conditions | |
| Disease resistance |
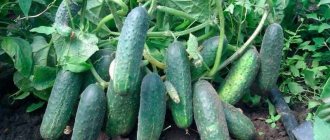
Photo gallery: cucumber Siberian Garland F1
Cucumber Siberian garland F1 on a trellis
Cucumber Siberian garland F1 in a greenhouse
The first ovaries of the Siberian Garland cucumber
Packaging of seeds Siberian Garland F1
Video: Growing cucumbers of the Siberian Garland F1 variety
Feedback from practitioners
The most important thing in growing this cucumber is to grow it strictly in one stem.
Remove all side shoots. And only when the whip reaches 220cm. it will be possible to let in whatever he wants. There are just tons of cucumbers. They are smooth, small, very juicy and sweet. The seeds are left over from last year, I'll try again. sel4anka
https://www.tomat-pomidor.com/newforum/index.php?topic=4264.0
Here is my Siberian garland.
According to the description, 5–8 cm, mine is larger, but it sheds a lot, although the potential is great. Doesn't like shading; higher up the bunches are more voluminous. Elena_
https://www.tomat-pomidor.com/newforum/index.php?topic=4264.40
This year I planted the Siberian garland f1 from the Ural summer resident.
I’m not happy with the harvest, there weren’t enough cucumbers, I didn’t like the taste, they were hollow when pickled. Natalia Khotkovo
https://www.tomat-pomidor.com/newforum/index.php?topic=4264.20
I planted the Siberian garland in 2014 and also “bought” the super yield.
My yield was no higher than that of my other cucumbers. In Sib girls, 3–4 ovaries grow simultaneously from their axils. In the picture the cucumbers are pimply, but in reality they are smooth. I don't like those. I liked the taste, the skin is thin, not “oaky”. As a salad variety, it’s not bad. But for the salad I plant Mama’s favorite from Gavrish (I like the taste and the PRICE is much cheaper than SG). I don’t want to try their other super-yielding varieties. Although, who knows, there is still a lot of time for planting. Marina Tula
https://www.tomat-pomidor.com/newforum/index.php?topic=4264.0
Seed selection and preparation
To obtain healthy adult cucumber bushes, always carry out pre-sowing seed germination: at the initial stage, you will be able to cull weak plants and lay a good foundation for the future harvest.
Preparation is carried out by soaking the seeds in a solution of a bioactivator and a disinfectant. This stimulates seed germination due to the receipt of microelements, which, in turn, will make it possible to protect the seedlings from a number of fungal diseases that affect the root system and young shoots.
Table: preparing seeds for germination
| Bioactivator | Dilution rate | Soaking time |
| Vermisol | Dilute with warm water in a ratio of 1:5 | 12 hours |
| Epin | 1 ml of the drug is diluted in 2 liters of water | 24 hours |
| Azotophyte | Dissolve 1 teaspoon in 500 ml of water, add 2 tablespoons of sugar, leave for 2 hours | 1.5–2 hours, dry for 4 to 8 hours |
| Zircon | 1–2 drops of the drug are diluted in 300 ml of water | 8–18 hours |
The soaked seeds are transferred to half a well-moistened napkin, covered and left in a warm place until the first sprouts appear. They appear in 1-2 days.
Another way to germinate seeds is to plant them in sawdust. The prepared seeds are laid on moistened sawdust. Cover the top with another layer of sawdust 1–2 cm thick and sprinkle it well with water. Place the dishes in a warm place until the cotyledon leaves appear, after which the seeds are transplanted into pots.
Transplanting cucumber seedlings must be done very carefully, together with sawdust, so as not to damage the root system and stem. If you don’t have the proper experience, it’s better not to experiment.
Sprouted cucumber seeds
Sowing seeds in the ground
Some gardeners prefer the seedless planting method, which is carried out when the soil temperature reaches 15°.
Before direct planting in open ground conditions, the seeds are kept in warm water for 24 hours. After this, they are treated with a solution of 1% potassium permanganate and the first shoots are expected.
The soil for cucumbers must be nutritious, so in the fall it is mixed with manure.
In the prepared area, lines are drawn at a distance of 15 cm. Seeds are placed in them every 50-60 cm to a depth of 1.5 cm and covered with earth.
The plantation is covered with film to provide greenhouse conditions and protect it from external factors.
Growing seedlings
The best period for planting cucumber seeds for seedlings is the end of March or the beginning of April. Thanks to this, you will protect the bushes from the “tricks” of spring weather and get an early harvest.
Sprouted seeds are placed in plastic cups filled with a soil mixture consisting of turf or forest soil, to which an equal amount of peat is added. To get a bucket of planting soil, add 1 tbsp. a spoonful of nitroamophoska and 3 tablespoons of earth. Remember - young roots need an active flow of oxygen, so the soil should be soft and fluffy. If your soil is lumpy and not granular, add 1 scoop of sifted sand to the soil bucket. The planting depth is 3–4 cm; after planting, the holes are filled with soil and the soil is carefully watered, trying not to get into the place where the seed is planted.
Approximately on day 5–6, the first cotyledon leaves will appear in the glass. After 3–4 true leaves appear, the plant begins to be fed. They are transplanted into the ground in the middle - end of May, when the danger of sharp spring frosts disappears. If they want to get an early harvest, seedlings are planted in greenhouses or greenhouses.
We recommend that owners of small garden plots use tunnel greenhouses. Structurally simple and easy to operate, they allow you to create a reliable shelter for seedlings.
It is very important not to outgrow the cucumber and transplant it into the ground in time. If the seedlings stretch out, the plant will weaken and begin to hurt.
Cucumber seedlings at 1 and 2 weeks
Seedless method
Cucumber seeds are sown in soil heated to 18–20 degrees; it is at this temperature that friendly shoots appear. If the soil temperature is below 16 degrees, the seeds die . Therefore, carefully monitor the weather conditions, even if during the day the air warms up to 20 - 25 degrees, but at night the temperature on the surface drops to 15 degrees - the cucumber will not grow.
The best period for sowing cucumbers in the soil is considered to be the end of May - the beginning of June. At this time, the soil is well warmed up, there are no frosts at night, and there is sufficient rainfall.
Cucumber grown without seedlings. Be sure to carry out hilling on the top sheet
Advantages and disadvantages
Cucumbers of this variety are distinguished by their endurance, productivity and excellent taste.
Table: positive and negative properties of cucumbers
| Advantages | Flaws |
| Good taste characteristics and universal use of fruits | Relatively high cost of seeds |
| Ability to thrive in adverse weather conditions | The yield declared by the manufacturer is achieved only if all the rules of agricultural technology are followed. |
| Fruiting before frost | The formation of new ovaries occurs with timely harvesting of ripened fruits |
| Resistance to cucumber mosaic, brown spot and powdery mildew | |
| Self-pollinating | |
| Precociousness | |
| High yield |
Planting scheme for non-seedling and seedling methods, trellis formation
An important feature of the Siberian Garland F1 variety is the formation of a trellis into one stem. This allows you to save space in the garden bed, while at the same time providing good lighting and fruiting. Seeds are planted at a distance of 5–7 cm from each other, there should be 12–15 cm between the rows. After the first shoots appear, they are broken through, leaving 10–15 cm between the plants. Seedlings are planted after 10–15 cm, the row spacing is 12– 15 cm.
The first 3–4 nodes of the Siberian garland are completely blinded (buds and ovaries are torn off), in addition, side shoots (stepchildren) are pinched to the very end of the trellis. Only the ovaries are left. When the cucumber reaches the top point of the trellis, the side shoots stop pinching, pinching off 5–6 leaves. The central stem, wrapped several times around the top of the trellis, is also pinched.
By blinding the cucumber to 5-6 leaves, you contribute to increased nutrition of the central stem. This promotes rapid growth, the plant develops organically and does not waste energy on fruiting. In addition, the survival instinct is spurred on, which contributes to a good harvest in later phases of development, and the cucumber forms a larger number of ovaries.
Cucumbers should be planted in shaded areas where there is shelter from the midday heat. It is advisable to choose a site so that in the morning the cucumber is well lit, and in the afternoon it is covered with tall plants (sunflower, corn, trees).
A shading net provides good shelter from the sun. The dimensions of its cell make it possible to reduce the intensity of sunlight, while at the same time not impeding its passage. The only drawback is its limited use over large plantations.
Video: how to properly shape cucumbers to obtain large yields
Photo gallery: ways to organize a cucumber trellis
Trellis net installed in the form of a hut
Cone cucumber trellis
Cucumber trellis on metal mesh
Hut cucumber trellis
Cucumber trellis on shingles
Cucumber trellis on wire
Cucumber trellis on mesh
Cucumber Royal Loop Garter
Methods for gartering a cucumber trellis
Harvest and storage
Siberian garland F1 is used both for preservation and fresh consumption
The first cucumbers can be picked in June (one and a half months after the sprouts appear). The harvest is harvested daily or with a break of one day. Longer intervals should not be taken, since in this variety new ovaries do not form until the ripe fruits are harvested . It is better to choose morning or evening time for this procedure, when cucumbers have the most elastic structure. A knife is used to cut fruits.
Important! When harvesting, it is undesirable to twist and pull the stalks, as well as turn the stems over, since this can injure the plant.
Cucumbers are stored in enamel containers, plastic or wooden boxes with holes at 5–10°C and humidity 80–90%. They can be placed in the refrigerator, cellar or basement. The shelf life is 1–2 weeks. You can increase this period using the following methods. The cucumbers are placed in sterilized jars, on the bottom of which chopped horseradish root is poured in a 2 cm layer. Then the containers are rolled up with lids. Another method is to apply protein foam to the fruits, with which the cucumbers are completely coated with a brush. Such methods will help extend the storage period to three months. Cucumbers can be eaten fresh, as well as salted, canned or pickled.
Organization of watering
When growing a cucumber, do not forget: this is a moisture-loving plant. The correct watering regime, especially for varieties such as Siberian Garland F1, which do not like extreme heat, ensures not only the supply of moisture, but also becomes the key to a complete supply of microelements.
In hot weather, an adult plant consumes up to 3 liters of water. In less intense heat up to 2 liters. By properly regulating watering, you will not only save the cucumber from drying out, but also from various diseases that affect the root system .
The organization of drip irrigation helps to distribute moisture well. In small areas, plastic bottles with the bottom cut off and suspended above the cucumber bush are used for these purposes. By making holes in the walls or lids, they ensure a continuous flow of moisture under the root. Another way to regulate the water flow is to open the lid slightly so that the water flows freely. And although it is quite difficult to get drops, the water flows gradually and, evenly wetting the soil, does not spread over the surface.
In large household plots where many bushes are grown, a pipe-tape system helps automate watering. It consists of:
- water tank;
- drip tape or pipe for supplying moisture to the roots;
- fittings for organizing branches;
- taps and mini-taps to regulate the flow of water through tape or pipes.
The advantage of such a drip system is the ability to control the flow of water and its heating; The disadvantage is that plants located closer to the water reservoir receive more moisture.
Photo gallery: organization of drip irrigation
Drip irrigation scheme for a summer cottage
Pipe drip irrigation system
Self-watering using plastic bottles
Scheme of homemade drip irrigation from plastic bottles
Drip irrigation of a small garden bed
Advantages and disadvantages
The hybrid Siberian Garland has many advantages. These include:
- precocity;
- long fruiting period;
- high productivity;
- versatility;
- resistance to adverse climatic conditions;
- resistance to common diseases.
See also how many days do cucumber seeds sprout after sowing: reasons for the lack of sprouts
The variety also has disadvantages. Vegetable growers include the need to shape bushes and negative changes in the shape of fruits due to pollination by bees.
Fertilizing
When starting to feed a cucumber, remember that at different phases of its development a special “diet” is needed. As it grows, it needs a comprehensive supply of chelates, metals and mineral salts. At the beginning of the formation of green mass, potassium is needed more; when it begins to bear fruit, the plant needs nitrogen more. The latter is especially relevant in view of the high productivity of the Siberian garland, so, having received the first fruits, feed the cucumber with fertilizer containing a large amount of nitrogen and phosphorus: this will stimulate the formation of new ovaries in the axils. But potassium is needed for their successful growth.
Table: fertilizers for cucumber
| Fertilizer | Preparing fertilizer | Application method |
| Chicken droppings | 50 grams of chicken manure are diluted in 10 liters of water. Mix well and leave to ferment for 10 days. | Root feeding |
| Manure | 1 kg of rotted manure (2-3 years old) is diluted in 10 liters of water | Root feeding |
| Wood ash | Throw a scoop of ash under the root before watering, once a season. Or prepare mash: 1 tablespoon of ash per 10 liters of water | Root feeding |
| Humate fertilizers | 200 grams of concentrate are diluted in 10 liters of water | Root and foliar feeding |
| Chelated fertilizers | 25 g of powder is diluted in 10 liters of water | Foliar feeding |
Feeding the cucumber is carried out at intervals of 10–14 days from the day of the previous feeding. In case of an excess of microelements, “fatification” begins . Its first signs: cessation of ovary formation, increased growth of green mass, leaves acquire a rich dark color and become lumpy. In this case, stop watering, add a small amount of sawdust under the root and dig in.
Table: signs of deficiency and excess of microelements in cucumbers
| Microelement | a lack of | Elimination | Zhirovka | Elimination |
| Iron and copper | Chlorosis - the plant turns yellow, the leaves become smaller, growth slows down, and the buds fall off. | Add chicken manure and spray with chelated fertilizers | The leaves are covered with brown spots, and interveinal chlorosis appears on young leaves. | Stop treatment with copper and iron sulfate. |
| Manganese | The leaves are richly dark green, curled, and covered with tubercles. | Spraying with chelated fertilizers | On old leaves, interveinal chlorosis forms and becomes covered with brown spots. | The soil is too acidic. Add lime, dolomite flour, chalk powder, and mulch. |
| Potassium | Yellow border along the edge of the leaf, pear-shaped greens | Apply humate fertilizers, compost infusion with ash, spray with chelates | The leaves become covered with white spots, the internodes are elongated, the foliage withers, and the plant dies. | Stop feeding the plant and watering. |
| Nitrogen | The cucumber leaves turn pale, the upper ones turn yellow, the lower ones fade, the stem becomes thinner, gradually drying out, the tips of the greens become pointed. | Add chicken manure and mullein solution. Spray with chelated fertilizers and humates. | The plant stops bearing fruit. The leaves and stem are dark green. | They stop feeding and watering. Sawdust is added to the root and mixed with soil. |
| Magnesium | The leaves fade, become thinner, the lower ones are covered with yellow spots, the green color remains only on the veins. | Spray with chelated fertilizers | Curled leaves darken. The roots die and the cucumber dies. | Stop watering. Add chalk, lime, dolomite flour |
| Bor | The ovaries and side shoots die, the flowers fall off. | Foliar feeding with chelated fertilizers. | The edge of the leaf dies and the leaves become dome-shaped. | Stop feeding |
| Phosphorus | The ovaries and buds fall off. The lower leaves turn yellow and die. | Spray with chelates. When watering, phosphorus-potassium fertilizers are added to the water. | The leaves are dying. | Feed with potassium fertilizers, which do not contain phosphorus. |
| Sulfur | Cut sheet plate. Leaves change color. | Spraying with chelated fertilizers. | He's being rude. The leaves become grayish-brown. Covered with growths of “scales”. | Stop feeding. |
| Zinc | The leaves are uneven and yellowed. | Spray with chelated fertilizers, and apply zinc sulfate at the root. | The leaf near the veins becomes discolored. | Stop feeding. |
Signs of microelement starvation in cucumber
Garden bed care
To get a good harvest, you first need proper care, which includes following the watering and fertilizing regime.
Among the main plant care measures necessary for good growth and a rich harvest, it is worth highlighting:
- regular watering with exclusively warm water;
- fertilizing cucumber bushes once every 2 weeks;
- regular loosening and weeding of the soil to provide the roots with oxygen;
- mulching beds;
- using trellises to facilitate cucumber care and harvesting;
- treatment of bushes from diseases and pests;
- formation of Siberian garland cucumbers into one stem;
- protection of beds from the wind.
Using trellises for growing cucumbers Siberian Garland
Proper watering
Cucumber is a moisture-loving crop, so it needs to be watered regularly, but following certain rules. Each stage of development requires its own watering scheme, for example:
- At the early stage of development and before flowering begins, watering is carried out as needed - every 45 days.
- During the period of ovary formation, the amount of watering must be increased. At this time, the beds are watered every 23 days.
- The location of the beds must also be taken into account: those located near walls or fences dry out much faster.
- You should not water cucumbers in hot, sunny weather, as this can cause the plants to burn. It is best to water the beds in the evening.
- Water must be poured under the bushes carefully so as not to damage the root system, which is very close to the surface of the earth.
- Watering should be carried out only in warm weather; at low temperatures, the root system may rot.
- Evening “rains” from a watering can have a good effect on plants. To further increase air humidity, you can place containers with water or an infusion of nettle, burdock and dandelion leaves between the rows.
Feeding cucumbers in the garden
Cucumbers, like any other vegetables, need fertilizing for the growth of the bush, as well as for the formation of a full-fledged harvest. When fertilizing cucumber beds, it is important to remember that such activities must be carried out in accordance with the instructions based on the calculation of 56 fertilizing per season.
Table: feeding seedlings and bushes
| Application period | Compound |
| For seedlings | |
| When the first true leaf appears |
|
| Formation of the second sheet | Solution: mineral complex fertilizers Nitrofoska or Kemira Lux - 1 tbsp. l. on a bucket of water. |
| Two weeks after the first feeding | Solution: water (10 l) + urea (15 g) + potassium salt (10 g) + superphosphate (40 g). |
| For bushes | |
| After landing in the ground | Solution: mineral complex fertilizer Aquarin or nitrophoska: dilute 1 tbsp. l. in 10 liters of water. You can add a glass of mullein, diluted in a ratio of 1:10, or bird droppings - 1:20, to the prepared solution. |
| 14–15 days after disembarkation | Solution: 10 liters of water + 0.5 liters of mullein. |
| Flowering period |
|
| Active growth phase of cucumbers | Root feeding - solution: urea (40 g) + water (10 l). |
| Fruiting period is once every 2 weeks |
|
The main rule that should be followed when fertilizing cucumbers is to fertilize only after abundant watering, in warm weather.
At any stage of growth, you can use ash by preparing a solution from it: 1 cup of ash per bucket of water. This composition is used once a week throughout the season.
In order for plants to gain weight faster, it is advisable to use organic fertilizers, for example, cow manure, pre-infused for two weeks and diluted with water (1:5) before use.
Typically, cucumbers are fertilized with organic or complex mineral fertilizers, which are best alternated.
Sometimes the plants themselves can tell you what they are currently missing:
- Pale fruits with a thin, curved end indicate a lack of nitrogen.
- The pear shape (thick end near the flower) indicates a lack of potassium.
- Any distortion of the cucumbers themselves indicates a violation of the watering regime or the use of cold water.
Diseases and pests of the Siberian Garland F1 variety
The variety is resistant to cladosporiosis, mosaic virus, powdery mildew, and does not tolerate downy mildew and anthracnose. It is subject to attacks by typical cucumber pests: spider mites, aphids, thrips. The best way to protect a plant from pests and diseases is preventative treatment. For this purpose, folk and chemical plant protection products are used.
Table: signs of cucumber damage, prevention and treatment with folk remedies
| Pest disease | Signs | Method of treatment and prevention |
| Downy mildew | The leaves are covered with yellow spots, a gray coating with black dots of fungal spores appears below, and the plant dries out. | Spraying solutions: urea is diluted with water in a ratio of 1:10; 3 liters of sour milk per 10 liters of water: Bordeaux mixture - 10 liters of water mixed with 100 g of copper sulfate and 100 g of lime |
| Anthracnose | The stem, leaves and fruits are covered with brown spots with a depressed surface. | Spray with Bordeaux mixture. The affected areas are sprinkled with charcoal, lime or chalk powder |
| Aphid | The inside is strewn with a colony of black or green insects. The leaves of the plant curl. | Spray with solutions: Add 1 kg of grass to 10 liters of water and infuse; 200 g of ash are diluted in 10 liters of water, 50 g of planed laundry soap are added |
| Slugs | Silvery marks on leaves, stems and soil. The surface of the leaf is covered with holes, the stems are eaten up and fall. | The soil is sprinkled with lime, ash or salt. |
| Spider mite | The leaves are entangled in a cobweb, under which there is a colony of small insects - mites. | Treat with a solution of ash and laundry soap |
| Thrips | They gnaw the leaves and suck out the juices. | No |
Photo gallery: diseases and pests of the Siberian Garland F1 variety
A cucumber leaf affected by peronosporosis. A cucumber brush affected by aphids. Thrips and their larvae.
Cucumber leaf with a spider mite colony
Slug eats leaves
Slug eggs
Gray spore coating on the back of the leaf
Cucumber affected by anthracnose
When using chemical methods of protection as preventive measures, do not forget that these are contact-intestinal poisons, therefore, when fresh, they pose a danger to all living organisms. Their use must be strictly regulated and carried out according to the schemes proposed by the manufacturer.
Table: treatment with chemical protective agents
| Stages of cucumber development | Disease, pest | A drug |
| 3–4 sheet | Downy mildew | Quadris 6 g is diluted in 5 liters of water or Previkur Energy 1.5 ml per 1 liter of water |
| 6–8 sheet | Downy mildew, aphids, spider mites | To 5 liters of water add 6 g of Topaz, 25 g of Ridomil Gold, a packet of Vertimek 018 EC; or Aliet 25 g per 10 liters of water and Confidor 1 g per 10 liters of water |
| 10–12 sheet | Downy mildew | Ridomil Gold 25 g per 10 liters of water or Previkur Energy |
| Budding and flowering | Downy mildew | Quadris or Infinito 12 ml per 10 liters of water |
| Beginning of fruiting | Aphids, downy mildew, anthracnose | Infinito + Confidor or Quadris Actellik 12 ml per 5 l |
| Fruiting | Downy mildew, anthracnose | Infinito or Quadris |
The waiting period between processing and the start of fruit harvesting must be observed. Failure to comply with them can lead to fatal consequences.
Harvest and storage
The variety's high ability to bear fruit requires the gardener to take a careful approach to harvesting, which is harvested once a day, and with a very large harvest - 2 times. Fruits that have reached 8–9 cm are considered ripe. Leaving cucumbers for a long period does not risk getting overgrown fruits, but there is a risk of continued fruiting. Greens that are not collected in time blunt the formation of new cucumbers.
The fruits of the Siberian garland can be stored for up to 10 days, in basements at a temperature of 7 to 10 degrees and a humidity of 75–90% for up to two weeks. Transportable well, great for canning and fresh consumption.
Landing rules
Features of soil preparation
Before planting cucumbers, the soil must be prepared and fertilized.
A semi-shaded area is selected for cucumbers. When exposed to direct ultraviolet rays, the plant dries out and its yield decreases. The predecessors of cucumbers can be tomatoes, corn, potatoes, beans or peas .
Important! It is not recommended to plant the plant after the pumpkin family crops. It is better to start preparing the site in the fall.
The top layer of soil is removed from the garden bed, then straw, sawdust or peat is poured to a thickness of 10 cm, after which the soil is laid in a layer of 20 cm. The plant material overheats during the winter and turns into fertilizer. Dolomite flour (300 g per 1 m2) is added to highly acidic soil. In the spring, a week before planting, the area is covered with film.
There is a faster way to prepare. In the fall, the soil is dug up with the addition of rotted manure (a bucket of fertilizer is needed per 1 m2). With the onset of spring, repeated digging is carried out.
If it is not possible to prepare the site in the fall, this can be done a few days before planting. The beds are dug up, a layer of compost or rotted manure 10 cm thick is poured, and wood ash (1 liter per 1 m2) or Nitrophoska (100 g per 1 m2) is added on top. The soil is watered and covered with film for 10 days.
Seed preparation
Seeds are prepared by hardening and disinfection
Siberian garland F1 can be grown either by seedlings or without seedlings. Regardless of the chosen method, it is necessary to disinfect the seeds. But first you should choose high-quality planting material. To do this, use a saline solution (40–50 g of table salt per 1 liter of water). Seeds suitable for planting will remain at the bottom, while empty ones will float to the surface .
It is advisable to use two-year or three-year-old planting material. One-year-old seeds can also be used, but they must be preheated for 3 hours at 60°C.
The next stage of preparation is disinfection. Planting material is immersed for 12 hours in a solution prepared on the basis of 1 liter of water, 1 tsp. ash and a similar amount of Nitrophoska.
Features of cultivation
Siberian Garland cucumbers are grown both by seedlings and by direct planting in the ground
To grow seedlings you will need to do the following manipulations:
- At the end of March or the first ten days of April, seeds are planted in containers measuring 10x10 cm, filled with a composition of sawdust, humus and peat (1: 2: 2). They are placed in the substrate to a depth of 1.5–2 cm.
- After this, the cups are covered with film and placed in a room with a temperature of 25°C. It is advisable that the containers should not be exposed to direct sunlight. Every 3-4 days, the seeds need to be watered (by spraying from a spray bottle).
- When seedlings appear, the temperature is reduced to 20°C.
- The film should be removed, but it is better to do this gradually. First, it is removed for 10 minutes a day. Then the time is increased and until the first leaves appear, they are completely removed.
- Plants begin to harden 8–10 days before planting. To do this, cucumbers are taken out into the open air every day, where they should remain for 2–3 hours.
- Plants are planted in the garden bed in May, when the soil warms up to 15°C. Holes are dug at a distance of 50 cm, 5 g of urea and handfuls of ash are poured into each of them.
- The seedlings are buried to the lower leaves. The soil is watered twice. The first time this is done before landing, the second time after its completion. You will need about 0.5 liters of water per hole.
With the seedless method, the seeds are planted every 6–7 cm, leaving a space of 20 cm between the rows. The depth level is 5 cm.