In conditions of lack of free space, lean-to greenhouses are erected on the site with their own hands within 1-2 hours. The mobile and durable design is suitable for use during the spring and summer season. The construction will protect the seedlings from wind and precipitation. If the greenhouse is located near the house, then it will be equipped with a heating system, lighting and plumbing. The greenhouse, which is planned to be used for 365 days, is equipped with a temperature control system. The list of disadvantages of 1-slope structures in botany includes the inability to use them for growing tall crops.
Pros and cons of a wall greenhouse
There are a sufficient number of positive aspects of the wall-mounted greenhouse, namely:
- Space saving, since this greenhouse is attached to one of the walls of the house.
- It does not require a large amount of materials, so in the end the costs are not too significant.
- Easy and simple to install.
- Quite durable, especially if you place the greenhouse on the south side to provide maximum protection from strong winds.
- If desired, you can make an entrance from the house, which will be more convenient and will also allow heat from the house to enter the greenhouse.
You can connect the greenhouse to a central heating system and will not need to install heating devices.
Despite a significant number of advantages, a wall-mounted greenhouse also has some disadvantages, which should definitely be taken into account:
- The size of the greenhouse directly depends on the size of the wall to which it will be attached.
- Due to the wall of the house, there will be shade in the greenhouse and not so much sunlight will pass through.
- The choice of material for building a wall-mounted greenhouse depends on the architecture of the house.
Preparing the site and laying out the foundation
It's time to get down to work and pick up the tools. Follow the step-by-step preparation of the site for building a greenhouse with a pitched roof.
Step 1. Mark the area around the perimeter of the walls of the future structure. To do this, use pegs or pieces of reinforcement and a stretched rope.
Marking the selected area
Step 2. Remove debris, stones and foreign objects from the site and surrounding area.
Step 3. Clear the construction site of tall vegetation, and the interior of the future greenhouse of grass.
Step 4. Build a site for building materials. Protect them from possible rain with a canopy or, at a minimum, a plastic sheeting.
Step 5. Set up a workspace to prepare frame elements. It should be smooth and clean.
Timber foundation
The type of foundation for a lean-to greenhouse depends on the purposes for which it is being created and the approximate weight of the future building. For lightweight structures designed for use only during the summer season, a simple structure made of timber is sufficient, step-by-step instructions for creating which are given below.
Timber foundation
Prices for wooden beams
wooden beam
Step 1. Dig a trench according to the previously applied markings. The depth and width must be equal to the cross-section of the timber used.
If possible, you can use special equipment
Step 2. Level the walls and bottom of the trench, fill 30-50% with sand or gravel.
Step 3. Measure and cut the required amount of timber with a section of 100x100 or 150x150 mm. Treat it with an antiseptic.
Advice! For the base for the greenhouse, choose larch timber - it has high strength and resistance to moisture.
Step 4. At the work site, connect the timber into a single box of rectangular cross-section. Fastening can be done either using corners and self-tapping screws, or with dowels, a “claw” or “half-tree” connection.
Laying timber in a trench
Sectional view of timber foundation
Step 5. Together with your assistants, lay the timber box in the trench, level it horizontally using a level and supporting planks, earth or stones.
Corner joints for timber trim
Step 6. The timber foundation must be securely fixed. To do this, you can either drill holes in the wood and drive metal pins at least 0.5-0.7 m long into the ground through them, or install the same ones, but at the inner corners of the structure.
Shallow strip foundation
A more complex and expensive option is a shallow strip foundation. Its use is justified when it is planned to build a heavy winter greenhouse. In addition, a strip foundation has a longer service life than a timber structure.
Scheme of a shallow concrete strip foundation
Step 1. According to the markings, dig a trench 50-70 cm deep and 25-30 cm wide.
Stages of forming a strip base: schematic representation
Step 2. Level the walls of the trench and compact the bottom.
Step 3. Fill the trench one third with sand, gravel or a mixture of them in a 1:1 ratio and compact it.
Step 4. Build formwork from plywood or boards; its final height above the ground level should be 5-20 cm.
Construction of a foundation for a greenhouse
Step 5. Prepare a concrete solution of grade M200, M300 or M400.
Step 6: Start pouring the concrete. Reinforcement can be installed beforehand or during the process to increase the strength of the foundation. After the mixture reaches the edge of the formwork, level it. Insert fasteners for anchor bolts at intervals of 1-1.5 m so that they are located between the future vertical posts of the frame.
Pouring concrete
Step 8. Cover the freshly poured concrete with plastic wrap and moisten it with water for 3-5 days.
Step 9. Remove the film and let the strip foundation gain strength. Duration – 2-3 weeks, depending on the weather and depth of the trench.
Step 10. Dismantle the formwork and cover the concrete strip with a layer of roofing material. Additionally, you can make a base, which also acts as a heat insulator for the soil and the lower part of the greenhouse.
Ready-made strip foundation for a greenhouse
Advice! In addition to a foundation made of timber or concrete, a greenhouse with a pitched roof can be built on stilts.
Types of wall greenhouse
A wall-mounted greenhouse can be built in different variations, so there are several types that have their own characteristic features and nuances in construction:
End
Such a greenhouse, in principle, can have any shape, but its end must rest against the wall of the house. As a rule, such greenhouses are small in size and equipped with an entrance from the house. The length of the end greenhouse does not depend on the wall of the house, but on personal preferences and the area of the site.
Polygonal
It is considered the most beautiful type of wall greenhouse. In most cases, this type of greenhouse is used to design a winter garden, since they are not very practical in their use. Typically, a polygonal wall greenhouse uses a metal or wood frame and glass as a covering.
Single-pitch
One of the most common and practical types of wall-mounted greenhouses. This greenhouse has a simple and economical design; in most cases, the entrance is located on the side. In appearance, a lean-to wall greenhouse resembles a standard gable greenhouse, but cut in half.
Semi arched
You could say it’s similar to a lean-to greenhouse, but the design is a little more complicated and there are a significant number of bent elements. As a rule, polycarbonate is used as a covering for such a greenhouse.
With entrance from home
One of the practical types of greenhouses, which is also easy to use. It is worth noting that such a greenhouse can be equipped with only one entrance from the house or an additional one from the street.
Design Features
One side of such buildings is adjacent to the wall of a brick house, garage or barn.
Brick is not as susceptible to moisture damage as wood. It dries faster and does not rot if the joints and the entire surface are treated with special hydrophobic agents Siloxyl or Funcosil. These preparations are environmentally friendly, water-repellent and not harmful to animals and plants. The general appearance of a lean-to greenhouse resembles the solid structure of a free-standing greenhouse, but as if cut in half along its length. The gardener himself selects the material for the construction of the extension:
- wooden frames made of timber or boards:
- polyethylene pipes;
- metal corners or fittings;
- entire window frames with glazing and vents.
Coating materials are also varied:
- glass;
- cellular polycarbonate;
- PVC film;
- a combination of all the mentioned shelters.
The type of construction depends on the material chosen. The roof of wooden greenhouses made from timber and structures made from old windows has the shape of a right triangle. Its highest part is adjacent to the blank wall of the fence. The presence of opening windows is convenient for ventilating the greenhouse space.
The roof of polycarbonate greenhouses can be built similarly or be rounded in the form of a hemisphere. Polyethylene film covering is used for many types of extensions.
Wall greenhouse frame
You can make a frame for a wall-mounted greenhouse from the following materials:
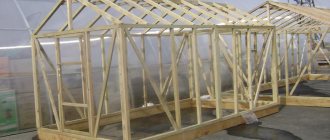
- Wooden beams are one of the available materials that can be processed very well. When creating a wooden frame for a wall-mounted greenhouse, it is necessary to build the upper and lower supports, and then the slopes and the door frame. When creating a frame from this material, you can use various fastening elements, but all cracks should be well sealed with tow.
- Profiled pipe is a sufficiently arched material to form the frame of an attached greenhouse. As a rule, pipes measuring 40 by 20 mm are used to create the frame, and pipes of 20 by 20 mm are used to connect them. The most suitable option for fastening this frame is considered to be welding and the structure must be assembled from the end walls.
- PVC profile is one of the simplest and lightest materials for creating the frame of an attached greenhouse. The frame made of this material is quite resistant to loads, but requires fixation, as it may not withstand strong gusts of wind.
Polypropylene pipe is one of the most popular materials for building the frame of a wall-mounted greenhouse. The material has a high level of flexibility, is light in weight, but is quite difficult to attach to a concrete surface.
Construction plan development
Construction of a lean-to greenhouse is not a difficult task, but the gardener should not relax. Detailed planning is the key to quick and successful completion of work. First, they look for a place on the site where they will put the greenhouse. The structure is located near the southern wall of the building, which already exists. The choice of the other 3 sides of the horizon is not made, otherwise the seedlings will not receive a sufficient amount of sunlight.
On a note! A greenhouse is a source of permanent humidity. It should not be attached to a wooden wall.
Covering a wall greenhouse
Any of the following materials can be used as a covering for a wall-mounted greenhouse:
- Polyethylene is the most inexpensive material that can be used to cover a wall-mounted greenhouse. Reinforced polyethylene film is considered the most practical and durable for this purpose. It is worth noting that this material protects plants well from sudden changes in temperature and precipitation, but it collects condensation inside the greenhouse, does not allow air to pass through, and is not very durable to use.
- Glass is one of the durable materials and transmits sunlight well, so it is often used as a greenhouse covering. At the same time, it is worth considering that this material is too fragile, heavy in weight and has a fairly high price.
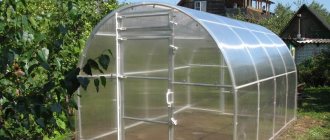
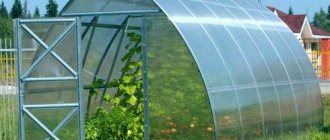
Cellular polycarbonate is the most practical option for covering a greenhouse, as it is durable and resistant to stress. Also, this material perfectly transmits sunlight, has good thermal insulation, is easy to process and bends.
Among the disadvantages, it is noted that polycarbonate has a high cost and can become deformed over time due to temperature changes.
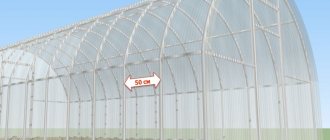
Installation of polycarbonate sheets
Immediately after unpacking the polycarbonate sheets, remove the protective film on the edges. Markings are applied on top of the material. Then cut using an electric jigsaw. At a distance of 35 cm from the edge of the sheet, holes are drilled for thermal washers. The further procedure is as follows:
- in the upper part the sheets are sealed with sealing tape, and at the bottom they are sealed with perforated tape;
- the end profile is installed taking into account the thermal gap;
- when fixing polycarbonate sheets to wood, do not over-tighten the sheets;
- polycarbonate sheets are applied to the frame (the stabilizing coating faces outward) at those points that were previously marked;
- thermal washers are inserted into the holes and screws are tightened;
- polycarbonate sheets are overlapped;
- proceed in the same way with the remaining sheets and roof;
- remove the protective film.
On a note! For work, you need sheets with a thickness of 4 mm and a length of 6 m.
Making lean-to greenhouses yourself does not require any construction skills. The key to success will be a well-developed plan. It takes into account the climatic features of the site, the nature of the soil, which, in turn, will affect the required type of foundation and the duration of use of the structure.
The best wall greenhouse models
If there is no desire or opportunity to build a wall-mounted greenhouse yourself, then you can buy a ready-made one in disassembled form and just assemble it.
Below are the manufacturers and best models of greenhouses that can be used as wall-mounted ones:
Greenhouse "Gardener Pristenok-Reinforced"
A high-quality lean-to greenhouse, it can be used for an extension to the wall of a house or a fence. This greenhouse has 2 doors and end windows, is covered with polycarbonate, and the frame is made of galvanized metal.
Greenhouse Green Storage G1002F
A popular greenhouse, which can be either wall-mounted or standard type. This greenhouse is equipped with a sliding door and 2 windows on the roof. The frame of the greenhouse is made of aluminum and covered with cellular polycarbonate.
"Wall" Very Strong
One of the most durable and durable wall-type greenhouses. The frame is made of galvanized steel pipe, and the coating is polycarbonate with protection from direct sunlight. This greenhouse model has 2 doors and windows.
Benefits and losses
Before construction begins, owners evaluate many nuances: choice of location, purpose of using the greenhouse, suitable materials.
| pros | Minuses |
| Small sizes | Lack of usable space (for experienced gardeners) |
| Small area for basic training in plant care (for beginners) | Loss of natural light. The sun's rays do not illuminate all areas of the greenhouse |
| Separate room for growing seedlings | Proximity to a residential building. Risk of damage to building communications |
| Savings on building materials, heating, lighting and automatic irrigation systems | — |
| Protection of the extension from wind and cold from the side of the main wall | — |
| The stability and reliability of the entire attached structure is ensured by fastening to the wall | — |
Advice! Wooden walls that will serve as an extension to the greenhouse should be treated with protective agents against moisture penetration. This will increase the service life of the greenhouses and will preserve the wood from rotting for a long time.
Photo of a wall greenhouse
We install windows and doors in a gable polycarbonate greenhouse
Beginners should remember that the most difficulties arise at the stage of forming the entrance group and windows. If in the case of a rectangular single-slope polycarbonate greenhouse everything is simple, then the 2-slope version requires much more time.
Greenhouses with a gable roof in their design resemble 2 lean-to ones, connected into one by their rear walls
To begin with, a preliminary drawing is made that takes into account the need for windows. They need to be placed in such a way that the incoming light is distributed evenly inside the building.
In this case, you need to remember one very significant “but”. Installed windows should not interfere with the strength of the roof.
Some of the recommendations below will help you avoid problems:
- In order for the gable structure to last longer, it is necessary to think about a forced ventilation system for large areas;
- An important role in determining the location of the future window is played by the angle of inclination of each roof slope;
- In the standard configuration, installation is carried out exactly in the middle, and if the angle is larger or smaller - in one of the corners;
- Gable greenhouses with identical geometry of the upper part allow the installation of no more than 2 window openings located opposite each other.
What you need to know before starting work
Before you start arranging a greenhouse, you need to pay attention to the following factors:
- It is advisable to erect the structure on the south side of the main building. This is necessary to ensure that the room has the maximum amount of heat and minimum cold throughout the year.
- Greenhouses attached to a home are very demanding on the environment. If the southern part is occupied, then it is necessary to choose a place that will be exposed to the sun for the longest possible time during the day and protected from winds from the sides.
- The frame must be constructed from lightweight materials - aluminum, plastic or wood.
- You should not start a project if the supporting wall is made of sand-lime bricks or gas silicate blocks.
Wooden greenhouse according to Mittleider + drawing
Jacob Mittlider is an American vegetable grower, agricultural consultant and expert, and a Doctor of Agricultural Sciences. He developed a special greenhouse design, which was named after him “Doctor Mittleider’s Greenhouse.” It is characterized by the strength of the frame, excellent ventilation, and the correct microclimate. You can also make such a greenhouse yourself, including from wood.
In the drawing you see a wooden greenhouse with transoms. The support beams are made of beams with a cross-section of 10*10 cm, the elements of the rafter system are 5*7.5 cm, the window transom frames are 5*5 cm. Film or polycarbonate can be used as a covering material.
Greenhouse below ground level
Reviews:
El Earthly
writes: Hello! Please tell me how you did the waterproofing from groundwater.
Leonid Orlov
writes: In my greenhouse (I’m building it now) there’s a plus to this solution:
Imran Dadakaev
writes: well done
Stepan Andriyovich
writes: I understand that the passage is 80 cm below ground level, and the peephole is 50?
Rose Rose
writes: Where are you located, in what region?
The roof of such a greenhouse can be of any shape, but, from a practical point of view, the lean-to version has a huge number of advantages. Also, this greenhouse can look like a temporary (not serious) structure with stretched plastic film on a frame made of pipes or wood beams. If you take the matter seriously, then it is better to spend a little more time, building materials, in order to make a reliable, aesthetically pleasing greenhouse that will last you more than one year. According to summer residents and gardeners, the most successful and convenient option is a wall-mounted greenhouse with a pitched roof made of polycarbonate.
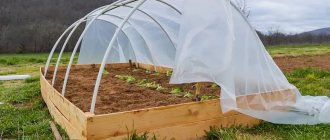
Project of a lean-to film greenhouse
You are using an outdated browser. This and other sites may not display correctly. You need to update your browser or try using a different one.
Impregnations, paints, oils, waterproofing from FORUMHOUSE
FORUMHOUSE turns 15 this year! During this time, millions of people have built their own homes thanks to the knowledge gained from our website. We want only high-quality and safe materials to be used during construction, which will help preserve houses for many decades. Therefore, we have launched a project of our own FORUMHOUSE brand, under which we will produce building materials and equipment that will serve you for many years and make your life in your own home more comfortable and safer.
We started this project with paints and varnishes for wooden surfaces. Last year, hundreds of forum members have already tested and given positive feedback about our protective and decorative impregnation for wood. Now we have a full range of products for wooden houses (impregnations, paints, oils, varnishes and waterproofing).
In this topic, we will be happy to advise you and select the best solutions for painting your home!
Best regards, FORUMHOUSE team.
Participate in the chronicles of suburban self-isolation with FORUMHOUSE
Sitting at home outside the city is cool: you can walk on your property as much as you want without consequences, and you can also make repairs, sort out the rubble in the attic, take care of the garden, organize a vegetable garden, make a workshop, build a bunker in case of the apocalypse, in general, whatever you like. We are sure that many of you will have a list of achievements during quarantine, and we really want you to share them, supporting and inspiring forum members.
Take part in our “Staying at Home” project and you can receive a powerful cordless saw as a gift!
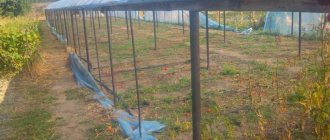
Size calculation
The wooden structure of the greenhouse allows it to be made in any size that is suitable specifically for your site. There are several calculation rules that should be followed when constructing a structure to increase its strength and reliability:
- Tall crops require a wall height of at least 2 m.
- Load-bearing beams require fixing in the ground by digging them to a depth of 50 cm; they should be placed along the perimeter of the future greenhouse at least every 1.5 meters.
- If you are planning to build a gable greenhouse, then it will need to be strengthened with the help of additional beams that are dug into the center of the greenhouse from the inside. Their height is approximately 3.3 meters, and the spacing is 2.5 meters.
- If you plan to use film as a covering material, then you need to make additional wooden fastenings along the end parts of the greenhouse.
- On top, along the entire perimeter of the frame, bars are attached, which will serve as a supporting structure for the future roof.
- Rafter pairs must be attached strictly to the supporting structures of wooden walls.
- If your greenhouse is small, then it is enough to make one door opening and a window, but in a large-scale building, for better ventilation you need to provide two entrances.