In order to get a good harvest of tasty tomatoes, you need to take proper care of the plant not only during the seedling period, but also after planting the tomatoes in a greenhouse or soil. Read below about how to properly plant seedlings and what to do next.
Before planting tomato seedlings, you need to select the best seedlings with a strong root system and strong shoots. Landing is carried out in the late afternoon or in cloudy weather. It is important that by this time the soil at the root depth has warmed up to 10-15°C (to measure the temperature, you can take a regular thermometer and place it in the ground for a short time). If the soil temperature is lower, the seedlings will not take root, and if the soil cools down to 2°C, the plants will die.
Time for planting tomato seedlings
In the middle zone, the optimal time for planting tomato seedlings in a polycarbonate greenhouse is considered to be May 1-15. Tomatoes are planted under film shelters on May 20-31, and in open ground on June 10-20. The main thing is to be sure that frost will not return.
To calculate the time for planting tomato seedlings, you need to start from the variety you have chosen:
| Optimal age of tomato seedlings for planting in the ground or greenhouse | |
| Early ripening varieties | 40-50 days |
| Mid-season varieties | 55-60 days |
| Late ripening varieties | 70 days |
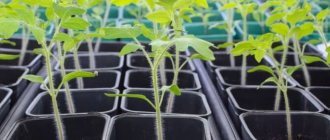
The height of the seedlings is measured from the root collar - the place where the above-ground part passes into the horse system. Of course, these figures are not strict; a lot depends on the conditions in which the seedlings were kept. In any case, be guided by the appearance of the plants. Tomato seedlings ready for planting in a permanent location should be 25-35 cm high, have a well-developed root system and 8-10 true leaves.
Seedlings ready for planting
Standard requirements for tomatoes
The future inhabitants of the greenhouse have their own list of requirements, regardless of the type of room covering. For good growth and smooth development of vegetables:
- Calcium is definitely needed, which will prevent the flowers from falling off and the formation of black spots on the fruits. Enrich greenhouse soil with this microelement during fertilizing with solutions of calcium chloride or calcium nitrate;
- It requires magnesium, potassium, nitrogen, boron, phosphorus, which are contained in the most popular country fertilizer “azofoska” in a form that is most accessible for absorption by plants;
- You need moist soil that can hold water for a long time without drying out. And at the same time, greenhouse soil should not be too heavy. For tomatoes, sandy loam, slightly clayey soil is recommended, in which moisture will be retained, and the humidity level should not exceed 70%, which is preferred by tomatoes. In order to achieve the recommended effect, peat is added to sandy soil, and sawdust and the same peat are added to clay soil, but as a fertilizer.
We must not forget that the life cycle of a bush varies from 110 to 130 days, depending on the personal characteristics of the variety. In order for the plant to have time to go through all the stages of the green and red life path, it is planted in the ground quite early. For the middle zone, the usual period is from the end/middle of the first ten days to the middle of the second ten days of May. By May 15–20, the seedlings should already be established in the greenhouse. For the northern regions, planting dates, of course, shift with a focus on specific climatic conditions.
The lifespan of a variety is an important parameter when choosing a variety of cultivated vegetables. In any case, seedlings are planted only when the ground has warmed to a depth of below 20 cm. Naturally, in the northern regions, conditions favorable for planting occur much later. This means that northerners need a tomato variety with a shorter life cycle than for the middle zone. True, increased daylight hours can help, but you shouldn’t rely on it recklessly.
How to prepare the soil for tomatoes
Good predecessors for tomato: cabbage, cucumbers, carrots, onions, legumes. It is not recommended to plant tomatoes after crops of the Solanaceae family: potatoes, eggplant, peppers and, please note, tomatoes. That is why the place where tomatoes are planted needs to be changed every season, returning the vegetables to their original bed no earlier than after 3-4 years. And if this is not possible, then it is recommended to remove the top layer of soil in the garden bed every year and replace it with a new one. Soil preparation is carried out in 5 stages:
- sanding (carried out in the fall for heavy, wet soil at the rate of 1 bucket of sand per 1 sq.m);
- liming (used to reduce soil acidity; for this purpose, during autumn or spring digging, lime powder is added to the soil at the rate of 0.5-0.8 kg per 1 sq.m);
- disinfection (in the spring the soil is treated with a hot (70-80⁰C) solution of copper sulfate at the rate of 1 liter per 1 sq.m);
- application of organic fertilizers (when digging the soil, add humus or rotted compost at the rate of 3-7 kg per 1 sq.m);
- application of mineral fertilizers is carried out during spring digging of the soil to a depth of 15-20 cm (see table).
| Consumption of mineral fertilizers per 1 sq.m | |
| Ammonium nitrate | 20 g |
| Superphosphate | 50-60 g |
| Potassium sulfate | 15-20 g |
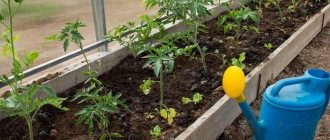
Planting tomato seedlings in the ground
Just before planting, you need to form the beds (optimal sizes: width 100-120 cm, height 15-20 cm) and make holes at a distance of 35-45 cm in the row and 55-75 cm between the rows.
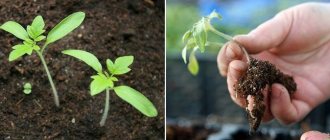
When the bed has already been prepared, further actions depend on the container in which the seedlings grew. If it is a peat tablet or cup, then the seedling is lowered into the hole without removing it from it. The earthen ball with the plant must be carefully removed from other containers using a spatula or other tools (a cardboard or plastic cup can be cut with scissors).
1-1.5 hours before planting, the seedlings need to be thoroughly watered so that during transplantation the earthen lump does not crumble and the roots are not damaged.
The seedlings are placed vertically in the holes and covered with fertile soil up to the cotyledons or the first pair of true leaves. Then the soil is thoroughly pressed and watered. It is important not to forget to place pegs (50-80 cm high) in order to tie the plants to them around the 12th day. If the seedlings are overgrown, they are planted lying down or buried deeper than usual.
Preparing seedlings for transplantation
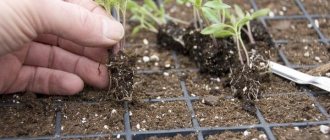
You need to start preparing the sprouts 2-3 days in advance. First of all, you need to remove yellow, unhealthy leaves and a few lower ones. At the same time, they must be cut carefully so as not to damage the stem. To do this, you do not need to cut the leaves close to the base of the trunk, but leave small branches.
Without a leaf, they themselves will thin out over time and fall off. At the same time, removing excess foliage will help the rest of the crown and roots receive the nutrients they need for adaptation. The flower branch will develop well.
Before planting tomatoes, you need to moisten them well. This will reduce moisture loss from the roots to a minimum. At the same time, you should also carefully remove the sprouts from the pots, leaving the earth ball around the root system intact.
When planting, seedlings are carefully removed from seedling boxes or cups and, without damaging the roots, planted in the ground.
What to do if it has outgrown
Overgrown seedlings will have a height of more than 40 cm. However, when planting, you should not deepen them into the soil as much as possible. Then the sprout will form additional roots on the sides. This will slow down the development of the peduncle. Flowers will fall off.
To grow good tomatoes, you need to choose the method that will be most effective. You can plant it like this:
- Dig a hole 12-13 cm deep. After that, make another one in it. It should be equal to the height of the pot with seedlings.
- In this case, you need to plant the stem in the lower hole. Do not fill the top one.
- After a few days (usually about 10-12 days), the plant will take root. Then you can fill in the outer hole.
If the tomato sprout has grown greatly and reaches a length of about a meter, then you need to plant it using the following method:
- Three days in advance, trim the lower leaves without damaging the stem.
- Instead of holes, make long furrows. Make holes in each one at equal distances.
- Pour water over everything.
- Seedlings should be planted in them by placing each stem in this furrow. Place the root into the hole.
- To prevent a buried sprout from rising to the surface, it should be strengthened underground with aluminum wire, making arcs out of it.
- Cover with soil and compact.
- Tie the upper part to the picket fence.
The soil that contains overgrown sprouts does not need to be loosened or hilled all summer. If, during watering, the stems dug into the ground become bare, then you need to cover them with soil mixed with peat one to one.
Overgrown seedlings also need to be hardened off before planting.
Planting tomato seedlings in a greenhouse
A mixture of garden soil (2 parts), peat (1 part), sawdust (1 part) and humus (1 part) is well suited for growing tomatoes in a greenhouse. In general, in terms of soil preparation technology and the planting process, this procedure does not have any special differences from working in open ground.
After planting tomatoes in a greenhouse, it is important to regulate the temperature, which means ventilation (especially during the flowering period), avoiding excessive moisture
- How to care for tomato seedlings in a greenhouse after planting
How to feed tomatoes growing in a greenhouse, whether they need shade, how many times a week to water and whether to worry about pests under cover - we answer the main questions.
Which greenhouse to choose?
The material from which your greenhouse is made also plays an important factor in improving productivity.
Nowadays, the more popular coating materials are polyethylene film and polycarbonate.
Polycarbonate is not a cheap material, but it is durable and does not wear out immediately, unlike film. Although it perfectly protects plants from ultraviolet radiation, it is more suitable for winter heated greenhouses due to its thermal insulation properties, but for summer greenhouses polycarbonate is not particularly needed and will not pay off.
And the temperature in such structures will be simply unbearable for plants on hot days, and even ventilation holes will not help. You will also have to insulate the soil in the greenhouse for the winter, otherwise it will freeze.
Film coating has its significant advantages over polycarbonate.
- It is easier to cover the greenhouse with film, and in case of a breakthrough it is easy to replace;
- in winter, since the film is removed, there is no need to think about covering the soil; snowdrifts will do an excellent job of insulation;
- film is a cheap material, although it quickly deteriorates.
The fundamental difference between these two materials is the number of harvests ; in a polycarbonate greenhouse, you can plant tomatoes earlier and several times, and therefore you can harvest more often.
Reference. Plants such as tomatoes require loamy, neutral or slightly acidic soil that is well ventilated.
Watering and fertilizing tomatoes after planting
After planting tomatoes in the ground or greenhouse, it is better not to water them for the first time (5-10 days). Then the tomatoes are watered about once a week, spending 3-5 liters of water on each bush. If the weather is dry, water the plants more often.
During the growth of the fruits themselves, it is important to ensure that the soil is constantly moist; for this, you can mulch the holes, for example, with compost, straw, newsprint, wood chips, etc. With the beginning of ripening, watering for low-growing varieties must be reduced, and for tall varieties, it must be increased. After each watering, you need to loosen the soil and remove weeds.
Tomatoes are watered exclusively at the root, since sprinkling watering leads to plant disease, as well as a delay in fruit ripening. Watering is done in the afternoon so that less moisture evaporates.
The first feeding of tomatoes is carried out 10 days after planting. The plants are watered with a mixture of mullein and nitrophoska (0.5 liters of the former and 15 ml of the latter per 10 liters of water) at the rate of 0.5 liters of solution per bush.
The second feeding is carried out 20 days after the first. This time a different solution is prepared: 0.4 kg of chicken manure, 1 tbsp. superphosphate and 1 tsp. potassium sulfate per 10 liters of water (1 liter of mixture is poured under each bush).
The third feeding is carried out after another 10-14 days (15 g of nitrophoska and 15 ml of potassium humate per 10 liters of water, consumption - 5 liters per 1 sq.m). And after another 2 weeks, the tomatoes are watered with a superphosphate solution (1 tablespoon per 10 liters of water) at the rate of 1 bucket per 1 sq.m.
Before each feeding, water the bushes well so as not to burn their roots. After planting in the ground, tomatoes also need to be fed by foliar feeding (by leaves). Tomatoes are sprayed 3-4 times a season with the following solution: 15 g of urea and 1 g of potassium permanganate per 10 liters of water (this amount is enough for 60-70 bushes). During drought, you can spray tomatoes with a solution of boric acid: 1 tsp. boron crystals per 10 liters of water. Like watering, foliar feeding is recommended in the evening in dry weather.
- Folk remedies for feeding tomatoes - the best recipes
Don’t know what to feed tomatoes in the greenhouse and open ground? We'll tell you!
Landing schemes
Tomatoes have a negative attitude towards “crowding” in the garden. This creates a shortage of light and nutrients, yields drop, and the risk of disease spread increases. The planting scheme is chosen based on varietal characteristics:
- Low-growing early-ripening tomatoes. When forming into one stem, 25–30 cm are left between the bushes, the row spacing is 45–50 cm. If you plan to grow plants in two stems, both intervals are increased by 5–10 cm.
- Standard and determinate tomatoes. Bushes are planted at intervals of 20–25 cm, intervals between rows are 45–50 cm. This is the most dense pattern.
- Tall and indeterminate tomatoes. They form powerful bushes, their height reaches 2 m or more. The minimum distance between bushes is 60–70 cm, row spacing is 75–80 cm.
The intervals between tomatoes and row spacing are determined based on the type of plant, its height, growth rate and other factors.
If there is a shortage of space in the greenhouse, you can compact the plantings:
- Plant tomatoes in a staggered pattern or in double rows. In the second case, wide row spacing (40–60 cm) alternates with narrow row spacing (30 cm).
- Place different varieties in two rows. As close as possible to the glass - determinate and standard, early ripening, near the aisle - tall, with a longer ripening period. Between them - again early. Both varieties will need to be formed into one stem. The first part of the harvest is harvested and the bushes are removed from the greenhouse while tall tomatoes are just forming.
- Use the square-nest method. The seedlings are placed in the corners of a square with a side of 50–60 cm; a hole about 40 cm deep is dug in the center for watering.
How to save frozen tomato seedlings
If it so happens that, despite careful care, your seedlings are frozen, do not rush to despair. Perhaps it can still be saved and subsequently grow fully healthy tomatoes. Below are the 2 most effective and therefore popular options for resuscitating seedlings.
Option 1. Radical
The first option involves the following steps: all frozen stems need to be trimmed with garden shears, right down to the ground. Your task is to save the roots of the plants and prevent them from wasting their energy on dead “tops”.
At the end of the procedure, experienced summer residents recommend feeding tomato seedlings with urea and wrapping them in film. If everything is done correctly, after some time the roots will begin to produce new, healthy shoots.
Option 2. Humane
The second option is to gradually “defrost” the seedlings. To do this, at dawn, the seedlings are sprayed with cool water.
Immediately after spraying, the seedlings need to be “hidden” from the sun’s rays, because the survival of the tomatoes will mainly depend on how gradual the warming process will be.
To help the seedlings recover, feeding should not be neglected. You need to dilute 15 g of urea in 10 liters of water and apply it under the roots of the seedlings. The next step (after 3 days) is to fertilize the tomatoes with humates and mullein. If necessary, treatment with growth stimulants is carried out.
By following simple rules for planting seedlings and providing the plants with the necessary care, within 40-60 days after the ovaries appear, you will receive a bountiful harvest of tomatoes.