Setting up a luxurious vineyard on your own property is quick and easy. Even an inexperienced gardener can cope with this. There are several basic ways to plant grapes:
- seedlings;
- cuttings;
- layering.
Cuttings are a vegetative propagation method, as a result of which a young plant appears from part of an old shoot - a cutting. For the propagation process, cuttings of a one-year-old fruit-bearing vine, called chubuks, are most often used. They may be green or woody.
The process is very labor-intensive and not the easiest. However, the success of the operation depends on proper compliance with all instructions.
How to properly prepare chibouks for storage?
To prepare material for planting, select a healthy grapevine with a diameter of up to 1 cm, and cut off its upper part. Leaves, tendrils, and unripe tops are removed from the cut shoots, keeping 4 eyes.
The upper cut is made a few centimeters above the upper bud. The lower part is cut vertically in three places, forming a cut about 3 cm in length. This procedure will ensure normal metabolism in the cuttings after planting in open ground.
The procedure is carried out with a sharp knife at an angle.
It is important to prepare gardening tools before starting the operation. To do this, it is cleaned and processed to prevent the spread of diseases. Attention! Pruning the shanks is extremely important.
If you cut the cutting incorrectly, it will dry out or die. If you are preparing cuttings of different varieties, they must be labeled and collected in bunches. This is done to prevent plants from infecting each other while at rest. Then they are immersed in water for a day. Then it is treated with a 5% solution of copper sulfate and dried well.
After this, they are placed in plastic wrap and sent for storage. The cuttings should survive the winter, get stronger, and in early spring they can be planted in open ground in a permanent place of growth.
Important! Treating cuttings with water and vitriol not only promotes disinfection, but also accumulates a supply of nutrients that will help the plant survive hibernation.
Sheltering the grapevine for the winter
After the final pruning of the branches and catheterization, it is necessary to provide good shelter for the grape bush. You should carefully bend it and tie it in such a way as not to deform its branches. Given changing weather conditions, grapes can be covered on different calendar days.
It is not necessary to rush to the grape bushes to protect them from the first frosts. Such hardening will only benefit them, because the grapevine will become noticeably stronger and gain a certain resistance to cold.
Those shoots that you have cut and pre-treated with copper sulfate should be placed on the ground and their position should be secured with staples. This should be done with extreme care. It is better if there is a bedding of dry branches and leaves under them.
Wooden shields with bee guards may appear on top. This will increase the space around the stems and provide additional protection from frost. After this, you need to cover the shields with any waterproof material. For example, polyethylene or roofing felt. Be sure to add dry branches or a small amount of soil to prevent the material from being blown away by the wind.
How to choose good planting material?
The success of the operation directly depends on the quality of the planting material. Before you start pruning, select healthy and strong cuttings.
You need to start with a preliminary inspection of the vine. The color of the shoots should be uniform brown-green. There should be no damage, cuts, stains or rot.
The diameter of a healthy stem should range from 0.6 to 1.0 cm. The length can vary from 12 to 60 cm. A shoot that is too short will not be able to survive the winter due to lack of strength and nutrients. Cuttings that are too long do not store well.
Preserving 2 to 4 buds will allow the plant to quickly take root and immediately enter the development and growth phase when transplanted into open ground.
How to choose a vine for seedlings
How to prepare grape cuttings in the fall? First of all, to get good planting material, you need to choose vine branches that have high yields. Please note that if you have a large vineyard, it is better to mark in advance the branches from which cuttings will be cut in the future.
Important! The branches from which the chibouks will be cut must be strong and healthy, not damaged by frost and at the same time well ripened.
When a suitable vine is selected for obtaining grape seedlings at home, they begin to harvest them.
Storage technologies before planting in the ground
During storage, the plant loses half of its nutrients and quickly weakens, becoming unsuitable for planting. The main objective of the procedure is to reduce losses. You can store cuttings in the basement, refrigerator or buried in the ground. Low temperature and darkness slow down vital processes and lead to a decrease in nutrient consumption.
How to store in a basement or cellar?
When storing pipes in the basement, it is important to ensure that the temperature is constant. It should not fall below 0 degrees. Otherwise, the air will become too cold and the vine will freeze. It is important not to allow the temperature to rise above +4 degrees. In this case, the buds will begin to swell and bloom ahead of time. You can regulate the temperature and humidity conditions of the room by providing ventilation and airing.
It is important to ventilate the cuttings themselves. To do this, several holes are made in the plastic film with which the shoots are wrapped. At least once a month, the film is unrolled and the cuttings are inspected. If mold forms, wipe it with a cloth soaked in a solution of copper sulfate. When the vine dries out, it is moistened with water.
Another popular way to retain moisture and reduce nutrient loss is to use wet sand or pine sawdust. To do this, they are added in small quantities to a plastic bag in which the cuttings are stored.
How to store in the refrigerator before planting?
This method is only good for storing a small number of cuttings, the length of which does not exceed half a meter. In this case, the shelves with cuttings are placed at a distance of at least 10 cm from each other.
The cuttings, prepared and treated with water and vitriol, are wrapped in a thin cloth and placed in plastic bags. Once a month, the bundles need to be opened, treated with copper sulfate and moistened.
Interesting! To make sure that the temperature in the bundle meets the standards, experienced gardeners put a thermometer in it for a couple of hours.
In the trench
One of the simplest and least labor-intensive ways to store cuttings is by digging. To do this, dig a shallow hole, place shoots in it and cover it with earth. It is necessary to choose a secluded place where water does not accumulate, otherwise the cuttings may rot. Dry soil will perfectly protect against mold, disease and retain nutrients.
Storage facilities
Grape cuttings can be placed in a cellar or trench for the winter. It is quite acceptable to store a small amount in a household refrigerator .
Option with a cellar
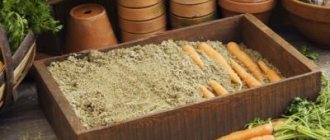
The most common storage of grape cuttings is in the cellar. Such maintenance is very convenient both for control and for laying large volumes of planting material. Usually in standard cellars the temperature is appropriate, and there is an exhaust hood for air exchange. For storage, select a container of the required size, such as an old bathtub, box, large bucket, and fill it with wet sand. The chibouks are stuck there with their lower ends, without touching each other. The tops remain open, which allows you to constantly monitor their condition.
Sometimes plastic bottles are used for these purposes . The bottom of the container is cut off, wet sand is poured in and cuttings are inserted. The top of the bottle is placed on top. The plug serves as ventilation. You can also stack the cuttings horizontally, sprinkling the rows with wet sand. From time to time the layers need to be changed. Instead of sand, you can use sawdust. The main rule is to keep them slightly damp.
Contents of planting material in the pit
You can store grape stems until spring in a trench or pit. This method is suitable for laying large volumes of material in the absence of a cellar. For the trench, a place is selected on a hill where the ingress of melt water in the spring or during winter thaws is excluded. Pit size requirements:
- The depth of such a pit is 60–100 centimeters.
- The width is 10-15 centimeters greater than the length of the chibouks.
- The length depends on the volume of planting material.
The entire inside of the trench is coated with a lime solution, and sand 10-15 centimeters thick is poured onto the bottom. Cuttings can be laid horizontally or placed vertically. No difference. The voids between them are densely filled with wet sand, and the earth dug out from the hole is poured on top. To prevent water from entering, you can also cover the mound with film, and also dig trenches around the perimeter to drain water. The disadvantage of such storage is the impossibility of control.
Harvesting grape cuttings in spring
Green cuttings can be used to propagate grapes. They are prepared in the spring, 2 weeks before the plant enters the flowering phase.
First of all, choose healthy shoots. On the cut cuttings, 2 eyes are kept, and the leaf blades are cut in half.
Attention! It is recommended to carry out the procedure in the early morning, when the plant tissues are most saturated with moisture.
Next, the chibouks are immersed in water for a day and covered with a cloth. Rooting begins immediately. To do this, prepare containers in which a bottom drainage layer of pebbles is placed, soil for grapes, fertilizers and sand are added. The cuttings are planted to a depth of 4 cm, at a distance of 10 cm from each other.
The containers are covered with film to maintain high temperature and humidity. During the first month from the moment of planting, it is necessary to maintain soil humidity at 100%, air humidity at 85% and temperature up to 30 degrees Celsius.
In subsequent months, the number of waterings is gradually reduced to 2 times a day. After the cuttings germinate, the film must be removed, starting to accustom the plant to natural environmental conditions.
By the end of summer, it is necessary to treat the chibuki with fungicides to prevent the development of diseases. It is recommended to leave the cuttings in this form for a year for full development and begin replanting in the spring.
When to carry out autumn harvesting
The yield from a young bush directly depends on properly organized harvesting and the conditions under which the grape cuttings were stored in winter.
The best reference point for starting work on pruning grapes is the onset of the first frost, when the ground is slightly frozen.
During this period, the woody vine is rich in nutrients and moisture. Experienced winegrowers harvest grape branches 15 days after most of the grape leaves have fallen.
Of course, we can also root a spring vine cut before the sap flows, but the chances of its rooting are much less. While the probability of rooting of preparations made in the autumn is almost 100%.
Germination of cuttings and planting
Planting cuttings in open ground is carried out in early spring. Before starting the procedure, the tufts must be prepared and rooted.
To do this, a couple of weeks before planting, they are taken out of storage and transplanted into plastic cups. This will help the plant quickly adapt and break dormancy.
First, the cuttings are soaked for up to 48 hours in warm water. Then several holes are made at the bottom of the cups. Then earth and humus. Sprinkle fine sand on top. The cutting is placed in the center to a depth of about 4 cm and then watered.
You can learn more about the process from the video.
Landing
When the chubuk has several roots, it is placed in the ground. To do this, use any container: plastic bottles, pots and just durable plastic bags. You need to make drainage holes at the bottom to drain excess water.
Recent Entries
Lilac perennials that are beautiful, compact and do not crowd out other plants Why when buying seedlings you should not take the sellers’ word for it and how to determine the age of the plant using 3 signs Tomato seedlings have turned purple or whitish: why the color has changed and how to save the plants
A layer of pebbles, expanded clay or other materials is placed on the bottom to organize normal drainage. The soil is prepared in advance. It is best to use the mixture in equal proportions:
- turf land;
- humus;
- river sand.
You can use ready-made soil for seedlings from the store.
Fill the container about a third with soil, place the cutting in the center and cover it with the remaining mixture very carefully so as not to damage the delicate and fragile roots.
The roots of the cuttings are very fragile, so they should be covered with soil carefully.
All that remains is to water the plant with warm, settled water. Subsequently, the soil is moistened every 2 days.
Main mistakes when choosing and storing pipes
- It is important to choose healthy and strong shoots for pruning. They should be about 8mm thick. It is recommended to cut the middle part of the vine, as this is where healthy buds and a large amount of nutrients are concentrated.
- During the period of preservation of the chibouks before planting, they lose a large amount of moisture. In order to replenish it, they need to be soaked in water for two days.
- To protect cuttings from diseases, they must be treated with a solution of copper sulfate. To do this, add a spoonful of the substance to 1 glass of water.
- If cuttings are kept in the ground, they should be protected from rotting. To do this, the outside air temperature should be about 0 degrees. You can mix soil with sand.
How to prepare grape cuttings for winter storage
The main preparatory measures that must be carried out without fail before laying the cuttings for the winter: soaking and preventive treatment against fungal diseases.
Soaking
I soak the chibouks vertically. To do this, I collect the cuttings in a stack, making sure that all the buds are facing up.
How to determine where the cutting is up and where it is down? The bud on the cutting always looks a little upward, it turns out that wherever the bud looks, there is an up. The second rule is that above the bud the vine is always smooth, and below the bud the place where the leaf is attached and this place is always rough. Do not confuse the bud and the petiole - the bud is always soft and fluffy, the petiole is hard.
I update the lower cuts of the shanks with a sharp knife or pruning shears. I align all the cuttings so that the bottom cuts of the entire stack are in the same plane. I tie the stack with a latex rubber band for money.
In a bowl, the depth of which is at least half the length of the chibouks, pour melt or rain water, or water from under the filter, most importantly not chlorinated, put the stacks with cuttings in the bowl vertically, leave for 12 hours. The cuttings should be immersed in water about half their length.
Disease treatment, disinfection
Why do we soak the chibuki for exactly 12 hours? Some winegrowers soak for a day or even two days, I don’t want to argue with them, but from my own experience I will say that if you soak for 6 hours, then this time will be enough for the cutting to be nourished, 12 hours is already time with a reserve, anything more and It can’t do any harm, but it won’t give any results, we’re just wasting time.
The cuttings were soaked in water for 12 hours; now they need to be disinfected. For disinfection, one of the systemic fungicides is used: Topsin-M, Fundazol, Switch, you can also use 3% iron or copper sulfate (1 teaspoon per glass of water). The preparations are diluted in accordance with the instructions for the volume of your bath, the cuttings are immersed in the solution, and then laid out on a dry surface so that they dry slightly before storing them for winter storage.
The final stage of preparation is to seal the sections of the chibouks with children's plasticine or paraffin.
Popular questions and answers
Below we will look at popular questions and answer them.
Why did the buds start to grow, but no roots?
A phenomenon is often observed when the buds begin to actively develop, but the root system lags behind. To do this, it is necessary to treat the roots with growth stimulants. Most often this is due to the characteristics of the grape varieties. Some of them take root more difficult.
Why are the roots moving but no buds?
This problem is associated with non-compliance with the optimal temperature and humidity storage conditions. Due to the dry air, the kidneys dry out. Most often, the phenomenon is observed when pipes are stored in an apartment. To solve the problem, you need to cover the cuttings with soil a couple of centimeters above the top bud and keep the soil moist.
Preparation and care
A grape cutting suitable for further rooting is a piece of vine 55-65 centimeters long and 1-1.5 centimeters in diameter. Selection criteria: the presence of at least three living, well-developed buds and the maturity of the vine itself. It is checked by slightly bending the stem: a barely audible crack indicates that the vine is ready for cuttings. And you can also check the maturity of planting material with iodine. When interacting with it, the cut of the branch turns black.
Benefits of winter storage
Cuttings can be harvested and rooted in the spring, but this can harm the mother bush. After spring pruning, it will take a long time to recover and ultimately will not complete its task. And the chibuki themselves, planted in unheated soil after winter, take root very weakly. It’s a completely different matter with autumn cuttings, after which the mother bush is well reanimated during the winter months, and the stems, cut from mature and strong branches, get used to independent survival all winter at zero temperatures.
It is recommended to cut the chibuki in the last ten days of September, which exactly coincides with the pre-winter pruning of grapes. The deadlines for covered vineyards are shifted a month later. But in any case, this is done after dropping the leaves and the first frost. Harvesting grape cuttings for the winter at this particular time causes less harm to the bush itself, since it is preparing for winter - life support processes slow down.
It is very important not to allow diseased shoots to be collected for planting material. They can be distinguished by dirty spots and an unpleasant odor
Having discovered such a vine, it must be immediately cut off and burned. And outside the vineyard area. Even ash can be dangerous to plants.
In preparation for winter and the slowdown of vital processes, the vine experiences a moisture deficit. It is estimated that loss of moisture below 35% of the weight of the chibouks will lead to the death of 50% of the eyes. Water is vital for seedlings. To do this, you will need to cut off all the leaves and tendrils from the branches. Place the chibouks for 20 hours in a container with clean, soft water—melt or rain would be good. Seal both ends of the twig with warm wax to retain moisture inside. Treatment of grape cuttings before storage is carried out with a phytodoctor or a manganese solution.
Storing double-length pipes has also proven to work well. They use moisture more economically. That is, material with 6-8 buds is cut, and before planting it is cut in half. It is recommended to take care of future root development. To do this, small grooves 20-30 mm long are made at the lower end of the cutting.
Conditions for keeping chibouks in winter
Winegrowers use three main methods of maintaining planting material. They are considered the most reliable and affordable. There are general rules for all methods:
- The temperature is strictly within 0−4 degrees plus.
- Humidity is not less than 60% and not more than 70%.
- Good air exchange.
- Pest protection.
Growing grapes from cuttings at home
Two-eyed chibouks are taken out of the refrigerator and cut into pieces 20 cm long. The upper oblique cut is made 2 cm above the upper eye, the lower straight cut is 0.5 cm below the eye. Completely immerse in water and soak for two days.
The next step is kilching on the battery in one of the following ways:
- The lower part of the shoot is wrapped in damp moss and placed in a bag.
- Pre-scalded sawdust is poured into a plastic glass and a chibouk is placed there. Place a plastic bag on top to prevent moisture from evaporating.
The cuttings are placed on a radiator at a temperature of 30ºC. The upper part should be kept cool. In 2-3 weeks, root primordia and leaves are formed. Cuttings can be planted in a container.
Plants are planted in open ground when the threat of return frosts has passed. Choose a bright place, protected from the prevailing winds. For the first two weeks, the seedlings are shaded from the hot sun.
How to understand that seedlings are ready for planting in the ground
Good rooting is a sign that the cuttings can be planted in the garden. This is not difficult to do.
- You can know immediately that the seedlings have taken root if they have been germinated in water or a damp cloth: roots 2–3 mm long are already a sign that the seedling has taken root. However, such roots are still very tender, so there is no need to rush to plant them directly on the site. Seedlings that have taken root are transplanted into containers with soil mixture.
- If the cutting is rooted in the substrate or soil, the roots cannot be seen. In this case, 3–4 weeks after planting, the shank is slightly supported. If resistance is felt, it means roots have appeared. After this, it is recommended to reduce watering.
- In a substrate and soil mixture with sufficient capacity, grapes can develop until the beginning of June. However, it is better to plant it earlier - in early to mid-May, as soon as the temperature stops dropping below 19 C.
Learn about planting and caring for grapes in open ground in this material.
Winter storage
Prepare cuttings for storage in a cool place (from +1 to +5 °C) in this way:
- Cut unprocessed chibuki are soaked in water for a day. Afterwards they need to be slightly dried to remove excess moisture. You should not leave soaked cuttings in a warm place for more than a day, as this can cause premature evaporation of moisture and awakening of the buds.
- Then the cuttings are wrapped in damp newspaper or cloth, over which they are wrapped with a plastic bag, allowing for little air access.
- The cuttings wrapped in this way are sent to the cellar, refrigerator or to the balcony. You can bury them in the ground to a depth of 20–40 cm, additionally covering them with branches, rags, sand or any available insulation.
After soaking for a day, the grape cuttings need to be slightly blotted from excess water and dried
Then the chibouks are given complete rest in a cool place until early spring.
Cutting cuttings
Cuttings must have live eyes (buds) and not dried or damaged ones. Therefore, planting material must be prepared before the autumn frosts intensify, which in some years occur as early as late September - early October. Some winegrowers believe that the likelihood of bud damage increases towards the end of leaf fall, so they begin to harvest chibouks early in the fall. Grapes that are grown in a greenhouse have a much longer supply of time.
The grape bushes from which cuttings are supposed to be taken are marked in advance. In the fall, it is easy to confuse where one variety or another was grown, especially in a large vineyard. There are several requirements for mother bushes. First of all, they must be healthy and productive, as well as interesting for further reproduction.
In the fall, cuttings are taken from the mature part of the vine. It is easy to recognize not only by its color. It should be warm. I sometimes show my friends a trick. I suggest placing your hand around the green part of the cutting and the part that has developed bark with the characteristic color of darkened straw. The green (unripe) part of the shoot will be cold even in summer, and the ripened part will be warm.
It is better not to use shoots and fat shoots for cuttings.
Cuttings must be freed from leaves, shoots and tendrils. Chubuks with a diameter of at least 1 cm are more likely to survive the winter. Thin cuttings are worse stored in winter. I have heard the opinion that the bushes grown from them are weaker. For me, it is desirable that the harvested parts of the vine have at least 5 internodes. It’s great if you can save parts of the vine in winter, 6 to 8 internodes long, so that later you can cut out the healthiest part. Many winegrowers consider a cutting length of 3–4 buds or less to be quite sufficient.
The cuttings should immediately be grouped by variety. They are easy to confuse, so labels are attached to the bundles. Not paper ones, which can cause the spread of mold and rot, but plastic, metal or made of foil. The more information on the labels, the better.
Cuttings can easily be spoiled if they are not treated within 24 hours. If there is any delay, it is better to at least temporarily bury the cuttings or wrap them in a plastic bag.
conclusions
- Rooting a large number of cuttings before planting in open ground is a mandatory element for northern and middle latitudes (Siberia, distant Urals). Too short a summer limits the growth and development of the plant.
- To prepare for autumn propagation, cuttings are taken from annual, fruit-bearing vines only after the dormant phase has begun.
- The cuttings are stored all winter (winter): at home in the refrigerator, in the cellar, in a special storage.
- At the end of February-mid-March, when the growth phase begins, the chibouks are germinated. Any suitable methods are used for this.
- Cuttings can be rooted (planted) in jars and pots, in substrate, or in damp cloth. Each method of germinating seedlings has its own advantages and disadvantages.
You can find out how to do spring grafting of grapes here.
Problems when germinating chibouks
Unfortunately, everything does not always work out correctly and smoothly. At every stage, from autumn pruning of the vine to the appearance of roots, a problem may arise that will nullify all six-month efforts. The most common problems when germinating chibouks:
- the eyes come to life, but the roots are missing;
- sometimes there is a root, but the revived shoot disappears, and it happens that it does not show any hope or signs of life at all, despite proper care and careful care.
Such situations happen solely due to our ignorance or due to wrong actions.
Let's look at some possible mistakes that lead to a lack of viability of grape cuttings:
- overmoistening during storage can cause spoilage or rotting of grape cuttings;
- non-compliance with the correct temperature regime: if the room temperature exceeds 30 oC, root growth stops or does not occur at all, calli form on the cuttings (growths on cuts);
- temperatures below 12 °C do not allow the eyes to grow well with developing roots;
A hot summer and lack of rain indicate that the plant struggled to survive all season and therefore was unable to accumulate enough substances for spring awakening - after such a summer there is no point in harvesting grape cuttings at all.
Basic rules for preparing pipes
The autumn period is most suitable for cutting grapes for harvesting chibouks. This is explained by the fact that after summer the vine is stronger than after winter. This is due to the fact that useful substances have been accumulated over the summer and the chibouks will be stronger and healthier. Autumn cuttings germinate faster and produce more branched roots. Grapes grown from autumn chubuks will yield a faster harvest. Therefore, every harvester should know how to store grape cuttings cut in the fall so that they retain the ability to germinate in the grapevine.
The best time for harvesting parts of the vine is considered to be the period of pre-winter pruning of grapes. Basically, it is carried out in November, when after light frosts the leaves have already fallen off, but severe frosts have not yet struck. After the leaves fall, it is better to wait at least two weeks. There is no need to delay; the average temperature should not drop below 5 degrees Celsius. The cutting time will depend on the region, because the further north you go, the earlier the frosty period begins.
For good subsequent rooting, the diameter of the shoot chosen for harvesting is important. It should be no more than 9 mm. Some sites recommend a shank thickness of up to 10-12 mm, but this is not entirely true - it may not take root. 8 mm would be optimal.
The shoot should already bear fruit during this period. The bush for harvesting is always chosen to be healthy, without the slightest signs of disease. Young shoots are not harvested. According to gardeners who give advice on how to preserve grape cuttings in winter for planting in spring, it is best to have a vine on the side that is as sunny as possible.
The middle part of the shoot is suitable as the best cutting preparation. It is necessary to prune from at least the fourth bud from the end of the vine. The area chosen for cutting should be as flat as possible - such seedlings take root more easily than their crooked “brothers”.
Green shoots are not chosen for rooting. The bark on the cutting blank should already be brown, depending on the grade, from light to dark shade. The color should be uniform, without darker or lighter spots, or, moreover, thickenings or growths. Such spots may indicate damage to the vine by some disease (for example, Phomopsis).
If you bend the intended shoot, it should make cracking sounds. But at the same time it should not break. You also need to carefully examine the cut; a healthy shoot is always green inside, without black spots. Experienced gardeners, sharing knowledge on how to preserve grape cuttings until spring, advise an effective way to check whether the appropriate material has been chosen. This requires 1% iodine. It is necessary to dip the freshly cut part of the vine in an iodine solution for a few seconds and see how the color of the cut changes. If it remains invariably green, then this part of the grape bush will not be suitable from the point of view of how to properly preserve grape cuttings until spring. For such purposes, only the cut part will be suitable, which will change its color to deep purple, almost black.
The core of the vine should be dense and under no circumstances loose. If you use chibouk with a loose core, it will probably dry out before mid-winter.
For rapid root formation, the length of the shank itself is important. The minimum is 30 cm, and preferably from 50 to 70 cm. Not all gardeners dig up seedlings for the winter; for some, they remain overwintering on the site. For this purpose, a large depth of planting of seedlings is practiced. Therefore, cuttings should not be short. In addition, according to the experience of most gardeners, long stems germinate better. The pruning shears should be as sharp as possible in order to give an even cut without splitting the vine.
The tool used to cut the shoot is always treated with some kind of disinfectant. Each gardener recommends his own remedy: alcohol-containing liquids, copper sulfate, kerosene or a weak solution of potassium permanganate. Sometimes it is recommended to heat the instrument, but this is not the most reliable option; it is inferior to the above disinfectants.
The cut is made at least 4 cm from the internode. In order for a new bush to develop from a fragment of a vine, it must have 4 eyes. Following these simple rules will help make storing grape cuttings at home as productive as possible.
Germination methods
Under favorable conditions - temperature, humidity, the presence of stimulants and nutrients, the process of regeneration of cuttings begins. Healing tissue (callus) is formed, then roots.
According to Radchevsky
Pre-treated cuttings are lowered into a jar, at the bottom of which a layer of cotton wool or foam is laid. The top of the cuttings is waxed to protect it from drying out. Water is poured into the jar so that the top of the cotton wool or foam plastic is covered by 2 cm. The neck of the jar is covered with film, holes are made and pipes are inserted. The temperature below is maintained at 23... 25°C, at the top – as low as possible.
The roots are formed at the water-air interface, the “heels” lightly touching the water. The advantage of the method is that the cuttings do not rot without changing the water.
According to Pusenko
The lower eye is cut from the cutting and several cuts are made along the bast on the lower part - this technique stimulates root formation. A piece of fabric is moistened with water and the chibouks are placed on it in a row so that the ends are in the middle of the fabric.
The second half of the canvas is covered with cuttings, closed at the edges and the structure is rolled into a tube. Then the cuttings packed in fabric are wrapped in plastic wrap and stored in a warm place until rooting. Periodically open for inspection and moisten if necessary.
In filler
Wet porous materials are used as filler - a layer of sand, expanded clay chips, old sawdust from which the resinous smell has disappeared. The filler is poured into a container, moistened and pipes are installed on it.
They are also grown in containers in a substrate, which should be at least 0.5 liters. Plastic bottles or paper milk or juice bags are used for containers.
The filler consists of sand, sawdust and peat, taken equally. Add a little loose soil. It is better to replace sand with expanded clay screenings, perlite or vermiculite. The moisture content of the filler is determined by squeezing it in a fist - single drops should be released from the substrate. The bottom of the boxes is pierced and a handful of crushed stone is poured in to avoid stagnation of water. Before planting, the substrate is steamed in a water bath and cooled to room temperature.