Every gardener dreams of having a well-groomed vineyard. At the moment, grapes have many varieties that are suitable for growing in different areas. The grapes can grow both in areas with a short summer period and in warm areas. To select the right variety for a specific climate zone, it is necessary to propagate this berry by cuttings. This kind of work is quite responsible, but in the end the gardener will get the result he needs.
Pros of growing from cuttings
A cutting is a part of a stem with several buds. For propagation at home, lignified branches are taken from a mature vine. Another name for them is cuttings or chibuki.
Any gardener, even a beginner, can propagate grapes from cuttings. This method has many advantages:
- the possibility of obtaining a large number of seedlings;
- seedlings are easy to transport, send by mail and store;
- ease of treatment against pests and diseases;
- low cost of seedlings.
Lignified cuttings are planted in open ground (in autumn or spring), but at the end of winter or spring they are rooted at home.
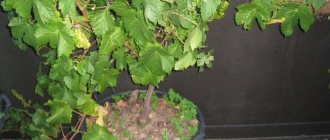
Growing grapes from cuttings at home provides a good opportunity to obtain full-fledged seedlings in regions where covered viticulture is widely used (Urals, Siberia, Moscow region).
Advantages of growing from cuttings at home:
- the process of development and acceleration is controlled;
- absence of negative weather factors;
- takes up little space;
- a good leap in time, which will allow you to increase your planting bushes in the current season.
Propagation of grapes - what else you need to know about cuttings
Inexperienced gardeners often complain that attempts to grow seedlings at home do not give the desired result. Most failures are rooted in ignorance of the basic rules.
Preparing cuttings in the fall - step-by-step instructions
For cutting into cuttings, take vines pruned in the fall. In preparation for winter, grapes deposit a supply of sugars and water in the wood. The presence of own reserves contributes to the survival of cuttings and a high percentage of viable seedlings. Not every cut vine is suitable for cuttings:
- Choose a vine with a diameter of 8-12 mm. Oddly enough, vines that are too thick are unsuitable for germination: just as they “fattened” on the mother bush, so they will behave in the future.
- The wood must be mature. In practice, this is very easy to check - when bending, a characteristic crunch is clearly heard.
- If the vine has a tendril, it is advisable to cut the vine in such a way that the internode with the tendril is at the very bottom of the stem. The explanation is simple: the presence of a tendril indicates the presence of a special membrane in the structure of the internode, which favors the formation of roots.
- After storage in winter, the cuts are not only renewed, checking for the presence of living, healthy wood. The lower cut immediately below the lower internode is made straight, the upper cut is made a few cm above the upper bud, oblique (exclusively so as not to confuse the top and bottom of the shank).
- Before germination, the bark is stratified - scratches are made just above the lower node. If the cutting has 2-3 nodes, carefully pluck out the lower bud.
The author of the video explains how and in what period grape cuttings should be harvested.
Chubuki are ready for germination using any of the selected methods.
Harvesting and preparing green cuttings in spring
Material for rooting green cuttings is formed in large quantities when excess thickening shoots are cut out in the spring.
The shoots grow very quickly and, with a length of 30-40 cm, have a diameter at the base of 7-8 mm. This is the optimal thickness of the shank for green cuttings.
The tissues of the cuttings are very delicate and quickly lose water, so it is necessary to take measures to preserve the properties of the cuttings:
- Remove the overgrowth in the evening.
- A bucket of water and a damp cloth should be ready to put the cuttings in water and cover them from drying out.
- Most likely, you will have to plant the cuttings in the morning - put the bucket with the vines in a cool place (cellar) overnight.
- The upper 1/3 of the vine is not suitable for rooting - only the lower ⅔ of the length is used.
- Before germination, the cuttings are cut into pieces of 2-3 internodes, the lower straight cut is immediately below the node, the upper, oblique cut is slightly above the upper node.
Green cuttings take root much worse than lignified autumn ones - before planting in the soil, it is recommended to treat the lower part with heteroauxin (or another root-forming preparation) according to the instructions.
Preparation of material for planting
For germination in the winter-spring period, cuttings are selected from a mature (brown, crackling when bent, woody) annual vine. They are harvested when pruning grape bushes (approximate period is October, before the onset of the first frost). In non-covered areas, stems for propagation are pruned at the end of November and in winter - from the vine, without any symptoms of drying out or freezing.
Propagation material is best obtained from the healthiest and most productive bushes that have typical varietal characteristics. These are bushes with even branches, without defects or spots. The middle part of the shoots that have sprouted from the central buds of two-year-old branches is selected for cuttings.
The normal thickness of cuttings is considered to be from 0.5 to 1 centimeter (for a variety with a thin vine, this norm may be smaller). Fattening and thick stems have loose wood, so they are not suitable for propagation.
Dimensions and cutting of cuttings
The length of the cutting is measured not in centimeters, but in the number of eyes (buds) located on it.
The most commonly used are two-eyed and three-eyed, although one-eyed and four-eyed are also suitable. When cutting branches, the stepsons, tendrils and remaining foliage are cut off. It happens that long vines (50-100-170 cm) are stored in winter, and cutting is carried out before rooting.
The upper cut is made straight, the height above the upper bud is 2-4 centimeters. The lower cut is made obliquely under the lower bud, and the indentation should be small. At first, novice gardeners cannot determine where the top part is and where the bottom part is. It is by the method of cutting that this issue can be resolved.
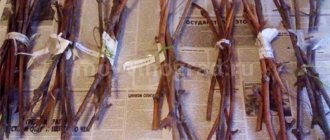
Chubuki are tied into bundles and tied in two places. Tags indicating the name of the variety are attached to the tied bunches. After this, the bundles should be stored for several months. Before this, they are processed.
Breeding by layering
Layers are called buried shoots that have taken root. This option is well suited for growing grape varieties that are difficult to root.
Reproduction by layering can be done in different ways:
- green layering underground;
- perennial layering;
- short shoots;
- hilling a bush;
- air layering;
- Chinese method.
Propagation of grapes by layering is the simplest and most commonly used method.
Green layering method
To propagate grapes with green layering on a healthy, well-bearing bush, one or two lower shoots are selected, the stepsons on which are removed, and the shoots are tied to a trellis. When, around the end of July, their length reaches two meters, the shoots are placed in a ditch dug under the bush. The depth and width of which should be about 0.5 m, and the bottom with a slight slope towards the mother bush. Rotted manure or compost is poured into the ditch and mixed with soil. Before laying the shoots in this trench, the tendrils and leaves on them are removed, leaving a few at the end, which will be above the soil surface. Then the layerings are covered with soil, lightly compacted, and watered. Moreover, their upper ends with 3-4 leaves, coming to the surface, are tied to pegs. In autumn, the rooted cuttings are separated from the mother bush. This propagation of grapes in summer allows you to obtain strong and high-yielding bushes that retain all the characteristics of the variety.
Preparing cuttings for storage
Chubuki needs:
- soak in water for 12 hours, laying them horizontally so that a small layer of water completely covers them;
- to disinfect: dip for 15 seconds in a solution of copper sulfate (400 grams per 10 liters of water) or iron sulfate (300 grams per 10 liters of water). After treatment with iron sulfate, the vine will turn black - this is a normal reaction;
- dry on fabric or paper for several hours;
- wax the sections (tips). Dip in paraffin, which is melted in a water bath and slightly cooled (not all gardeners use this method);
- Before storing, wrap in cling film or plastic bag.
If all these steps are followed, the cuttings will be well preserved.
Watch the video! Preparation and storage of grape cuttings
Preserving cuttings before planting
The ideal storage conditions are:
- air humidity – from 80 to 95%;
- temperature - from 1 to 4 degrees (but not higher than +8).
Planting material should be stored in the refrigerator or basement, as well as outside - in a trench or in a snowdrift.
Storage locations for cuttings:
- Snowdrift. Ideal storage location for snowy areas. It must be stored in loose snow (optimal humidity and temperature) at a depth of at least 50 centimeters. Before the snow falls, the cut vine is wrapped in damp burlap and kept on the ground in the garden. When the first frost appears, it is transferred to the basement or room with a low positive temperature. Chubuki are placed in a snowdrift open or packaged (in cut-off plastic bottles or sugar bags);
- Trench. The depth of the trench is 50 - 100 centimeters. The bottom of the trench is covered with a small layer of sand, on which bunches of vines are placed vertically. After this, the trench is filled with sand and earth and covered with boards, slate or film. Often the vine is packed in a sugar bag and buried half a meter deep. The disadvantage of this method is that it is very difficult to get chibouks in the spring;
- In the cellar or refrigerator. The seedlings are placed in a sugar bag or plastic bag. The packaging is placed in the refrigerator (in the vegetable department) or lowered into the cellar. First, the vine (bottom cut) is wrapped in moistened newspaper. For moisture and ventilation, the newspaper is opened at the beginning of January. The bundles are placed in two cut bottles, and the joint is wrapped with tape.
Winter preparation for growing grapes: how to take cuttings correctly
Cutting propagation is based on the principle of natural restoration of a plant from a small part of it. Moreover, the resulting plant completely retains all the qualities of the mother vine. Planting with chibouks in the spring is mainly used in industrial vineyards, but it is also suitable for amateur gardeners. Preparation of chubuks for spring planting is carried out in the fall, when the leaves of the grape bush begin to turn yellow and autumn pruning of the vine is performed. You shouldn’t be too hasty with cutting, but you also shouldn’t delay it until frost. For future propagation, you should choose a vine that bears fruit well in the summer. You can find out about the growing season of the grapevine here.
To obtain cuttings, you need to choose healthy mother bushes of a variety that is promising and productive in the area.
A cutting is cut from the middle part of the vine with a diameter of 0.7 to 1.0 centimeters. The number of buds on the cutting should be at least five to six, and the length should be slightly longer than required for planting. In the process of cutting planting material, the following errors may be made:
- cuttings cut too thin;
- the material is not cut from the middle;
- cuttings were cut too early.
It is the chibouks, cut from the middle part of the vine, that best withstand winter storage and have the strongest and most viable buds. If there are several varieties in your home vineyard, then several cuttings should be taken from each of them. When cutting cuttings, the lower cut should be approximately 0.5 centimeters away from the bud, and the upper cut should be made at an angle and located 1-2 centimeters from the bud. The work should be done with a very sharp knife so that the dull blade does not crush the fibers of the core.
Planting material of the same variety should be stored in a separate bunch, in a plastic bag. Every package must be signed, be it Swag or Wild. Before storing the chibouks for winter storage, they should be prepared in a certain way.
To protect against pests and diseases, chibuki should be treated with fungicides, either a 1% solution of copper sulfate or use a 0.5% solution of Quinozol. The use of iron sulfate is allowed. The cuttings should be kept in the solution for 1-2 hours. To prevent the planting material from drying out, place it in a vessel with clean water for at least 2 days. After this, the pipes should be lightly wiped with a cloth to remove any drops of liquid. This article will tell you about the use of iron sulfate for apple trees in the spring.
The material can be stored in a cellar or refrigerator at an optimal temperature of +10C. The maximum temperature at which cuttings are stored in normal condition should not exceed + 60C. Humidity can vary from 95 to 100%. During storage, the pipes should be inspected for dryness. Such specimens become unsuitable for planting and must be removed from the bunch.
The first stage of preparing cuttings for storage in winter is to soak them in water for 24 hours.
Experienced gardeners add spruce or pine sawdust to a bag of cuttings intended for winter storage. Resin from coniferous trees can protect planting material from infection by rot or mold. Before pouring sawdust into the bag, they should be doused with boiling water. During the winter they can be changed 2-3 times.
Treatment before rooting
Before rooting, it is necessary to check the condition of the materials for planting: good ones - prepare for germination, bad ones - throw them away. If traces of mold appear on the seedlings, they must be treated with a solution of potassium permanganate.
Security check:
- The bark is examined: healthy - without blackening and wrinkles;
- A transverse cut is made in the stem. All wood and cambium under the bark should have a light green tint. Brown, white or black tint is an indicator of death;
- When pressing on the cut, a little moisture should be released. If there is no or a lot of it, then the rooting process will be low.
Soak
After checking for grape diseases, the chubuks are placed in a container with water for a period of 12 hours to 2 days. It is necessary to soak both overdried and normal chibouks. The room temperature is approximately +20 degrees. The water is changed every 12 hours. There are times when honey is added to water (1 tablespoon per 10 liters of water).
Trimming
A long vine is cut into chibouks with 2-3 buds. If pruning was done in the fall, then the lower cuts are renewed before rooting. They are made under the lowest nodes - on a wedge or obliquely. The work is carried out with a sharp knife to avoid squeezing the tissue. The cut branches are immediately placed in a container with water at the bottom.
Furrowing
The best place for root formation is the place where callus flows onto the wound surfaces. This phenomenon can be triggered manually. The lower part of the cuttings is scratched with a knife, making several longitudinal grooves. It is necessary to go deep to the wood or cambium. The length of the scratches is approximately 3-6 centimeters.
Processing by simulator
The lower part of the cuttings is soaked in one of the liquid root formation stimulants (solution of Zircon, Heteroauxin, Potassium Humate - according to the instructions) or treated with Kornevin.
After processing, the chibuki must be placed in 3–4 centimeters of water until the time for planting approaches.
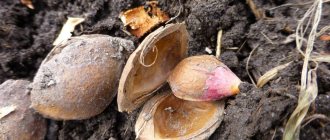
After two weeks, the top bud will begin to bloom, and the seedling will begin to absorb water, so it needs to be topped up.
Further care of seedlings
Caring for young grapes is not difficult; even beginners can do it.
You just need to pay attention to the following procedures:
- Watering. Young seedlings need regular watering. In spring, the soil should be moistened as it dries, and the plant should be watered for the last time no later than a week before flowering. Resume watering after flowering ends. Water the vine at the root with warm water, avoiding moisture getting on the stems and leaves. There is no need to overwater the plant - excess moisture has a detrimental effect on it.
- Feeding. Grapes do not need constant fertilizer. If the soil has been sufficiently fertilized in spring and autumn, the cuttings should be fed for the first time on the day of planting, and the next feeding should be applied after 3-4 years, when the soil is depleted.
- Mulching. It is advisable to cover the soil near the seedlings with mulch (you can use hay for this), which will help retain moisture in the soil, and the hay will prevent the growth of weeds. Mulch should only be removed when watering.
- Soil care. As soon as weeds appear, they must be removed immediately. In addition, the beds need to be weeded from time to time. This procedure will provide oxygen access to the roots.
- Disease prevention. To do this, young bushes must be periodically treated with fungicides.
As you can see, in order to get a good harvest, it is not necessary to buy grape seedlings from nurseries. It is quite possible to propagate grapes yourself. And having mastered the methods of cuttings, you can exchange new varieties with friends and neighbors.
Rooting of seedlings
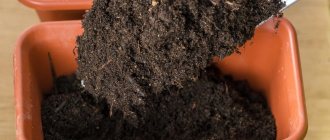
After 10 days, after the first bud has blossomed, the first roots will appear. When the root system develops, the chibuki are planted in a container with a special substrate. A special drainage is placed at the bottom of the container, and then a grape substrate. The seedling is filled to the top so that the top bud remains on the surface. After rooting, the seedling is watered and placed on the sunny side for productive growth. For survival, some gardeners feed young grapes. Grapes are grown from cuttings only with the rooting process.
Watch the video! How to root a grape cutting
Planting in open ground
Grape cuttings should be planted in May or early summer, when the threat of late frosts is behind us. For planting, it is better to choose a well-lit place, protected from wind and drafts on the south side of the site - the more light and warmth, the sooner the clusters will appear. There should be a support nearby for the grapes to cling to with their tendrils - a fence, mesh or a special trellis.
Sprouted cuttings are transferred to an open place in spring or autumn.
The basic requirements for the soil are low acidity and normal air permeability. It is important that there is no stagnation of water on the site, otherwise you will have to prepare high beds for planting. The procedure for planting cuttings is simple, but requires compliance with a number of conditions.
Table 2. Instructions for planting grape cuttings on the site.
| Sequencing | Description |
| Step 1 | Clear the area of weeds, dig a hole 50 cm deep |
| Step 2 | Place drainage at the bottom, pour humus on top, pour water at room temperature heated in the sun |
| Step 3 | Carefully remove the cutting so as not to damage the root system and earthen ball, place the plant and cover it with soil 40 cm so that the top bud is above the surface of the ground |
| Step 4 | Water the planted cuttings well with warm water, compact and mulch the soil |
| Step 5 | If the weather outside is cool, you need to cover the ground around the perimeter of the holes with oilcloth, and in sunny weather provide them with shading for 2-3 weeks |
Attention! For different grape varieties, agricultural technology provides for different planting schemes. For technical varieties used in the preparation of wine and juice, the distance is 80 cm, between table varieties - 1.5 m.
Video - Planting grapes from cuttings
Picking grapes
Kilching is the process of creating a temperature difference in the lower and upper parts of the chibuka: below is warm, above is cool. Kilching increases the chance of rooting.
When sprouting, the problem arises of bud sprouting earlier than root growth. There are times when greenery appears on a seedling and, before it has time to take root, it becomes exhausted and dies. It is kilching that can solve this problem. At home, in practice, it is carried out in the following ways:
- Containers with cuttings are placed on a radiator or in a special keel for bottom heating (temperature from +20 to +27 degrees). The temperature in the upper part should be from +5 to +10 degrees. To create such conditions, the culver must be placed in a cool room. In the absence of a piercer, the containers are kept on the battery, while a protective curtain-screen is constructed between the warm air of the room and the cool window;
- High productivity is achieved by upside down kilching. The moistened material is placed at the top, which is covered with a heated lid. This method prevents the bud from blooming before the root system.
Planting seedlings in school
A shkolka is a pre-prepared area of soil where grape seedlings are planted. This should be an area well lit by the sun. Boarding at school is carried out as follows:
- In the spring, the soil is dug up to a depth of 40 centimeters;
- One bucket of humus, two of sand and a scoop of wood ash are added per square meter of land;
- The soil is dug up again;
- Make small mounds in which the seedlings will be planted, after waxing the buds.
Growing grape seedlings in spring
In spring, it is easier to grow grapes from seedlings, but not everyone will be able to do this due to weather conditions. When growing, a special technique is followed:
- Woody and healthy shoots are cut off. They should be smooth and have swelling buds. Ready cuts are infused in water;
- The shoots are cut and distributed into chibouks with 2-3 buds. The lower cuts are made oblique;
- Each chubuk is planted in a jar or glass. Cultivation must be carried out in a warm, dark place until the seedling begins to develop its root system and take root;
- This growing of seedlings occurs all summer, and in the fall they are sent for preservation;
- Next spring, planting is done in a temporary place, and in the fall - in a permanent place.