Let's start the article from the moment the cutting is removed from its place of winter storage. As we already wrote in the article about winter storage of cuttings, we store cuttings in the basement, cellar or refrigerator. So we brought a cutting into the apartment from the cellar or took it out of the refrigerator, what should we do with it? Many authors advise leaving it at room temperature for several days to allow the cutting to acclimatize. Should not be doing that. Before germination, we will still saturate the cutting with water; it sits in water for about a day, plus operations for updating cuts, processing in root formers, etc., the cutting is quite capable of accepting the ambient temperature during this time, and the extra days are the start of exchange processes in the cutting - the start of a bud, and we definitely don’t need this ahead of time.
Planting grape cuttings in February. Early or just right?
No one will give a clear answer to this question. Grape cuttings are rooted from January to April, it all depends on the conditions of the winegrower and the region. In this matter, you just need to analyze your desires and capabilities. For example, I live in the Urals in the Republic of Bashkortostan, I have a greenhouse in which I can keep my seedlings during return frosts, I plant the greenhouse with tomatoes on the May holidays, most often on May 09-10. I will start from this date. If I start rooting grape cuttings in mid-March, then in early April they can be planted in cups, I will keep them on the windowsill and under lamps for a month, by May the root system will occupy the entire volume of the cup, in the greenhouse I will transplant the seedlings into a larger one container and will keep the grapes in the greenhouse until June. And suppose you live in the south and can plant cuttings earlier, which means we start rooting earlier. I know several winegrowers who plant cuttings in February and they also have excellent results. Or you don’t have greenhouses or hotbeds, in which case you won’t be able to transfer the grapes to the site early, and return frosts are simply destructive for young shoots, so root them not in mid-March, but in early April.
Now about planting cuttings in February. The first question is - do you want to plant it already or put the cuttings to germination? If you plant, it means you started germinating the chibouks back in January, by February they have taken root and you plant them in cups. My personal opinion: February is too early; even in the south, spring return frosts cannot be avoided. It's good if you have one or two cuttings and live in the south. You can plant them in February, transplant them into larger containers in March, then transfer them to a greenhouse in April and grow them there in large containers until the return frosts pass and the cuttings can be transferred to open ground. And if there are a lot of cuttings and by March they no longer need cups, but large pots. Do you have the opportunity to place all the seedlings in the apartment?
Regarding the regions of the Moscow region, the Urals and Siberia, I can say with confidence that it is definitely not worth planting cuttings in February. We plant in April, and place the chibuka for rooting in mid-March.
Procedure for caring for grapes
Conditions for caring for grapes at home
Cultivation at home does not require complex agricultural equipment. Timely preventive work, watering, fertilizing and pruning are the key to successful vine growing.
Optimal conditions
Caring for grapes after rooting begins with accustoming the plant to environmental conditions. With the onset of warmth, the seedlings are taken out onto the glazed balcony. Its side walls are covered, if possible, with reflective foil. Such conditions will allow you to grow any grape variety at home.
Lighting
Indoor crops fully develop in good lighting for 10 hours a day. If the vine is located on the north side, additional lighting is required. The use of fluorescent lamps is suitable for this. Plants placed on the south side may suffer from excess sunlight. The use of artificial darkening at noon saves the situation.
Temperature
In summer and autumn, +25°C is the most comfortable temperature for home grapevines. With the onset of cold weather, the trimmed bushes are transferred to a room heated to 12-16°C.
Humidity
Growing grapes in an apartment does not require strict adherence to humidity levels. The exception is Cissus multicolored; dry air is unacceptable for it. Other varieties do not tolerate excessive heat well. On such days, it is recommended to use a humidifier or increase the humidity with a spray.
Irrigation scheme
In the spring-autumn period, the soil is moistened abundantly. Fruit development depends on watering. Lack of moisture during flowering leads to low yields. The berries become small and sour.
With the onset of autumn and until the beginning of spring, the amount of irrigation decreases. To protect the root system from damage and decay, water from the pan is controlled and drained in a timely manner.
Loosening the soil
The structure of the soil affects the health and productivity of the vine. Grapes require loose soil that easily allows air and moisture to reach the roots. Treatment is carried out once a week with a rake for indoor plants.
Application of fertilizing and fertilizers
The growth and development of plants depends on the content of nutrients in the soil. In the process of growing grapes at home, it is necessary to regularly fertilize. At the beginning of spring, products with a large amount of nitrogen are used. In summer and autumn, potassium-phosphorus fertilizers are applied. In winter, the grapes are not fed. The day before the procedure, the soil is well moistened.
Support and garter of shoots
Growing grape shoots are tied up when the vine reaches the upper edge of the support. The garter is placed on a trellis or net for plants. Flexible branches are fixed at an angle of 45-60°, coarsened ones are bent to the bottom row of the support. The young vine is attached vertically. For fixation, flexible wire, tape or rope is used. The number of garters carried out during the summer depends on the vigor of grape growth.
Pollination of flowers
At home, it is recommended to grow self-pollinating grape varieties. It is allowed to place bisexual varieties with especially abundant pollen, blooming at the same time, next to the “female” ones. To improve the process, a piece of cotton wool or fur is used to carefully transfer pollen from bisexual varieties to non-pollinated species. Shaking the support also promotes additional pollination.
Shaping and pruning the bush
The best time for molding is autumn. During this period, sanitary pruning is carried out: dry, old, damaged parts of the plant are removed. The strongest fresh shoots remain on each branch. Rapidly overgrown side branches are pruned. The shape of the bush is chosen taking into account the fact that it will grow along the wall. It is recommended to give preference to a large fan formation.
In the process of pruning a fruit-bearing bush, the vine is divided into two parts. One of which is shortened to 2-3 buds, and the length of the other is reduced by 2/3. Next year, loops will grow on the long branch and clusters will form, and the shortened branch will produce new shoots.
Important! To get a large harvest, leave the strongest vine, located closer to the roots. The remaining branches are removed. During flowering, pinch shoots above the 4th or 5th leaf from the flower
Preparing for winter
After harvesting grapes grown in a pot, pruning is carried out, damaged and dried branches are removed. The vine is removed from the support. Bushes are stored in the basement or on the balcony if the temperature there does not drop below 0°C. To do this, the plant is placed on the floor. The top of the grapes is covered with burlap and covered with sawdust.
The first rules for rooting grape cuttings
- Cuttings need to be rooted with the buds facing up! How to determine where the cutting is up and where it is down? The bud on the cutting always looks a little upward, it turns out that wherever the bud looks, there is an up. The second rule is that above the bud the vine is always smooth, and below the bud the place where the leaf is attached and this place is always rough. Do not confuse the bud and the petiole - the bud is always soft and fluffy, the petiole is hard.
- What cuttings are suitable for germination? Both classic three-eyed and two-eyed and even one-eyed cuttings (especially important for expensive new products).
- What to root in? The simplest and most common method for home rooting is in water, some root in steamed sawdust, others in coconut, agroperlite, etc. We will consider water, because... it’s effective and free, but we’ll dwell on other methods a little.
- Where to root? We are talking about rooting grapes at home, so we are rooting at home and we will need a container for rooting - a simple liter jar or a plastic bottle with a cut off top, if there are a lot of cuttings, then you can approach the process more thoroughly and build a cultivator, this will also be a separate section in this article. However, a separate room is needed for the cultivator, so this option is not always acceptable for the average gardener.
- What we will need in terms of preparations and tools: any root formation stimulator, of the newfangled ones, Clonex gel and Rizopon have good reviews, of the long-proven ones - Kornevin, Heteroauxin. All root formers work on indolylbutyric acid, so it doesn’t make much difference which one to choose. The question here is more about the possibilities, for example, Clonex gel drug is expensive, 50 ml. costs 1300 rubles, approximately the same cost for a similar volume of Rizopon powder, and a Heteroauxin tablet costs 30-40 rubles. You will need a sharp knife, preferably a pruning shears, narrow masking tape to quickly and easily mark the cuttings, a marker, rubber bands for money or a paint marker (with this marker we write directly on the cuttings, then masking tape is not needed)
How to check that the cutting overwintered properly? When renewing a cut, take a closer look at the cross-section of the cutting; it should be green, “alive”, not dried out.
Selection of planting material
The seeds for planting should not have any damage, stains or traces of mold. Germination is checked by soaking the seeds in warm water for 30 minutes. Suitable for cultivation are specimens that have sunk to the bottom. Any floating residues are discarded.
The viability of the cuttings is checked by cutting the bark at the base. The greenery underneath indicates that the material can be used for growing. Chubuk is rejected if black or gray appears on the cut.
Suitable containers
The first time planting is carried out in ceramic or plastic pots with a volume of 4-5 liters. Second-year plants are transplanted into eight-liter containers. For three-year-olds, a pot of at least 10 liters in volume is required. From the age of five the container size does not increase.
Soil preparation
Growing grapes in an apartment is carried out in loose and nutritious soil. To do this, earth, humus, and river sand are mixed in equal proportions. For young seedlings, the amount of turf soil should be less than the proportion of humus.
The following are used for drainage: expanded clay, small crushed stone or special filler. Before planting, the soil and drainage are disinfected by calcination in the oven or treatment with a solution of potassium permanganate.
On a note! Ready-made soil for planting vines can be purchased at gardening stores. It is recommended to choose soil with a neutral acidity level.
Step-by-step landing algorithm
A favorable time to plant grapes is the end of March or the beginning of April. The event consists of several stages:
- A developed seedling is purchased or prepared.
- The roots, cut by a third, are soaked in water with potassium permanganate for 30 minutes. It is recommended to keep the seedlings in a solution with a root formation stimulator.
- The bottom of the pot is filled with a drainage layer of 1-2 cm. Soil is poured on top, leaving 2-3 cm of the edges of the planting container free.
- The seedling is transferred into the soil to a depth that allows it to stand without support. Its lower part is hilled until a small mound is formed.
- The plant is watered abundantly, covered with film or plastic caps with holes for air penetration.
- Watering is carried out as the soil dries out.
- After the buds open, the film is removed.
How to prepare cuttings for rooting
First of all, we mark the cuttings. We take masking tape, wrap a small piece around the cutting and write the name of the variety or hybrid form on top. It seems like a small thing, everyone thinks that they will remember where they have what, but then no one remembers.
We update the cuts on the cuttings. Methods for updating a cutting/division are presented in the table:
| 5-10 mm. below the internode, cut perpendicular to the axis of the cutting. This cut is considered classic and I personally use it, the result is excellent. I tried other methods, cutting at an angle, at a knot, etc., but I don’t see any real difference between them. | |
| An oblique cut through the septum to the kidney. The main advantage over the first method is the large surface area on which roots will form. In theory, everything seems to be the same and many winegrowers use this method, but in comparison, I did not see any difference. | |
| Dividing the cuttings into single buds. An oblique or straight cut is made in the middle of the internode (at an equal distance from neighboring buds). | |
| Various options shown in one photo | |
| We cut off the lower bud on two- and three-eyed cuttings. At the site of the cut bud, roots will also actively develop. Some winegrowers advise not to touch the lower bud, because... A shoot can also develop from it, therefore, removing such a bud reduces the likelihood of successful germination of the cutting. I believe that by removing this bud we stimulate the development of the upper buds and they will definitely “wake up”, but if we leave it, then it is quite possible that the lower bud will wake up first, but the upper ones will not. In the keeler, the lower bud must be removed, because it is located in the zone of action of elevated temperatures and, if it is left, then the purpose of using the keeler is lost. |
The table presented ways to form the bottom cut, but what to do with the top? It seems to have dried out, so the cutting itself will not dry out and there is no need to touch it. Many winegrowers do this, but I renew the top cut. I just retreat 5-10 mm. from the top of the cutting and make a new cut. For what? In the future, we will soak the cuttings and the cutting will seem to drive water through itself; within an hour after the start of soaking, you will see how the upper cut becomes wet. By updating the cut, we seem to allow the cutting to displace possible air in the tissues, as if to pump water through itself.
The cuts have been updated, next we need to soak the cuttings in water. We tie the cuttings with renewed cuts into bundles with rubber bands and place them vertically in a container of water at room temperature for a day so that they are saturated with water. We use water from a filter, rain or melt water, most importantly, not chlorinated from the tap. There is no point in placing cuttings in basins or bathtubs, this is a waste of time and resources; within a day the vine will be perfectly saturated completely, immersed with the lower cut literally a few cm in water. Some authors write that you need to soak for 3 or 4 days. No, it’s not necessary, the cutting will have time to be saturated in 12 hours, and in 24 hours it will definitely be saturated, you can keep it in water for a week, it won’t get any better.
To disinfect the cuttings, before soaking them for a day in clean water, you can place the cuttings in a bright pink solution of potassium permanganate for 2-3 hours, I don’t do this, but I don’t see any harm from this advice
After the cuttings are saturated, you need to treat them with a root former. I personally don’t furrow cuttings, so first I’ll tell you how I do it myself, and then taking into account furrowing. If we use Heteroauxin, then dilute one tablet in 5 liters of water and keep the seedlings in the preparation for 24 hours. Exactly the same as they were soaked in water, vertically and tied into bundles, the water was simply drained and the Heteroauxin solution was poured. If we use Clonex gel, then we take a brush and use the brush to rub the gel into the lower part of the cutting: the place of the cut and literally 1.0-2.0 cm up. After Clonex gel, the cuttings should dry a little (10-15 minutes). If we use Kornevin or Rizopon, then we simply dip the lower part of the cutting into the powder, you can rub it a little with your finger, as if rubbing the powder into the heel of the seedling, then we wait 10-15 minutes and the cutting can be rooted. If there is no preparation, then you can use honey, a tablespoon per bucket of water.
Now about furrowing. I don't furrow, because... I think that the plant itself will calmly “tear” the bark in the place where the roots should form, I tried furrowing, compared the results and did not notice any difference. If you still want to scratch something on your cuttings, then this is done like this: on each cutting you make grooves with any sharp object, for example, a nail, scalpel or knife. Number of grooves/scratches: 3-4 pcs., length 1.5-2 cm, depth 1.0-1.5 mm.
The second advice of many authors, which I do not use in my practice, is to cover the upper cut of the cutting with wax or paraffin. Someone even covers the top bud so that it will bloom later when the roots have already formed. I personally don’t do anything with the top cut, but if you want, then take a candle, melt it, and dip the top cut of the cutting into wax or paraffin. I wouldn’t recommend treating the kidney; I haven’t tried doing this myself and I can’t say anything about the results.
We updated the cuts, processed them in a root former, made furrows as desired, all that remains is to place the cuttings in water. Take a jar and pour 1 cm of water into it. You shouldn't pour a lot of water, because... For the formation of roots, access to oxygen is needed; it is at the border of water and air that roots grow most actively. If we pour a lot of water, the roots will also appear, just not at the heel of the cutting, but higher up, so it is optimal to use little water. Place the container with water in a warm place (23-25 °C). You can put it on a closet, it’s warmer upstairs and there is no direct sunlight (we don’t put it on a windowsill in the sun! A dark place is not a prerequisite, but desirable). Cover the jar with cuttings with a plastic bag to reduce water evaporation and drying of the cuttings. Don’t forget about the water level, check it periodically, it’s convenient to put a mark on the jar with a marker so that you can use this mark to determine whether the level has changed or not. We also change the water as necessary so that it does not fade.
The photo shows a cutting on the 15th day of rooting; it can already be planted in the substrate. This cutting has even grown a little; the most optimal root length for planting in the substrate is literally 5-10 mm.
The optimal root size for planting in the ground is shown in the photo below. Larger roots may break during planting.
We prepare chibuki
Rooting of the stems must be done immediately after sanitary pruning of the grapes, which is usually carried out in the fall. Before the formation of the winter shelter begins. The optimal period for harvesting is the last month of autumn.
- In the process of sanitary pruning of grapes, we select those vines that bore fruit this year, have ripened well, look great and have a thickness approximately like that of a simple pencil.
- We take a pruner and cut the selected vines into segments so that the minimum number of buds per segment is three, and the maximum is five.
- Soak the cut cuttings in water for 24 hours.
- After a day, we take out the cuttings, lay them out in a well-ventilated place and let them dry thoroughly.
- We melt the wax and dip the edges of the cutting into it, as if sealing them.
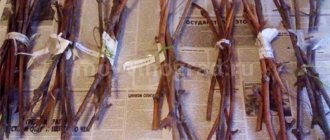
- We wrap each cutting in a separate bag, without tying it tightly so that the grape stem can breathe.
- In each bag we put a piece of paper with the name of the variety or label the bags so as not to confuse the variety of crop later.
It is best to store bags of cuttings in the refrigerator, close to the freezer, but not in the freezer itself. It is there, under the freezer, that the level of humidity and temperature best corresponds to the standards necessary for storing grape cuttings.
Another option for storing chibouks, if there are a lot of them and it is extremely inconvenient to store them in the refrigerator, is a cellar. True, in this case it is better to wrap them in film or, if you are a supporter of environmentally friendly storage methods, in a wax-soaked napkin. In this form, the cuttings are placed in a container on a sandy base and covered with sand on top. An alternative storage option is in the ground. Experts recommend burying the cuttings in a trench 20 cm deep and covering the top with, for example, fallen leaves collected under healthy trees.
Cut shanks cannot be stored at room temperature for more than 24 hours. The planting material will “wake up” quite quickly and, feeling comfortable conditions, will begin to grow. After this, it will no longer be suitable for long-term storage.
Another important question that needs to be answered at the very beginning of the conversation concerns the relevance of autumn cutting. After all, in theory, it would be more convenient to cut the chibouks after frost, with the arrival of spring, that is, directly from a vine that has successfully overwintered. Everything would be fine, but during the frosty period of the year the moisture contained in the grapevine evaporates, its level reaches a critical level. That is, after winter the vine is actually dehydrated. To root such chibouks, they must be kept in water for at least 72 hours. Sometimes even this time is not enough to restore turgor.
There is another weighty argument in favor of autumn harvesting of chibouks. The fact is that due to severe frosts, the buds on the vine may freeze. This will not happen if you prepare the cuttings in advance and provide them with comfortable storage during the winter.
Planting rooted cuttings
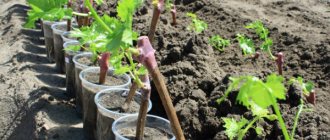
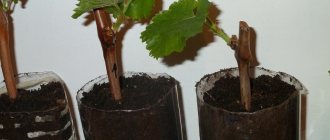
2-3 weeks have passed since the cuttings were planted for rooting, roots 5-10 mm long have appeared, it’s time to plant the cuttings in the substrate. For planting we use 500 ml beer glasses, or even better 1.5-2.0 liter PEK bottles. with the top cut off. We make drainage holes in the containers and sign the name of the variety. We prepare nutritious soil from equal parts of chernozem, rotted manure (namely rotted manure!, grit) and sand. Personally, lately I have been planting in forest soil + sand + perlite, vermiculite or foam chips. Pour in a little more than half a glass of the nutrient mixture, install the cutting, and sprinkle the glass to the very top. We do not compact the soil too much so as not to damage the roots. We water from the tray. We place the cups in a tray with water, the soil will be saturated and then we place the cups on the windowsill or under fluorescent lamps. The frequency of subsequent watering is no more than once every 7-10 days, otherwise the roots will rot. Overwatering is the main cause of death of vegetative seedlings; more details on all the reasons for the death of rooted cuttings can be found in a separate article.
It is important not to bury the cutting too deep into the glass; the roots grow downward, so they need room to develop.
Transshipment and replanting of bushes
Before the first fruiting, young crops are transferred to a larger pot every year. The bush is removed from the container along with the soil. Drainage is poured into the bottom of the new container, after which the plant is immersed inside the pot. The voids are filled with fresh soil.
Replanting grapes at home begins after the first harvest. The procedure is carried out once every 2-3 years. The vine is removed from the pot and cleared of soil. During the examination, diseased or damaged roots are removed. The grapes are placed in a container with drainage and covered with earth. After watering, the vine is transferred to a dark place for 7 days.
Important! The vine grows quickly at home. Therefore, until the age of five, bushes are replanted annually. Subsequently, the procedure is repeated every two years.
How to root grapes in peat
All preliminary work with cuttings is no different from germination in water. Therefore, we saturated the cuttings with water, treated them with any rooting agent, then took peat tablets, poured boiling water over them, waited until they swelled and cooled. Should become these barrels
We stuck the cuttings into the tablets, then took a bag, for example, white ones in rolls for food products, immersed the tablet with the cutting in it and tied it with tape at the point where the cutting entered the peat. The bag is needed so that the peat does not dry out; there is enough moisture in it for the cutting to take root. If the cutting is thick, a shoot develops from the bud, but the roots are not visible and you observe that the peat is already dry, then take a syringe, pierce the bag and slightly moisten the peat. Don’t pour too much, grapes don’t like swamps, it’s better to underwater than overwater.