Preparing the soil for tomatoes
To get a decent harvest even before planting tomatoes in open ground, you should choose the optimal place for tomato bushes. The culture loves indirect sunlight, and usually performs well in illuminated but sheltered beds. The best pre-tomato plants are onions, carrots and cucumbers. If you plant seedlings next to strawberries, both crops will show a good reaction. The yield of both plants will increase noticeably, and the ripened fruits will grow more voluminous. The beds where eggplants, peppers, and potatoes were previously planted should not be given over to tomatoes, since in these areas there is a high probability of finding pathogens of various diseases.
The quality of soil varies not only in each region, but even in the fields of the same area. Tomato crops are quite picky about soil, which is why, before planting tomatoes in open ground, it is best to find out, if possible, the condition of the soil in future beds for tomato seedlings. Garden departments sell tests that determine soil acidity. The lower the indicator, the higher the acidity level is considered. A soil with a number of 7.0 is considered neutral. Tomatoes will grow well with an acidity range of 6 to 7. If the number is lower, it is worth adding lime to the soil, if higher, sulfur.
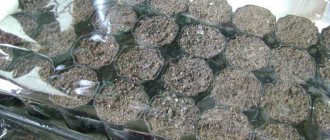
Compost is an ideal tool for preparing land for planting. It also acts as a good bait for earthworms, which are known to perfectly loosen the soil and provide a favorable environment for beneficial bacteria. Experienced gardeners know how to plant tomatoes correctly, and begin preparing the soil in the fall immediately after thoroughly clearing the area of previous plants and their remains. It is better not to use manure, since tomatoes, after fertilizing with manure, begin to actively grow leaves to the detriment of the fruits. If the soil does not warm up well, it is usually covered with black film or dark plastic.
Time to plant tomatoes in beds
The most common period when you can plant tomatoes in open ground is certainly May. Usually during this month, hardened tomato seedlings are transplanted into open beds. During the warm spring, some gardeners try to plant bushes a little earlier, hoping for a quick harvest. However, there is no need to rush; tomatoes planted in mid-April may take a long time to take root, get sick and even die, since the soil has not yet warmed up enough.
In the first ten days of May, the first planting of seedlings, which have already become a little stronger in the air and sun, gradually begins. The best time to plant tomatoes in open ground is in the afternoon or evening. At this moment, the sun is no longer shining so brightly, or you should choose cloudy weather for transplanting to the beds. Thus, the entire process of planting young plants may not occur in one go.
Formation and location of beds
Gardeners have long formed the opinion that the tomato planting pattern affects the future number of fruits. The most common arrangement of beds: traditional and double rows. According to the traditional method, rows of beds about a meter wide or a little more in the direction from north to south are formed on the prepared soil, about 5 days before planting. This rule helps ensure uniform illumination of the sprouts. There is usually a distance of 70 centimeters between the beds, regardless of the tomato variety.
Young bushes are placed in two rows. As for the space at what distance to plant tomatoes, for low varieties the gap is approximately 30 centimeters, for medium and tall varieties - 45 cm. When forming double ridges, tomato bushes are placed in a checkerboard pattern on a strip of soil about half a meter wide, leaving wide paths between them beds. Wide paths are comfortable, it is convenient to pull hoses along them, to process bushes; with such planting, each sprout receives more light.
Mitlider landing method
It should be noted that planting tomatoes in trenches according to Mittleider is quite reliable and practical. Using this technology, you need to form and dig trenches so as not to go beyond the boundaries and not affect other areas of the soil. It is not necessary to loosen the soil; weeds will grow quite rarely. You can plant tomatoes in narrow trenches made in boxes with sand and sawdust. The Mittleider method is usually used on difficult, infertile soil. A small plot of land is suitable for this method. The length of the trenches can be any.
If the garden is located in a lowland, then for this method it is worth raising the ground level by 20 centimeters using bulk soil or subsoil flooring. It is necessary to form a clear horizontal soil level.
Understanding how to properly plant tomatoes in open ground according to Mittleider will help you harvest tomatoes that differ in taste from fruits from ordinary garden beds.
Proper feeding, regular watering and photosynthesis help tomatoes carry out the cleaning process themselves. After harvesting, it is better to leave all waste between the trenches.
Method of planting in open ground
Before planting tomatoes in open ground, water the soil in containers with seedlings well. This makes it easier to remove the bushes from the planting places and will also prevent the possibility of damage to the roots of the sprouts. The holes for planting and subsequently growing tomatoes in open soil should be about 10-15 centimeters deep. Usually they are watered at the rate of a bucket of water per 8-10 holes, then fertilizers are added along with humus.
Gardeners know how to properly plant tomatoes in open ground, so the sprout is usually carefully removed from the container with two fingers, removing all leaves except the 2-3 on top. The stem along with the root soil is placed vertically in a hole and covered with earth and compost. In this case, the sprout should remain open. Only the roots enter the soil. After planting, the land is often treated with mulch. After transplanting to the ground, the tomatoes are left untouched for 8-10 days; during this period, the plants get used to the new place and take root.
There is no need to water the bushes yet. However, we must not forget about possible frosts. Therefore, it is worth choosing the right time when to plant tomatoes in the ground in order to avoid the death of fragile shoots. To protect against cold weather, immediately after being placed in the soil, the bushes can be covered with transparent film material. The film is usually kept until the tenth of June, when the threat of cold disappears. After 10 days, the sprouts are watered for the first time, and two weeks later they are earthed up.
Rules and nuances of caring for tomatoes in an open area
Planting tomatoes in open ground is supported by subsequent plant care. One of the mandatory procedures is pinching or removing excess shoots. When pinching, side shoots should not be pulled out with force, but carefully broken out by pulling to the side. If the stepsons have become powerful enough, they should be cut off with a razor or a sharp knife. First of all, the shoots under the brushes are removed so that the bush does not drop the ovary. It is also better to get rid of excess clusters of flowers where the fruits could not set.
Many gardeners are of the opinion that such a plant as tomatoes: planting and care in the open ground should be accompanied by extremely competent actions, since tomatoes are one of the most demanding plants. The main components that are most needed by tomato plants are phosphorus, potassium, and nitrogen. Creating their own fertilizers with the addition of various components, gardeners have long been using many traditional types of fertilizers that have been tested in practice.
Types and sizes of beds for tomatoes
The size of tomato plots is directly influenced by what varieties the gardener plans to grow and the method of plant formation.
When choosing powerful, tall, indeterminate varieties (especially if you plan to form two stems), the distance between plants in the row and between the rows should be greater than when growing low-growing, compact tomatoes.
The planting scheme directly affects the size, namely the width of the plots. The length is limited by the size of the plot and the number of tomatoes that are planned to be planted:
Wide beds. This option is suitable for growing tall and powerful tomatoes. The width of such plots is 1.1-1.2 m. When planting in two lines, the row spacing is on average 70-80 cm, and the distance between tomatoes in a row is 40-50 cm. The passage between the plots should be wide so that there are no difficulties when harvesting and performing other agricultural work. Medium-sized varieties can also be planted on them, in which case the row spacing will be 60 cm, and the distance between tomatoes in a row will be 30-40 cm. The width of the planting plot is also reduced - it will be 0.9-1.1 m.
Narrow beds. They are made for planting compact, low-growing varieties. The row spacing is 40-50 cm, between plants in a row is 30-40 cm. The width of the passage between plots is 70-80 cm. Both wide and narrow beds are suitable for two-line planting. When planting tomatoes in one line, the width of the plot will be on average 50 cm; this option of planting seedlings is less profitable and productive.
High beds. They can also be either wide or narrow. Their difference is that tomatoes are planted not at soil level, but at some elevation above it. The height of the ridge should be convenient for caring for and harvesting the nightshade crop. Basically, gardeners pour them 25-30 centimeters high, but preferably no higher than 40 cm.
Box beds. This is a type of raised beds, but they are distinguished by their convenience, ease of care, excellent appearance, durability, and functionality. Such plots produce an earlier, richer harvest. You can make beds from various materials, but the most common is wooden boards. Moreover, they even choose substandard wood, the main thing is that it is not rotten or eaten by pests. Before installing the structure, the boards are treated with a protective antiseptic. It is best to use hardwood - oak, acacia and others. The width of the bed for tomatoes in open ground depends on which varieties will be planted and according to what scheme. Typically, such plots are formed in the form of a rectangle. After assembling the structure, a drainage layer is poured or agrofibre is laid over it, and a mixture of garden soil with non-acidic, nutritious peat, rotted manure and universal granular fertilizers is poured onto it. Afterwards, water well and tomato seedlings are planted.
Warm beds. This interesting way of preparing a planting plot allows tomatoes to start the growing season faster. Consequently, gardeners will be able to harvest from such plants much earlier. This is achieved due to the fact that the beds are heated not only by the sun’s rays from above, but also by heat from below. It is released as a result of rotting, decomposition of organic matter embedded in the “foundation”.
Construction of warm beds
Three types of beds are recognized by gardeners as the most effective: those using electric and water heating, and organic ones.
The creation of future beds should begin with the creation of frames. They can be made from materials available to the summer resident:
- The most financially and labor-intensive are solid brick beds. But this option will last a long time, and the brick will hold heat perfectly.
- Wooden frames also hold heat well, but they are less durable. To increase their service life, they must be treated with antiseptics in several layers.
- Metal sides are durable, but have high thermal conductivity.
They also use slate, plastic panels and everything that has served its intended purpose. However, these materials are possible to use, but are not desirable due to their impracticality and fragility.
Problems when growing ground tomatoes
Late blight affects ground tomatoes very early, especially when adjacent to potatoes. To prevent disease, the distance between crops should be at least 200 m. But in a small area this is almost impossible to do.
The only preventive measure is spraying both crops with copper preparations (HOM, Oxychom, Ordan). Copper-containing preparations are alternated with Previkur or Consento. Treatments are carried out at intervals of 10-12 days throughout the entire growing season, alternating chemicals. Solutions of these drugs are spilled on the soil under the tomatoes.
Phytophthora later appears where copper is present, so tomato stems are wrapped with copper wire. Wire can also be inserted between potato hogs.
But, despite all the measures, late blight will still appear in the open ground. The only question is timing. The later the disease appears, the greater the harvest you can get.
Cladosporiosis severely affects soil-grown tomatoes in the south. In the middle zone in open ground, the disease is rare. Since the disease begins with the lower leaves, their timely removal reduces the risk of the disease. For prevention, treating bushes with Pseudobacterin is a good option. Treatments are carried out 3-5 times per season with an interval of 7-10 days.
When the first signs of the disease appear, the affected leaves are removed and the tomatoes are treated with copper-containing preparations.
In the middle zone, it is much more difficult to get a good harvest of ground tomatoes than with greenhouse cultivation. Often the efforts are not worth it. Therefore, greenhouse cultivation is preferable here. In the south, on the contrary, it is better to grow tomatoes in open ground, covering them with spunbond on cold days. With the right selection of varieties and proper care, two harvests are harvested here per season.
- Schemes for feeding tomatoes in a greenhouse and exhaust gas
- Growing tomatoes Bull's heart
- The most dangerous tomato diseases and methods of treating them
- What to do if tomato leaves curl
- How to pick tomatoes correctly and why to do it
- Rules for planting tomato seedlings in a greenhouse
- Caring for tomatoes in a greenhouse
- How to protect tomatoes from late blight
Preparing beds and soil
You need to start preparing for planting tomatoes in advance; most often this is done in the fall, so that everything is ready by spring. Tomatoes are very sun-loving, so they are given an open, sunny place in the garden. This crop cannot be planted even in weak shade or under trees; bright light and sun are required all day long. In low light, tomatoes will grow poorly, will not ripen, will spoil, and even if they reach perfect condition, their taste will leave much to be desired. Only tomatoes grown in the sun, with proper agricultural technology, turn out juicy and, as they say, sugary.
In the fall, they begin to prepare future beds for tomatoes. The quality of the soil is of great importance; tomatoes need it to be nutritious, so various fertilizers are added to the soil. The soil is thoroughly dug up, weeds and roots are removed, and loosened. Add manure or compost at about 5 kg per 1 m2 - these fertilizers can only be applied in the fall, then they will rot over the winter and enrich the soil with useful substances. They cannot be used in the spring.
In addition to manure and compost or in addition to them, you can add 40-50 g of potassium chloride and superphosphate per square meter. These fertilizers must be mixed with the soil and not scattered over the surface.
But not always and not everyone succeeds in preparing the soil for tomatoes in the fall. In the spring, you can also work on the soil: to grow tomatoes, add 20 g of saltpeter, 60 g of nitrophoska, 1.5 cups of wood ash powder and a bucket of compost per 1 m2. Fertilizers must be thoroughly mixed with the soil; compost can be additionally added to the holes.
The following rule applies to fertilizers: it’s better to use too little than too much. If you overdo it with fertilizers, the tomatoes will actively sap, which will negatively affect the development of the bush and the harvest.
Tomatoes often suffer from various types of fungi, this applies to both seedlings and adult bushes. The seedlings die from blackleg and other similar aggressive fungi; other diseases, various rots, molds, but no less dangerous, live in the open ground. Experienced vegetable growers recommend disinfecting the soil before planting tomatoes; using copper sulfate or copper oxychloride to treat the soil against fungi.
The beds and holes for tomatoes are made a few days before planting the seedlings. This cannot be done day after day, because in this case the soil will be cold. Sometimes fertilizers are added directly to the holes, then they are poured with plenty of water and left for a day so that the earth warms up. The distance between the holes is 35-50 cm, depending on the variety; the distance between the rows is larger - 50-70 cm.
Features of tomato beds
Agronomists increase crop fertility through crop rotation. This method allows you to get rid of infections and pests accumulated over the season. Therefore, experts recommend planting tomatoes after carrots, beets, onions, cucumbers, and strawberries.
It is not recommended to plant tomatoes after eggplants, potatoes and peppers, as they are nightshades. This species has only infectious diseases and pests.
Tomatoes are not fussy and grow well in loamy and sandy soils. Heavy clay soil is loosened with sand, peat or sawdust. Humus or compost is also added to increase fertility. Agronomists recommend adding 3 buckets of sand and 4 buckets of humus per 1 m2 of clay soil.
Using simple garden soil: how to prepare and process?
After a place for tomatoes has been chosen, it is necessary to prepare the area for planting. It is recommended to cultivate the soil twice a year:
- In the fall, the ground is dug up to destroy weeds. Poor soil should be fertilized with organic fertilizers (humus at the rate of 5 kg per 1 sq.m.). You can also add mineral fertilizers (50 g of superphosphate or 25 g of potassium salt per 1 square meter).
- In the spring, the area is cultivated to prepare the land for planting. Bird droppings are used as fertilizers at the rate of 1 kg per 1 sq.m., wood ash in the same proportion and ammonium sulfate (25 g are used per 1 sq.m.). It is necessary to apply fertilizers at least 4 weeks before planting in order to so that minerals are evenly distributed in the soil.
- Increased soil acidity is corrected by adding lime in an amount of 500-800 g per square meter of area.
Experienced gardeners do not recommend using fresh manure for tomatoes, since in this case the plants will build up green mass to the detriment of the formation of ovaries.
The beds for tomatoes begin to be prepared at the end of May:
- Small trenches are formed in a north-south direction. The distance between rows is 70 cm, between beds from 1 meter.
- For each bed you need to make sides about 5 cm high. This system prevents water from spreading during watering.
- Now you can plant tomato seedlings in open ground.
To grow tomatoes, it is important to know how to choose soil for seedlings, including ready-made soil for tomatoes and peppers. And if you want to grow them in a greenhouse, then read this article, which talks about what kind of soil is needed for this.. Tomatoes are everyone’s favorite vegetable on summer and winter tables
Although it is demanding in care, if you approach the issue of growing tomatoes with knowledge of the subject and with love for the land, you will be pleased with the harvest!
Tomatoes are everyone’s favorite vegetable on summer and winter tables. Although it is demanding in care, if you approach the issue of growing tomatoes with knowledge of the subject and with love for the land, you will be pleased with the harvest!
In-ground beds with compost - step-by-step instructions
This type of warm bed with compost filler has the simplest design and requires a minimum of materials, but it takes a lot of time and effort to set up. Here are step-by-step instructions for creating it.
Step 1. Using pegs and a rope stretched between them, mark the places for future warm beds. For an ordinary country greenhouse, this can be either 2-3 rows with a width of 60 to 120 cm with paths between them, or a U-shaped bed.
Step 2: Remove the turf with a shovel. Do not throw it away or mix it with the rest of the soil - it will be needed to form a warm bed.
Advice! If the arrangement of warm beds occurs at the same time as the construction of the greenhouse itself, start digging a trench before completing the frame of the structure.
Step 3. Dig a trench 50-70 cm deep or two shovels deep.
Step 4. Level the side walls of the trench.
Step 5. Determine the type of soil. If the soil is heavy and contains a lot of clay, deepen the trench by 50 mm and fill it with sand to the same thickness - it will act as drainage and absorb excess water faster. Otherwise, when the soil absorbs water quickly, cover the bottom of the trench with cotton cloth, which will prevent excessive leaching of nutrients from the bed along with moisture.
Step 6. Place a row of empty plastic bottles with tightly screwed caps on the bottom of the trench - this is necessary to insulate the bed with compost and protect it from freezing in cold weather. As additional measures, you can line the walls of the trench with boards or several layers of plastic film.
Step 7. Prepare covering material and mulch.
Step 8. Proceed to fill the prepared trench with the necessary rotting material. What needs to be laid and in what order is described below in one of the following sections of the article.
Selecting a site, preparing soil and beds for planting tomatoes
So, based on the above, you were able to choose a suitable site. Next comes preparing the soil for future beds. It is best to prepare the soil in the fall, namely, dig up the soil, adding wood ash and humus to it. To improve the nutritional value of the soil, you can sow the area with oats for the winter. In the spring it will be much easier to dig it up a second time, remove the weeds and add fertilizer.
When the soil is ready, you need to form the beds. The following types of tomato beds are distinguished:
1. Warm beds in open ground. Tomatoes are very heat-loving plants, so many summer residents choose this type of garden bed. They work on the principle of a compost heap: organic matter rots and gives off its heat.
Such a bed is made as follows: a trench is dug a meter wide and half a meter deep, and wood chips, sawdust, dry grass, and shrubs are placed at its bottom. A layer of organic matter is placed on a layer of wood, on top of which manure is poured. Next, they begin to complete the top layer, consisting of last year's compost and soil. Tomatoes are planted in such beds a little earlier, as is harvesting.
High bed for tomatoes
2. High bed. This type of arrangement is very similar to a warm garden bed. A high bed is soil raised above the main level of the garden and framed with special sides. Tomatoes in such soil are easy to care for, since the appearance of weeds is hampered by the sides. Such beds are not destroyed during the winter and during unfavorable weather conditions.
3. Regular garden bed. Many gardeners are negligent in preparing their beds and make the usual dug beds. Unfortunately, they have many disadvantages: a large number of weeds, it is impossible to protect them from frost, wide beds complicate the care of plants. Therefore, such beds are more suitable for greenhouses.
Organic fuel beds
The most budget option. Organic matter is used to create heat - wood chips, leaves, compost, grass, manure, etc. In this case, expenses will be needed only for the construction of the frame. Surprisingly, if such beds are arranged correctly, they will last for 5 years. And organic matter will turn into excellent soil for plants.
Summer residents recognize the third method of organizing warm beds as the most effective. Not surprising. Maximum effect at minimal cost!
The organization of organic beds has 3 options: buried, raised and combined. These methods of organization can be of other varieties (bed-box, bed-hill, etc.), but the essence remains the same.
What to make a warm bed from
A high warm bed can be made from a wide variety of materials that are available: board, slate, plastic, metal, stone, brick. If not only functionality and benefits are important to you, but also beauty, then you will have to try a little more. However, such a garden will be pleasing to the eye and will become part of the overall landscape.
High beds arranged using gabions are ready-made composters. All season you put plant residues in them, and in the fall you fill them with soil - the bed is ready for the next season.
The beds with herbs look picturesque and give off aromas. Such flower beds especially need watering.
From several beds you can create a composition in the form of a flower, pattern, or geometric shapes. This creative approach will decorate your site and make it more interesting. Use garden figurines, vases, birdbaths, and scarecrows as decorations.
Decorative borders are another way to turn an ordinary garden bed into an original landscape feature. Depending on the style of the garden, the border can be made in the form of a fence for a rustic style, decorated with mosaics for a Mediterranean style, or the stone will remind you of Italy.
A warm bed can even fit in a barrel! For example, from such a small area, you can get a pretty decent harvest.
Caring for such beds is as simple as possible, and the beds themselves become the highlight of the garden and give it volume.
decorateme.com
Feeding tomatoes
The first time fertilizer is applied 2-3 weeks after planting the seedlings in the ground. Weakened plants can be fed a week earlier.
In this case, nettle infusion is used. It is prepared as follows: nettles without roots are placed in a barrel up to half the volume, filled with water and covered with film. After 7-10 days the fertilizer is ready for use.
The resulting infusion is poured into a bucket, 1 tbsp is added there. l. Kemira, stir well and water the tomatoes at the root so that the splashes do not get on the leaves. Consumption of nettle infusion is 1.5-2 liters per 10 plants.
The second and third feeding is carried out during flowering and fruit growth. The same fertilizer is used, but the dose of Kemira is doubled.
Foliar feeding is also useful. To stimulate the appearance of ovaries during the flowering period, once every 10 days, tomatoes are sprayed with boric acid (10 g diluted in 10 liters of hot water, the solution is cooled before use).
To speed up the ripening of fruits, immediately after planting the seedlings and during the formation of buds, spray the plants with Ovary or Tomaton. But keep in mind that it is not recommended to use stimulants more than twice a season.
How to care for tomatoes in open ground
Immediately after planting in the ground, tomatoes require special attention and careful care. Plant them in a place that is lit all day. There is a danger of seedlings unaccustomed to outdoors being burned under direct rays. It is recommended to protect tomatoes in the ground from bright light for the first few days. Those who do not have shade netting can cover the bed with white non-woven material or newspapers.
Watering
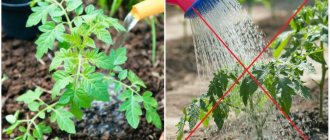
After planting in the ground, the tomatoes are watered abundantly, and then they are not given water for about 2 weeks. This is necessary so that the root develops intensively in search of moisture - this is the only way it can feed the above-ground part.
Worries that the crop does not have enough water, even if in the middle of the day the leaves wither and do not droop - this is a normal reaction. Tomatoes should be watered for the first time when the plates do not straighten out early in the morning. This means that the leaves actually withered not due to intense evaporation of moisture, but due to its lack.
It is impossible to insert watering into the tomato care schedule in advance. The soil must be moistened regularly and evenly, not forgetting that the crop comes from a hot, arid climate and has a rather long root. Overwatering of tomatoes during cultivation is unacceptable - this is the path to the development of various rots. Drought will lead to intensive formation of flower clusters, but with a lack of moisture, the ovaries will crumble or grow poorly.
In hot sunny weather, you need to moisten the soil in the evening. In the morning this can only be done if the sky is overcast.
The frequency of watering when growing tomatoes depends on the structure of the soil, weather, climate, the condition of the bushes and the development of their root system. Gardeners must focus on their own conditions. Average irrigation scheme:
- in hot weather twice a week;
- when it gets cold – once every 7 days.
Feeding
To get a good tomato harvest, the crop should be properly fertilized during the growing period. First, it must grow green mass capable of feeding fruits, and be in the vegetative stage of development. Nitrogen is especially needed for this.
But all elements must be present in the nutrition of tomatoes, from the first feeding to the end of the growing season, just in different quantities. Those who do not want to study the needs of the crop can buy special fertilizers for nightshades. There, the manufacturer independently took care of the balance of nutrients, which makes care easier.
Fertilizers when growing seedlings were discussed in the corresponding chapter. The first feeding after planting is given to tomatoes 10-14 days later - with potassium and phosphorus for the development and strengthening of the root system. A few days later - nitrogen.
After the second branch with buds appears, N is already given:
- in small doses;
- in ammonium form;
- better - with foliar feeding.
Based on the length of the growing season (some varieties are harvested from the garden in mid-to-late July, others produce a harvest before frost), the tomatoes are fed 2-4 more times. During the flowering and fruiting period, tomatoes especially need potassium, calcium, and phosphorus.
But K and Ca cannot be given at the same time; the first element blocks the action of the second, and their proportion should only be 10:7. First, tomatoes are fed with calcium, then with potassium and phosphorus in an easily accessible form.
It is recommended to give microelements by spraying every 14 days - this way they are better absorbed.
Formation
Superdeterminate and standard varieties do not need to be tied up or pinched when grown, which makes care much easier. Tall ones are attached to the support as early as possible, leaving as many lateral shoots as the number of trunks the bush is going to grow into. The rest are mercilessly broken out or cut off.
The first pinching is carried out 2 weeks after moving into the ground. Subsequent ones as needed. The operation should be included in the system of care and performed regularly. Leaves are removed under the tassels that have begun to fill.
Benefits of a raised bed
Summer residents from the northern regions constantly face difficulties in growing heat-loving crops. In short summer conditions, it is almost impossible to get a good tomato harvest. Spring is long, the ground takes a long time to warm up, and recurrent frosts are often observed in early summer. It is possible to plant seedlings in open ground only closer to mid-June; tomatoes do not have time to ripen before the first autumn cold, which arrives here at the end of September.
Attention!
Growing tomatoes in boxes is important for areas where the soil remains cold for a long time. In regions with early, warm springs and hot summers, the roots in the box will burn; planting in recesses is popular here.
To install a large greenhouse you need a lot of money and a sufficient amount of free space on the site. It is even more difficult for those who have a vegetable garden located on a slope; it is impossible to place a greenhouse in such conditions. Box beds (soil raised above the main level of the garden, framed by high sides) allow you to solve several problems at once:
- the soil warms up faster, tomatoes can be planted earlier;
- It is easy to install pegs or arcs on the structure and cover them with polyethylene (to protect plants during cold periods);
- boxes allow rational use of free space in a small area, since they do not take up much space;
- installation is possible both on flat and flat areas. On the slope, the boxes should be placed in the form of terraces. When arranging, you should take care of the paths and level the upper sides strictly horizontally;
- It is easier to care for plants and it is convenient to approach them;
- the soil always remains inside the structure and is not washed away during watering, during rains or after snow melts;
- Tomato roots do not like stagnant moisture, so they are not planted in places with high groundwater levels. In a high bed, water does not stagnate, it can be installed in a problem area, and crops can be grown without the risk of rotting;
- the box is easy to install and dismantle; the structures can be permanent or portable.
Let us also note the aesthetic side of such structures. The tall mini-garden is a geometrically regular figure that looks very attractive on the site. Even an inexperienced summer resident can make a box bed with his own hands, based on his own wishes and capabilities; there are no complicated plans or strict calculations. There are 2 options for tall structures:
- Narrow (for planting tomatoes in 1 row) - width no more than 50 cm. It is possible to cover the bushes using a tent method, install supports in the middle of each edge of the box, connect them at the top with a crossbar on which to throw the canvas.
- Wide (for planting tomatoes in 2 rows) – width up to 120 cm. You can install arcs for shelter, the canvas will be easy to lift on each side of the box.
Both options are good in their own way, it is difficult to clearly determine which will be more successful, it all depends on the goals and free space on the site. One thing is for sure, boxes are better and more convenient than classic beds. After rains and waterings, you don’t have to walk through the mud. Paths can be overgrown with weeds, but they do not penetrate into the beds from behind the sides, and weeds that have sprouted inside the structure can be easily removed without weeding.
Don't skimp on greenery
Pruning, removing excess leaves, pinching the tops scare many people. Of course, it’s a pity for the beautiful leaves. But when fruiting has begun, you need to prefer the result. Timely “cleaning” is the best prevention not only of late blight, but also of all other “tomato scourges”.
Start with tomato hygiene. “Garbage”—dry, damaged leaves on and under bushes—has no place.
In order for the light to reach the lower ovaries, the bush “breathes” freely; with the beginning of fruit formation, you need to remove 1-2 leaves per week. Without a doubt, remove all the leaves under the lower stem, and higher up the trunk - take a closer look, gradually lightening the crown.
Pinching improves the quality of the crop. If you are not growing one of the hybrids that do not require pinching, form tomatoes into 1 stem, for bushy varieties - into 2-3 stems. From an early age, tirelessly, every 1-2 weeks, or better yet, when they reach a length of 3-4 cm, remove side shoots-stepchildren growing from the axils (by hand or by cutting, but not to the base, but leaving a stump of up to 1 cm).
It is also necessary to regularly remove “empty” flower clusters on which ovaries have not formed.
Stop the growth of the bushes in time at the end of July or the first ten days of August, then all the ovaries will have time to ripen normally. For open ground culture, it is better to limit the number of brushes to 5-6 (all on one shoot or 3-4 on the main shoot and 2-3 on the side shoots). The tops are pinched, leaving 2-3 leaves above the upper ovary.
Pinching improves the quality of tomato harvest
Dates for planting tomatoes in the middle zone
In the middle zone, it is recommended to plant grown tomato bushes in early April in greenhouses and greenhouses and in mid-May in open beds; choose the best day according to the lunar calendar. Seedlings planted in the garden before May 15 may be subject to night frosts, for which the first days of May are famous (usually they coincide with the flowering period of apricots).
If you nevertheless decide to plant early, and weather forecasters predict a sharp drop in temperature, then cover the plantings with film at night, fixing it along the contour of the beds with cobblestones or bricks. Such insulation usually helps plants to withstand sudden cold snaps normally.
In a small area
Vertical beds are a good find for determinants. Low-growing varieties grow and bear fruit comfortably.
As soon as the air warms up to 14 degrees and the soil reaches 10, seedlings are planted. Plants are planted in holes 20 cm deep. Water with a warm solution of potassium permanganate.
You can just sow seeds in pots at the beginning of May. Cut bottles are placed on top. Cover with lutrasil at night at low temperatures.
Tomatoes in such structures require more frequent watering and fertilizing. To keep the bushes from drying out, use hydrogel.
General information
The tomato, intended for growing in a greenhouse, belongs to the Solanaceae genus and is a herbaceous plant. The root system is rod-shaped and quite well developed. The leaves of the tomato are odd-pinnate, sometimes strongly reminiscent of potatoes. The stem is erect or branched.
Tomatoes for growing in a greenhouse, depending on the variety, are also divided into types. Even experienced gardeners are confused by this classification. Stand out:
- Peruvian tomatoes;
- hairy tomatoes;
- ordinary tomatoes.
In order to choose the right variety for a greenhouse or greenhouse, you must know the basic characteristics of the plant:
- bush height;
- determinant or indeterminate type;
- timing of fruit ripening;
- versatility of using the harvested crop.
In addition, tomatoes can be intended for a summer or winter greenhouse. The quality and quantity of the future harvest depends on how correctly the variety is selected for specific conditions and requirements.
Diseases and pests of tomatoes, control methods
There are quite a few pests that can harm tomatoes, the most common of which are:
- The mole cricket is an insect that settles on well-fertilized and moist soils. To combat it, strong insecticidal preparations are used, including infusions of vinegar and red pepper.
- Wireworms are larvae that are covered with a dense shell and damage the root system of the plant. For prevention, during autumn site preparation, acidic soils are alkalized.
- Gnawing cutworms - these caterpillars are considered the most dangerous enemy of vegetable crops. For prevention, it is recommended to carry out deep mechanical tillage and timely weeding. If caterpillars appear in large numbers on tomatoes, they must be collected and destroyed manually.
Mole cricket - a pest of tomatoes
Wireworms: these larvae cause damage to the root system
Gnawing cutworms are dangerous caterpillars
Tomatoes can suffer from the Colorado potato beetle, thrips, spider mites, whiteflies and melon aphids. To combat these types of pests, it is worth using insecticidal preparations.
It is recommended to carry out preventive spraying of tomatoes every 5-7 days, alternately using onion infusion and Bordeaux mixture. If the plant has been affected by a dangerous infection, serious treatment is required.
Tomatoes are often subject to diseases such as blossom end rot, mosaic, late blight, wild spot, anthracnose, fomoz, etc. In this case, it is necessary to treat the plants with special potent fungicides, and the affected parts of the plant must be removed.
If the tomatoes are severely damaged, complete destruction of the planting is required. To minimize the likelihood of re-development of the infection, before the new season the soil must be treated with disinfectants, for example, watered with a solution of copper sulfate, a hot solution of potassium permanganate, and deep digging is performed.
How to make beds for tomatoes with your own hands
Making your own beds is quite easy. If necessary, you can start arranging a high or warm bed for tomatoes in the spring. No difficulties should arise if, in the process of carrying out the work, you follow a step-by-step algorithm, as well as the advice and recommendations of experienced gardeners.
It is important to understand that in order to obtain a high yield, it is important not only to choose the right planting material and carry out the planting process. An equally important point is the preparation of the soil and place for planting tomatoes.
The ease of caring for the plants and the amount of sunlight penetrating each crop depend on how well the site is landscaped. It is worth thinking in advance about how watering will be organized - this will save you from many problems in the future.
How to make raised beds for tomatoes
It is important to correctly determine the optimal height of the beds for tomatoes. In high beds it is quite easy and convenient to carry out the process of cultivating tomatoes
In order to make the sides, you will need to use the following materials:
- asbestos-cement slate sheets;
- building brick;
- boards.
Just as in warm options, in this case it will be necessary to use organic matter, due to which the seedlings will be heated in the spring. You can do planting work several weeks earlier than gardeners usually do. During the process of decay of organic matter, the process of heat release begins. If, during the growth of the crop, you water the tomatoes frequently and abundantly, then the process of decay of organic matter becomes much more intense.
Raised beds consist of several layers. The sequence of layers should be as follows:
- wood – you can use bush branches after sanitary pruning or crown formation;
- hay, weeds, fruit and vegetable peelings;
- compost, manure, chicken droppings;
- wood ash;
- nutritious soil.
Many experienced gardeners note that it is not necessary to use a fence. In this case, you can simply form mounds, on the surface of which tomatoes are subsequently planted.
Advice from experienced gardeners
If you listen to advice and recommendations from experienced gardeners, then you should take into account the following points:
- If you plan to make warm beds for tomatoes yourself, but there is no manure, then an excellent alternative solution is to choose bales with straw. It is recommended to first fill the bales with straw with a solution based on chicken solution, which is made in the ratio: 1 bucket of chicken manure per 50 liters of water ;
- Basil, lettuce, sage, garlic, bell pepper, and onion can be excellent neighbors for tomatoes;
- as practice shows, it is best to plant tomatoes in narrow beds, while the paths are best made wide, this is due to the fact that if the beds are narrow, then it is possible to reach all the tomato bushes without trampling the soil in the beds;
- if the path is wide, this will allow you to stretch the hose for watering the plants without much difficulty;
- when arranging warm beds, it is recommended to first lay a metal mesh with small cells and only then rotted manure; this approach will prevent the penetration of rodents.
Growing tomatoes is not as difficult as it may initially seem, but it will take some effort to get the desired result.
Advice! It is recommended to make the beds so that the sun's rays fall evenly over the entire area. For these purposes, you can make the southern side of the site a little lower.
How to make beds for tomatoes: features of beds, types, sizes. How to make high and warm beds yourself. Preparing beds in spring and autumn. Advice from gardeners.