Vegetable growing » Tomatoes
0
1630
Article rating
Kira Stoletova
The sale of vegetable crops is now very common in the consumer market. Planting and growing tomatoes is especially revered among farmers. But, like any plant, the bush requires proper care and attention; crops are especially in dire need of irrigation. Drip irrigation of tomatoes is one of the most effective irrigation systems, which allows you to correctly and timely add the necessary moisture to the soil and supply vegetables with nutrients.
Rules for drip irrigation of tomatoes
Disadvantages of drip irrigation for tomatoes. How to make drip irrigation in a greenhouse.
Drip irrigation is a technology that allows you to hope to make your work in the garden easier. Originally, drip irrigation is a technology that is partially borrowed from hydroponics. But on a personal plot, soil is added, which ensures the inertia of the spread of water, and an aggressive environment that will begin to destroy your plants as soon as you neglect and moisten the soil more than required. Based on this, you need to approach the implementation of drip irrigation wisely, and spend several months, and maybe years, fine-tuning the system to suit your needs, climate, humidity and soil structure. You should not initially count on a good result, the main thing is that you will gain irreplaceable experience in building drip irrigation, find your mistakes and modernize or re-make a system that will be better than the previous one. I don’t know a single fellow gardener who did drip irrigation the first time, which satisfied him for several years. Everyone goes through a series of mistakes and failures.
Norms for watering tomatoes in a greenhouse using the drip method.
It is impossible to determine the exact watering rate for tomatoes; it will vary depending on temperature, humidity, and soil structure. Averaged data often goes beyond normal and leads to negative consequences for plant growth. On average, after planting in the ground, a small tomato bush requires 2-4 liters of water. During the fruiting period, adult plants consume about 10 liters of water per day. Before putting into operation a drip irrigation system, it is necessary to carry out commissioning testing and determine over what period of time such an amount of water passes and how deep the soil is moistened.
After planting seedlings in open ground, watering is required 1-4 times a week, depending on humidity and temperature. In the future, the plants are watered 1-2 times a week. During flowering and fruit formation, tomatoes need to be watered more often. To prevent tomatoes from cracking, some gardeners water the bush less frequently and with less water during the final stage of fruit ripening. You cannot water tomatoes with cold water; with drip irrigation, this problem rarely arises, since the water settles in tanks and heats up to 24-26.
How often should you water tomatoes in open ground?
Watering tomatoes in open ground is not as easy a procedure as it might seem at first glance. This matter has its own characteristics and nuances. Tomatoes love warmth and sunlight, but not heat!
Watering frequency
The frequency of watering a tomato plant outdoors depends on how quickly it dries out. You need to moisturize it abundantly, once a week - this will be enough, provided that there is no rain. If there is any precipitation, you need to do this less often. There should be enough liquid in the ground after the start and before the tomato stops pouring. If you do not water tomatoes in open ground on time, they will become small, and even worse, they may even fall off the ovaries. They don’t need to be irrigated often, but the main thing is to do it correctly.
And when the tomatoes have developed and grown, the lack of moisture in them can cause them to crack.
After planting, tomatoes do not need to be moistened frequently.
In open ground there is also no need to pour water often. The right thing to do is to do this less often, but with plenty of water. This is the basic rule that must be followed immediately after planting. But if it is done often and in small portions, this is not correct, and besides, such watering can negatively affect the fruits.
If there is intense heat during the day, it is better to water the tomatoes after it subsides, literally before sunset. Since at night the liquid is well absorbed by the root system of the plant.
By the appearance of the plant, you can determine with the naked eye whether it has enough moisture. If it is deficient, the leaves will become darker and wilted. When the fruits begin to set, the amount of water when watering will need to be increased.
The best way to water
This method is very easy to set up with your own hands. Plastic bottles will make your life easier. When using this method, productivity increases. It also has a beneficial effect on the preservation of fruits and plants from the disease blossom end rot. It will be correct if you add literally two or three pinches of ash per ten liters of liquid to the water for irrigation. Also, for a good harvest, you can sprinkle the ground around the plants with ash.
If you find a hard crust on the surface of the earth, be sure to loosen it immediately. This often happens after heavy watering or after a rainstorm. And if there is mulch of cut grass on the ground near your plants, then it is not necessary to loosen the soil every time.
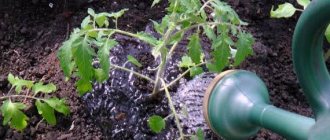
When watering, the stream of water should be directed to the place where the plant is planted, that is, at the root. Never direct liquid onto leaves or fruit. If droplets of water remain on the leaves, this will damage them. As a result, late blight spores can germinate.
Tap water is very hard and can affect the acid balance and soil temperature. You can water in the morning, the main thing is to monitor the water temperature.
What water to water
What kind of water to water the tomatoes also plays an important role. After planting plants in open ground, water them every week, once or twice. A sufficient quantity is approximately five liters for one bush. The most ideal option for watering tomatoes is rainwater.
Gardeners recommend infusing water for irrigation in containers, and then adding fertilizers in the form of manure or weeds. This will make the water much softer.
Video “Watering tomatoes”
In the recording, an experienced gardener talks about the proper watering of tomatoes grown in open ground.
plodovie.ru
Drip irrigation for tomatoes in a greenhouse
For example, we will take the simplest option - drip irrigation individually for each plant using a flexible hose.
- Step 1. Installation of water storage tanks. For these purposes, you can use plastic cans or barrels from various building materials. If the capacity of one is insufficient, then you need to connect several in series so that the total amount of water is at least 100 liters. The containers are connected at a distance of 5 cm above the bottom. This is necessary to prevent dirt from getting into the hoses. To guarantee, you can install a special filter for water purification at the common outlet. Containers must be raised above ground level by more than one meter. The best option is to fill them with rainwater; drainpipes can be connected for these purposes.
- Step 2. Installation of hoses and pipelines. Make a preliminary routing of the hoses, estimate the location of the droppers. Practical advice. It is impossible to foresee all options for the future. In this regard, we strongly recommend that the length of the hose and the number of holes be kept in excess. If they are not needed, they can be turned off, and as soon as the need arises, the “power” of drip irrigation increases without any problems.
- Step 3. Install taps and wiring. The number of taps and additional equipment depends on the specific characteristics of drip irrigation. But all of them must ensure full functionality of the system, uninterrupted operation and ease of management. Practitioners strongly advise using the simplest taps; they are easy to maintain and unpretentious in operation.
- Step 4: Make IVs. There are several options to solve the problem.
- Buy a ready-made sleeve in the store. It has calibrated holes and can be laid in any place. In greenhouses, such a sleeve can serve for at least ten years; in the open air, due to the influence of hard ultraviolet rays, the service life is reduced to two years.
- Make holes with a small, highly heated nail. The distance between the holes is selected in accordance with the agricultural growing technology used in the greenhouses. The advantages of this method are simplicity and speed of execution. Disadvantages - plants in the beds need to be planted in even rows.
- Make the holes mobile. To do this, additional small-diameter “antennae” bends are inserted into the main hose at certain distances. The length of the branches is approximately 20-30 cm on each side, the diameter is 3–4 mm. To make them, you can use any plastic or rubber flexible hoses.
Containers for creating an irrigation system
For do-it-yourself drip irrigation from plastic bottles for tomatoes, you need to prepare the following tools and materials:
- flasks of various capacities;
- foam;
- awl or nail;
- scissors;
- supports for hanging bottles;
- flexible cocktail straws;
- toothpicks;
- scotch;
- sealant;
- burlap.
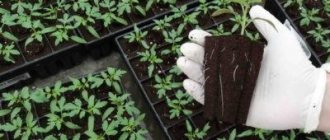
Watering tomatoes in a greenhouse using a homemade device requires compliance with certain rules. 2-liter containers are most convenient for use. To water a large area you will need a 5 liter container.
To prevent water loss, you should make several holes in the bottle with a diameter of 1-1.5 mm. Gardeners note that during use, the flasks become clogged with soil particles, so they are wrapped in pieces of burlap.
To ensure watering of plants located in a small area, calculate the amount of flexible containers required. The correct ratio between the number of containers and the number of plants reduces water consumption and improves the quality of watering.
Moisture consumption increases in hot weather as intense evaporation occurs. The structure, made by yourself, is installed in the soil during planting of seedlings.
The bottle is buried in the ground at a distance of 15-20 cm from the seedlings. Watering with plastic containers does not damage even the shortest plants and ensures soil permeability of 30-40 cm.
Disadvantages of drip irrigation for tomatoes.
One of the main disadvantages of a drip irrigation system for tomatoes is its limited area of action. The root system of tomatoes can extend 20-25 centimeters from the center of the plant. Drip irrigation moisturizes only a small area and increasing it is not economically feasible. With drip irrigation, there is no point in planting plants at a great distance, no matter what fertilizer you apply, the roots will be able to extract useful microelements only where the watering is distributed, and the area, as we have already said, is small. Conclusion: with drip irrigation, the effectiveness of fertilizers decreases depending on the area covered by irrigation.
The second disadvantage of drip irrigation is the vertical distribution of moisture. The roots of tomatoes extend 15-20 centimeters deep into the ground. In order for the ground to get wet by 7-10 centimeters, drip irrigation is needed for 40-70 minutes. Tomatoes do not like too much watering, so before installing a drip irrigation system, you need to carry out tests to measure the time it takes for the soil to get wet to the depth you need. If there is insufficient moisture in depth, the root system will not work effectively. If there is excessive moisture, the entire plant may rot and become depressed or die.
Rules for drip irrigation of tomatoes
The sale of vegetable crops is now very common in the consumer market. Planting and growing tomatoes is especially revered among farmers. But, like any plant, the bush requires proper care and attention; crops are especially in dire need of irrigation. Drip irrigation of tomatoes is one of the most effective irrigation systems, which allows you to correctly and timely add the necessary moisture to the soil and supply vegetables with nutrients.
Rules for drip irrigation of tomatoes
Description of the method
The most optimal solution when growing vegetables in open ground or greenhouse conditions is drip irrigation of tomatoes, then a sufficient amount of water will always be added to the soil. The essence of the method is to use pressure to pass water through a hose located around the perimeter of the beds and ensure a uniform flow of water.
The advantage of the method is its functionality; it not only irrigates the soil, but also frees you from the grueling manual application of liquid into the soil. Another benefit is the fact that with the help of drip irrigation of tomatoes in a greenhouse, you can do the work twice as fast, while the water gets to all the beds in the right quantity. With the help of such a system it is very easy to maintain the required watering regime.
If you grow tomatoes in a greenhouse, drip irrigation is the best solution for you, just like in open ground. The system is designed to water vegetable crops, house plants, and flowers in the garden. Thanks to the automatic watering system, water is distributed only to the necessary plants, which prevents the growth of weeds.
Manufacturing a drip system from pipes and hoses
First, you will need to purchase the required number of devices: “Katif” or “Supertif”. The first is suitable for flexible hoses, and the second for pipes. The design of the system using the Katif module is extremely simple:
- The hoses are laid so as to cover each bush. If the tomatoes are planted in two rows, it is enough to place the structure around the perimeter.
- Holes are carefully made in the hoses, equal to the diameter of the droppers.
- Press the droppers firmly into place so that 1-2 devices fit per plant.
“Supertif” is installed on pipe bends, but the structure of this system is similar to that described above. You can install tubes on it that supply water to 4 plants at once; this option will be less expensive. To accurately calculate how many devices and tubes you will need, first draw up a diagram.
The frequency of turning on the system can be adjusted using sensors. This will allow the tomatoes to be hydrated when they really need it. You can also adjust the amount of incoming moisture, for example, purchase devices with a capacity of 4 liters per hour.
You can make your own irrigation system from medical droppers. To do this, lay pipes along sections and drill holes in them with a screwdriver. Insert the plastic part of the dripper and turn it to adjust the rate of water flow. This system has earned flattering reviews for its accessibility.
- Watering and caring for an orchid at home
- How to fertilize tomatoes in a greenhouse with yeast and sugar
- How to properly dilute yeast for watering tomatoes
- How often should you water tomatoes in a greenhouse?
Rules for crop irrigation
In order for drip irrigation of tomatoes to bring the expected benefits, you should follow the general irrigation recommendations when growing vegetable crops in a greenhouse. Tomato species grow well in moist soil, but the air must be dry. Therefore, it is not recommended to aerate the soil immediately after irrigation - these manipulations will dry it out and will not have the desired effect. The best way would be to fertilize the soil with freshly cut grass; such actions will retain moisture.
Rules for adding liquid:
- You should water under the root system, the main thing is to make sure that you do not wash the rhizome with your actions;
- to avoid diseases, try to prevent the leaves and stems from getting wet in the greenhouse, as this may create excessive humidity;
- all water procedures should be carried out in the morning;
- the liquid must be heated to 22-24 °C;
- improper care can lead to excessive evaporation of moisture through the leaves, which will lead to the death of the plant;
- vegetable crops require abundant but not frequent application of liquid to avoid dampness and suppuration.
Irrigation systems
You can make a drip irrigation system yourself
Dripper systems for watering vegetables can be of different types.
- Katif is a device for irrigation on an industrial scale, made from a hose with an elastic structure, the width of the walls should be no more than 15 mm.
- Supertif is an external dripper with a flow rate of up to 2 liters per hour, which is designed for irrigating several beds at once. Such a device can be installed on steep slopes and not worry about excess fluid consumption.
- Also, in your personal garden, you can do without any devices and make a system with your own hands, for example, with plastic bottles. To do this, you need to take a bottle, make several holes in it with an awl at a distance of 3-4 cm from the bottom and dig the container to a depth of 10-12 cm upside down between the plants.
- Automatic irrigation system Signor Tomato - drip tape, which is designed for 100 m of beds. It runs on a battery and does not require recharging with electricity because it is powered by the sun.
With each of these systems it is quite easy to maintain the irrigation regime, which is so necessary for growing shrubs and mature crops.
Options for making systems yourself
In specialized markets you can purchase universal kits for making a drip system. Such designs after assembly will not differ from factory samples, however, their cost will be considerable. But you can use the advice and recommendations of skilled gardeners by creating structures from old plastic bottles, medical products for introducing liquids, and clay containers.
Standard design
Making a structure from polypropylene pipes for water supply has many advantages. The material is distinguished by its budget cost, reliability and practicality.
What you will need:
- metal or plastic container with a volume of 150 - 200 l;
- a shut-off device for the passage of water and its shutoff;
- water purification device;
- plastic pipes without connections with a diameter of 1.5-2 cm - 100 - 200 m;
- old hoses or purchased drip tapes 50 - 100 m;
- connecting elements;
- soldering iron for soldering polymer pipes;
- screwdriver;
- sharp knife.
Manufacturing
Having taken measurements of all the necessary elements before purchasing, you should take into account that to irrigate 1 square meter of planted tomatoes you will need 20-25 liters of water per day and about 2 m of drainage drip tapes. In order to ensure the supply of water to the plants with sufficient pressure, a large container with water should be installed one to two meters above the ground level.
Having made a hole in the container at a height of about 10-15 cm from the bottom, install a ball valve. Cut the polymer pipes with a sharp construction knife into pieces of the required length, use a screwdriver to make holes at a distance of 40 -70 cm. Using a soldering iron, secure the pipes to the fittings and make wiring to connect branches from an old hose or purchased drip tape. At the edge of each outlet pipe, a plug should be made with wooden blocks.
Attach the ends of the branches to the fittings, install a mini-starter splitter or a pass-through tap for a plastic pipe. The design of such connecting elements ensures good tightness, and opening and closing the tap does not require much effort. In addition, thanks to special regulators, you can smoothly change the amount of water supplied. At the last stage of manufacturing the structure, you should connect the water supply to the container, fill it and start drip irrigation.
Recommendations!
The filter for water purification must be installed on the container. After all, the unit will retain sand and debris. Without filtering small particles, the irrigation system will quickly fail.
Use of plastic bottles
The most budget-friendly and ordinary method of watering tomatoes is to create a structure using plastic bottles, which accumulate in every home. This method of irrigation will not replace proper soil moisture during severe drought. However, it will be a good idea to maintain humidity, saving the life of the plants.
Necessary materials:
- plastic bottles with a volume of 1.5 to 5 liters;
- needle, knitting needle or nail;
- nylon;
- twine;
- geyser plugs.
Buried containers
Manufacturing
Taking the prepared bottles and a hot sharp object, make holes around the entire circumference, retreating 5cm-10cm from the upper and lower edges of the container. Having dug a hole next to the tomato bush, place the bottle there with the neck up. Cover with soil, leaving 15 cm of the top. Secure a piece of nylon to the neck of the container to prevent dirt from entering. Using a watering can without a nozzle, pour water into the bottle, which will subsequently be evenly supplied to the root system of the tomatoes.
Hanging containers
Manufacturing
To create this structure, you should worry in advance about the construction of wooden stakes or metal rods over the bushes with tomatoes, on which a container of water will be attached. The maximum height of the structures should not exceed 50 cm. Having made holes in the lid of the bottle with a hot sharp object, the bottom must be cut off with a knife. Punch two holes on the side of the bottle, thread a string and hang it from a structure of stakes. Fill with water and secure a piece of nylon over the top of the container to prevent debris from entering.
With geyser stopper for plastic bottles
Manufacturing
To create that original design, you need to purchase a geyser watering can from specialized markets, which screws onto the bottle instead of a cap. The bottom of the container can be cut off as desired. After all, the advantage of the design is that as soon as the liquid in the container runs out, you can unscrew it from the geyser nozzle and fill it with water again. After first making holes in the bottle, put a watering can on it, and stick the structure into the ground at a distance of 10 cm from the tomato bush. The only disadvantage of this system is that the nozzle can only be selected for bottles with a volume of 1l-2.5l.
Recommendations!
When creating a drip irrigation system from plastic bottles, you should know that the more holes are made in the containers, the more drops will fall on the plantings. In this case, the containers will have to be filled with water much more often. An excellent option when installing plastic structures would be to add fertilizers and disinfectants against pests and diseases to the containers. However, you need to remember that fertilizing, fungicides and insecticides should be added already in dissolved form. The preparations must be diluted strictly following the instructions.
Use of pottery
The method of spot irrigation using clay containers was used thousands of years ago by the people of Israel to irrigate fields. When using this method, much less water is consumed, weeds grow poorly, and there are fewer pests.
Necessary materials:
- clay containers of various sizes.
Manufacturing
Clay vessels should be buried in the ground at a distance of 15 cm from the root system of the plant. Small containers should be buried in the ground for watering crops in small raised beds or containers; larger containers should be buried for irrigating plants on small plots of land. All that needs to be done after burying the jugs in the ground is to fill them with water in a timely manner, systematically monitoring the condition of the tomatoes.
With this method of drip irrigation, all the lateral branches of the tomato root system will intensively reach towards the buried vessel with water, entwining it over time, securely fixing on its outer walls.
Drip irrigation technology using clay vessels helps save up to 60% of the water consumed during surface irrigation. To preserve the dishes before the onset of sub-zero temperatures, the pots should be removed from the ground, cleaned with soda ash and vinegar, and stored in a dry place until the next season.
Recommendations!
When using the drip irrigation method using clay dishes, fertilizers and disinfectants cannot be added to the containers. Therefore, plants should be fed and treated with fungicides and insecticides separately.
Design of medical droppers
Spot irrigation using medical droppers has a similar principle of operation to other DIY structures. The supply of liquid to the root system of tomatoes in such a system can occur either from a bulk container or directly from the water supply.
Necessary materials:
- plastic or metal container with a volume of 100l-200l;
- polymer pipes for water supply 50m-100m;
- filter for water purification;
- medical devices for introducing fluid into the body;
- ball valve;
- plastic plugs;
- fitting;
- angle-HDPE for connecting pipes;
- sharp construction knife;
- drill or screwdriver.
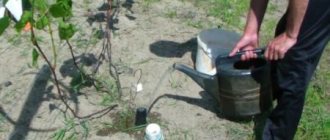
Water tank system
Manufacturing
After installing a container for supplying water to a height of 1m-2m, it is necessary to install a filter and a ball valve into it, retreating 10 cm from the bottom. After installing the elements, you should install the HDPE corner, securing it with a coupling. You need to put a piece of polymer pipe on one edge of it, and another corner on the second to connect it to the main plastic hose. Having counted the number of beds, make the wiring, securing the branches with fittings.
When the polymer pipes are installed and laid out throughout the area, you should begin connecting medical devices. After making the necessary holes in the hoses with a screwdriver or drill, secure the tubes. After attaching the droppers, the needle should be placed at the base of the tomatoes, and the system wheel should be unscrewed until it stops. This action is necessary to check the operation of the structure, after which adjust the required level of water supply. For moisture-loving crops, you need to adjust a higher liquid supply; for others, reduce the level.
Plumbing system
Manufacturing
Drip irrigation of their medical products can be done directly from the water supply by connecting a hose to it. This method is applicable even in the presence of high water pressure. After all, after waiting until the liquid reaches the most distant point, you can turn off the tap, reducing the water supply. To make the structure, lay out polymer pipes or old hoses around the area and make the wiring. Using a screwdriver or drill, make holes and install droppers.
Installation methods
Katif and Supertif
The method of installation and operation of Katif and Supertif droppers is very similar. In order to make an irrigation system, we will need to insert droppers into the hose with our own hands:
- make holes of the required size;
- make sure that the holes are level;
- make sure that all the tubes fit well into the holes.
A distinctive feature of the Supertif installation is that the hose is inserted onto special supports and located around the perimeter of the garden. Such a system is capable of watering tomatoes in four directions at once. Depending on how much water you need for irrigation, you can choose devices with different capacities.
Installing a homemade dropper
To make an eco-sprinkler for tomatoes in open or closed ground, you can use ordinary plastic bottles. In this case, you will do without automation and save a lot of money.
Watering through plastic bottles
Finally, our system is installed and, as you can see, there is nothing overly complicated here; anyone can do it with their own hands. Now let's discuss the watering process itself.
It’s very simple to walk through each bed and fill the bottles with water. Through small holes in the lids, water will slowly flow directly into the root system of the tomatoes. You can also feed plants in exactly the same way, using various nutrient solutions instead of water.
This way, your plants will have constant access to vital moisture for several days, and we won’t have to run to the garden every day and check if our tomatoes are dry.
Why is it important to water tomatoes correctly?
Proper watering plays a key role in obtaining a good harvest. For tomatoes, this issue is very acute, because violations can lead to various diseases.
You can determine that the irrigation technology has been violated by the following signs:
- Spots form on the leaves, and subsequently the leaves begin to curl.
- Stems and leaves dry out.
- Plants do not bloom or the ovaries fall off.
- The root system begins to rot.
- Late blight or other diseases appear.
If any of this exists, then you need to immediately normalize watering and apply methods to restore plants.
Many people argue when it is better to water - in the morning or in the evening. But there is no definite answer here, it is more related to other parameters and we will talk about them further.
Signs of under- and over-watering
Strong and healthy seedlings receive the required amount of liquid; the following signs indicate possible problems:
- curling of leaves;
- stem cracking.
The first symptom indicates a lack of water, but excessive watering causes damage to the green parts of the plant and fruits - they become inedible.
In a greenhouse, it is important to moderately irrigate the beds, however, in dry and hot weather, the amount of liquid can be increased.
Signs of lack of moisture in tomatoes:
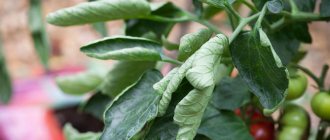
- Twisting the sheet plate along;
- Drying of ovaries and buds without symptoms of disease.
If there is a lack of moisture, tomato leaves curl into a boat.
If there is a lack of watering, the plants become weak and frail. There is an increased vulnerability to fungal diseases and insect-borne viruses.
Signs of excess moisture:
- Tomatoes that have been over-watered become watery and tasteless;
- The stem and fruit crack, which leads to further infection and disease of the plant;
- Fungal diseases spread quickly in a greenhouse.
From an excess of water, tomatoes crack and rot.
With high humidity and poor ventilation of the greenhouse, all types of rot occur, late blight develops quickly, the fruits deteriorate and lose their keeping quality and transportability.
Features of watering tomatoes in a greenhouse
The main distinguishing feature of tomatoes from other plants is that root watering is more suitable for them. Therefore, in the greenhouse they try to prevent the air from becoming waterlogged so that there is no moisture on the bushes.
Water should not get on the leaves and fruits.
Now let's look at the features of watering under different conditions and for different methods.
At different stages of development
The first important irrigation recommendations depend on the tomato growth stages. Each will have its own differences, which are very important for a healthy plant.
- When planting, tomato seedlings need to be watered generously: up to 5 liters of water per hole. After this, the plants are left for 1-1.5 weeks to take root.
- Subsequently, active growth of seedlings begins. During this period, the frequency of watering tomatoes in a polycarbonate greenhouse, greenhouse made of frames or other material will be 2 times a week. Up to 3 liters of water is poured under each bush.
- The frequency of watering during flowering is reduced to once every 7 days, but the abundance is increased to 5 liters. As soon as the ovaries appear, they again switch to 2 times a week, but slightly reduce the abundance.
- The next stage begins when the tomatoes begin to turn red. During the ripening of fruits and during the fruiting period, they switch to the watering regime once every 7 days. The amount of water also needs to be reduced to prevent cracking of the fruit.
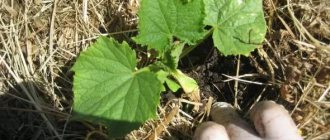
Will this method work for cucumbers?
It is necessary to water cucumbers correctly so that they grow intensively and produce a bountiful harvest. Cucumbers love high air humidity and high air temperatures. The roots do not absorb water from the soil well and, if there is too much water in the ground, they rot and die.
This is why watering cucumbers through plastic bottles is so important. Especially if gardeners cannot live in the country all the time, and cucumbers are rather capricious plants that constantly require moisture. When there is a lack of moisture, the leaves of cucumbers curl and bend.
Cucumbers are very moisture-loving, so use 5-liter bottles to water them. Also, for watering cucumbers, it is better to place bottles horizontally so that there are a large number of holes.
Watering through plastic bottles helps the growth of new roots in the bushes, since they grow deep into the soil when searching for water. Because of this, cucumber yields increase and their ripening season is extended.
If, when planting cucumber seedlings, you want them to grow more intensively and become stronger, then add nutritional yeast to the water. But the crop also requires watering from a watering can, since cucumbers love high humidity in the soil and air.
Hanging bottles
Not everyone likes this method:
- hanging containers and devices for hanging them clutter the greenhouse space;
- dripping water erodes the soil near the roots;
- water gets on the leaves and there is a danger of sunburn;
- there is damp soil around the roots and weeds grow;
- The humidity level in the greenhouse increases, creating the preconditions for late blight disease.
It is recommended to hang bottles very close to the ground to reduce negative effects.
Hanging bottles
What else does watering tomatoes depend on?
As we have already found out, the weather influences the time and method of watering, so the region of residence will also play a certain role here. The climate differs significantly in different areas, for example, in the south you can increase the frequency of watering and use daytime for this.
In the central regions in the Moscow region, Chernozem region, and the middle zone, it is better to water in the morning and ventilate the greenhouse more often.
In the north, due to the cold climate, it is better to use heated greenhouses. Here you should also not water in the evening, or after that you need to ventilate the room well.
The watering schedule will differ from the summer months
In June, it would be optimal to plant 2 times a week, because tomatoes are in the active growth phase. In July, flowering begins and watering is reduced to once a week. And in August, during fruiting, the frequency of watering remains the same, but the abundance decreases.
Following all these recommendations will allow you to get a decent harvest, and in the greenhouse it will be even earlier. But in any case, your own experience is the best you can get, so first you need to rely on these tips and subsequently develop your own technology.
Recommendations from gardeners
Many gardeners pay attention to a common mistake when watering. When a container of water is inside the greenhouse, it must be closed to prevent an increase in air humidity.
If the ground becomes quite dense in some places and the water does not penetrate deeply, it is recommended to make punctures with a pitchfork near the bushes. This will give the roots additional access to moisture and subsequently the soil will become loose.
Gardeners do not recommend immediately loosening the soil after watering. The best option is to mulch the soil. It is also not recommended to plant tomatoes and cucumbers in the same greenhouse, since they have different watering regimes and cultivation techniques.
Advantages and disadvantages
Automatic drip irrigation has the following advantages:
- facilitates the work of caring for plantings and saves time;
- can work in the absence of a person;
- tomatoes receive as much moisture as they need;
- gradual supply of water does not lead to erosion of the soil under the bushes;
- no crust forms on the ground;
- saving water consumption by 30-40%;
- the air humidity in the greenhouse does not increase, which does not lead to the development of fungal diseases;
- Fertilizers can be fertilized through a drip irrigation system.
There are few disadvantages of automatic watering:
- it is necessary to purchase hoses, drippers, taps and containers, which can result in a large sum;
- installation of a drip system requires certain skills;
- It is necessary to monitor the purity of the water to prevent clogging of the droppers.
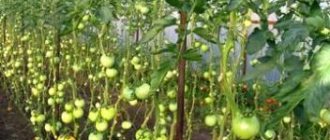
According to reviews from gardeners who have tried this soil moistening system, it is most advisable to install drip irrigation of tomatoes in a greenhouse rather than in open ground.