How to make a garden bed from plastic bottles?
With the arrival of warm days, many owners of country houses and summer residents begin to worry about decorating the territory of their garden. Available materials are used: plastic containers, tires, bamboo. With at least a small amount of imagination, a gardener can create a unique atmosphere on his site. Plastic bottles are especially popular for their environmental friendliness and low cost of material. To build beds from them, just follow the instructions.
Disadvantages of vertical beds
The main drawback of container structures is the small volume of soil they contain. Actually, all the other disadvantages of vertical beds are associated with this circumstance, namely:
- accelerated drying of the soil and, as a consequence, the need for frequent watering;
- the need for constant feeding due to lack of nutrients;
- the impossibility of growing tall plants on them;
- limited permissibility of cultivating perennial crops due to soil freezing in winter.
Vertical beds with lettuce
Advantages and disadvantages
In beds made from plastic containers, the advantages mainly prevail: the structure is easy to construct, the plastic is resistant to temperature changes and lasts a long time. There are no difficulties in using it. Containers can be painted any color, but if possible, they are filled with colored sand - this is how something completely new and bright emerges from a colorless and nondescript bottle. Beds made from plastic bottles will not only fulfill their main function, but will also become a decoration of the garden.
The disadvantages include low mechanical strength, but if garden containers are filled with sand, they will hold securely. An important rule: you need to install the bottles as close to each other as possible. Also, the disadvantages include toxicity - some types of plastic emit poisons. These types include: PET (1), PS (6), OTHER (7).
Information about the material is located on the bottom of the container in the form of a graphic symbol consisting of three arrows. There is a number in the middle - you need to pay attention to it.
The beds of Lyadov and Medvedev
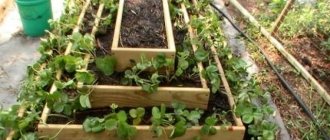
Most summer residents arrange warm beds according to Igor Lyadov’s method or use the recommendations of Valery Medvedev. The warm beds created by Igor Lyadov require minimal care and allow for a rich harvest. To arrange the fence you will need sand, cardboard, and plant residues. On the territory of the summer cottage, markings of the future bed are applied. Next, the wooden frame of the box is assembled. Cardboard is placed at the bottom. Sand is poured in. Next comes a layer of remnants of garden plants. Water the bed with infusion of manure. Then they are covered with earth. The structure is ready.
In some ways, Igor Lyadov’s technique is similar to the well-known technology for arranging beds according to Kurdyumov. Only there the author advises building a fairly high structure (up to 80 cm), a meter wide, and filling it a little differently: first of all with coarse organic matter, and only then with compost. And make special holes in the side walls for water. Valery Medvedev is the author of many manuals for summer residents. For example, how to build universal warm Medvedev beds, etc. He suggests creating a garden bed from plastic bottles.
To solve problems associated with crop freezing and poor yields, there are warm beds. They allow you to create favorable conditions for plants, stimulating the process of development and fruiting. It's easy to create them. The main thing is to choose the right location and follow the rules. You can create effective systems using the advice of I. Lyadov and V. Medvedev.
Interesting creation ideas
To make beautiful beds without resorting to outside help, you first need to decide on the option for arranging the land. There are many interesting ideas: you can build beds for strawberries even on the wall of your house. When the time comes to harvest, it will be very easy to do, since the beds will be arranged according to the height of the gardener. You can hang almost any object on the wall, but the most popular are beds made from plastic containers - you need to cut a hole in them and fill them with soil. This is just one way.
Vertical
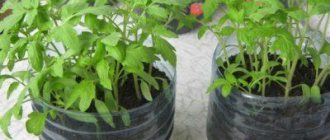
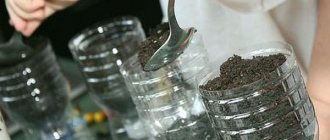
Vertical structures made from plastic bottles are the fastest and most reliable option for getting a good harvest. You can plant strawberries, vegetables or beautiful flowers in them that will decorate your garden. For the design you will need 2-liter bottles (the gardener determines the quantity himself, it all depends on the goals). First, we wash each bottle, remove labels and glue.
We cut a triangle on the side of the bottle, and on the opposite side there are drainage holes (there should be a lot of them). Having stepped back 2 cm from the neck of the bottle and reached the base of the container, we make punctures all the way through. We stretch a fishing line through them (or a rope, whichever you prefer), and tie a nut at the ends of the rope so that the bottles do not fall off under the weight of the soil. We fill the bottles with a mixture of drainage and soil and plant strawberry seedlings.
Warm
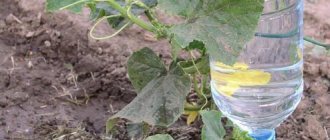
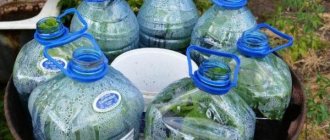
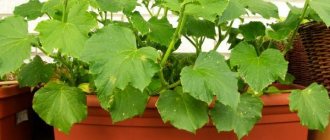
Warm beds made from plastic bottles are the best design option, suitable for most crops, but most popular for cucumbers and herbs. It takes no more than 20 minutes to create a warm bed. First of all, we collect a set of identical bottles in one row (you can use 1.5 liters). We glue them all together with tape. It is important that the bottoms are at the same level. After gluing, we turn the structure over and on the reverse side we also “go through” it with tape, not sparing the tape. The more it is, the denser the structure of the cucumber bed.
Now you can make a rounded high bed; tape will also help in the formation. A bed with a fence made of plastic containers will accumulate heat due to water. Fill each one to the brim and close with a lid. Thus, the frame will become durable, and water in this case will act as a coolant. Due to the sun's rays, the water will heat up during the day, and at night, when it cools, it will retain the heat of the soil and prevent temperature changes from negatively affecting the seedlings.
For reference! Making such a bed is as easy as shelling pears, it’s just important to choose a sunny place for it. You can put a piece of agrofabric on the bottom - this way, when watering, the soil will not be washed out of the bed.
Hanging
A hanging garden bed is perfect for a small dacha. A great place to place it: the wall of a house. This type of bed is suitable for growing greenery. The only problem may arise in bottles; not everyone has 2 liter containers. If there are bottles, good, they need to be prepared. First, take a CD (or something identical in shape) and trace it on paper with a marker. We cut a round hole, and then apply the cut sheet to the bottle. We outline with a marker.
This manipulation must be done with each bottle, do not forget to cut holes on both sides. To make the work easier, it is better to use a stationery knife, since cutting out plastic containers can make your hands more tired. At the very end we make a hole in the bottom of the bottle. To do this, heat a knife on gas, and then cut out a small hole (slightly smaller in size than the cork). Next, we make holes in the lids of the containers. Now the most interesting part: we insert the neck into the hole, which is located in the bottom, and screw the plug inside.
Creating a warm bed
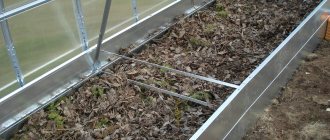
When using plastic bottles to build a warm bed, first dig a trench with a depth of 0.2 m cm to 0.4 m of arbitrary length and a width of 0.8 to 1 m. A wooden frame is installed on top. A metal mesh with small cells is placed at the bottom of the trench, which will serve as protection against rodents and other pests, then plastic bottles with screwed caps are placed tightly together. They serve as a barrier for plants from the cold coming from below. The sides of the dug trench are reinforced with sheets of packaging cardboard.
You will need:
7 Useful Ways to Use Newspapers for the GardenOften, after purchasing large and small household appliances, residents throw cardboard packaging boxes in the trash, so...
A layer of earth is placed on them, which must be watered abundantly so that the soil settles. Coarse organic residues are placed on top:
- rotten boards;
- branches;
- tree foliage.
Then again there is an abundant shedding of the layer. If there is an infusion of herbs or mullein, gardeners water the layers with it to give an impetus to warming the soil and accelerating the decomposition of organic matter. The next filling of mowed grass and weeded weeds is placed on top, which also needs to be moistened. The top of the “layer cake” is covered with 15-20 cm of fertile soil. If possible, the soil is spilled with a solution containing microorganisms. If the garden bed was arranged in the fall, it is covered with a layer of mulch or covered with fallen leaves and closed for the winter. When creating a warm bed in the spring, arcs are placed and covered with film or non-woven material to quickly warm the soil.
There are many possibilities for using plastic bottles in the garden. In addition to the fact that they are laid at the bottom of the trench as a layer that cuts off the cold and retains heat, they are used to make sides for warm beds. The bottles are connected with tape, sand is poured inside or water is poured in and they are turned into a fence for the garden bed so that the fertile soil does not scatter throughout the area during rain. This material is durable and does not rot like wood.
Manufacturing of fencing...
The final stage of work will be the border for the flower bed. If you have a lot of bottles at home, you shouldn’t get rid of them. They can be used to fence flower beds. Plastic, decomposing in natural conditions for 100 years, causes great harm to the environment. But as a fence, the material is simply a godsend! The configuration, size and shape of the fence are limited only by the imagination of the site owners.
For the fence, we remove the labels from the bottles and fill them with sand. We dig trenches. If the flowerbed has a complex shape, we make markings in advance. The depth of the ditch should be approximately 9-10 cm, and the width should be identical to the thickness of the container. The bottles should fit snugly against each other. Thus, a fence is gradually formed.
The bottles can be painted in any color upon request.
Pyramid bed
Since not everyone has their own share of fertile land, this option is perfect for them. The good thing about it is that you can build such a bed in your own yard. It will not take up much space and you can plant various plants on it, for example:
- onion;
- strawberries;
- parsley
The dimensions of such a structure will depend only on the wishes of the gardener. To build it you will need the following materials:
- depending on the size of the pyramid, wooden boards will be required;
- a pack of self-tapping screws;
- bottles, if you don’t have them, you can use small bottles.
To make a pyramid, you first need to build a wooden skeleton. And you can already attach containers with cut holes to it.
Beautiful examples
It is worth noting that plants thrive in plastic hanging containers. Coupled with backlighting, such a bed looks truly mystical at night! The bottles, filled with earth below, seem to float in the air. As for pyramidal structures, they look very decorative and at the same time functional. Different types of plants are grown in them - it turns out to be a kind of corner consisting of different types of lettuce.
Plastic pipes are also very popular among gardeners. They are cut and hung on ropes or chains. You can make several rows and plant different plants. The good thing about such beds is that they can be rearranged and fit perfectly into any garden design.
You can use any plastic pipes and paint them in the desired color: white, gray, red - the main thing is that it fits into the decor.
Decorating your garden with plastic containers is easier than it seems. Painted bottles look very unusual - in the garden they are used to make beds of different shapes: triangular, round, square. Often, instead of colored sand, bottles are filled with acrylic paint, they are dangled, after which the containers acquire the desired shade. The brighter the better!
Using just a little imagination, you can build original beds from ordinary plastic bottles. How nice it is to sit in the garden and admire beautiful flowers, inhale their aroma and know that this beauty is the work of your own hands. Happy making!
To learn how to make a warm bed from plastic bottles with your own hands, see the following video.
Source of the article: https://stroy-podskazka.ru/gryadki/iz-plastikovyh-butylok/
Why do we need warm beds?
Seedlings that are planted in warm beds develop many times faster. Plants get sick less often and grow healthier and stronger. At the same time, there are practically no weeds in such beds. And all fertilizers applied to the soil are not washed away, but remain in place. After using the bed, the gardener has another plus - humus. Such designs are used for any agricultural crops. Cucumbers, tomatoes, potatoes, etc. are often grown in them. Warm beds have the following advantages:
- Seedlings can be planted about a month earlier. But in this case it is necessary to cover the bed with film.
- In case of spring frosts, plants do not die. Because recycled organics release heat and keep crops warm.
- The garden bed contains nitrogen fertilizers. This has a beneficial effect on growing vegetables. For example, a warm bed for cucumbers allows you to harvest a rich harvest.
- The garden bed produces large amounts of carbon dioxide. This is exactly what garden plants need.
- Organic matter that decomposes in the garden bed releases many useful substances. Therefore, a warm bed for cucumbers is very useful and helps speed up the development process. Accordingly, the fruits appear much earlier than expected.
- The harvest is abundant. Moreover, it can be collected until late autumn.
- Additionally, there is no need to feed vegetables and fruits with anything.
There are several options for creating warm beds. And having chosen the most optimal way to make a warm bed for cucumbers and tomatoes, or another crop, you can begin to implement the method and enjoy the fruits of the work done. Warm beds are often used for planting raspberries. You can see how raspberries are processed, as well as how they are planted in a warm bed.
Do-it-yourself beds made from plastic bottles: vertical, high, warm
Do-it-yourself beds made from plastic bottles allow you to competently arrange a site, delimiting it into separate zones, and prevent the displacement of the fertile upper layers from the place where agricultural plants are grown. Despite the variety of available materials, plastic containers are most popular among gardeners. It is not only accessible, but also does not require any skills to work with it. To make beds from plastic bottles with your own hands, you need to consider the most common options, and, having decided on a specific type, follow the instructions.
Warm bed: what material is suitable?
You can make warm beds from slate, plastic bottles or polycarbonate. Each option has its own advantages and features. So the system of plastic bottles is simple and original. To construct the structure, you will need to dig a trench 4 meters long and 1 meter wide. 1.5-2 liter empty plastic bottles with closed lids are laid out at the bottom. These products will serve to contain the cold from below. The side walls of the trench are insulated using cardboard or packaging foam.
It is important to properly fill warm beds with plastic products. First, a layer of soil is poured onto the bottles. Next, weeds, branches, and leaves are laid. To ensure that organic matter is processed faster, effective microorganisms can be used. A layer of earth is poured on top. After this, warm beds made of plastic bottles need to be covered. If it is spring, the shelter should be film. This way the earth will warm up faster. If it is autumn, the soil is covered with a thick layer of mulch.
For many regions of Russia, a warm bed in a polycarbonate greenhouse is an excellent option for growing vegetables and crops in weather conditions unsuitable for plants.
By equipping such a structure, you can grow plants all year round. The harvest will be twice as good if you also install drip irrigation in the greenhouse. It is advisable to place the beds along the entire structure. You can also make a couple of beds along the walls. Which system to use depends on the type of crop being grown. So, for growing pumpkins, watermelons, melons and cucumbers, high beds are needed. Vertical ones are ideal for strawberries. To increase the yield of legumes and root crops, warm structures should be created.
Pros and cons of beds made from plastic bottles
Among the advantages of using garden beds made from bottles it is worth noting:
- availability of plastic containers;
- long service life;
- no difficulties in application;
- resistance to negative environmental factors;
- Possibility of painting in any color;
- ability to withstand heavy loads;
- aesthetics of the fence.
Plastic bottles allow you to create beds of different sizes and shapes.
The disadvantages of do-it-yourself bottle beds, which are visible in the photo, are their low degree of mechanical strength.
Advice from experienced gardeners
Making borders for beds from plastic bottles is not difficult, the main thing is to listen to some recommendations.
Features of creating beds:
- To add originality, you can dig plastic bottles of different sizes into the ground, alternating between 1.5-liter and 2-liter containers.
- To make the garden bed look elegant, plastic bottles can be painted in any color. To do this, you need to pour a little paint into each container and shake the bottle until it is completely colored. Drain off the remaining paint.
- The bottles can be cut and filled with colorful aquarium stones, and then dug into the ground with the bottom up. This move will make the site not only elegant, but also original.
Attention! Plastic bottles of different colors retain their appearance longer, in contrast to hand-painted products. Therefore, it is better to spend extra money and time searching for suitable plastic containers.
Beds made from plastic bottles can not only be a practical solution in terms of maintaining soil fertility, but also an excellent option for creating creative plantings. The main thing is to be patient and put in some effort, not forgetting about your own imagination.
There are many ways that garden beds are not fenced off at the dacha. All sorts of materials lying around in the yard are used. The plastic bottle can rightfully be considered a hero of our time. On the farm they are trying to adapt it as a feeder, drinking bowl, watering device, etc. Garden beds made from plastic bottles are popular among summer residents, on which they can grow flowers and garden crops.
>CONCLUSION
There are a lot of options for making beds from plastic containers. There are no requirements for these designs, so each master shows his own talent.
Types of beds made from plastic bottles
To make a beautiful and functional fence for beds from plastic bottles with your own hands, you need to decide on the option for arranging the land. There are many ways to make garden beds from recycled materials.
Fence made from buried bottles
This option is simple to manufacture; it is enough to install plastic containers in a pre-dug trench. For greater decorativeness, it is recommended to use multi-colored containers of the same size and volume. Containers of 1.5-2 liters are best suited for arrangement. If it is not possible to collect multi-colored containers in the required quantity, then the transparent modules can be painted. For these purposes, acrylic paint is used, which is poured inside and shaken until the desired effect is obtained. The main thing is that the consistency of the composition is sufficiently liquid; the excess is then simply poured out. But multi-colored containers still turn out to be more resistant to ultraviolet radiation and elevated air temperatures than painted ones. It is a priority when making beds.
Raised beds
They have a lot of advantages, including: maintaining soil fertility, ease of implementation, and the ability to use in small areas. Both flower and berry crops grow and develop well in high beds. But here there is a need to use not only plastic bottles, but also auxiliary materials to create a supporting structure, for example, boards, plywood sheets, mesh. The main thing is that the fence does not sag or tilt on different sides.
Canopy made of plastic containers
Thanks to this approach, it is possible to make the most efficient use of the free space on the site. Such a hanging structure made from recycled materials can be fixed on a fence, on the wall of a utility shed, or on a house. As additional accessories, you will need ropes to make a secure fastening for plastic containers.
Pyramid structures
They are compact, decorative and functional. You can plant strawberry bushes, parsley, onions, dill, and different types of salads in them.
Warm bed
The construction of warm beds is necessary in those regions and places:
- Where there is a long and cold spring and there is a high probability of recurrence of spring frosts, cool summers and early autumns with cold rains.
- High groundwater means there is a need to raise the beds high above the ground.
The advantage of warm beds is that:
- soil can be used both from the site and imported;
- it is possible to get a harvest even if there is infertile land in the garden;
- you can plant seedlings 2 weeks earlier, thanks to the heat generated;
- as a result of the decomposition of organic matter, the seedlings will not freeze during spring temperature drops and will begin to develop quickly;
- you can harvest the crop 2 weeks earlier than from a regular garden bed;
- utilize all organic residues beneficially and improve soil fertility;
- you can do almost without fertilizing, the plants are provided with adequate nutrition from below.
Note! Using warm beds in a greenhouse, a gardener gets a harvest 1-1.5 months earlier.
You will need:
Do-it-yourself Swedish garden bed without weeds In the northern regions, summer has a short duration. There are not enough warm days to grow vegetables such as...
How to make a garden bed from plastic bottles
After looking at the photo and deciding on a bed of plastic bottles, you can start making it yourself. To simplify the process of growing plants in your garden plot, it is enough to prepare consumables and follow a certain algorithm of actions.
How to make a hanging bed from bottles
It’s very easy to make a hanging bed from plastic bottles, if you look at the photo for step-by-step instructions:
- Select recycled containers of the desired color and size. It must be suitable for growing plants. To make the bed pleasant to look at, it is necessary to make the hole in all containers the same size. When turned upside down, it will look like a boat.
- Fix a cornice with secure hooks on the wall of a fence or outbuilding or at home. It is needed for hanging bottles. When choosing a mount, you should take into account that the containers, after filling with fertile soil, will weigh between 4-5 kg.
- Using a nylon thread, pull the bottles through the holes made at the top and bottom. Thanks to strong and large knots, you can prevent them from sliding down.
- Place plastic containers on the eaves, maintaining a distance between them of 40-50 cm. Planted plants require a sufficient amount of sunlight and space for development; if the distance is made smaller, then soon everything will intertwine with each other. It is better if the bottles are staggered, offset by 20-25 cm relative to each other.
Vertical bed made of plastic bottles
You can build a complex bed from plastic bottles collected in long sleeves with your own hands if you follow the assembly process from the photo:
- Prepare a container with a narrowed neck, for example, a Coca-Cola container. The base is made from a container, first of which you need to use a sharp knife to cut off the part with the bottom at the narrowing point.
- Puncture 2-3 holes to drain excess liquid near the neck, retreating 7 cm from it. This manipulation can be done with a hot nail, an awl or punctures with scissors.
- Fill the container with fertile soil, leaving a free space of 3 cm to the edge. The lid must be screwed on tightly.
- Secure the first tier pots to the fence using wire.
- The second and subsequent tiers are made according to a similar scheme, only instead of drainage holes they will use a neck without a lid. Soil with sufficient moisture and air permeability is placed in bottles, also leaving 3 cm of free space from the top. In order for water to flow to the plants, the containers of the second tier are placed with a recess with the neck in the first tier. Also, all structural elements are mounted to the support with wire.
- After installing the last tier, drip irrigation is organized. The container must be cut into 2 parts, screw the lid onto the neck, in which a hole has already been drilled. Such finished elements are placed in the upper pots, with the lid slightly buried in the ground. After fixing to the support, the system is filled with water.
Building a raised bed
A raised bed helps out those who have a small plot of land. After all, in a high bed you can grow a lot of things, both strawberries and flowers. There are many different ways to build them, but you'll need more than just bottles. You need to use a strong support, it can be anything, some use boards, others use mesh fencing. The main thing is that over time the entire structure does not tilt or sag.
This section will look at two ways to build raised beds:
- First you need to cut off the bottom of the bottles and drill a hole with a diameter of 3 mm. Only then can you cut holes for the plants. The next step is to fill the containers with coarse sand and fine gravel in the neck area. The remaining area must be filled with fertile soil to the level of the cut window. Then you can fix the finished products upside down on a pre-prepared support. To achieve a strong structure, you need to check that all bottles rest against the bottom of another container below. When the entire vertical flower bed is ready, plants need to be planted in the holes.
- Another method involves using a hot soldering gun. First you need to cut off the bottom, as well as the part in the neck area. Only the central part should remain. To ensure that all bottles are the same size, you need to make markings with a marker in advance. After cutting, the cured barrels are glued into one large pipe and attached to the prepared support. For the next step you will need a drainage pipe. It needs to be wrapped in burlap and inserted into the center of the glued bottles. This way, you can easily water your plants with maximum efficiency.
After everything is collected, the containers are filled with fertile soil and windows for plants are cut out.
If you take this work seriously, show your imagination and work hard, you can make anything and any height out of plastic bottles.
Ideas for decorating beds from bottles
In order for plants in plastic containers to grow and develop well, a distance of 25-30 cm must be maintained between them. Fencing from recycled materials can be made in different shapes and sizes, additionally painted in bright colors for greater decorativeness. Designs made from plastic containers with a volume of 1.5-2 liters are larger. suitable for growing low-growing plants Soil in fences made of plastic containers remains moist longer and retains heat well Planting plants in plastic containers protects them from the invasion of small pests and birds
Advantages of vertical beds
Vertically arranged beds are no longer a novelty. Constructions of this type have been tested by many gardeners and are recognized by them as ideal devices for growing strawberries, low-growing garden flowers and herbs. Such beds have many advantages:
- The beds are convenient to use, as it is easier to harvest from vertical containers. In addition, such structures are much easier to water, and they do not need to be weeded;
- there is no need to repeatedly dig up and fertilize the soil for such structures before winter - the soil is poured into bottles or pipes immediately before planting;
- vertically located beds are very decorative - they can decorate an unpresentable facade or disguise an unattractive fence;
- Strawberry bushes growing in vertical containers are inaccessible to small rodents; in addition, the berries that ripen in such beds do not rot in rainy weather and are not pecked by birds.
Vertical beds with strawberries
Vertical flower beds
A vertical flower bed means growing flowers on a wall or fence. Plastic bottles are perfect for this.
- They are laid horizontally and the sidewall is cut off to form a “boat”.
- Such boats are fixed on a vertical surface in any order.
- Inside each one, it remains to pour soil and sow flower seeds or plant seedlings.
- Climbing plants are best suited.
This design is also suitable for growing garden strawberries.