The main mistakes gardeners make when watering seedlings
The desire of gardeners to grow healthy and strong seedlings does not always correspond to reality. And the reason for this is a number of annoying and, at first glance, simple mistakes.
- Watering with cold water leads to hypothermia of the root system, which in turn causes its rotting and death.
- Using hard water. Tap water contains a lot of chemical compounds used for cleaning. They negatively affect the life of plants.
- Excessive moisture content in the soil leads to infection by fungi, which significantly worsens the condition of the seedlings. If urgent measures are not taken, she will die.
- The previous problem is closely related to the lack of drainage holes in the seedling containers and causes the same consequences.
- Irrigation by sprinkling is contraindicated when growing tomato seedlings. Drops of moisture linger on the surface of the leaf plates and cause burns on sunny days. In cloudy weather, this can cause late blight.
- Insufficient moisture also negatively affects the development of tomato seedlings. The plant slows down in development, the leaves turn yellow and fall off, and the period of laying the first flower cluster is delayed.
- Transplanting seedlings into dry soil at a summer cottage. In this case, the plant experiences double stress. It needs strength to take root, and it must spend it searching for moisture.
Advantages of using drip irrigation in the country
The main advantages of drip irrigation are the receipt of the required amount of moisture by the root system, as well as minimal physical effort and material costs. This type of irrigation is of interest to many summer residents and gardeners, since the drip irrigation system can be left unattended.
Watering beds using plastic bottles has a great advantage - it is almost completely self-sufficient. Thus, a person does not need to stand with a hose or carry heavy buckets one after another to water the plants.
Automatic drip irrigation has many advantages. For its effectiveness to be high, you need to choose the right drip tape.
Unfortunately, a ready-made drip irrigation system connected to a centralized water supply is quite expensive. Therefore, summer residents and gardeners have come up with a good alternative - using old used plastic bottles. Of course, this option is not completely autonomous, since from time to time you will need to add water to the container.
But, nevertheless, such watering minimizes human resources
, so you can pay more attention to other things or spend time relaxing. Drip irrigation using plastic bottles has the following advantages:
- No need to purchase material. Plastic bottles are something that can be found in almost every home one way or another;
Ease of execution. By following simple instructions, you can do everything yourself, even if you have no experience in creating such systems;
Saving. This type of watering allows you to significantly save time and effort that is spent on traditional types of watering;
Easy to use. All you need to do is go around the garden and fill the containers with water;
Rationality of watering. Water immediately flows under the top layer of soil, nourishing the root system of plants. Also, water will not spill over a large area and evaporate due to high temperatures in the summer. Thus, homemade watering favors the full development and subsequent strengthening of the plant’s root system;
No waterlogging. When watering with a hose, a so-called “swamp” often forms in the holes. Drip irrigation helps avoid this;
Reduces weed growth. This system also allows you not to wet the excess surface. Thus, favorable conditions are not created for the growth of all kinds of weeds, and this, in turn, makes it easier to care for the land.
This method of irrigation will be especially useful for those summer residents who, due to circumstances, can only come to their dacha once a week. In this case, they will only need to fill the container before leaving. This volume of water will be enough so that the plants do not need moisture while the owner is away.
Did you know? Drip irrigation from plastic bottles can work on the principle of solar distillation, which is good for hot summers. To do this, place half a 1.5-liter container of water on the pre-mulched soil near the plant, and cover it with a five-liter eggplant without a bottom. When heated, the moisture will turn into steam, which will settle in the form of drops on the walls and then roll down to the soil. Thus, the stronger the heat, the better the soil will be moistened.
Root watering with plastic bottles
To save water and for more efficient watering, many older gardeners use so-called underground irrigation.
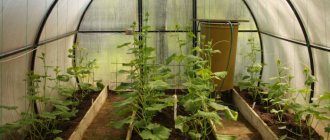
This way the water goes straight to the roots. The method is a suitable greenhouse because the soil surface remains dry (especially if it is mulched). The less evaporation, the less disease. Very suitable for root vegetables - tomatoes. The method can be used for cucumbers, eggplants, peppers, pumpkins and others. Watering with plastic bottles is a good solution if you cannot visit the villa every day and have water. Please note that this method does not apply to sandy soils because the water will drain out of the bottle very quickly.
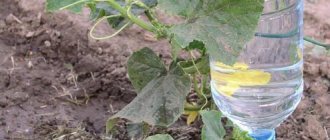
Take a plastic bottle (1.5 - 2.5 liters) and cut off the bottom (you will later use it for a latch to reduce water evaporation). From the side, make several holes near the neck of the bottle.
At a distance of 15-20 cm from the tomato or other plant you are going to water, dig a hole without worrying about the roots. At the bottom of the hole, apply a putty knife, dry grass, or anything else that will prevent the hole from getting stuck.
Place the bottle with the neck down at an angle of 30-40 degrees. Take it so that you can pour water through the bottom bottom. Once the bottle is filled, the water will slowly flow towards the roots of the plants.
The number of holes should be determined by sampling, taking into account that the plant needs an average of 250 ml per day.
If you want, you can't cut out the bottom of the bottle, but drill it and climb up with your neck. This way, your garden will look more aesthetically pleasing and less water will evaporate. In this case, however, it will be more difficult to fill the bottles.
Likewise, you can also feed your plants with liquid fertilizers.
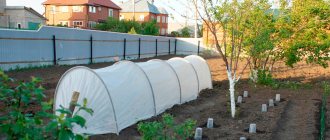
How to make drip irrigation from bottles in a greenhouse
This option involves the use of so-called drinking bowls. You can make them in half an hour.
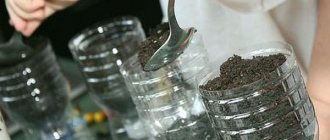
Making drinking bowls
To do this, you need to take 1.5 or 2 liter plastic bottles. They take as many as there are bushes in the greenhouse. The bottom of the drinking bowl is cut off, but not all the way. Often, to prevent water from evaporating, a lid is made from the bottom.
A small hole is punched in the cap, which is screwed onto the neck. Place the bottle neck down and pour water. First you need to check at what speed water will flow out of the hole. The size of the hole should be such that the water drips out in drops. Often this can only be achieved through experience.
How to place drinkers in a greenhouse
It is necessary to install drip irrigation in the greenhouse when transplanting tomatoes into a polycarbonate greenhouse. But you can do this later, when the plants have already been planted. To do this, you need to carefully dig a small hole 15-20 cm from each bush. The depth of the hole should be at least 15 cm. A drinking bowl is placed in it with the neck down. In this case, it is necessary to maintain a tilt angle of 30 degrees. Then the drinking bowl is buried, leaving a small part on the surface.
There are many options for watering plants through plastic bottles in a greenhouse. Another option involves not placing the bottle in the soil, but hanging it above the plant. To do this, drive pegs along the edges and pull on a rope or wire. The third option involves having a tube on the side from which water will drip.
To do this, use pen refills. They are washed and the writing part is removed. A plug made of a match, a toothpick, or covered with plasticine is placed on one end of the rod. Next to the plug, use a needle to pierce a hole from which water will drip.
The optimal hole diameter is determined by how often the water drips. The tube is inserted into the hole of the plastic bottle on the side. If necessary, the joint is sealed with tape or plasticine.
We prepare everything you need
Knowledgeable people recommend installing an irrigation system at the time of planting tomato seedlings. Why is this necessary? The fact is that when the bushes more or less grow, the installed bottles for drip irrigation can touch the roots of the plant, which will also grow. List of required tools:
- Plastic bottles, the volume of which should be 2-2.5 liters.
- Hand drill.
- Small diameter drill (2 millimeters).
- Knife or scissors (sharp).
Some may not understand the point of having a drill on this list, but it’s simple. Using it you will make holes in the lid. They will need to be made from 3 to 4 pieces, it all depends on the type of soil. If there are few holes, the liquid flows out very slowly. By the way, if you don’t have a drill, it doesn’t matter; you can safely use a hot nail of small diameter. You need to hold it with pliers and heat the nail over the column of the gas stove so that it turns red. After this, you can easily make holes in the plastic with it.
Next you need to deal with the bottle:
- Wash it thoroughly and remove the sticker, if any.
- Next, using a knife or scissors, you need to cut the bottle. This is done just above the dividing strip.
- Try not to cut off the bottom completely, as it can act as a hinged lid that will protect the water from drying out.
Required materials and tools
To set up drip irrigation using regular plastic bottles, you will need the following materials and tools:
- plastic bottles;
- a piece of cotton fabric or old nylon stockings;
- shovel for digging holes for bottles;
- ruler for measurements;
- sharp nail, thick needle or awl;
- a lighter, fire or other source of open flame on which you can heat a nail or needle.
Before you start arranging watering, you need to figure out what size bottles are suitable for the plants in your greenhouse. The choice depends on the crop being grown - some require more moisture, others, on the contrary, less. Also, consider the weather in your area - the higher the temperature, the more water you will need. And, of course, the volume of containers depends on how often you are willing to visit the dacha.
Plastic bottle for drip irrigation
Table. How long does a bottle of a certain size last for one plant?
| Volume, liters | Time, days |
| 0,5 | 2 |
| 1 | 4 |
| 1,5 | 5-6 |
| 2 | 7-8 |
| 5 | 12-16 |
Plastic bottles
As you can see, it is not advisable to use small-volume containers - bottles with a volume of 0.5 to 1 liter will require frequent “refilling”, which will force you to visit your garden plot as often as before.
The best option is a container with a volume of 1.5-2 liters, when using which you can come to the dacha once a week to “refuel” the containers, additional watering and perform other work that the plants in the greenhouse require. If the crop you grow requires a lot of water, then you should give preference to large bottles with a volume of 5 liters. But keep in mind that a five-liter plastic container takes up a lot of space and a hole for it must be prepared of the appropriate size.
Some summer residents may have a question: “Why do you need fabric for drip irrigation? Are there not enough bottles with holes? The problem is that these holes can become clogged and clogged with soil over time. To prevent this, from the outside (and sometimes from the inside) that part of the bottle where the holes are located should be wrapped in an old nylon stocking or a piece of cotton fabric. Water will seep through it, but the soil will not get inside.
Another issue that requires consideration is how many holes and what diameter should be made. Their number should depend on the properties of the soil - the worse it absorbs moisture, the more holes will be required. So, if you bury a bottle in a hole with the neck down, then 2-3 holes are enough for sandy soils, and 4-5 for clay soils.
Relationship between hole size and watering amount
Holes in the bottle or cap are punched using a nail or needle heated on a stove/lighter. The optimal diameter is from 0.5 to 1 mm. Figures of 1.5-2 mm are the maximum permissible; with larger values, water will be consumed too quickly.
As for the ratio of bottles to plants in the greenhouse, the ideal option would be 1:1 - one plant per container. If there is not enough space or the crop does not require a lot of moisture, then you can use one bottle (preferably 2 or 5 liters) for 2, 3 or even 4 plants. But, accordingly, more holes will need to be made in the container.
Design and principle of operation
To arrange dosed watering of cucumbers in a greenhouse or in beds, familiarize yourself with the design of the system. Homemade micro-irrigation using plastic bottles involves placing drink containers next to the plant.
To create a drip water supply device, follow the algorithm:
- prepare polymer containers of different volumes (1.5, 2, 5 l bottles);
- Depending on the installation method, make holes in the walls using a heated needle. The use of an awl or knitting needles for these purposes is impractical due to the high liquid consumption and the need to frequently fill the container;
- make many micro-holes, the flows from which should be directed into the segment being processed. For example, perforate bottles placed between closely spaced bushes on several sides. Pierce the containers that you place at the edge of the beds only in the segment close to the cucumber bushes. The more microscopic holes you make, the more moist the soil will be;
- place the polymer container as fashionably closer to the stem and roots to create spot watering without wasting moisture on empty areas;
- position bottles to ensure stability. Dig to a shallow depth, provide supports or tie up containers.
Thus, to create micro-irrigation, you need to install plastic drink containers near each bush or next to densely planted plants. If it is not possible to regularly visit the garden plot to water the crops, use large-volume bottles (from 5 liters). During the dry season, you can safely leave the plantings for 5 days.
The principle of water supply is based on the law of gravity. Water under its own weight and gravity will rush into them and seep through the holes. The moistened soil will create a dense mass that will close the holes and watering will stop. As soon as the substrate dries and loosens, the liquid will again exit the container.
Schemes of the future system
The drip irrigation scheme using plastic bottles is an extensive network of water pipes, which is responsible for supplying liquid to the rhizomes of plants. The bottle design is quite simple - first, liquid is supplied from the main source of water into a barrel, after which it is distributed into bottles using tubes and gets to the bushes.
Modern schemes can be improved and made automatic. This will help determine the optimal dose of watering for each bush. To do this, drip systems are equipped with special rain sensors that determine whether water needs to be supplied to the plants or not.
Many gardeners advise using bottle watering, as it is many times more effective than manually moistening the soil.
Advantages
- Drip irrigation from plastic bottles is primarily good because it allows water to be delivered directly to the roots of tomatoes or other plants, which in turn allows us to save water, applied fertilizers and time.
- Also, this allows us to avoid high air humidity, tomatoes will feel much better, and will protect our plants from various viral diseases, especially late blight, which spread very well in humid air conditions.
- A significant advantage is that it is very easy to do it yourself, and all the materials are absolutely free; I think every home has several dozen plastic bottles.
Methods for watering tomatoes in a greenhouse
Watering tomatoes in open ground can be done using different methods and with different regularity. Do not forget to sometimes replace watering with plain water by using nutrient solutions - this will bring double benefits to the plants. Consider the needs of the variety, the type of soil, the weather outside and then the tomatoes will remain healthy, and the fruits will be moderately juicy, rich in taste, as if they have absorbed a piece of summer.
The most common method among summer residents is manual using a watering can or garden hose. The disadvantage is the inability to control water consumption per bush. Plants are watered with settled water from a barrel. If the water tank is installed in a greenhouse, it must be covered with polyethylene or a lid so as not to create excess humidity. The manual method is suitable for small greenhouses.
Drip or capillary irrigation method. It is used for both large and small greenhouses.
Farms use pumps, dispensers, filters, automatic microclimate control in a greenhouse, and many summer residents make a drip system from improvised means.
Watering tomatoes in a polycarbonate greenhouse using the drip method is most effective when growing, because:
- water costs are reduced, while it gets directly under the roots and can be strictly dosed depending on the needs of the plant;
- the risk of soil salinization and leaching is reduced; a crust does not form on the soil surface.
- hoses are laid between rows along or in the middle once and are not moved throughout the season - this prevents damage to plants;
- watering a tomato does not require physical effort;
- productivity increases.
After irrigation, the soil should be mulched with sawdust or grass to prevent moisture evaporation and weed growth. It is recommended to regularly loosen the soil, which improves aeration and increases productivity. If you follow the norms and timing of watering, as well as the rules for caring for tomatoes in a greenhouse, even a novice gardener will be able to reap an excellent harvest of tasty and healthy fruits.
Watering bottles of tomatoes is SUCH A TRICK!
Author. ILONA POPLAVSKAYA
Every year I plant a dozen tomato bushes. Water them for a very long time. Water dries out quickly, and tomatoes need a lot of them. From now on the problem is solved! Plastic bottles are useful. I noticed this idea on the Internet and decided to try it. Execution is very simple! I used one bottle for one tomato plant. Bottled watering is such a trick!
Bottle preparation
I cut out the bottom of the bottle (about 10 cm from the bottom). At the top I made scissors with several holes through which water will flow. When planting tomatoes, I made large holes, the size of which would fit into the bottle and tomato seedlings. The hole was deep enough to let out 10 cm bottle. I placed the bottle with the neck and next to the seedlings.
Advantages and disadvantages of a bottle watering system
All the pros and cons collected by gardeners will help you make sure of the need for such an installation on your site.
- noticeable water savings (more watering cans or hoses are used);
- autonomous operation of the system (you can safely leave the garden bed unattended for several days);
- versatility: the possibility of application does not depend on the type of soil, the method of growing vegetables (greenhouse, vegetable garden);
- availability of material;
- ease of installation and maintenance;
- targeted targeted moisture ingress;
- absence of hardened earthen crust around the plant;
- reducing the need to loosen the soil around the bush;
- slow evaporation of moisture (only on hot days will you have to monitor the condition of the plants: do they need additional watering);
- saving money;
- facilitating human labor;
- the top layer of soil is not washed away;
- the roots receive warm liquid (they have time to warm up under the rays of the sun);
- simplification of application of fertilizing (only to seedlings).
Drip irrigation saves the amount of liquid and allows it to flow directly to the roots.
Weeds rarely germinate in such an area.
A homemade drain system often gets clogged. To prevent such a situation, old nylon tights are the best option for creating drainage. The material does not rot in the ground and has excellent throughput.
Now let's talk about the disadvantages:
- frequent clogging of holes;
- the impossibility of using such a system on a large plot: a lot of containers will be required, the garden does not look aesthetically pleasing;
- limited fluid volume;
- difficult to use on heavy soils (bottles often become unusable when they become clogged);
- on hot days, plants receive little moisture from such a supply.
For cucumbers and tomatoes, drip watering using bottles will not replace full watering: depending on the weather, the sprouts will require additional moisture.
How to install the system correctly
There are several good ways. Let's start with the one that is used most often. So, if the bottle is ready, it needs to be buried in the ground to a depth of 10-15 centimeters. For better irrigation, you need to install the container directly near the root. However, it is worth considering that this is only possible if the system is installed together with the planting of seedlings. Otherwise, you can dig in the bottle at a distance of at least 15 cm from the trunk of the bush.
It must be taken into account that wet soil will clog into the holes of the plug and watering will quickly stop. To avoid this, you should tighten the cap on the outside of the bottle with a nylon stocking or place a piece of burlap on the bottom of the hole. The lid must be screwed on well, then the bottle must be placed in the ground, but at an angle. All that remains is to fill the hole with earth. Next, fill the container with water to begin watering. Please note that the water should be used gradually so that it lasts for several days. If the liquid pours out quickly, you need to reduce the diameter of the holes. During summer, especially dry summer, one plant should receive a glass of water per day. If everything is done correctly, water will need to be added about once a week.
Sources:
https://7ogorod.ru/pomidory/poliv-v-teplice-cerez-plastikovye-butylki.html https://pomidorchik.com/vyrashhivanie/poliv-pomidor-cherez-plastikovye-butylki.html https://dachamechty. ru/tomat/kapelnyj-poliv-svoimi-rukami-iz-plastikovyh-butylok.html
Other ways to drip water a tomato through a plastic bottle
The method described above is, in my opinion, the easiest to implement, but there are several more options for how to water a tomato through a bottle. Now we will look at them superficially, without going into too much detail; everything is already clear if you look at the diagram.
In the first case, empty pastes from ordinary ballpoint pens are used as a tube (number 2 in the diagram). We take out the writing rod from it, wash it in gasoline to remove any remaining paste, close one end with plug No. 3 (match, toothpick) and make a small hole near it with a thin needle through which water will drip. The diameter is selected experimentally to achieve the optimal flow rate of water. And we insert the second end of the paste at the very bottom of the bottle; if necessary, the contact between the bottle and the tube can be sealed with plasticine.
Another option is to hang a bottle, with a small hole at the bottom, near each plant. The method is described in more detail in the video at the end of the article.
Each of the methods is good in its own way, and it’s up to you to decide which one to implement.
Watering through straws
There is one more method that is used less frequently than the previous two, but has its place. To organize a watering system, you should find pen refills from which the writing unit and ink residues are removed, or you can use narrow-diameter cocktail tubes. The system is installed in the following way:
- The rod is washed well, there should be no ink left in it.
- One side needs to be plugged with something, for example, a match or a piece of wood.
- Next, you should go down 1 cm from the plug and pierce a hole. The free end is inserted into the bottle, which is previously buried in the ground. The rod is brought directly to the soil.
- Where the connection between the tube and the rod occurs must be covered with plasticine.
- The tube should be brought directly to the stem so that drops of water fall on the root system. If the water pressure coming out of the tube is too weak, you should slightly increase the size of the hole, making it wider. This is not always possible, then you need to use a new tube.
This method may take a little more time and effort than all the previous ones, which is why it is not as popular. It is necessary to look for the rods, wash them of ink, and close one side. However, if you use straws for cocktails, it is still easier, since all you have to do is plug one of the sides and create a hole.
See also
Review of the best early tomato varieties, how and when to plant themRead
Drip watering of tomatoes in a greenhouse
Various methods are used to water vegetables. The most effective is drip irrigation. This method allows you to significantly save water consumption, the soil remains loose. It is quite possible to install a drip irrigation system for a greenhouse with your own hands.
There are various options for drip tape on sale, where the holes for irrigation are located at different distances. For each individual vegetable crop, it is necessary to choose the right option. For tomatoes, it is enough to put “droppers” with 10-15 cm between the holes.
The main plastic pipe is laid in the greenhouse, to which the drip tapes will be attached. Their number depends on the rows: for each row of plants - one watering tape. At the connection points with the main pipe, special couplings and taps are installed to regulate the irrigation regime. If the row with seedlings does not need watering, turn off the tap. The edges of the droppers at the end of the row are closed, secured with special clamps or wire.
With this method of irrigation, the soil is not compacted and does not require regular loosening. The earth remains light, loose, saturated with oxygen. The new automated irrigation system “Signor Tomato” is gaining popularity. This unique device facilitates the work of watering and fertilizing plants. Minimizes manual labor and allows you to control the process using special timers and sensors.
Drip irrigation can be organized from empty plastic bottles, with small holes made along the walls at different heights. The plastic with water is not completely covered and is buried upside down so that the seeping moisture constantly flows to the roots of the plant. If necessary, unscrew the lid and add water.
A homemade drip irrigation system must be constantly checked to ensure that the holes are not clogged with soil. If this happens, the plants will die from drought.
Installing the sprayer with the cap down
Watering tomatoes begins by placing a plastic flask with small holes near the roots of the plant. The container is filled with settled water heated by the sun.
At a distance of 15 cm, dig a hole, insert a flexible container so that the lid is at the bottom, and sprinkle it with a small amount of earth.
Water enters the soil slowly and does not damage the seedlings. Experienced gardeners place the flask in a small nylon bag to prevent soil from penetrating into the hole in the plug.
See also
Description and characteristics of Chinese tomato varieties, yield and cultivation
Read
Summer residents do not use drip irrigation if sandy soil predominates on the site, since the water quickly leaves the bottle. The flow of liquid is regulated by turning the flask to the side.
Water consumption is reduced if you mulch the soil around the plants with grass or black film. The rate at which liquid reaches the roots of the seedlings depends on the capacity of the bottle.
Adult plants are irrigated once a week in several doses. Drip irrigation protects tomatoes from late blight.
The main disadvantage of this method is that it becomes difficult to fill a bottle with water from a hose, since it has a diameter larger than the neck of the bottle.
Preparation before organizing watering in the greenhouse using bottles
The main material for organizing drip irrigation is plastic bottles. Before work, it is necessary to determine their optimal size. This depends on the type of crop, as some plants require more intensive watering, while others need less moisture. Also in this matter it is worth relying on the climate of the region and the frequency of visits to the greenhouse by the summer resident.
Necessary tools for work:
- Plastic bottles;
- A piece of cotton or nylon fabric;
- Shovel;
- Ruler;
- Awl.
Small bottles are inconvenient to use. You will have to frequently visit the greenhouse to top up the liquid. It is most correct to choose containers with a size of 1.5 or 2 liters. If the crops really love moisture, then you will have to use large 5 liter bottles. But the large dimensions are inconvenient.
Many people are interested in the purpose of fabric in drip irrigation. But the fact is that often the holes in the bottles become clogged with earth and water cannot pass through and fully perform its functions. The fabric is wound around the outside of the bottle, and it becomes a kind of filter.
You should also think about the number of holes in the bottle in advance. It all depends on the properties of the soil. If it does not absorb moisture well, then you need to make more holes.
You can make holes using a hot nail or an awl. The bottles themselves must be installed with one container per plant. But for crops that do not really like moisture, you may need only one bottle for several seedlings.
Automated irrigation system
Of course, using bottles is not as convenient as automated watering. In this case, a special device is used - an automatic water supply timer. It can be ordered online. They may be available in specialty gardening stores.
This method is good because once installed,
- you can adjust the frequency of watering, duration, days of the week;
- use for a long time, even without putting it away for the winter;
- it is easy to assemble, even a woman can handle it;
- Water can be supplied from a water supply or from a barrel.
For more details on how to use automated drip irrigation, watch this video.
How to make drip irrigation with your own hands from plastic bottles?
If you like to grow vegetables and other crops in a greenhouse or in open ground, then you probably know what an important part of plant care is irrigation. The soil needs to be moistened, and besides the usual standard watering, for example, from a hose, there are other, more effective methods. We are talking about organizing drip irrigation
What is most important is that the water goes directly to the plants, not cool, straight from the well. And heated by the sun's rays, gradually feeding the bush
We are talking about organizing drip irrigation. What is most important is that the water goes directly to the plants, not cool, straight from the well. And heated by the sun's rays, gradually feeding the bush.
Of course, you can purchase a special system, buy cones for watering, connect everything to the water supply system and sunbathe in peace on the lawn. However, such a purchase will not cost you a lot, so we recommend using available materials. Plastic bottles have been and remain a faithful assistant to the summer resident. We have already told you how to make flowers from plastic bottles.
Now comes the turn of more practical actions, namely do-it-yourself drip watering from plastic bottles for cucumbers. This cost-free watering option for a dacha has helped more than one hundred summer residents save their harvest. After all, in the summer the sun can be merciless; gardeners and gardeners come to the aid of ingenuity and simple recipes from the “do it yourself” category.
There are several options for organizing watering using plastic bottles. Moreover, containers can be of different volumes - from 1.5 liters to 5 liters. Accordingly, water will flow out of one and a half liter bottles faster than from five liter bottles. It all depends on the hole you make in the container - the thinner it is, the better.
Option 1. The container is buried next to the plant
Everything ingenious is simple. This is exactly what this drip irrigation system is about. Here, too, there are 2 options - the hole is made either in the bottom or in the cap of the bottle. The hole should be thin so that the water does not drain out quickly. It really can pour out in a couple of hours.
Therefore, without wasting time, bury the bottle either bottom or neck down. Depending on the location of the hole. There is one small trick - you also need to make a hole on the opposite side of the bottle so that the water is pushed out with the help of air, and the bottle does not shrink.
There can be as many of these buried bottles as you have in your garden bed. This method is suitable not only for cucumbers, but also for peppers, tomatoes, eggplants and other moisture-loving crops. The main thing is that the roots of the plant are not too long and thin. Also make sure that the part of the bottle that is in the ground is located above the root system and feeds it with water.
Another modification of using this method is to drop the bottle upside down and cut off the bottom to make it easier to fill with water.
Option 2. A container with several holes buried in the ground
Make several holes in the bottle (about 10) and dig the container 2/3 into the ground.
Place the bottle between two plants for more efficient irrigation.
Option 3. Hanging bottle watering
In order to organize drip irrigation in a greenhouse using plastic bottles with your own hands, you can use this method.
You will need a structure to hold the water bottle on. For example, a crossbar between two sticks can serve as a support for attaching bottles. Make a hole in the lid and hang the bottle over the plant.
Also, the design can be individual for each bush.
In the same way, you can make a watering system from cut bottles to make it convenient to pour water.
Option 4. Watering using nozzles
Gardening stores sell a special nozzle in the form of a tip, which is attached instead of a lid.
The nozzle should be stuck into the ground, so there is no need to make any holes in the lid. This method is also used for watering indoor plants.
Benefits of bottle irrigation
- Undoubtedly cheap due to the use of available materials in the manufacture of the sprinkler.
- Simple and quick application of the design.
- Saving time . The need to frequently visit the greenhouse to check soil moisture disappears.
- Through the bottle, not only water can enter the ground , but also fertilizers dissolved in it . They arrive in doses and directly to the root system , bypassing the overlying layers of soil.
- Reliability : You no longer have to worry about the condition of the plants during a short trip.
- Prevention of fungal diseases of the root system caused by excess soil moisture.
- There is no need to loosen and soften the soil .
- The water located in a container dug into the ground reaches ambient temperature and is heated to the roots .
Method number 3 – Hang over plants
If you do not want to expose the root system of greenhouse crops, then the drip irrigation system can be placed not next to the plants, but above them. In addition, with this method, the soil around the roots is not washed away.
Step 1. A series of holes are made in the bottom of the bottle, as for the second method. And in the same way, part of the bottom is cut off from the container with scissors.
Step 2. Using a needle or nail, a couple more holes are made in the bottom of the bottle for wire or twine, on which the container will be hung in the greenhouse.
Step 3. The bottle is secured so that the distance from the neck to the ground is from 35 cm to 50 cm.
Watering plants from a hanging bottle
Try to position the bottle so that most of the drops land on the ground near the stem, rather than on the leaves. This way, more water will reach the roots, and the likelihood of sunburn of the leaves will be significantly less.
The nuances of making an irrigation system in open ground
For garden beds where cucumbers are planted, it is more convenient to create a drip irrigation system with bottles buried in the ground on their sides, up or down with their necks.
Consider the following features when creating point irrigation in open ground:
- securely secure bottles in the ground. Wind and precipitation can dislodge the workpiece;
- To prevent the holes in the container from getting dirty, place a nylon elastic band from old tights on the perforation segment;
- during the growing season, a 5-liter container is sufficient for 1 cucumber bush;
- during flowering, increase the amount of water supplied;
- during the dry period, at least 25 liters per week are required for 1 bush;
- Rinse containers regularly as sludge may form in them.
It is best to equip a drip irrigation system at the time of transplanting seedlings or planting seeds in the ground.
Features of watering tomatoes in a greenhouse
Experienced gardeners know that the frequency and abundance of watering tomatoes grown in a greenhouse depends on what stage of development the bushes are at.
After disembarkation
After the seedlings are transplanted into the bed in the greenhouse, they should be well watered with plenty of water.
Transplanted seedlings are initially in a depressed state, and their root system is still very weak, so special attention should be paid to soil moisture during this period
However, there is no consensus on this matter:
- Some experts advise watering the planted seedlings daily, using a small amount of water, arguing that the weak root system is not able to absorb too much liquid, and since it has not yet grown, it is not able to extract moisture from deeper layers soil.
- Other experts are confident that after the bushes are watered abundantly after planting (4–5 liters of water per bush), they should be left alone for a week. During this time, they will have time to take root, and their root system will become stronger.
During active growth and flowering
When the seedlings take root and begin to grow actively, the frequency of watering should be such that the soil surface between them has time to dry to a depth of 30–50 mm. As a rule, at this time the soil is moistened once every 5 days.
If you water tomatoes more often, then only their superficial root system will develop well, which is not able to provide the plant with all the necessary nutrients. The same watering regime is provided to this vegetable crop during flowering.
During fruiting in July-August
During the period of fruit set, the amount of watering is increased. The fact is that at this time the bushes spend a lot of moisture on the growth of fruits, but if there is too much liquid in the soil, this can cause them to crack.
Make sure that the soil is always slightly moist, but do not allow water to stagnate in the root system. On average, at this time watering is carried out twice every 7 days.
However, if the surface of the earth near the bushes is very wet, then the number of waterings can be reduced to once every 5 days.
When the fruits grow and begin to ripen, the watering regime should be changed again. If you water the bushes too much and often at this time, then the ripening tomatoes will not only crack, but also begin to rot. As a rule, at this time the soil is moistened once every 1–1.5 weeks.
Drip irrigation in a greenhouse
The method of growing fruit crops in greenhouses and in open areas is different. Greenhouses have their own characteristics:
- higher planting density;
- accelerated plant growth;
- increased bushiness;
- more escapes.
An important fact is that certain crops in a greenhouse produce crops up to 4 times a year. As a result, when installing a drip irrigation system, it is necessary to take into account the increased water consumption per unit area of the greenhouse. You will also have to provide for changes in the amount of water and supply schedule associated with growing seasons and the individual needs of each plant.
Drip irrigation plan
The drip irrigation system in the greenhouse should be installed in stages, according to the instructions:
- Choose what will act as a source of water. It can be supplied to plants from a water supply, a well, or from a large storage tank. In the latter case, the container must be placed at a height of 1-2 meters.
- Lay pipes. The main dividing line is diverted from the water supply source. Next, a pipe for irrigation is connected directly to it. The number of pipes for irrigation may not be limited to one. It is determined by the number of beds requiring watering.
- Connect the system. A drip tape should be placed at the roots of each plant and then connected to the main irrigation pipe. To avoid clogging and failure of the system, in cases where the use of special fertilizers during irrigation is required, it is allowed to use formulations that do not contain small particles that dissolve in water.
- Select the type of drip tape. Most often, there are two main types of tapes found in stores. In one embodiment, droppers are located on the tapes in increments of 0.3 m. This type is well suited for watering tomatoes. The second option is tapes in which the pitch between the droppers is 15 cm. They are used to irrigate other crops. However, a situation often arises when a smaller step for placing droppers is required. The solution to the problem is to buy a blind hose that has no holes. You can install droppers on it in any places. Another solution for dense plantings is the use of drippers, the design of which allows you to water several plants at once. In this case, pipe sections are connected to each individual outlet and supplied to the plants. It is convenient to use minifolds (splitters) using drippers designed for watering one bush.
- A pressure regulator and filter may need to be installed. Fine filters are usually installed in front of the main line that supplies water. In the case where the water source is a water supply system, the system must be equipped with a pressure regulator. It is necessary because there are constant pressure surges in the water supply, and drip irrigation operates at a pressure of up to 1 atmosphere.