The question of how to plant strawberries in a pyramid requires not only a technical approach. When planting berries using this method, you will have to pay extra attention to them.
One of the most common methods of growing strawberries is a vertical pyramid. This option is very popular all over the world, as it is beautiful and convenient.
You can build a strawberry pyramid bed with your own hands from existing materials. We will look at how to build a pyramid for strawberries on your site in this article. Pyramid ridges rationally occupy a landing plane, which is directed upward, and not along a horizontal surface.
This solution saves land area. This is especially important in small areas.
Pros and cons of multi-tiered beds
Strawberry pyramid beds are built from different materials, but usually from wood. The assembled structure is installed in the place prepared for it, covered with drainage and soil. If everything is done according to the rules, then before filling the soil, an irrigation system is installed on the pyramid.
Let's consider the advantages of a strawberry pyramid bed:
- Space saving. On a plot of 1 m2 you can plant a lot of strawberries, using the planting area upwards, and not on the sides, taking away land from the garden, which is usually not enough.
- It’s easier to care for the structure; you don’t have to bend over and squat.
- Before planting the seedlings, the backfill soil is treated to remove bacteria, fungi, weeds and pests. The soil practically does not need weeding. If healthy seedlings are planted, strawberries are not attacked by insects and diseases, which are often caused by contaminated soil.
- When watering plants, excess moisture flows down, the root system does not rot.
- The pyramid is the first to receive the sun's rays on the site. On cold mornings and in spring, the hill warms up faster than horizontal beds.
- Berries grown on tiers hang from the structure without touching the ground, so they do not rot and remain clean.
- A pyramid can be built from old scrap materials.
- A beautiful pyramidal hill with green bushes and bright berries becomes a useful decoration for a personal garden or summer cottage.
The beds, which are built in the form of a pyramid, also have disadvantages. It is better to know about them in advance:
- It takes time to build a slide. If it is built from new materials, then funds must be invested.
- Soil that is isolated from the common ground quickly freezes, dries out and becomes depleted. This means that the pyramid bed needs to be irrigated and fed frequently. During the winter, in regions with cold climates, the strawberry hill must be insulated.
- The problem with soil irrigation can be solved using a drip irrigation system, but this leads to additional time and money costs.
Main design options
Let's consider the existing types of multi-level beds, their positive and negative sides.
"Classic" two-level bed
A beautiful product that turns even ordinary growing of strawberries or greens into an art.
Two-story composition of complex curved shape
Advantages:
- Appearance.
- Easy to make yourself from scrap materials.
- Warms up quickly.
And now the cons. Convenience is a controversial issue . It’s easier to reach the middle of an ordinary bed of the same area by grasping the side with one hand than to reach the top of a large structure in a semi-inclined state. This must be taken into account when designing or purchasing a finished product.
The larger the size of the first level and the height of the last, the more inconvenient it is to carry out mandatory agrotechnical measures
In addition, significantly more soil is required . You can pour, for example, sawdust or sand into the center, thereby saving on fertile soil. But, as practice shows, due to uneven subsidence, everything ends up getting mixed up.
Fresh organic matter is placed at the bottom of high beds, including two-tier ones (as in the photo), which serves as “biofuel” and natural fertilizer.
There can be no talk of any increase in usable area . And some materials (stone, brick) even steal precious centimeters.
Pyramid
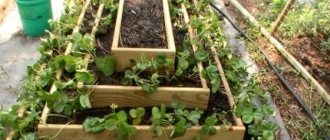
Such designs are mainly made by hand. The tiers are made of a clear geometric shape - triangular, square or rectangular.
Approximate drawing of a multi-tiered pyramid and finished product
The pyramid, due to its sides placed at an angle, really saves space , allowing you to plant many more crops and, accordingly, get an increased yield. Typically, such structures are planned as mobile, so that two or three people can move them to a new location immediately with soil and plantings. The product looks quite original; interesting compositions are obtained from several multi-level pyramids correctly placed on the site.
But such a bed has a significant drawback - a tall structure shades not only the space nearby, but also itself.
The pyramid will have to be located in an open place so that during the day each side is illuminated at least alternately
Hanging
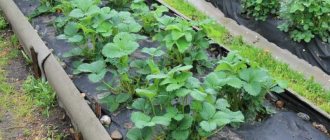
A practical solution for those who are limited in space.
Hanging beds really save space, are very convenient to use, and the fruits in them are always clean
For production, ready-made plastic boxes, wooden frames, welded metal forms, baskets, large-diameter pipes, etc. are used. They are suspended on chains and strong ropes, rigidly attached to walls or to stationary vertical supports, placing the planting containers on the south side if possible .
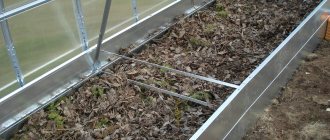
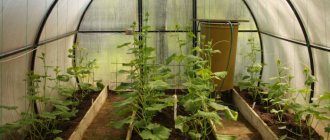
It is more reasonable to make additional floors in the greenhouse in the form of well-reinforced racks, shelves and other structures
An example of the interior arrangement of a greenhouse
Important! Due to incorrect calculation of the load, hanging beds may collapse - it is better not to make them heavy. During the design process, take into account the weight of the product, soil and water that will be spent on watering, and the density of planting. Safety first!
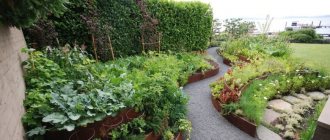
Staircases (inclined)
One of the most convenient options that really saves space, especially if there are a lot of buildings or natural slopes on the site. The main difference is the installation of the frame at an angle, which ensures full lighting of each level and air circulation.
Shelves made of wooden and plastic plant boxes. The support is the wall of the house
Depending on the project, the structure may provide support (its own, in the form of a wall, fence, embankment, large tree) or do without it. Sloping beds are made from a variety of materials: plastic, wood, metal. The material is selected based on its availability and the planned load.
A ladder bed is an ideal solution for a vegetable garden with a large height difference
Another undeniable advantage is noted by sellers of seedlings and herbs. They use collapsible structures of this type, which serve as display windows in a store or at a fair.
Ready-made display cases are very expensive, but they are easy to make yourself from scrap materials, such as water pipes and durable textiles
Vertical
One of the common offers that looks attractive in pictures, but in reality usually does not live up to expectations.
Most of these structures are difficult to maintain, and the shading created by the upper tiers depresses the lower levels
It is recommended to grow vertically green and vegetable crops that ripen quickly (arugula, radish, lettuce). For slightly more capricious plants, this option is not suitable.
How to build a multi-tiered strawberry bed
Before starting work, you need to decide on the height of the bed and the number of tiers. It takes into account how much space can be allocated for a hill on the site.
Next, they think about what material is available. Do not forget about the drawing if the multi-tiered pyramid is assembled from boards. The plan will help you determine the optimal dimensions and calculate the required amount of material.
Material selection
A garden bed pyramid can be built from many building materials, even brick. True, such designs are rarely resorted to. Wood is most often used for construction. Wood rots faster in the ground, but it is easier to process and more convenient to work with.
A bed made of pine is guaranteed to last 5 years.
If hardwood is additionally treated with a waterproofing solution and an antiseptic, the service life increases to 10 years.
They are building beds for strawberry seedlings from car tires. Finding tires of different diameters is difficult. It is with different tires that you will get a pyramid with a smooth transition of tiers.
One of the advantages of tires is their resistance to destructive factors. The downside is that when heated by the sun's rays, rubber releases toxic substances into the soil. This effect can be reduced by painting the tires.
Another material chosen for the slide is metal, but it has a big disadvantage: rapid corrosion upon contact with damp earth.
Making a wooden pyramid
When wondering how to make a pyramid for strawberries yourself, many, looking at the drawings, remember children's sandboxes. Indeed, a do-it-yourself strawberry pyramid, the drawings of which you can draw up yourself, will resemble a children's playground, albeit in an unusual design. For manufacturing you will need the following materials:
- wooden boards of durable thickness, their dimensions are determined by the original area of the site. Before work, it is important not to forget to saturate them with drying oil. And then sand it with sandpaper and varnish it. This will help smooth the boards and reduce the risk of injury for both the berry and the gardener;
- material for fastening the tiers of the pyramid, with which the boards will be connected to each other;
- hammer with a building level;
- soil, with which after completion of the work it will be necessary to fill the pyramid.
The pyramid construction scheme begins with leveling the prepared area of soil. After the process, the manufacturing of the largest part of the structure begins. It usually requires boards about 30 cm in size. They need to be connected using fasteners, forming a square or rectangle shape. Then deepen the structure about 15 cm deep into the ground. Then you immediately need to fill the bottom layer with soil.
The strawberry pyramid is first filled with nutritious compost, humus and coarse sand. Then water the structure generously and leave for half an hour for the soil to settle. Next, if necessary, you can add more soil to the bed so that it reaches the edges of the boards, but does not spill out of them.
Then you need to build the second part of the pyramid. Which, according to average estimates, should be 70 cm smaller than the first plot. Such space is optimal for comfortable germination of strawberries. The second part must be placed strictly in the center on the base of the pyramid, then the process is repeated, similar to the first stage. Then you need to install another tier according to the same principle as the first two.
When wondering how to build a pyramid for strawberries with your own hands, you can pay attention to another way to create a structure.
Pyramid made from old tires
In addition to the previous option, you can create a pyramid of tires for strawberries. When wondering how to build such a pyramid, you need to find several tires of different sizes in advance. Anything will do, from multi-ton trucks to small car models. Typically, the bottom tier is a tire from heavy-duty vehicles. Next come smaller diameters, which are selected based on the base.
The place where strawberries will be planted in a pyramid must be thoroughly cleaned and a hole dug. It must match the tire diameter. The top part of the tire with the largest diameter will have to be cut using an electric jigsaw. The remaining part is placed in the prepared hole. It is necessary to pour a 2 cm drainage layer at the bottom of the structure. It usually consists of a soil mixture mixed with expanded clay. The tiers are then made using similar methods.
Drawings and parameters of a pyramid for strawberries
There is no point in making a complex drawing for a slide, since it is a fairly simple design. The pyramid is made up of several boxes stacked on top of each other. If tires are used, then a drawing is not needed at all.
You don’t need a plan if you are building a two- or three-tier pyramid for strawberries.
It’s more difficult to deal with a structure that has 5-7 tiers, because it needs to be watered somehow. To ensure that water is evenly distributed over the soil, the slide is equipped in the center with a perforated pipe into which water is poured.
The above scheme provides for the protection of the bottom of the pyramid with a galvanized mesh. She will not allow rodents to get out of the garden. When a pyramidal bed is installed on asphalt or in the yard on paving slabs, there is no need for reinforced mesh.
Briefly about multi-tiered ridges
But how to make a multi-tiered ridge and why make it at all? Isn't it easier to make ordinary beds? Now we will look at all the necessary information.
Making a multi-tiered bed is considered a truly creative procedure or action. Because of these ridges, you will increase the amount of harvest stored for the winter season, in excellent condition, naturally pure vegetable and berry crops, cultivated with your own hands. In addition, multi-level beds allow you to use the entire area of your summer cottage as accurately as possible. And this is extremely necessary if your dacha area cannot boast of large sizes.
Immediately before you make a multi-level ridge, you should choose which herbaceous plants you want to plant on it and in what order. In this case, it is worth taking into account the specifics of herbaceous plants: growth, characteristics of leaves, timing of crop ripening.
If it's a three-tier bed, then the shorter growing plants will, as you might expect, be placed on the bottom level. Salad greens, tomatoes and peppers will grow comfortably in the middle, while stems that climb, such as beans and cucumbers, should be placed on the last level, as they need more space to grow tendrils.
It’s a pretty good option when, on the top tier, beds with two levels will have a sufficient amount of sunlight, placing tight sides, for example, tomatoes, salad greens, eggplants and peppers, and on the last tier place beautiful-looking zucchini, squash and zucchini.
When selecting a site for placing a ridge with several tiers, it is necessary to take into account the amount of shade or the amount of sunlight. It is also important to take into account the herbaceous’s attitude to heat or its preference for shade. It was this information and observations that helped you correctly, efficiently and amazingly make a pile with several levels.
Technology for assembling a pyramidal bed for strawberries
It is easier to form a pyramid of tires. It is difficult to find a large number of tires of different diameters. So many gardeners limit themselves to a pyramid of two or three tiers.
First, use a sharp knife to cut off one flange of the tire from the side.
In its place, a planting area for seedlings is being set up.
The inside of the tires can be painted in any color. The paint acts as a protective layer. The outside of tires is painted in multi-colored shades to decorate the garden bed.
Further actions:
- The largest wheel is placed on the ground.
- If necessary, galvanized mesh is placed under the wheel.
- The tire is filled with a drainage sand layer and prepared soil.
- A smaller second wheel is placed on top. Do the same actions.
- Subsequent tiers are arranged similarly.
- When there are only two tires, a plastic basin is placed as the third tier.
Wooden pyramids are more difficult to assemble.
- First, edged boards are prepared: thickness 4 cm, width 25 cm. It is easier to make a pyramid in a square shape. If the bed is high, the size of the lower tier is 2.2 × 2.2 m.
- To create the lower tier, a board 2.2 m long is cut. The sides of the second tier pyramid should be 30-35 cm smaller.
- The square boxes of all subsequent tiers are reduced in this proportion.
A pyramid of ready-made boxes is assembled in the same way as from tires. An exception is the installation of a perforated plastic pipe with a diameter of 10 cm in the center of the bed. It is closed at the bottom with a plug.
The walls of the pipe are drilled with a drill with a diameter of 1 cm.
The pipe is wrapped with geotextile. This way soil will not get inside. The pipe is installed simultaneously with the lower tier box. During powdering, it is pressed down by the soil.
In the photo the design is more complicated, but quite doable:
Advice ! You can protect wood from moisture by treating it with an antiseptic or drying oil. Pieces of roofing felt can be laid out inside the boxes.
DIY lazy bed
- Determine the desired height of the sides.
- Connect the boards using a screwdriver and remove the clamps.
- Turn the bed over and set it in place.
- Make sure that the light here is sufficient for seedlings to germinate.
- Bury the corner beams 12-15 cm into the ground.
- Adjust the sides using a building level.
- This is necessary for the proper operation of the irrigation system.
- Install plastic tubes from the inside to prevent the walls from collapsing due to bad weather.
- Level the area and cover it with anti-mole netting.
- Fill in the soil.
- Secure the irrigation system.
- Plant the seedlings.
- Install an awning if necessary.
How to make from pipes
Pipe beds are an excellent option for saving space and also for good plant development. They are made as simple as shelling pears, so even an inexperienced summer resident can cope with such work. We considered making vertical beds, but horizontal structures can also be made from PVC pipe.
Most often, a frame is prepared for them, preferably metal, on which the beds will subsequently be attached. You will need wide pipes, which are usually used for sewage, as well as thin ones. Don't forget to purchase plugs for them. Such beds are made according to the vertical principle, with the only difference being that the plugs are installed on both sides, and the bed itself is attached to the frame.
What is the advantage of a multi-tiered bed?
Multi-tiered beds are characterized by a number of significant advantages. They are extremely compact, and any owner will definitely take care to ensure that every piece of land is functionally exploited. Therefore, the construction of multi-level beds will be a pleasant event for any summer resident. In addition, such designs will fully unleash the owner’s imagination.
Also, the multi-tier design is very effective. With proper care and the creation of fertile soil, you can get a good harvest. Such structures are much easier to maintain, and the soil warms up faster because it is closer to the sun.
Another advantage is ergonomics. The beds with several tiers are very comfortable. Thanks to the required height, you will be able to avoid wasting time caring for structures. The owners of the beds do not need to regularly bend down to weed and carry out other manipulations. In this case, you can make any height that will be most comfortable for caring for the beds.
What is the advantage of a bed of several tiers.
Aesthetics is another significant advantage of multi-tiered structures. You can practice growing different crops on them, for example, tomatoes are planted on the lower ones, and basil is planted on the upper ones, which will repel pests.
Did you like the article? Share with your friends and like!
Facebook Twitter VKontakte
NEWS DELIVERY BY MAIL IS CONVENIENT
When you subscribe, you will receive an email about new articles posted on the site over the past two weeks.
Planting strawberry seedlings in pyramidal beds
Planting strawberries in a hill is the same as in a regular garden bed.
- A soil mixture is prepared, consisting of garden soil, peat and leaf compost.
- Perlite with sand acts as drainage.
- If the soil is heavy, you can add sand and perlite to the soil itself.
- Strawberries are planted in spring or September, but not later. Otherwise, the seedlings will not have time to take root in the pyramid bed.
- Planting is done from the top level so that during planting the soil does not cover the strawberries planted below.
The number of seedlings on each tier depends on the size of each box. But the plantings should not be thickened; the distance between seedlings is maintained at 20-25 cm.
After planting, the plants are watered with warm water and shaded from the sun.
Many gardeners mulch seedlings.
Stone fencing
The beds, framed with stones of various sizes and shapes, look static and very decorative. This is a durable option. During installation, certain skills in laying such material are required if it is decided to use cement-sand mortar as a binding material.
A simpler option is to fill stones between metal gratings, which are strengthened along the perimeter of the ridges at the preparatory stage. Such pergons look noble, introducing an innovative sound even into an ordinary landscape.
Garden beds made of stone can easily withstand any external influences, are durable, and allow you to create any configuration and shape.
Soil requirements and preparatory activities
We have already figured out how to make a bed for plants, and now let’s talk about the soil. In order to grow a really good strawberry crop, you need to choose soils similar in composition to loamy and sandy loam.
Loamy soil perfectly passes and retains moisture, breathes and warms up easily. Sandy loam has a lot of sand in its composition, due to which it also has excellent throughput. When it dries, a dense crust does not form on its surface.
Strawberries just don’t like sandy and clay soils. Sand quickly heats up and cools down, losing its beneficial properties. Clay slows down the growth of the plant, since it does not contain enough oxygen and moisture.
Acidity is considered an important characteristic. Acidic and alkaline soil types are unsuitable for strawberries. Neutral soil compositions or with a normal/slightly acidic reaction, when the pH level is not higher than 5.5, are best suited.
In order to increase soil fertility, it is necessary to regularly feed the plantings with organic matter. This fertilizer is prepared mainly from bird droppings in a ratio of 1:10. It infuses for several weeks. Mullein can also be used.
Compost is prepared in late spring. We take garbage bags with a volume of about 120 liters and prepare chamomile, nettles, weeds and clover. We chop everything thoroughly and then put it in bags in layers, topping each layer with wood ash. Next, we place the bags in the sun. By the end of summer the compost will be ready. It is perfect for digging up the ground in the fall or as mulching around a bush.
In autumn, when preparing the soil, you can add mineral fertilizers to it:
- phosphorus;
- potassium;
- nitrogen.
But when using this type of fertilizer, you must follow the dosage regimen. They can be used both dry and dissolved.
Also, before digging the soil in the fall, ammonium sulfate is used. It looks like small white crystals. For 1 sq.m. it will require no more than 40 g.
Important! Ammonium sulfate will allow strawberries to grow green mass.
Cleaning the soil from weeds and insects
Before planting, the land must be carefully prepared. It is recommended to dig it up, then check for the presence of roots of perennial weeds, as well as wintering reserves of the pest. It is best to thoroughly steam it with boiling water after cleaning the soil. But this method is suitable for small quantities.
On a large area we do this:
- in the spring we remove a layer of earth 10 cm thick;
- We dig a hole 1x1 m and put the removed layers there;
- Place the last layer with the roots facing up;
- pour warm water over everything and cover with film;
- leave air gaps at ground level.
Over the course of several months, the soil will be steamed under the film. Afterwards the soil needs to be sifted. Done, ready to use.
In addition, garden soil may be full of harmful insect larvae and spores of various fungal diseases. They can be eliminated using special preparations for soil treatment. Among them are Fitosporin, Intavir, Aktara and Quadris.
As you can see, preparatory and planting work can be time-consuming. But the right location, well-formed beds, ideal soil and timely fertilizing can be the key to an excellent harvest in the future. And already next season you will be able to pamper yourself with delicious berries grown on your own plot, equipped with your own hands.
Types of beds
Keeping your garden in order is very easy. It is necessary to begin landscaping it by dividing it into separate zones - beds. This will make it easier to care for plants and make crop rotation possible. The place where crops are planted can be permanent or temporary. In unfavorable conditions, in arid climates, in small areas, the following types of beds can be used:
- Tall. The soil in raised beds warms up better due to the heating of the walls of the structure. The harvest does not depend on the quality of the land on the site, and weed control is reduced to a minimum. Vegetables can be planted several weeks earlier. Ripening is accelerated due to a special drainage system. The soil of high beds does not freeze and is protected from erosion during rain.
- Vertical. Used in small areas. The height of cascade structures is not limited. Compact beds will complement the landscape design of a private house and hide the shortcomings of unsightly buildings. You can care for crops in a vertical structure without experiencing physical discomfort. The beds are located at a convenient height. Plants get sick less and are not attacked by pests.
- French. Beautiful beds of regular shape with borders made of timber, boards, and bricks. Structures can be elevated or at ground level. The center of the composition is usually indicated by a small outdoor sculpture, a fountain. Branching paths divide the territory into symmetrical flower beds and rectangular areas.
- English. Gardeners add bright flowers to any planting of crops. The fencing is lavender bushes and various greenery. This option is not suitable for all crops. It is better to plant only perennial flowers in a homemade garden bed.
- Lazy. The most convenient compact structures, no more than 2 meters wide. A box is installed around the perimeter. The height of the structure and materials can be varied, depending on the type of crop. For the winter, you can make multi-layered beds in a greenhouse. You will need to install a pallet, rods and stretch the film. Fences prevent soil erosion and the growth of weeds.
- Smart. At low costs they allow you to get a large harvest. The method of growing crops involves the absence of annual digging of the soil. Self-made beds are fenced with sides in the yard, organic mulch and compost are laid on the surface of the ground. Organic matter retains heat for a long time and provides plants with essential nutrients.
- Warm. Multilayer beds filled with heterogeneous organic matter. The fuel, drainage layer is located at the very bottom. It is lined with branches, any tree. Subsequent layers are made from wet paper and grass. To maintain the functioning of microorganisms and nourish the soil, flower beds must be constantly watered.
Caring for strawberries in vertical beds
Strawberries should be maintained in the same way as those growing in horizontal beds.
There are nuances of care, we will consider them.
- Watering. Since there is little soil in the boxes, it dries out faster. The frequency of irrigation will need to be determined experimentally, examining the soil every day. Water carefully from a bottle or watering can. It is best to arrange drip irrigation with adjustable droppers. Then the plants will receive a certain portion of water.
- Feeding. Soil depletion in vertical beds occurs faster. Therefore, fertilizers must be applied frequently. Liquid solutions are combined with watering and applied once a week. The nutrient solution is diluted with organic water in a ratio of 10:1. Mineral fertilizers are diluted according to the instructions.
- Pyramid beds do not require weeding.
A vertical bed with strawberries is installed in a sunny place, away from trees.
Paths between the beds
Every gardener tries to use all means and possibilities to give the plot an aesthetic appearance and increase the yield. It is not very convenient to move on the ground between the beds, especially with working equipment and after rain. Therefore, the arrangement of paths plays an important role in the design of a village garden. In addition to physical convenience, there is no need for weeding. You can make the following tracks with your own hands:
- Wooden plank flooring;
- Permanent sidewalks made of crushed stone and broken bricks;
- Ribbons from old carpets.
Covering vertical strawberry beds for the winter
You can’t just leave a pyramid with seedlings over the winter. A thin layer of soil will freeze and the strawberries will die.
Before frost, the bed is covered with agrofibre and spruce branches on top.
Craftsmen build a vertical bed on wheels. Then such a structure is simply rolled into an outbuilding until spring.
Over time, the novice gardener will gain his own experience. And he will have his own methods and secrets of growing strawberries in a pyramid-bed.
Watch the video: multi-tiered strawberry bed
You may also find the following materials useful:
- What to put in the hole when planting strawberries?
- Everything you need to know about watering grapes in the summer
- Why doesn't apricot bear fruit? Basic ways to solve the problem
- Formative pruning of the currant crown will provide all parts of the plant with sunlight
- Fertilizing strawberries: from bud formation to fruiting