The tasty and beloved berry is usually planted in the spring or, preferably, in the fall. But, of course, it is allowed to organize landing areas at any convenient time. If you plan to plant bushes directly in the year of construction of the fences, then the only condition that needs to be thought out in advance is related to being able to prepare the land by the scheduled planting dates, add the necessary fertilizers to the strawberry beds at least a week before placing the plants on the new place.
Strawberry plantations are renewed, as a rule, every 3-4 years; when planting remontant and commercial highly productive varieties, they plan for 1-2 seasons
Detailed information about the different varieties of garden strawberries and the peculiarities of their cultivation can be found in the section of our website.
How to choose a place
Proper beds for strawberries are set up in well-lit, sunny areas. In the shade of trees, the plant gives a poor harvest. The berry does not tolerate drafts, so gardeners often build beds for strawberries between gooseberry or red currant bushes.
The plant does not take root in waterlogged soils. If there is no dry place at the dacha, build a high bed with a drainage system.
Summer residents get a good harvest on sandy-loamy soils enriched with humus. The southeast direction is ideal for placing a strawberry bed.
Attention! Agronomists do not recommend setting up beds for strawberries after nightshades: potatoes, peppers, tomatoes, eggplants, because the soil may be contaminated with gray mold.
Ideal precursors for the plant are:
- onion;
- parsley;
- carrot;
- beet;
- corn;
- celery;
- legumes
Selecting a location
Before organizing the beds, it is important to choose a good place for growing strawberries or wild strawberries. These crops grow poorly in areas of high humidity. If your land plot has very shallow groundwater, then the strawberry beds will have to be made high. Otherwise, water will constantly stagnate in the soil - and this will be the main answer to the question of why strawberries rot in the garden beds. In this case, the area you choose should be well illuminated by sunlight. A shady area is not suitable for strawberries - the berries will be small, unsweetened, and ripening will be very slow. There is a risk that strawberries will not have time to ripen at all during the summer season.
Crop rotation rules:
| After what crops should strawberries be planted? |
| Cereals (rye, corn), legumes (beans, peas, lentils). |
| Potatoes, cucumbers, tomatoes, all types of cabbage, peppers, pumpkin, zucchini, melon, watermelon, squash, eggplant |
Kinds
A smart strawberry bed allows you to produce a bountiful harvest for a long time. Properly organized agricultural technology lasts up to 5 years. Then a change of site is required, because the soil is depleted and the bushes weaken. They arrange high, vertical and pyramidal ridges.
High
Preparing a high bed for strawberries begins in the spring. The height of the fences can be 20-40 cm or 80-100 cm.
The first option is most adapted to changes in weather conditions. The low side prevents the soil from drying out. This design is equipped with drip irrigation.
Before installing the box, remove a 10 cm layer of earth, fill it with broken bricks and branches for drainage
High beds are easy to cultivate, but are susceptible to soil drying out in hot weather and berries freezing in cold weather. The second option is recommended to be installed in damp areas where the soil does not dry out or where groundwater is high.
The height of the bed allows you to lay a good drainage layer of stones or broken bricks. After planting the plants, the soil must be mulched with hay or wood chips.
High beds must be covered with non-woven agrofibre for wintering and drip irrigation installed in the summer for uniform distribution of moisture
Vertical
A new and exotic idea for many summer residents, growing strawberries has a number of advantages and disadvantages. Advantages of the technology:
- saving space in small summer cottages;
- convenient to care for, no need to bow before the discount;
- contact with the ground is limited, the roots of the berry are less susceptible to diseases;
- eliminates thickening of plantings;
- looks decorative.
The soil substrate for vertical beds is diluted with hydrogel to reduce irrigation.
Disadvantages of the technology:
- the soil freezes quickly in winter;
- weekly feeding is required;
- In summer, the substrate dries out quickly.
When arranging a vertical bed for strawberries, the pipe size is chosen with a diameter of 10-20 cm.
To prevent the soil from drying out, install a drip tape in the center of each pipe, this allows the moisture to be evenly distributed
Pyramid
Convenient beds for strawberries are made from boards in such a way as to form a pyramid. It has a decorative function. To prevent the soil from drying out on a high ridge, each tier is equipped with drip tape for irrigation.
The substrate filled with perlite and organic fertilizers is poured into the pyramid in layers
In winter, plants are mulched with straw or hay. In the northern regions, in order to preserve the berries in winter, the structure is carefully covered with non-woven fiber.
Types of covering material
In order for plants to develop normally, they need to be provided with moisture, warmth and light. Using a suitable covering material will solve several problems: it will protect the bushes and soil of the mini-plantation. In the first case, the mini-vegetable garden needs to be completely covered - the material can be stretched over supports and arches. To protect the soil, mulching is used: the strawberry bed is covered with material, and the plants are transplanted into pre-made holes. Types of covering materials:
- organic;
- inorganic.
Organic
Organic type covering materials are more often used due to their availability and low cost. Organic mulch decomposes quickly and therefore requires regular replacement, which is somewhat of a disadvantage. If you do not change them in time, they will turn into a substrate that is teeming with fungi and bacteria. Organic materials include:
- Pine needles. They contain phytoncides that impart many beneficial properties to the berries. When using such mulch, the aroma and taste of the product will improve.
- Sawdust. The cheapest covering material that does not have specific beneficial properties.
- Straw. In itself, it does not provide any benefit to berry products, but the hay bacillus multiplies in it, ridding the bushes of root rot.
Modern inorganic materials
Inorganic covering materials such as Agrotex, Agril, Lutrasil, Agrospan, Spandbond, and black polyethylene film are in great demand. The first five relate to agrofibre, which is a polypropylene fabric that can withstand moisture and does not react with chemical compounds. Inorganic materials are good because they do not rot and microorganisms do not grow in them. Removing it from a mini-plantation is easier than its organic counterpart. To cover strawberry beds with agrofibre, consider several important nuances:
- It is necessary to spread agrofibre in spring or autumn, i.e. during the transplant.
- A couple of weeks before you cover the strawberry bed, prepare the plantation: level the surface, moisten it, and fertilize the soil.
- If you are placing a two-layer material, make sure that the moisture-repellent side is at the bottom - it prevents the soil from drying out.
- A suitable layout of beds under a black covering cloth is 45 cm between rows and 40 cm between bushes. The film is laid on a mini-plantation, after which cross-shaped holes are cut out in it.
- If the seedlings are planted, then first cover the mini-garden with agrofibre, then feel the bushes under the canvas and make holes for them.
- Before fixing the covering material, check the tension of the canvas - the agrofibre should be free, but not develop.
- The covering material is fixed around the perimeter with boards, metal pins or sprinkled with earth. Make sure there are no holes anywhere around the perimeter, otherwise this will cause the agrofibre to swell and move.
Materials for decorating beds
Arranging a strawberry garden is made from any available materials. They use boards and logs, slate left over from the construction of the dacha. They even use propylene bags and car tires.
From bags
This option is good for setting up a strawberry plantation on a balcony, veranda or terrace. Thick bags are filled with organic substrate and bushes are planted in a checkerboard pattern.
Ready-made bags are sold in gardening stores; the substrate for this technology is filled with perlite and organic fertilizer
Excess moisture leaves through the burlap without additional arrangement of the drainage system. This method of growing berries requires weekly feeding and constant irrigation.
To make beds for strawberries, bags are filled with substrate, as shown in the video:
From tires
This technology is actively used in small summer cottages to save space. Tires are arranged in a pyramid using tires of different diameters. They are not an environmentally friendly material, but their availability makes them more attractive for experimental growing of berries.
In the place where the beds are arranged, make a 10 cm deepening and fill it with sand and crushed stone.
In the upper part of the tire, holes are cut out every 20 cm, measuring 10*10 cm. To drain excess water, holes are drilled in the lower part of the tire.
The substrate is filled with perlite and peat so that the soil is loose and breathable
From boards
Strawberry beds made from boards with your own hands look neat. This design maintains a natural microclimate for the plant.
Moisture-resistant wood species will extend the service life of the ridge and reduce the time it takes for the material to rot
Attention! If preference is given to cheap, non-moisture-resistant species, such as pine, they are additionally treated with anti-rotting agents to extend the life of the structure.
The height of the sides of the bed is selected based on soil moisture. In wet areas, ridges 80-100 cm high are erected with a good drainage layer of stones, broken bricks and branches.
In dry areas, prepare a trench 10-20 cm deep. Organic drainage material, mainly wood chips of different fractions, is laid so that the material rots and retains moisture. An organic substrate is poured on top. Black agrofibre is attached to the sides and plant seedlings are planted.
The row spacing is improved with crushed stone, sand, tiles are laid or green manure is planted:
From slate
Flat slate is widely used by gardeners. High beds made from it always look well-groomed and neat. Most often, they are used to make sides for high ridges. Metal stakes are driven in around the perimeter and slate is attached to them with roofing bolts.
To prevent the bed from bursting, wedges are installed every 50-100 cm on the outer side of the ridge, and if necessary, a fixing beam is nailed to them
The bed is carefully covered with black agrofibre, holes of 10*10 cm are made every 20-40 cm. Strawberry bushes are planted in the resulting holes. The size between plants depends on the variety. The more actively the bush develops, the greater the distance between the strawberries.
From bottles
In order for the bush to develop fully, choose 2-liter bottles. The procedure for making a vertical bed from a bottle:
- Cut off the top part and wrap it in burlap.
- A hole with a diameter of 2-5 cm is made at the bottom and a neck is inserted into it.
- Fill the container with organic substrate.
To ensure uniform distribution of moisture throughout the bed, 5-10 holes are made at the bottom.
Water is supplied to the top bottle and flows down through the holes. For one tape take 3-5 bottles. A hole with a diameter of 7-10 cm is made at the end of the container and a bush is planted.
Each container is attached to the frame with wire. This system is easy to install. She is put away for the winter in a barn.
The bottle option for arranging a hanging vegetable garden is suitable for annual growing of plants
Made from PVC pipe
Vertical and horizontal beds are built from sewer plastic pipes. These methods are used if the dacha plot is small to save space.
Decorative vertical beds are arranged in the recreation area to enjoy the beauty and aroma of berries
Attention! This technology is applicable only for humid climates. In arid regions, the harvest will be meager, the soil will constantly dry out even with established drip irrigation.
To increase moisture resistance in the substrate, add perlite or hydrogel
For the winter, vertical beds are transferred to a horizontal position and carefully covered with agrofibre. In the northern regions, the garden bed is moved indoors.
Bushes planted in horizontal beds do not produce planting material, because it is inconvenient to place containers for rooting the mustaches
A horizontal bed made of PVC pipe with a diameter of 20 cm is built on a frame. Holes with a diameter of 10 cm are made in the pipe every 15-20 cm. Drainage is added to the bottom.
Pebbles, pebbles and fine crushed stone provide drainage and prevent moisture from stagnating in the soil
An irrigation pipe with a diameter of 4 cm is placed in the center. To ensure that the moisture is evenly distributed throughout the bed, holes are made in it and wrapped with fiber, or a drip tape is installed.
Arranging a horizontal bed:
Filling with drainage and substrate:
Strawberries in the pipe, a month later:
Warm strawberry beds
This type of structure is installed directly on the surface of the earth or goes deep into the soil. The structure of the insulated version includes several layers: drainage, heat-generating layer and soil. Its arrangement is optimal for regions with an unfavorable climate, where there is still a threat of a return of frost until mid-June. Structures of this type can be frame, bulk, or combined. Regardless of the organization option, the filling of the “warm garden” is identical. Sequence of filling the box:
- The rectangular structure is made from boards for the box. The height of the sides is about 60 cm, and the width of the box is approximately 90 cm. The inside of the body is finished with waterproofing material.
- A fine metal mesh is installed underneath to protect against voles.
- This is followed by a layer (about 20 cm) of chopped branches, bars, and wood waste.
- Newspapers and cardboard are placed on top.
- Then you need to lay sawdust and small wood shavings.
- The next layer consists of fresh plant waste.
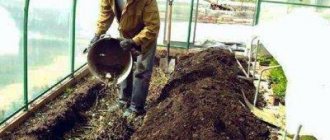
- Next comes humus from the compost pit.
- At the very end, the box needs to be covered with a layer of earth.
- If necessary, lay out the area around the front garden with tiles and make paths. Lay decorative stone, etc. around the perimeter.
Before you make a “warm garden” to set up a strawberry bed, decide on the fencing material. An excellent choice would be boards, metal profiles or slate. Another option is a wicker structure made from branches. It is relatively simple to manufacture, but is not able to provide proper thermal insulation - moisture will quickly evaporate when used.
- Nail polish - so good that it lasts a long time. Long lasting nail polishes, video and photos
- Reducing the size of the mammary glands through surgery, diet and visually
- Ultrasound of the vessels of the head and neck: what the diagnostic method shows
Frame
In such a structure, all the lower layers and the fertile “cushion” are placed in a pre-made box. This method of organization is ideal for areas with high levels of humidity, where the soil is swampy or where it rains frequently. The main thing is to make a durable frame that will last more than one season. Boards or slate are well suited for its manufacture. The former need to be treated with a protective coating.
Bulk
The peculiarity of this technology is the need to dig a shallow trench, which is filled with “filling”. This creates a raised bed-hill with a warm bottom. Bulk technology for application on the ground without the threat of flooding, i.e. where groundwater is far from the surface. Main stages:
- A trench is dug across the width of the bed (from 40 cm) - the depth of a shovel bayonet.
- Pre-chopped dry branches are laid at the bottom of the trench. You need to start with the largest ones and end with the smallest ones.
- Any plant debris, for example, leaves, compost, withered grass, humus, is placed on the branches.
- Then everything is thoroughly compacted, water with warm water.
- Fertile soil is laid on top.
- The mound will eventually become 20-30 cm higher. You can fence it with boards or make the edges flat.
Combined
This option for organizing a “warm garden” for growing berries differs in that it combines the features of the previous two. Sequencing:
- Dig a trench as in the first option.
- place the lower layers of organic matter in it.
- make a box, for example, from boards.
- put the top layers of organic matter in it.
How to make strawberry beds with your own hands
In order for the plants to develop well and produce a constant harvest, when arranging the beds the following rules are followed:
- The width of the bed is up to 80 cm. In this case, strawberries are planted in 2 rows.
- The ridge is placed from east to west. This location provides continuous sun exposure.
- The distance between the bushes is 25-40 cm, depending on the variety of berries.
- The height of the sides is 20-40 cm or 70-100 cm, depending on the soil moisture in the area. The greater the stagnation of moisture, the higher the sides of the ridge.
- The distance between strawberry beds is maintained at 60-80 cm. This will ensure the passage of a wheelbarrow and a convenient approach for care.
- In the aisles, weeds are mowed or tiles are laid.
Preparation
Prepare a bed for strawberries in the fall. The top layer of soil is removed by 10-20 cm.
All layers of soil for a frame ridge are placed in a pre-prepared box. It is recommended to build a bulk bed in arid regions where groundwater runs deep. Combined ridges are set up on moist soils, the lower layers of organic matter are placed in a trench, and the substrate is placed in a box.
Strawberry bed size
The recommended width of the bed for strawberries is 40-80 cm. This allows you to conveniently care for the plants.
Planting methods to achieve a bountiful harvest
Installation steps
To make strawberry beds, you need:
- Prepare the area and install the box to the size of the ridge. The box is leveled and secured at the corners with stakes
- A rodent net is placed at the bottom. Cardboard and other cutting material are laid on top of the mesh.
- Throw in straw. Straw ensures rapid warming of the soil in spring and rapid ripening of berries
What can you plant in the garden after strawberries?
Crop rotation involves alternating plants depending on how much of them is used for food. After the strawberries, greens and root crops are planted.
It is recommended to sow plants that will help restore the balance of potassium and nitrogen in the soil, such as legumes and grains. To disinfect the soil, onions or garlic are planted after the rosaceae. Strawberries have long roots, so crops with a superficial root system grow well after them. You can plant decorative flowers: violets, daffodils, tulips, hyacinths.
Rate this article:
Preparing the bed and planting strawberries
Stages of preparing a bed for planting strawberries:
- The drainage layer is compacted and covered with earth. Cover with black agrofibre. Make holes with a diameter of 8-10 cm every 25-40 cm.
The greater the distance between the bushes, the more the plant can grow green mass for a rich harvest. - A hole is prepared in the hole made and the plant is planted so that the neck is at the level of the bed. When planting, humus and ash are added to the hole and thoroughly shed with water.
Arrangement of the ridge:
Strawberry combs:
Soil for strawberries
- Light, loose.
- Provides excellent ventilation.
- Fertile.
- Non-acidic (pH level within 5-6).
- Disinfected.
Experienced gardeners know that turf soil is always replete with the larvae of many pests, dangerous fungal spores, and weed seeds. As soon as the ground thaws in the spring, all pests intensify their activity. Therefore, before planting seedlings in open ground, it is necessary to carry out a useful procedure for disinfecting the soil.
Treat future beds with ammonia water. Use at the rate of 1 liter per 5 square meters. land area. You can also use ready-made soil preparations, for example, Roundall.
Then you need to dig up the ground, apply fertilizer and begin marking out the plantation. There can be several options for beds - each has its own advantages. Let's consider their types in detail.
Possible mistakes
Remontant strawberries produce few tendrils unless the flowers are picked off. To quickly propagate the variety, at 1 year the buds are cut off and the harvest is sacrificed.
In the spring, the ridge is set up in an area cleared of leaves and branches. This will help avoid contamination of the soil with rot.
To ensure a good harvest in the first year of planting, the soil is fertilized with an organic composition: humus, bird droppings or rotted manure.
Thick planting reduces plant development. Yields also decrease.
Furrows between rows remove excess moisture. This method helps get rid of root rot.
What beds are best to make for strawberries?
To successfully cultivate a berry crop, it is necessary to create the most comfortable conditions for its growth and development in the garden:
- access of oxygen to the roots;
- normal level of humidity;
- sufficient air circulation in the bush growth zone;
- good lighting;
- soil fertility;
- eliminating the possibility of berries coming into contact with the ground.
Based on these requirements, it is best to give preference to high beds with agrofibre. This material simplifies the process of caring for the crop, prevents slugs from damaging the berries, and makes picking strawberries as comfortable as possible. In addition, an invasion of garden ants is rarely observed in high beds.
Beautiful beds for strawberries
The photo shows warm and unusual beds for strawberries, made with your own hands. Flowerpots from an old flowerpot give the garden additional charm. Holes are made in an old retro washbasin, filled with soil mixture and strawberries are planted.
A forged flowerpot is filled with coconut fiber, a substrate is added and hanging strawberries are planted. Stuffed slats prevent the sides from bursting and help retain moisture in the cells. Canopy varieties of strawberries are planted in multi-tiered ridges - this simplifies harvesting in the greenhouse. 10% perlite, 30% peat, 10% are added to the substrate. % lime and 50% soil A drip tape is laid along the perimeter of each tier of the pyramid
At what distance to plant strawberries?
There are some rules, the implementation of which will produce large and tasty berries. The correct bed for strawberries has a width of 40 to 80 cm. Here you can plant seedlings in one or two rows at a distance of 40 cm between rows. The height of the bed itself depends on the type of bed, its location and other factors.
If the area is flat, it is important to make trenches between the rows below the level of the bushes to collect water in them. It is easy for the gardener to move along these furrows, for example, when picking ripe berries. The optimal width of such a furrow is 30-40 cm. It is better to leave at least 20 cm between individual bushes so that each plant receives the same amount of water and nutrients.
Planting strawberries in autumn. How to plant strawberries in open ground in the fall
Experienced gardeners know that strawberry seedlings can be planted in open ground in the spring, but the harvest this year will be extremely small. To speed up the process, you can plant the plant at the end of the season. Planting strawberries in open ground in the fall has several nuances.
Let's talk about choosing the right place and how to arrange a garden bed. We’ll tell you which varieties of garden strawberries tolerate autumn planting better and give detailed instructions for this event.
Strawberry planting dates
If you grow strawberries according to the rules, then you need to renew the plants in the beds every 3-4 years. Modern varieties give a large harvest, but the lifespan of the plant is significantly reduced. That’s why questions arise about when to plant strawberries correctly.
Speaking about autumn planting, it is meant that the event will be held at the end of the season, and this, depending on the region, is the beginning of August - the beginning of September. It should not be very hot so that the plant can more easily survive stress, but there should also be time for the formation of fruit buds.
If you hesitate and plant strawberries in October and later, they will not tolerate frosts, and the surviving bushes will be sick and will not produce a large harvest.
In the Ural region and in the gardens of Siberia, strawberries are planted from the second half of July to mid-August.
Selecting a location and preparing the bed
Most varieties of strawberries survive and bear fruit on any type of soil, but a bountiful harvest is produced only on sandy loam, loamy, and chernozem soils, cleared of weeds, systematically moistened and with conditions for deep penetration of roots. Therefore, the beds for autumn planting of strawberries are prepared as follows:
- choose a sunny place, slight darkening is acceptable in the afternoon;
- add 100 kg of humus, 450 g of superphosphate, 180 g of potassium chloride for every 10 square meters;
- dig the bed to a depth of 20-35 cm, depending on the type of soil (chernozem is dug deeper).
If the bed is being laid out for the first time, then the best place will be where cucumbers or zucchini previously grew. It is better not to grow strawberries after tomatoes and potatoes - these plants suffer from the same diseases, and the pathogen can persist in the soil for years.
It is believed that the acidity of the soil should be at a level of 5.5 pH, but according to the observations of gardeners, the best result is achieved at a value of 4.8-5.0 pH.
The best varieties for planting in autumn
Traditionally, remontant varieties of strawberries are planted in the fall, which can produce up to two harvests per season, and therefore it is better if they overwinter in open ground. Most remontant varieties of garden strawberries are characterized by large berries and high resistance to diseases, which is also a plus, especially when grown for sale.
The following varieties are suitable for autumn planting:
- Selva.
- Elizabeth II.
- Elsanta.
Of the non-remontant varieties, the strawberry varieties Bereginya, Florence, Kent, Honey and others have proven themselves well.
It’s good if the varieties are zoned specifically for your region. This means that their resistance characteristics will match your climate conditions.
How to plant strawberries in the fall
Planting strawberries in autumn is not much different from spring. Different schemes for placing seedlings are used, for example, you can plant them with a distance between bushes of 30-40 cm in two or three rows, or you can make one row and maintain the same interval.
The depth of the holes should not be large, the main thing is that the roots “feel” free. It is important that the bush is not planted very high, otherwise it will freeze. The optimal option for placing a bush in a hole is that the place where the leaves grow is at the level of the bed.
Having placed the plant in the hole and straightened its roots, the empty space is filled with soil and lightly compacted with hands. At this moment, you need to act carefully so as not to damage the fragile roots (during autumn planting, they have less time to recover). The final stage of planting is mulching the ground with straw or black agrofibre.
For the first three days, strawberries are watered regularly, pouring a bucket of water into 20 bushes at a time. Then, if there is no rain, watering is repeated after 3 days. Mulching is carried out after the first watering, so the soil will better retain moisture. If it rains immediately after planting, you don’t have to water the strawberries.
When planting in autumn, experienced gardeners place 2 bushes in one hole at once. If one dies, the second may survive and bear fruit profusely.
Conclusion
If you want to try strawberries next year and preserve them for the winter, then it is better to plant the plant in late summer-early autumn. The strawberries will have time to take root, form fruit buds and go into the winter prepared.
The main thing is that the bed is prepared correctly, and the bushes are not too deep or too high. Watering is also required, especially if the fall has been poor in precipitation. If these conditions are met, you will receive a harvest in May-June, depending on your region.
Strawberries and root vegetables
What to plant between root strawberry rows? Parsley will grow best with strawberries. Its smell cannot be tolerated by slugs, so parsley planted between strawberry rows will guarantee that these pests will not appear in the garden and the strawberries will remain undamaged. A combination of strawberries and carrots will work well, but it’s better not to plant carrots and parsley next to each other. Beets, radishes or radishes are excellent neighbors for strawberries. But for their normal development, row spacing must be at least half a meter wide.
But it is strictly not recommended to plant potatoes between strawberry rows. This crop is highly susceptible to late blight, which can destroy all strawberry beds in a couple of months.
Features of planting and caring for strawberries in multi-tiered beds
There are some nuances that should be followed when planting berry seedlings:
- Strawberries should be planted in spring or autumn, in September, so that the seedlings have time to take root in the garden;
- It is recommended to plant seedlings from the upper rows so as not to cover the lower tiers with soil.
- The number of bushes depends on the size of the multi-tiered pyramid bed for strawberries. There is no need to thicken it too much. The optimal distance is 30 cm between seedlings;
- After planting, the plants need to be watered with warm water and shaded. Can be mulched.
Caring for strawberries growing in multi-tiered beds is practically no different from caring for plants in regular rows. But there are several features.
- The soil in multi-tiered beds dries faster. Therefore, it is necessary to irrigate the plantings more often. To do this, you need to check the soil moisture daily. Watering is carried out with a watering can or from a bottle. The ideal option is to install drip irrigation;
- Isolated soil is quickly depleted. Therefore, strawberries need to be constantly fertilized. Liquid fertilizers are applied once a week, combining them with watering. Mineral fertilizing is carried out once a month, choosing complex products - Nitrophoska, Nitroammofoska, Ammofoska (1 tbsp per bucket of water, 0.5 liters per bush). OMU, Fasco, Rubin, FERTIKA Kristalon for strawberries performed well. Use them according to the instructions on the package.
- For the winter, a multi-level bed should be insulated.
- With well-sifted soil, weeding is not required. But to allow oxygen to enter the soil, it must be loosened periodically.
2-3 years after planting, the soil and seedlings should be changed. And, if necessary, repair structural elements.
A multi-tiered strawberry bed allows you to rationally use the space on your plot and get a good harvest. This method has advantages and disadvantages that should be studied in advance. But you definitely shouldn’t forget about him.
Raised beds
Gardeners often consider warm and high beds a synonymous concept. But they are still different species, since there are some differences between them. As in the case of warm beds, high beds are made using the same principle of laying out layers. But the difference lies in the backfill. High beds for strawberries do not provide for insulated soil layers - only the presence of a fertile substrate.
Advantages of tall structures:
- You can use ready-made balanced soil purchased in the store.
- The frame is easy to build with your own hands
- The ground is not trampled, so there is no need to loosen the soil
- Covering material can be used
- The mound can be beautifully decorated with twisting shapes
- High embankments warm up quickly and deeply
By the way, a high bulk structure is an ideal bed for strawberries in August. The best time to plant the crop is mid-August. Planting at a later date is not recommended, since the plant will not be able to fully prepare for the arrival of winter. And from next year you will get weak, non-viable bushes with very low yields.
From pallets
This is a very practical, convenient and environmentally friendly option for growing strawberries. You don’t have to dig around the perimeter, dig trenches, or make embankments. The soil just needs to be poured onto a tray, carefully filling the gaps between the wooden planks. Then I sow seeds in them or plant ready-made seedlings. By the way, mulching the soil in this case is also not needed. The pallets allow air to pass through perfectly, the soil will always be loose, without stagnant water.
How to make structures from pallets:
- Saw wooden pallets into two types of elements: for the side walls and the bottom
- Assemble pallets like a construction set, in the form of a low box
- If you want to make them mobile, then the bottom needs to be placed on wooden legs
- Fasten all the elements of the box with nails
- The bottom of the pallet should be tightly covered with hay.
- Next add turf soil
- Strawberry bushes should be placed around the perimeter of the box
- Bring the leaves and tendrils out by pulling them through the gaps in the boxes
- Water the soil
From slate
Many summer residents practice this type of beds. Slate is often left over after the construction of summer cottages and outbuildings. The building material itself is cheap. But keep in mind that slate will actively release asbestos cement into the soil. This substance is toxic, so your harvest will not be healthy.
Construction stages:
- Make markings for future beds.
- Deepen the slate sides into the ground by 25 cm.
- To prevent the slate sheets from coming apart, they need to be secured with metal corners.
- If the slate is wavy in shape, then it can be “planted” on wooden guide slats.
- Next, pour the soil around the entire perimeter of the fence.
From tires
Strawberries in high beds made from old car tires are not the best option. Such beds are very common because they are compact and convenient. But the material is not environmentally friendly
It is important to understand that old tires release toxins into the soil. There are several ways to build such a bed
The first is to assemble the tires in the form of a tower. The second type of structure is a multi-tiered pyramid. In this case, tires of different sizes are needed. They are laid out from largest to smallest.
The variety of beds for strawberries allows you to grow this crop in areas where this is not possible on classic plantation options. For small summer cottages, vertical beds are optimally suited, as they allow efficient use of space. In the northern regions, with a fairly harsh climate even in the summer season, warm beds will be successful. They will allow you to get a high yield even in cool summer conditions.
https://youtube.com/watch?v=TiVMzHPKfDs
Periods and methods of applying fertilizer for strawberries
During the season, strawberry beds need 3 feedings at different periods of their development:
- It is best to apply the first fertilizer for strawberries in the spring, when the hard winter time is behind us, and the season of active flowering and fruiting is ahead;
- Then - immediately after harvesting;
- The final stage is feeding strawberries in the fall, around mid-September, to help the bushes resist diseases, pests, and withstand the winter well.
Remember that this crop usually grows in one place for 4 years in a row, then the old bushes need to be replaced with young ones.
Fertilizer application depending on the life cycle of strawberries
In the first year, young strawberries, as a rule, are not fertilized, since fertilizing is applied to the soil immediately before planting the bushes.
In the second year, the following potassium-phosphorus mixture will help to care for strawberries in the spring, before flowering: humus and water 5:1, add 150g of potassium sulfate (or potassium nitrate) and 60g of superphosphate. Consumption – 1 bucket per 3-4 m (watering into the furrows of the rows). Subsequently, potassium-phosphorus fertilizers are applied again in the second half of the growing season in the same dosage.
Nitrogen fertilizers may not be added this year if they were already added during planting. It is also not recommended to apply them in the spring, before flowering, as this will negatively affect fruiting.
Fertilizing with nitrogen later than August worsens the winter hardiness of plants. But after harvesting, you can just add:
- ammonium nitrate: it is either scattered on the site at the rate of 1 kg per 100 sq.m., or diluted in water (20-30 g per 10 liters of water), which is used to water the site at the rate of 0.5 liters per plant. When watering, make sure that the solution does not get on the leaves.
- urea in a dosage of 1 tablespoon of dry fertilizer per bucket of water, solution consumption - 0.5 liters per bush.
In the third or fourth year, caring for strawberries consists of feeding only inorganic fertilizers using the above methods.
Strawberry care in spring. Fertilizing with organic fertilizers
If you grow strawberries in small quantities “for yourself”, and the farm has a sufficient amount of manure and bird droppings, then it is quite possible to get by only with organic fertilizers.
Manure, humus, chicken droppings, and wood ash are natural sources of potassium, phosphorus and nitrogen. It is enough to fertilize strawberries with them once at the beginning of the season during spring treatment, throughout all 4 years of growth.
- Manure and humus are simply scattered around the area after cleaning the beds in the spring, consumption is no more than 5 kg per 1 sq. m. m, then the soil should be loosened.
- How to treat strawberries with wood ash in the spring: you can dry it, pouring a handful under each bush, or diluted - 1 glass of ash per 1 liter of hot water, let it brew for a day, then bring it to 10 liters with water, and water at the rate of 1 liter of solution per 1 sq. .m. land.
- It is more convenient to use chicken manure in a solution: 0.7 liters of fresh manure per 10 liters of warm, settled water. The solution consumption is 10 liters per 6-8 bushes for a mature plant, and 24-26 for a young one.