Have you ever had a neighbor on a dacha or garden plot who started planting seedlings back in March, and no cold or other problems prevented him from achieving a good harvest with large fruits? If he was or even is now, it means that he is a very experienced summer resident who knows exactly how to make warm beds in a greenhouse with his own hands, because it is with their help that he achieves such results. There is nothing too complicated about this, the instructions and recommendations below will help you.
Do-it-yourself warm beds in a greenhouse
Warm beds and their advantages
Let's start with the basics. A warm bed differs from an ordinary one in that in a certain way an increased temperature is created in it, which is optimal for the growth of crops, even in the presence of frosts or real colds “outside” the greenhouse. Thanks to this design, gardeners have the opportunity to start the summer season in March-April, despite the remaining snow, unheated ground, temperatures below zero and unpredictable weather.
High warm beds
The most popular options for warm beds are those that use “biological fuel” in the form of compost or manure to heat plants and their root systems. But this will be discussed in more detail below, and now let’s look at what the advantages of warm beds in a greenhouse are, and whether they justify the investment of time and effort.
- The opportunity to start planting seedlings in the greenhouse earlier and achieve a large and high-quality harvest.
- Protection of crops and especially their root systems from freezing during sudden frosts.
- Good harvests with large fruits even on relatively poor and infertile soil.
- Improving the process of photosynthesis - when using “biological fuel”, carbon dioxide is released, which immediately goes to the leaves of seedlings and bushes.
Good potato harvest from a warm bed
- Reducing the need for fertilizers and fertilizing - the very composition of the warm bed contains a large amount of nutrients and minerals.
- Weed control - their seeds in a warm bed begin the process of rotting, without having time to turn into a hindrance for your tomatoes or cucumbers.
- A slight reduction in the need for watering due to wetter soil and minimizing the process of water evaporation.
- A warm bed allows you to use various waste from gardening and animal husbandry, which previously had to be burned or disposed of in some other way.
Proper organization of internal space is the key to high productivity
Among the disadvantages of warm beds, one can highlight only the need to start work in early spring or even autumn and the fact that the rotting process may be accompanied by far from pleasant odors.
Advantages and disadvantages
Compared to conventional beds, warm beds have both advantages and disadvantages:
pros
warm up faster and better
allow you to receive early products
water does not stagnate, but flows into the lower layers of the soil
Garden waste does not need to be disposed of
high warm beds framed with boards or other materials give the site a pleasant appearance, they are convenient to work on - you don’t need to bend over too much
Minuses
with a thin layer of snow in winter, strawberry bushes, early onions and garlic can freeze
water quickly seeps into the lower layers, so frequent watering is required
layers of organic matter subside, they have to be topped up
there are ants
installation of above-ground structures requires framing costs
requires a lot of manual labor
Not all crops can be grown in such structures. It is necessary to select plants whose roots do not go deep. This is especially important in the first year of planting, when undecayed organic matter is located under a small layer of soil.
Types of warm beds
Based on the principle of heating the soil and the root system of plants, warm beds are divided into three types.
- “Biological” warm beds . As a source of elevated temperature, they use the process of decay of various vegetation residues and animal waste. There are many subtypes of warm beds using “biofuel”, differing in their design and filling.
Types of warm beds with compost
Laying cables for arranging an electric heated bed
Making a warm bed using a heating cable
Prices for heating cables
heating cable
Construction of warm beds with subsoil pipes
Important! Regardless of the principle of operation, for any warm bed it would not be superfluous to install thermal insulation from below (and in some cases from above). This will prevent heat from rotting cables or pipes from being wasted in the frozen ground.
This article will focus on warm beds using “biofuel”, as they are the most common at the moment. They are easier and cheaper to install compared to other options.
Warm organic beds
According to their design, warm beds operating on rotting are divided into four subtypes.
- Recessed - under them, the turf is removed from the soil of the greenhouse, a sufficiently deep trench is dug and filled with several layers of organic material so that the upper boundary is at ground level or slightly higher.
Trench with organic matter, high and raised beds
The main options for warm beds working on rotting
The best option would be a raised warm bed - it is the easiest to arrange, it does not require digging a trench, and it will lose less heat due to contact with frozen spring soil. In addition, due to the relatively small volume, the warm bed in the box warms up much faster.
Beds in a greenhouse 3 by 6
The beds in a greenhouse 3 by 6 meters have their own design nuances. It is necessary to rationally use the entire area of the greenhouse, and be sure to provide free access to every bush, plant, and branch. In addition, the conditions for the plants themselves must be the best - so that there is enough light and nutrition.
Arrangement algorithm
- Dig a trench 40-60 cm, 50 cm wide. The length depends on the length of the intended bed. Compact the soil.
- Cover the bottom with thermal insulation material - polystyrene foam. This will increase the efficiency of the system.
- Next, a sandy drainage layer of 5-10 cm is poured.
- A fine-mesh metal mesh is laid on the drainage layer, to which the cable is attached. The cable is located in a “snake” at a distance of 15 cm.
- A sand layer forms and spills.
- The protective mesh protecting the cable is stretched again.
- The top layer is the soil in which the seedlings are planted.
The thermostat is placed in a box (1 m above ground level), which is made of moisture-proof material. The system operates in spring and autumn.
In-ground beds with compost - step-by-step instructions
This type of warm bed with compost filler has the simplest design and requires a minimum of materials, but it takes a lot of time and effort to set up. Here are step-by-step instructions for creating it.
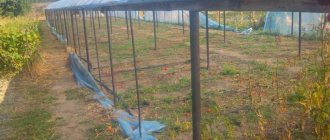
Ready-made warm beds in a trench with a path between them made of boards
Step 1. Using pegs and a rope stretched between them, mark the places for future warm beds. For an ordinary country greenhouse, this can be either 2-3 rows with a width of 60 to 120 cm with paths between them, or a U-shaped bed.
An example of marking warm beds in a greenhouse with a width of 2.4 and 3 meters
Step 2: Remove the turf with a shovel. Do not throw it away or mix it with the rest of the soil - it will be needed to form a warm bed.
Advice! If the arrangement of warm beds occurs at the same time as the construction of the greenhouse itself, start digging a trench before completing the frame of the structure.
Step 3. Dig a trench 50-70 cm deep or two shovels deep.
Digging a trench
Step 4. Level the side walls of the trench.
Step 5. Determine the type of soil. If the soil is heavy and contains a lot of clay, deepen the trench by 50 mm and fill it with sand to the same thickness - it will act as drainage and absorb excess water faster. Otherwise, when the soil absorbs water quickly, cover the bottom of the trench with cotton cloth, which will prevent excessive leaching of nutrients from the bed along with moisture.
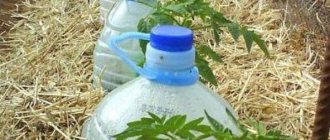
Step 6. Place a row of empty plastic bottles with tightly screwed caps on the bottom of the trench - this is necessary to insulate the bed with compost and protect it from freezing in cold weather. As additional measures, you can line the walls of the trench with boards or several layers of plastic film.
Thermal insulation with plastic bottles
Arrangement of a warm bed
Arranging a warm bed
Step 7. Prepare covering material and mulch.
Step 8. Proceed to fill the prepared trench with the necessary rotting material. What needs to be laid and in what order is described below in one of the following sections of the article.
Filling a warm bed trench
Questions and answers
Why doesn’t manure “burn”? In the fall, I brought a carload of cow manure, covered it with black film, and now I started making a “warm” bed, but the pile of manure itself... is cold. Why didn't the mullein start to decompose?
You have clean, bedding-free manure that has been lying around for a long time, has become compacted and has lost its ability to burn. To start heating, you need to mix it with some kind of organic matter such as sawdust or straw (1:1). Sometimes it is enough to shake up the caked substance to start heating it.
Is it possible to plant sun-dried fresh cow dung collected from the meadow in a garden bed?
Dry manure is more than suitable as a fertilizer and soil structure improver. There are doubts about heat transfer. He had already changed somewhat after lying in the open air. Some of the nitrogen has evaporated, that is, the supply of microbes that cause the “burning” of organic matter has decreased. If it does start, it will be less intense than that of fresh manure or manure that has lain in a compacted layer of bedding in a barn over the winter.
On the surface of one of the warm beds, wet yellow mold appeared, similar to polyurethane foam, which when dried turns into a white (like soda) color. Is it possible to somehow remove this mold or is it better to rebuild the bed?
It’s just that you have sterile and fertile soil, so primitive mushrooms grow on it. As soon as bio-equilibrium is restored during the growth of vegetables, they will disappear. Primitive mushrooms are harmless to humans and plants.
There were a huge number of mice in the bed with the bottom layer of branches. What did I do wrong?
Everyone did this. It’s just that the mice liked it all... Usually, poisoned baits solve this problem. Unless, of course, you breed cats. For example, at one of our dachas we have a lot of stray cats, which we periodically feed. And we don’t have any problems with mice there.
We would like to manure the poor sandy soil with fallen leaves from the forest for mulch and compost heap. Is there a way to disinfect foliage from pest larvae (in particular, ixodid ticks)?
Treat the foliage with Metarizin, bleach, bleach with monophosphate or iron sulfate.
Warm bed in a box - step-by-step instructions
A wooden or slate box with compost stands out from a warm bed buried in a trench because it requires less time and effort to arrange - there is no need to dig a long and deep hole, it is enough to put together a simple structure from boards. In addition, it is more convenient to work with raised warm beds - there is no need to bend over too much to care for crops and when harvesting.
One example of a box for a warm bed. 1. Boards for the box 2. Vole netting 3. Wood scraps or shredded branches 4. Newspapers and cardboard 5. Wood shavings and sawdust 6. Fresh garden waste 7. Autumn leaves from the compost pile 8. Compost with soil
The standard height of the box is approximately equal to the depth of the trench from the previous section of the article - from 40 to 70 cm. For small arched greenhouses, this gives rise to two problems. First, the beds cannot be placed close to the wall; the useful area of the already small structure in terms of length/width is lost. The second is that the bushes of some agricultural crops can grow too tall and begin to rest against the skin of the greenhouse, which is undesirable. The solution to these problems is a combined warm bed - its lower half is located in a trench of appropriate depth, and the upper half is located in a box above ground level.
Combined warm bed with metal walls
Frame for a high warm bed made of corrugated iron sheet
Apart from the presence of a pit, the design of raised and combined warm beds has no major differences; boxes for them can be assembled according to the same instructions, only adjusted for the height of the product. One such step-by-step method is given below.
Step 1. Using a tape measure, pegs and rope, measure the locations for the boxes inside the greenhouse. The width of warm beds located near the wall should not exceed 60-80 cm, otherwise it will be inconvenient to work with them. In addition, if the boxes are too wide with access to them only from one side, there is a high risk of damaging one of the plants through negligence. In total, in an ordinary country greenhouse you can place 2-3 rows of boxes with paths between them. Another option is the U-shape, when a warm bed is also located on the wall opposite the entrance to the greenhouse. In this case, you get an additional 1 m2 to 3 m2 for growing plants.
Plan for dividing the greenhouse into two and three beds
U-shaped warm bed with a vertical branch in the middle and already prepared pots with seedlings
Step 2. Remove a thin layer of sod from the area where the boxes will be located.
Removing the top layer of soil
Step 3. If you plan to create a combined warm bed, dig a trench. You can find out more about this in the previous section of the article.
Step 4. Prepare the boards. Choose rot-resistant wood; larch is the best option. If it is not there, others will do, but first treat them with an antiseptic two or three times. Choose thick boards, at least 20 mm.
Edged boards made of Siberian larch
Step 5. Cut out the boards or prepare separately vertical posts that will act as a kind of frame. Their height should be 5-15 cm greater than that of the box.
Step 6. Cut the boards using an electric jigsaw or saw to the length and width of the boxes.
Step 7. Gather together the boards of the long wall of the box, attach the posts and connect them using nails or self-tapping screws. Repeat the operation for the opposite wall.
Assembling a wooden box
Step 8. Using the same screws or nails, attach the boards of the short wall to the ends of the boards of the long one. Repeat the operation on the other side. Check the quality of the box by measuring the lengths of the diagonals - deviations should be insignificant.
For better connections, you can make cuts in the corners of the boards
Step 9. Cover the inner surface of the box with plastic film. This is necessary to ensure that moisture does not leave the bed too quickly upon contact with hygroscopic wood. Fasten the film to the staples using a furniture stapler or clamp with strips nailed on top of the boards of the box.
Scheme of a warm bed in a box
Step 10. Install the box on the prepared place, the protruding parts of the racks should be dug into the ground.
The box is installed in place
Step 11. Connect the opposite boards of the long wall of the box at the top with a cross member to protect it from spreading under soil pressure.
The walls of the box are connected by crossbars
Step 12. Begin filling the box with the necessary material for the warm bed.
Preparing a warm bed
Instead of boards, slate can be used as a material for the box (as a more durable alternative). In this case, it is necessary to make a sufficiently strong frame from timber or profiled pipe. Please note that the final structure will be heavy, so create it either directly in the greenhouse or close to it so that moving the box does not cause big problems.
Creating permanent boxes for warm beds from stone, tile and brick will not only make them stronger and more durable, but will also decorate your greenhouse, especially together with a paved path
Advice from professionals
In order for warm beds to be truly comfortable and effective, it is necessary to constantly monitor the nitrogen content in the soil. This has to be done without special instruments and sensors, as they say, by eye. When first laying warm beds, it is necessary to increase the content of nitrate or use bird droppings in order to increase the amount of nitrogen to double the norm.
Microorganisms that actively process plant matter strongly absorb nitrogen from the soil. Therefore, when it comes to planting seedlings and seeds, the level of nitrogen in the soil is only slightly higher than normal, which has a beneficial effect on the development of plants.
Warm bed-hill - step-by-step instructions
Arranging a warm bed-hill is suitable for those who just want to try this agricultural technique and experiment with it, but do not want to spend too much time assembling the box and digging a deep trench.
Section of a hilly ridge (example with location on the site)
Step 1. Mark the areas in the greenhouse for the future bed.
Step 2: Remove the turf in these areas.
Step 3. Dig a shallow trench with one bayonet of a shovel.
Step 4. Lay layers of biological material for a warm bed so that there is 15-20 cm from the edges of the trench to it.
Step 5. Fill these gaps with fertile soil, also pour all the biological material on top.
Ready bed-hill
It should be understood that the width of the final warm bed will be from 80 to 120 cm, therefore it is not advisable to arrange it against the wall of the greenhouse.
Video - Warm bed in a greenhouse
Features of use
The plant layer of warm beds provides enough energy and nutrients for seeds to germinate and develop regardless of air temperature. But at the same time, fermenting and rotting plant matter, even with the addition of ammonia fertilizers, becomes an ideal environment for the development of pathogenic microorganisms and infection.
To get rid of pathogens, a large amount of fertilizer, manure or chicken droppings is always added to the beds. At the first spills of soil, organic nitrogenous salts begin to react violently with the release of ammonia, the temperature inside the bed reaches more than 100 ° C, which contributes to good sterilization of the plant mass, removal of pathogens and rot.
Excess nitrogen is easily regulated by radishes
Preparing and laying raw materials for a warm bed
Now let's look at the most important thing - what and how to put in a pre-prepared box or trench to get a warm bed. In cross section, it is a “pie” of several layers of various organic matter, which, when rotting, release heat and form nutrients for plants.
Layers of warm beds
The lowest layer is the thermal insulation necessary to protect the bed from freezing from below. It is created from empty plastic bottles, always with tightly screwed caps. Don't forget to lay a fine wire mesh under or on top of this layer to protect the warm bed from mice and other rodents.
The mesh is necessary to protect against mice and other rodents
Wire mesh prices
wire mesh
Next begins the first layer of organic matter - large branches, wood chips, wooden logs, corn leaves, sunflower stalks and other relatively large objects of plant origin that are susceptible to rotting. In addition to generating heat and nutrients, this layer will play the role of a kind of drainage - excess moisture will easily go down through the cracks and gaps between large organic matter. Its thickness should be from 50 to 70% of the entire warm bed.
Formation of a trench warm bed. Fill the trench with branches and large organic matter
Important! When choosing plant waste for a warm bed, make sure that there are no traces of diseases on it, otherwise the latter may subsequently spread to the crops you grow.
Having filled in the large organic matter, pour it with a sufficient amount of water and sprinkle it with microbiological fertilizer “Siyanie-3” (also known as “BakSib F”) or its analogues. It contains many bacteria that trigger and support decay and the transformation of organic matter into compost. Subsequently, treat each new layer for a warm bed with microbiological fertilizer and water it with water.
"Shine-3"
Next will be a relatively thin layer of shredded cardboard, newspapers and waste paper. Additionally, you can add chalk and ash to it. Repeat the operation with watering and microbiological fertilizer “Shine-3”.
Prices for fertilizers "Shine"
fertilizer shine
The new layer of the warm bed contains medium-sized organic matter - potato and other peelings, tops, thin branches without seeds and plant stems. You can add sawdust, but first pour boiling water over them to kill any weed seeds that accidentally fall into them.
Potato peelings are also useful when arranging warm beds in a greenhouse
Next, place a layer of fallen leaves, mown grass, small sawdust and plant debris. Large organic matter is also added, only pre-crushed. This layer of warm beds needs especially a lot of water and microbiological fertilizer. It would not be a bad idea to cover it on top with rotted manure or ready-made compost - the decay reaction will begin much faster and will be more effective.
One of the options for a warm bed of great depth, capable of generating heat for a very long time
The last layer should occupy approximately 20-25% of the entire depth or height of the warm bed. This is fertile soil. It is advisable to purchase it separately to get as many nutrients as possible. If the land of your dacha or personal plot is rich enough, add the previously removed turf to the purchased land. For the winter, cover the top of the finished warm bed with leaves, straw or transparent plastic film with cross-shaped slits for plant stems.
The beginning of filling the warm bed with fertile soil. You can see the intermediate layer of fine organic matter
You can increase the efficiency of a warm bed and its nutrient content by preparing a special mixture for the last layer. Its composition is given in the table below.
Table. Composition of soil mixture for a warm bed.
| Ingredient name, photo | Quantity used |
| Garden soil, black soil or peat | Six standard buckets, approximately 60 to 72 l |
| river sand | One standard bucket, approximately 10 to 12 liters |
| Fine sawdust, pre-scalded | One standard bucket, approximately 10 to 12 liters |
| Wood ash | 3 tbsp. spoons |
| Superphosphate | 1 tbsp. spoon |
| Boric acid | 1.5 teaspoons |
| Potassium sulfate | 1 teaspoon |
| Urea (urea) | 1 teaspoon |
| Zinc sulfate | 1 teaspoon |
Recommendation! The filler of a warm bed can be used either until its nutrients are completely depleted and the release of heat during decay ceases, or with an annual change of organic matter. In the latter case, the compost formed as a result of decomposition processes is used to form a fertile layer on ordinary beds in a greenhouse or on open ground.
Preparing filler for a warm bed
Beds using biological materials are the most environmentally friendly and at the same time economical. To warm the soil in such a bed, there are no costs for their construction and maintenance.
In addition to the thermal effect, this option enriches the soil with nutrients and carbon dioxide. Plants are in warm soil and receive enough nutrition. At the same time, they become resistant to diseases.
The ideal filler for the garden bed is a layer of rotted manure. Various plant residues, foliage, and trimmed branches are mixed into it.
If there is no manure, freshly cut grass mixed with food waste and potato peelings can serve as a filler.
You can fill the bed with straw bales, which are watered with a solution of chicken manure or Baikal fertilizer.
Last year's tops mixed with fresh humus can also be planted in the garden bed in the fall.
Compost bed
The traditional compost heap, created on the surface, has a large number of disadvantages. It is laid in a fairly high layer in the fall and freezes through in the winter. In frozen layers, the rotting process does not occur, which means that decomposition does not occur and the summer resident does not receive ready-made compost by spring.
In addition, such a high layer will thaw in the spring later than it will be necessary to use compost. Another disadvantage of such a heap is its maintenance in the summer.
The unpleasant appearance and smell, periodically watered with slops, causes a lot of unpleasant sensations. Flies fly over the heap, maggots begin to crawl along the edge, this phenomenon causes a lot of inconvenience not only to you, but also to your neighbors in the area.
An expedient way to prepare this biofuel is to create a compost trench bed. It is dug to a depth of 40 centimeters, the top layer is deposited, and the hole is filled with plant debris. In autumn, falling leaves are placed in the same trench.
To start the fermentation processes, the vegetable compost filler is spilled with slurry or grass infusion. The surface of the trench can be covered with roofing felt or a piece of linoleum. It is better to place them on poles for air access.
In winter, the compost trench is filled with a layer of sawdust and covered with a layer of snow to avoid severe freezing.
In the spring, the trench becomes a source of effective biofuel for laying in a warm bed.
Leaf compost
Fallen leaves are an excellent material for creating compost - biofuel. To obtain compost in a greenhouse to generate heat, you can use two options:
- Compost pile of leaves for heating a greenhouse. .
The foliage is laid on the surface of the soil, and a certain amount of ready-made compost is added to it to start the decomposition process. The top of the pile is covered with straw or bags. This is necessary so that the foliage does not dry out, but rot. The compost preparation process takes place over two years. The pile is periodically watered. - compost pit. To make it, a hole two meters wide and 30-40 centimeters deep is dug in the ground. The bottom is covered with film or roofing felt.
Fallen leaves are laid in layers, each of which is spilled with a solution of saltpeter and sprinkled with a small amount of turf soil. The next layer is shed with slurry.This is followed by a layer of caustic soda. Next, a layer of foliage is laid, sprinkled with wood ash. This sandwich is covered with straw on top, and then with turf, with the grass laid down.
After a month, the pit must be loosened to allow oxygen to enter and all layers to be mixed.
REFERENCE. The use of plant waste and branches as a filler for warm beds solves the problem of recycling plant waste on the site. Instead of simply being destroyed, they will serve as fuel and at the same time fertilizer for other plants.
Recommendations for using a warm bed
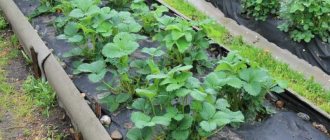
It should be understood that the properties of a warm bed, if it uses “biological” fuel, are not static and change over time. This applies to the release of heat and the amount of nitrates, nutrients, and minerals. On average, a normal warm bed with compost can last four years, and it is best to plant different crops in each of them.
Basil, which was sown in a regular bed (left) and in a warm one (right)
The first 12 months for this design are characterized by the release of a large amount of heat, as well as an increased content of nitrogenous substances. Given these conditions, plant heat-loving plants that require large amounts of minerals and nutrients.
Such crops include:
Important! It is not recommended to plant root vegetables and greens in the first year - they tend to accumulate excessive amounts of nitrates in the fruits, which is harmful to those who consume them.
Arranging a warm bed creates favorable conditions for growing plants
In the second year, the average temperature in the soil of the warm bed will decrease, but there will still be quite a lot of nutrients and nitrates. The list of plants recommended for planting will remain the same, with the exception of watermelons, pumpkins and melons. The content of nitrogenous substances is still too high, so it is undesirable to grow agricultural crops prone to their accumulation in warm beds this year.
By the third year of using a warm bed with “biological” fuel, it will cool down even more, but the heat and nutrients created will be enough for tomatoes, beans, cabbage and peppers. The nitrate content will become acceptable and you can begin to grow root vegetables and various greens.
Beds in a greenhouse
The last year of using compost beds is characterized by the depletion of nutrients and the gradual cessation of reactions with the release of heat. It is recommended to plant greens, peas, beans and other unpretentious crops. In some cases, plants will need fertilizing.
At the end of the four-year cycle outlined above, the warm bed must be created anew, clearing the remnants of old organic matter and filling in new ones. A good solution would be to create such beds at intervals of one or two years in order to grow different types of vegetables and herbs in the same season.
Cleaning a warm bed in a greenhouse after the fourth year of use
Prepare warm beds in the greenhouse in advance - in the fall, after harvesting the previous harvest. In this case, during the period from November to March or April, decay will begin and develop in organic matter, and the heat created during decomposition will be enough to create optimal conditions for seedlings planted in early spring. If everything was done correctly, then at the end of the season you will receive a rich, healthy and high-quality harvest!
Principles of preparing beds for winter
Preparing the garden for winter is carried out in stages. Vegetable beds are cultivated as soon as they are cleared of plantings immediately after harvesting. For example, areas with early potatoes, onions and garlic should not be left unattended after the grown crops have already been harvested. The best option is to sow green manure to restore the fertile composition of the soil. In addition, green manure crops are considered effective assistants in the fight against weeds.
Next comes the period of harvesting potatoes, zucchini, and cucumbers. Afterwards, turnips, beets, carrots and late varieties of cabbage are removed from the beds and they continue to carry out comprehensive measures to prepare the garden for the coming winter.
Site cleaning
At the initial stage, work is carried out to clear the site of plant debris. Remove the tops and weeds and remove the roots. It is important to thoroughly clear the soil of weeds, removing creeping varieties of vegetation, the ubiquitous wheatgrass with parts of the root system, horse sorrel, dandelions, wild mint, wild rosemary and other grass. Plant waste should be destroyed, for example, burned in a safe place outside the garden.
The best option for eliminating plant residues after cleaning areas is considered to be composting. To speed up the decomposition process, special microbiological preparations are added to the pile of organic matter, for example, “Baikal EM1”. As a result, the processed vegetation is used as fertilizer to enrich the composition of fertile soil.
Disinfection
An important stage in preparing a garden for winter is the fight against pathogens of fungal infections by disinfecting the substrate. By autumn, a large concentration of pathogenic microorganisms is observed in the beds. This is facilitated by unfavorable weather conditions with plenty of rain, sharp changes in air temperature day and night, and high humidity levels. Also, the development of pathogenic microflora can be caused by violations of agricultural practices of cultivated crops. For a good harvest next season, autumn soil disinfection is necessary using available methods.
An effective option for disinfecting garden soil for the winter is treatment with biological products:
- "Trichoplant". The composition is capable of destroying harmful microorganisms that have settled in the ground for wintering. The drug contains the trichoderma fungus, a natural enemy of pathogenic microflora. The spores work great in any conditions; the product disinfects the soil in greenhouses and open ground.
- "Trichocin." Powder analogue of the drug "Trichoplant".
- "Fitosporin". An effective biological agent for soil disinfection is used in the fall after digging up the garden. The drug is developed on the basis of Bacillus subtilis and has a universal purpose.
- "Farmayod." The composition is a unique product based on a water-polymer suspension containing iodine in an accessible form. The broad-spectrum drug also helps to suppress viruses and is successfully used to disinfect substrates in greenhouses and open spaces.
Trichocin is a means for soil disinfection.
Biological products are effective in late summer and early autumn, since living compounds do not work when a stable temperature is established below +10°C. With the onset of the cool off-season, chemical substances are used to disinfect the soil, including Bordeaux mixture, HOM, copper and iron sulfate, Oksikhom and other preparations.
Preparing the beds
Gardeners practice 2 options for digging beds:
- dumpless - the earthen lump is not broken. This promotes maximum disinfection of the substrate with freezing of the soil to a great depth;
- dump - the lump is broken. This digging option allows you to embed fertilizers deep into the fertile layer.
Digging up the area promotes the effective use of biologically active snow moisture, since melt water is well absorbed into the loosened fertile layer.
Among the advantages of digging up the site after harvesting, the following points are also noted:
- as a result of digging, the passages and winter shelters of insect pests are destroyed, which helps to combat the unwanted population;
- The digging procedure is accompanied by the introduction of useful elements to restore the composition of the soil. As a result, organic fertilizers are qualitatively decomposed by the time of spring planting, granular additives acquire a form accessible for absorption by the plant;
- Be sure to dig up an area heavily overgrown with weeds and remove the rhizomes. In addition, this accelerates the germination of weed seeds, which die with the onset of frost.
Gardeners use various methods of planting beds:
- a flat bed - a standard option for an area with a predominance of sand - is done by simple marking using a set of 4 pegs and a cord, the row spacing is carefully trampled;
- elevated - the shape of the future bed is marked, the row spacing is formed by removing soil, which is thrown onto the area allocated for planting;
- high - the design provides for drainage under the fertile structure, decorated with a border made of boards, bricks, concrete, slate, plastic and metal profiles. Height parameters vary in the range of 25-60 cm and more.
For an area with a close groundwater horizon or a predominance of lowlands, where there is an accumulation of sedimentary moisture, high beds are an ideal option for growing garden crops.
Fertilizing and mulching
By the end of the summer season, it is necessary to compensate for the lack of useful elements in the soil, which is depleted, since nutrients are removed during the cultivation of plants. Most of all, garden soil needs nitrogen and phosphorus-potassium fertilizers.
In the fall, after harvesting, it is recommended to apply:
- urea – 25 g/m²;
- superphosphate – 20 g/²;
- potassium chloride – 20 g/m².
It is also advisable to enrich the substrate with rotted manure at a rate of 5-6 kg/m² and ash in proportions of 300 g/m². It is recommended to add peat, if possible, given that the composition helps to increase the acidity of the soil. They deoxidize soil with low pH values by adding dolomite flour, lime, chalk and wood ash.
To improve the structure of clay soil, add river sand and compost at 10 kg/m². Sandy areas are diluted with organic matter in the form of humus at 3-4 kg/m², compost at 5-6 kg/m², rotted sawdust per bucket per m². Nutrient compositions are sealed by digging onto the bayonet of a shovel. Next, the ground is mulched with pine needles, fallen leaves, and bark.