If you don't want your tulips to become shriveled and degenerate over time, you need to know when to dig up your tulips and store them.
Unfortunately, many gardeners neglect this agricultural technique. Dear readers!
For you, we have created communities on social networks in which useful articles and interesting ideas are published several times a day! Subscribe and receive useful content in a convenient format! But digging up tulips is very important if you want to preserve the varietal characteristics of specific plants, as well as propagate flowers to form a beautiful flower bed.
In this article we will talk about the timing of digging tulips in different regions and preparing the bulbs for storage. You will also learn about the features of storing planting material until the new summer season.
When to dig up tulips after flowering and how to choose the time?
When determining the time when to dig up tulips, first of all, pay attention to the condition of the leaves of the plant. It is considered optimal to dig up the rhizomes when the above-ground part begins to turn yellow, but has not yet completely dried out. This means that the plant has completed the cycle and is going into a dormant period.
It makes no sense to dig up earlier, since the plant has not yet finished its growing season and has not been saturated with the nutrients it needs. There is also no need to wait for the foliage to completely dry out, because then you simply won’t be able to find all the bulbs.
Having received planting material in June-July, you will, firstly, be sure that you have dug up all the tulips. Secondly, you can separate fused nests and get new planting material. Thirdly, in the time before planting, the bulbs will rest and gain strength for flowering in the new season.
INTERESTING! In Central Russia there is such a sign. As soon as the day begins to decrease, you need to dig up the tulip bulbs. That is, after June 22.
Time selection depending on region
Russia is a large country, and in different regions, depending on climatic conditions, tulips are dug up at their own time. Let's consider when it is necessary to carry out the procedure in different areas of our vast Motherland.
Southern regions
In the south of the country, you can start harvesting tulips at the beginning of summer. At this time, the plants will have finished flowering and will be ready for the dormant period.
Middle lane
In the regions of the Middle Zone, tulip bulbs are traditionally dug up from the 20th of June until the second ten days of July. A specific day is chosen depending on the weather and the condition of the plants themselves.
Moscow and Moscow region
In the capital region, bulbs are dug up in the last days of June and the first days of July.
Leningrad region
In St. Petersburg and its environs, bulb harvesting can be done starting in the second ten days of July.
Volga region
In the Volga region, tulips can be dug starting from the last days of June.
Ural, Siberia, Far East
In the eastern regions of the country, the time for harvesting bulbs occurs in the last days of July - the first days of August.
The tulips have bloomed, what to do with them next?
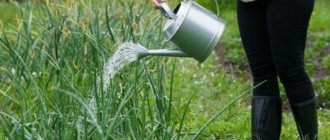
Caring for faded flowers itself begins with fertilizing and increased watering. The first step after the flowers have faded, when the petals have already dried out and fallen off, is to strengthen the peduncle. If you immediately cut off the entire above-ground part at this time, then the onion itself will not be able to form and ripen. Its growing season ends by the end of July. And this will be visible by the withering of the leaves.
On the contrary, if you do not remove the peduncle at all, that is, the head remaining after the flower, then it will begin to take on nutrients in order to form seeds. And the bulb itself will be depleted. Therefore, it is necessary to cut off the head and leave the green leaves and part of the stem.
The next step for faded tulips is feeding. It is during this period that the heads accumulate nutrients. Complex potassium-phosphorus fertilizers, superphosphate or wood ash are better suited for this. Fertilizers are scattered next to the remaining flower stalks and embedded in the soil. Fertilizer consumption – 30 g per 1 sq. m.
Pay special attention to the fact that after flowering, you should not use fertilizers containing nitrogen and chlorine, and you should also not overfeed the tulips. Otherwise, the formation of the bulbs will be delayed.
Next, when the leaves turn yellow, you can start trimming them, leaving a small stump above the soil level. Pruning the peduncle before the greenery turns yellow should not be done, otherwise the heads will stop developing. The stump is also left in order not to lose its location. If you accidentally remove the peduncle completely, leave some kind of mark in this place.
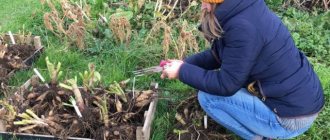
How to properly dig up tulip bulbs?
It is better to choose a dry, sunny day to “harvest” tulips. It is better to dig with a pitchfork, trying not to touch the rhizomes. With experience, you will be able to use a shovel, but it is better to start with a pitchfork.
In any case, the shovel or fork should be held vertically, almost perpendicular to the ground. This is done so as not to damage the rhizome when the bulb is deep.
However, do not dig to the very root of the tulip. Step back a few centimeters so as not to leave children in the ground.
After digging up the bulbs, carefully shake off the soil and place them in a basket or box. You will prepare them for storage a little later.
Don’t forget that you must remove the “babies” from the soil along with the main bulbs. These shoots can be used to propagate and plant tulips in other areas of your garden.
IMPORTANT! Do not tear the stem and leaves from the bulb. They will then fall off on their own during drying.
Are there varieties that don’t need to be dug up?
Variety Johann Strauss
There are varieties whose bulbs do not require annual removal from the soil. These are mainly varietal variations of tulips from the group of Foster, Kaufman and Greig. These species are botanical and reproduce very slowly.
Pinocchio variety
Here are the most popular of these varieties:
- Johann Strauss;
- Giuseppe Verdi;
- Heart's Delight;
- Ali Baba;
- Princess Charmant;
- Sylvia van Lennep;
- Pinocchio;
- Passionale.
Variety Hearts Delight
But this does not mean that having planted botanical tulips in your garden once, you can forget about them. Bulbs of these species also need to be dug up, they just do this not annually, but once every 4-5 years.
When to plant tulip bulbs after digging
The good thing about tulips is that their bulbs will be ready for planting in just a few months. For example, children can be seated in the second half of August and the first ten days of September. Adult bulbs are planted a little later, from September to November.
The main condition in this case is that the earth must have time to cool down to AT LEAST 10 degrees.
Why is it important? The fact is that tulips are considered one of the primroses, which means they begin to germinate in relatively cold soil.
It is also possible to plant plants in the spring, but in this case they will bloom much later.
The most experienced flower growers plant tulips literally 1.5-2 weeks before frost. But in this case, they carefully mulch the plantings and additionally cover everything with branches, leaves and even agrofibre.
Timing for harvesting tubers: favorable days and unfavorable days (table)
You need to dig up plant tubers during the waning phase of the moon. At this time, nutrients are directed downward from the leaves and trunks and concentrated in the root area. Bulbs in the ground grow better and faster.
When choosing a specific date for digging up plant bulbs, you need to take into account the instructions of the lunar calendar. Of great importance is the zodiac sign in which the celestial body is located. The most successful are Aries, Leo, Cancer.
How to prepare bulbs for storage step by step
Now let's look at the algorithm for preparing tulip bulbs for storage.
Step 1. You have removed all the bulbs from the soil. Inspect them and set aside any that are rotten, diseased or damaged.
Step 2 : Calibrate. By sorting the bulbs by size, in the future you will be able to organize a flower bed and plant them beautifully.
Step 3 : Clean. It is necessary to remove adhering soil, roots, peeling husks, etc.
You may also need to cut off any rotten areas on the bulb. Please note that if there is little rot, then it is easier to remove it, but if there is a lot, then the onion will have to be thrown away.
And don’t forget to treat the cut area with potassium permanganate and crushed activated carbon.
An important point about the husk. There is no need to specially “undress” the bulbs. Clean off only those scales that easily come off on their own. Otherwise, you may damage the rhizome.
Step 4. Drying the planting material. The bulbs must be dried before storing.
This can be done by placing the rhizomes in mesh boxes in 1 - 2 layers. There is no need to apply more, as then the process of rotting may begin.
Drying time can vary from several days to 2 weeks. Everything, as you understand, depends on the weather.
Step 5. Disinfection. The simplest way to disinfect planting material is to soak it for several hours in a pale solution of potassium permanganate. Don’t forget that you need to dry the bulbs again later.
Step 6. Bookmark for storage. Choose the method that suits you to store planting material and do not forget to provide the necessary storage conditions.
ON A NOTE. If the bulbs have grown together into nests, then they need to be carefully separated, peeled, cut off the roots and soaked for 30 minutes in a weak solution of potassium permanganate. Then they are dried again and sent for storage.
What is the danger of delaying bulb digging?
Some people rush to remove the bulbs from the ground because they are afraid that in the future it will be difficult to find where exactly the tulips were planted. This is especially often done by those summer residents who have other flowers planted in the same flower bed.
However, if you dig up tulips immediately after flowering, the nutrients will not have time to be redistributed from the leaves to the underground part. As a result, the bulbs will be incompletely formed and immature. You just need to mark the place where the tulips grew with a peg or leave another mark.
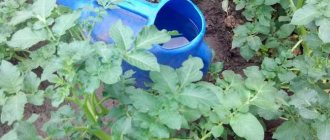
It happens that summer residents are simply forced to dig up the bulbs early due to cool and rainy weather, for fear of them rotting in the ground. In this case, the tulips, without cutting the leaves, are placed in buckets, containers, an old basin, covered with dry soil and allowed to ripen for 3-4 weeks.
If you delay digging up the bulbs, waiting for the leaves to completely die, the nest will disintegrate underground and it will be difficult to remove the bulbs without loss. This is especially true for small children. To find them, you will have to sift the earth.
Methods for storing planting material at home
Planting material should be stored in a dark, warm place (about 20 - 23 degrees Celsius) without dampness. The room should be well ventilated. Boxes with holes made or baskets are ideal for containers.
ON A NOTE. It would be ideal to gradually reduce the storage temperature of tulips. Start with 25-27 degrees and end at around 20 degrees. But, unfortunately, not everyone can afford this storage method.
The bulbs are laid out in one layer. They need to be laid out so that they do not come into contact with their neighbors. Tulips folded in boxes can be sprinkled with dry sand or sawdust.
However, there are other ways to preserve planting material.
It is very convenient, for example, to store onions in egg cassettes. Then each bulb will have its own cell. No need to use bulk materials.
A cheap but practical option is to store the bulbs in nylon stockings, string bags and fabric bags.
IMPORTANT! Do not use iron or plastic containers, plastic bags or glass jars as storage containers. If there is no free air circulation, the bulbs will inevitably begin to rot.
Experienced flower growers advise periodically inspecting tulips during storage (once every 2 months is enough) in order to notice putrefactive processes in time and save the bulb.
ON A NOTE. There is a storage method called “wet germination.” Wet sawdust is poured into the container (preferably peat, if you have it). Onions are planted in them and again sprinkled with peat or sawdust. Then the container is removed to the basement and stored until disembarkation.
Further care for tulips
Caring for tulips is not difficult. The main thing is to follow the basic rules of agricultural technology. Vegetation care involves doing the following:
- timely removal of weeds from the garden;
- fertilization;
- mulching the soil;
- adding a sufficient amount of water to the soil;
- insulation of plantings for the winter.
After the emergence of seedlings, it will be necessary to apply fertilizing twice during the active growing season of the plants. The first is applied after the snow melts into moist soil to a depth of 5 cm. At this stage, nitroammophos is used. 30 g of substance is added per 1 m². At the moment of bud formation, watering is carried out with the addition of potassium-phosphorus elements. 20 g of superphosphate and 10 g of potassium salt are dissolved in 10 liters of water. This amount is enough to fertilize 1 m² of area.
Features of storing planting material in winter, and what conditions are needed
Sometimes it happens that it is not possible to plant tulips in the fall. In this case, the bulbs need to be stored for winter.
Preparing planting material for wintering does not differ from the standard procedure. You dry and disinfect the rhizomes.
Larger specimens (from 3 cm) are left for stocking for the winter.
It is very important to prepare your storage properly.
Firstly, it should be dry there, there should be no access to sunlight. A cellar, basement, or attic are quite suitable.
If there are few bulbs, you can put them in the refrigerator. But keep in mind that refrigeration is a last resort. Not all bulbs will survive such low temperatures.
The most important point is the temperature regime. Ideally, the temperature of tulip planting material is gradually reduced from 25 to 15 degrees. The reduction occurs once a month.
Storing tulip bulbs before autumn planting
When storing tulip bulbs, the correct temperature is of great importance. This is important so that the flower arrow can be formed.
For the first month, the bulbs should be kept warm, at a temperature not lower than 23 ° C and normal air humidity (40-60%). It is important that the air in the room is constantly exchanged; if it stagnates, mold can develop on the bulbs.
In dry, sunny weather, you can continue to keep the bulbs under a canopy outside, in the same place where they dried. If the weather turns bad and it starts to rain, the planting material is brought into the house, where it can be stored under the bed or in a dry pantry.
Some varieties of tulips (parrot, fringed) require a higher temperature for storage in the first month - about 30 ° C. It is under these conditions that the flower arrow matures.
Starting from August, the storage temperature is slightly reduced, it is advisable that at this stage it does not exceed 20 °C. Closer to September, the temperature needs to be lowered a little more - to 15-16 °C.
However, the humidity should still remain low, so outdoor storage conditions will no longer be suitable at this stage; a barn or enclosed veranda can be used for this purpose. This temperature schedule may seem complicated to some, but it is necessary to adhere to it. These are the needs of the plant.
First, in the warmth of the tulips, flower arrows are laid, then replacement buds are formed, leaves are laid, after 2 months the future parts of the flower (pistil, stamens, ovaries) are formed. If the required temperature schedule is not observed, the tulips may not bloom in the future or blind (unopened) buds may be expelled.
Is it possible to store diseased and thrips-infected bulbs?
There is still controversy regarding the storage of diseased bulbs.
Some gardeners are absolutely sure that infected or rotten planting material should be thrown away so that the infection does not affect other tulips.
This is a common sense approach. After all, it is better to sacrifice a few specimens than to receive completely infected planting material.
Others disagree with them. And here too there is a grain of truth. If you remove the infected areas and treat them with antifungal and insecticidal agents, the bulb will sprout as if it were healthy.
Here you need to decide for yourself. But, if you want to save the maximum number of bulbs, here are some useful tips:
- Sick and infected rhizomes are stored first.
- Be sure to place them separately so as not to infect other bulbs.
- Treat infected planting material. To do this, you need to remove the diseased areas (if there are few of them and they are small), treat them with crushed coal and soak the tulip bulbs in a solution of potassium permanganate or Fundazol.
- During storage, inspect the problematic planting material at least once a month; if rotting processes continue, then destroy the infected bulbs without regret.
Preparing tulips for planting
In order for tulips to take root well in the soil and subsequently produce a good harvest, it is necessary to process their bulbs even before they are in the ground. Such processing does not take much time and effort, and in return provides invaluable assistance to the plant. So, the preventive procedures include the following:
- Inspect the bulbs for cracks and damage;
- Sorting bulbs depending on their variety and size;
- Peeling the bulbs;
- Disinfection of bulbs.
Before immersing the bulbs in the soil, it is necessary to process them
. Let's consider each of the preparatory stages in more detail.
General inspection
Before using bulbs as planting material, you need to make sure they are in proper condition. The bulbs should not show signs of rotting, mechanical damage or infection. If desired, you can use damaged bulbs for planting by removing the injured segment. However, it is advisable to plant such planting material at a distance from healthy ones.
Bulbs prepared for planting must be healthy and strong.
Sorting
One look at the bulbs is enough to understand that they all have different sizes. When planting, it is advisable to take into account the diameter of each bulb and plant them in accordance with their dimensions. Large specimens are more suitable for planting, while small ones take root better in flower beds. In addition to size, you should also take into account the variety of bulbs and group them based on it.
Sorting will allow for more efficient planting and ensure comfortable harvesting.
Peeling
During their storage, the bulbs had time to dry out, and therefore removing the hard covering layer will not be much effort. This action will make it possible to determine whether the planting material has been infected, since many infections are hidden precisely under the integumentary peel. In addition, without a covering layer, the bulbs will become more receptive to nutrients obtained from the soil. Keep in mind that when cleaning the bulbs, damage is possible, so the procedure should be carried out very carefully.
Bulbs peeled from old husks will germinate faster
Disinfection
Even in the absence of visible symptoms of infection, it is advisable to disinfect the bulbs before planting, since this action will help them maintain strong immunity while already in the soil. To disinfect the bulbs, it is enough to make a weak solution of potassium permanganate and immerse the planting material in it for thirty minutes. After this procedure, the bulbs should be immersed in the soil as soon as possible. Delay may cost the gardener roots that have fallen off due to excess moisture.
A weak solution of potassium permanganate will disinfect the bulbs and also protect them from infection
Digging technique
It is better to remove the plant from the ground with a pitchfork. The soil must be dry. Do not rush to cut off the above-ground part; after digging, it will continue to give nutrients to the onion for some time. The dug up plants are laid out in one layer in a dry room for 2–3 days. After this, the above-ground part is cut off, leaving a “stump” of 1 cm.
Preparing tulip bulbs for storage
Preparation for storage of planting material is carried out as follows:
- cleared of remnants of earth;
- remove diseased, rotten, damaged specimens;
- freed from integumentary scales (which are easily detached);
- sorted by size and species;
- keep for 30 minutes for disinfection in a 1% solution of potassium permanganate (1 g per 100 ml of water) or foundation (25 g per 10 liters of liquid);
- spread on rags to dry;
- sorted by size;
- laid out in containers (1 layer) for storage;
- labeled by variety.
Tulip bulbs in storage
Schemes and methods of planting tulips
Traditionally, tulips are planted in a flowerbed and placed as a border along the garden path. They can also be planted under the canopy of trees. When the leaves begin to bloom, the tulips will already have time to bloom. In addition, the plants can be placed in any suitable container.
To the beds
Bulbs in open ground are planted at intervals of 8-10 centimeters from one another. The depth depends on the size of the planting material. For large bulbs, dig holes 12-15 centimeters deep, for small ones - 7-8 centimeters. The holes are covered with earth and watered.
You can create a beautiful flower arrangement from tulips. In this case, large bulbs are placed in the central part of the flowerbed, medium ones - along its edges. The larger the planting material, the greater the distance between it should be left. As a rule, the interval between the bulbs should be maintained within 6-10 centimeters.
In pots and baskets
If you plant tulips in containers, you can regulate the beginning of their flowering. Pots, baskets, and boxes must have drainage holes. Place small pebbles or expanded clay at the bottom of the containers. Then they are filled with loose substrate. In pots or boxes, the bulbs can be planted close together. Containers with plantings should be kept at a temperature of 1-2 °C for at least 2 months.
By placing them in a warm room in the middle of winter, the gardener will be able to admire flowering plants in early March.
Tiered method
Bulbs can be planted not only in rows, but also in a tiered method. A container is usually used for this. The lower tier is made up of large bulbs planted to a depth of 15 centimeters. They are covered with soil and medium-sized planting material is laid out in a checkerboard pattern. The top layer consists of small bulbs.
Optimal planting dates
Tulips in the Urals should be planted in the fall. Over the winter, the bulbs will have time to adapt and naturally undergo the necessary stratification. If the gardener is late with early autumn planting, he can plant the crop later. But in this case, the flower bed will need to be carefully insulated. In spring, tulips are planted only in case of emergency.
Spring
During this period, bulbs can be planted only if absolutely necessary. For example, a gardener did not have time to do this in the fall, or in the spring he purchased a rare variety of tulips. When planted in spring, he will not see plants flowering this season. But the underground part will develop well, and next year the crop will bloom beautiful buds.
Expert opinion
Zarechny Maxim Valerievich
Agronomist with 12 years of experience. Our best country expert.
Ask a Question
Note! In spring, tulips are planted immediately after the ground thaws. For successful development, the bulbs are first kept for 2 months at a temperature of 1-2 °C.
Autumn
Early planting may cause tulips to germinate prematurely. In a harsh winter with little snow, they can die. In the north of the Urals, bulbs should be planted at the end of August. Planting lasts until mid-September. In the south, the procedure is carried out from the first days of autumn until almost the end of October. If these time frames are observed, the gardener will be able to ensure a safe winter for the bulbs.
See also
Rules for planting and caring for terry aquilegia, the best varieties and growing secrets
Read