The variety of vegetable varieties and hybrids often confuses any gardener. What to choose? Some prefer varietal crops, others prefer hybrid ones. When creating crossed crops, breeders try to take only the strongest qualities from varieties, so hybrids are more resistant to diseases and more resilient to weather conditions.
Tomato Neighbor's Envy f1 has not only the above advantages. This unique cluster hybrid has early ripening and excellent taste of ripe and juicy vegetables. Gardeners who know the tomato firsthand confidently advise every gardener to plant it in their beds.
Characteristics and description
The Neighbor's Envy tomato is an early-ripening cluster hybrid and is recommended for cultivation in greenhouse conditions. However, in the southern regions it is planted in open beds, where it takes root well without shelter.
Distinctive features
The type is indeterminate, that is, without natural growth restrictions, and requires mandatory tying to a support and pinching.
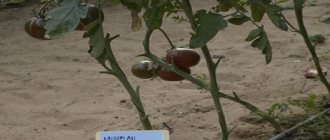
Belongs to the carpal family, each brush bears up to 12 fruits.
The ripening period is early, from the moment of emergence of seedlings to full maturity, 85–95 days pass.
It is highly resistant to major tomato diseases and is practically not susceptible to late blight.
Productivity is high when placed on 1 sq. m beds of 3-4 seedlings harvest up to 17 kg of fruit.
Fruit characteristics
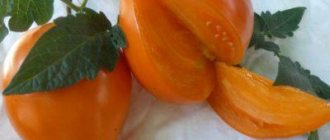
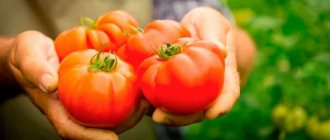
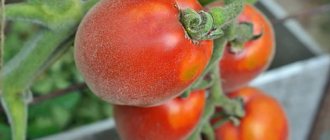
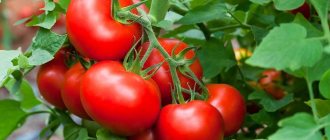
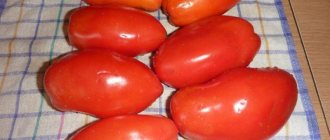
Average weight – 95–110 g, flat-round shape, bright red color. The pulp is juicy, the taste is sweet with noticeable sourness. Ripening occurs simultaneously, tomatoes do not crack from overripening and retain their presentation for a month.
Thanks to their dense peel, the fruits are universal in use, as they are not afraid of heat treatment. They are great for preserves, marinades and pickles. Ripe vegetables are also good in fresh salads, side dishes and hot dishes.
Tomatoes can withstand transportation over long distances without losing their appearance or taste.
The photo shows tomatoes Neighbor's Envy f1.
How to grow seedlings
Sowing seeds for seedlings is carried out on the 20th of March, having previously prepared the container, soil and seed.
Seed preparation
It is not possible to collect seeds from hybrid crops yourself, since they do not retain their parental properties. Purchased seed, as a rule, does not require disinfection, since disinfection is carried out by the manufacturer. But the seeds are soaked in a growth stimulant to improve germination.
Specialized drugs are used as stimulants, for example, Epin, Kornevin or Zircon. Folk remedies are no less effective: aloe juice, potato juice, melt water. As practice shows, the percentage of germination when using folk remedies and specialized preparations is the same. The seed material is soaked in the stimulator for 10–12 hours.
Reference . When seeds are placed in aloe juice, additional disinfection occurs, and potato juice enriches the grains with nutrients.
Container and soil
At the next stage, prepare the container and soil. The soil is made up of garden soil, peat, humus and river sand . Peat enriches the soil with useful substances necessary for the full development of seedlings, and sand acts as a leavening agent. After thoroughly mixing the components, the resulting soil mixture is spilled with a hot solution of dark-colored potassium permanganate. Disinfection is necessary to destroy pathogenic flora, which can have a detrimental effect on seedlings.
Before sowing, containers are also disinfected with a manganese solution. You can plant them in a common wooden box or in separate containers. Do not forget that when planting seeds in peat containers, picking and replanting the seedlings is not required in the future. Peat cups decompose in the ground on their own and feed the young roots with useful substances.
Reference . Peat cups are the most convenient, but most expensive way to grow seedlings.
At the bottom of the planting containers, small holes must be made that perform a drainage function. Without the drainage of excess moisture, the likelihood of developing blackleg, a dangerous disease during the seedling period, increases. It can destroy all plantings. Characterized by darkening and narrowing of the stem at the bottom.
Sowing
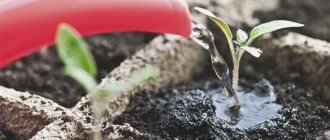
Seeds are placed in furrows to a depth of 1.5–2 cm. If sown superficially, they will germinate along with the seed coat, which will subsequently slow down the growth of seedlings. After sowing, the soil is leveled and slightly compacted.
After moistening the soil with a spray bottle with warm, settled water, the planting containers are covered with film and left in a bright room at a temperature of 23 °C. Periodically, the film is removed to ventilate and moisten the top layer of soil as it dries out.
Growing and care
After the seedlings emerge, the containers are placed on the windowsill for sufficient lighting. With a daylight period of at least 13 hours, seedlings will grow stronger and faster than in the absence of the required amount of light.
As the top layer of soil dries out, the seedlings are moistened with warm, settled water from a shallow watering can. After watering, the soil is loosened superficially.
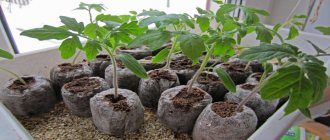
After 2 true leaves appear, the seedlings are planted in separate containers. During picking, weak plants are removed.
If growth is poor, 2 weeks after picking, the seedlings are fed with liquid fertilizer for tomato seedlings.
10 days before transplanting into the ground, the seedlings are hardened off so that they can quickly adapt to new conditions. Young bushes are left outdoors for 1 hour at first, increasing the time spent outside by 30–40 minutes every day. The night temperature in the room is reduced to 13 °C.
The necessary conditions
When growing seedlings, it is necessary to create the right conditions. Temperature conditions and light allow the sprouts to sprout quickly and develop correctly.
Conditions for growing seedlings:
- Transfer the sprouted tomatoes to a bright place. The room temperature should be kept from 15 to 16 degrees.
- Gradually increase the temperature to 20-22 degrees.
- It is prohibited to store seedlings in direct sunlight. The room should have diffused light and there should be no drafts.
- Watering the seedlings is carried out using a spray bottle, at the root.
- When the first true leaves appear, the plant requires transplanting into larger containers.
- The large root is cut off by about 1/3. Watering after diving should be moderate.
- If the plant has a normal appearance and good growth, the use of fertilizers is not required. The presence of wrinkled or dry leaves indicates insufficient nutrition of the tomatoes.
- Feeding of such plants can begin 10 days after the dive. Repeat fertilization after 14 days.
The plant also requires hardening. Hardening is carried out as a prevention of stress conditions in seedlings. When transplanted into open ground or greenhouse conditions, slow growth can be noted, which is a consequence of stress.
Stages of seedling hardening:
- A week before transplanting, move the seedlings outdoors. It is important to choose a sunny, warm day, as seedlings are sensitive to temperature changes.
- Add 1-2 hours daily, leaving the seedlings for a longer period. It is important to control weather changes so that the seedlings are not exposed to drafts or direct sunlight.
- On the day before transplanting, leave the seedlings for full daylight in the fresh air.
After this stage, the seedlings are ready for transplanting, and a change of environment for the plant will not bring stress.
How to grow tomatoes
Seedlings are transplanted into the greenhouse at the end of April - beginning of May, into open ground - no earlier than mid-June. By this time, the bushes will have at least 6 true leaves and one flower cluster.
Landing
Planting pattern: 40 cm – distance between seedlings, 50 cm – between rows. For 1 sq. m place no more than 4 seedlings.
They are planted in pre-prepared holes 20 cm deep. Before transplanting, a little wood ash or sawdust is placed at the bottom of the holes and filled with warm water.
After planting, the holes are compacted, watered with warm water and left to adapt to new conditions for 10 days. During adaptation, young plants are not watered, as the roots do not absorb moisture.
Further care
After rooting, establish regular watering at least 2 times a week. On dry days, the amount of watering is increased, and on rainy days, on the contrary, it is reduced. The main indicator of the need for watering is the top layer of soil. Water only with warm water, as cold water can cause the root system to rot. To heat the water in barrels, expose it to the sun.
To retain moisture, the beds are mulched with straw. Mulch also performs a preventive function, protecting plantings from pests.
After watering, the soil is loosened and all weeds are removed. Weeds take from the soil many nutrients necessary for the development of tomatoes.
Seedlings are fed throughout the growing season once every 14 days. The necessary elements for full development are phosphorus, potassium and nitrogen. Nitrogen is introduced at the initial stage, as it stimulates the growth and expansion of green mass. Potassium is needed at the time of fruiting, and seedlings constantly need phosphorus. The full complex of minerals is alternated with organic matter - bird droppings or mullein infusion in a ratio of 1:15.
Features of cultivation and possible difficulties
To get maximum results, the bush is formed into 2 stems. All other stepsons are regularly removed to prevent the plantings from becoming dense. All lower leaves up to the first fruitful branch must also be removed.
The pinching procedure is carried out early in the morning. The shoots that have reached 3 cm are removed, the cut areas are sprinkled with ash or treated with a manganese solution for disinfection. When removing shoots of more than 5 cm, pinching is painful for plants.
Tall seedlings need to be fixed to a support, otherwise the branches will not withstand the weight of the fruit. When transplanting into the ground, wooden stakes or metal rods are installed next to each plant, to which the stem and branches are fixed as they grow.
Also, in greenhouse conditions, they are tied to a trellis. This is the most convenient garter option, as it is less traumatic for plants.
Diseases and pests
According to reviews, the Neighbor's Envy tomato is distinguished by its stable immunity to major diseases, so preventive measures are sufficient. When transplanting, young bushes are watered with a decoction of chamomile or nettle. Strong-smelling herbs prevent many flying and ground pests from approaching the beds, so marigolds, mustard bushes and calendula are planted in tomato beds.
Spraying with Fitosporin not only protects plants from fungal spores, but also increases their immunity.
Reference . "Fitosporin" is a systemic fungicide. It is used not only for prevention purposes, but also for the treatment of diseased plants.
Regular loosening and weeding prevent the proliferation of pests in tomato beds. Ventilation of protected structures performs the same function, destroying the usual habitat of greenhouse pests.
Among insects, the Colorado potato beetle and mole cricket are dangerous. The mole cricket moves underground, so it is difficult to notice. To scare it away, fish heads and chopped garlic cloves are dug into the beds. The Colorado potato beetle is collected by hand, carefully inspecting each seedling. When there is a large concentration of the pest, the drug “Prestige” is used.
Pinching, tying
Pinching is the process of removing excess tomato shoots. The removed shoots do not participate in fruit formation, but only slow down the development of the main stems. To provide the stepsons with the necessary minerals and water, the plant expends the energy and resources necessary for the development of fruits.
How to carry out the procedure correctly:
- pinching is carried out regularly to avoid the appearance of large shoots;
- the procedure is carried out on a sunny day so that the remaining open areas of the plant are not exposed to diseases and pests;
- as a result of pinching, the bush should be formed into 1-2 large stems.
When the plant reaches the desired height, you can begin tying it up.
Tying up bushes is carried out in several stages:
- For greenhouse plants, a frame support is used on which the bush is fixed.
- In open ground, high individual pegs are driven in for each plant, not far from the main stems.
- The material for tying should be soft and not tearable. The fabric is cut into long strips that can be used to freely secure the bush.
- Carefully secure the bush to the frame or pegs, grasping the stems just above the middle. It is best to wrap the material in a figure eight.
- Secure the strip of fabric with a knot.
Tying is carried out so that the bush does not break off at the root under the weight of leaves and fruits.
Nuances for open ground and greenhouses
In outdoor conditions, the beds are chosen in a sunny, draft-free place. The soil is prepared in advance by digging and fertilizing with humus.
When planted in a staggered pattern, the plants receive enough sunlight without shading each other, and can be ventilated, which prevents the development of fungal spores.
The indeterminate type of plants implies unlimited growth. To ensure that nutrients are spent on the formation of fruits, and not on the growth of green mass, the crown of the plants is pinched, thereby determining the end point of growth.
The best option for moisturizing in greenhouse conditions is drip irrigation. With this method, moisture does not stagnate in the beds and does not increase the level of air humidity. Water constantly and gradually penetrates to the roots, and the plants do not suffer from lack of moisture.
Harvesting and application
The early ripening type of hybrid makes it possible to harvest at the beginning of the summer season. The fruits ripen at the same time, so they are collected in whole clusters. Tomatoes can be stored for a long time without losing their presentation and excellent taste.
The use of ripe vegetables is universal. They are consumed fresh, pickled, preserved and salted.
Features of raceme tomatoes
Carpal tomatoes are those whose fruits can be collected in whole clusters. In clusters, the fruits fill and ripen at the same time, do not overripe or crack. Ripe fruits on a branch look very impressive. At the same time, raceme tomatoes are distinguished by very high quality fruits, and the plants themselves are unpretentious, resistant to diseases and have a genetically inherent increased productivity. The combination of all these factors determines the popularity of these tomatoes among summer residents.
In general, raceme tomatoes have small fruit sizes and thick skin, so they can be used for preservation and fresh. The preparations made from them are very tasty and beautiful.
The fruits of raceme tomatoes are stored well even without special conditions. To extend the period of consumption of tomatoes, the brushes can be cut off at the moment when the first 2-3 fruits in the “bunch” turn red. After 4 - 5 days, the rest of the tomatoes in the bunch will turn red.
These tomatoes tolerate transportation well, which is why they are in great demand when growing tomatoes for sale.
Like other raceme tomatoes, they are divided into indeterminate and determinate.
As a rule, raceme tomatoes are grown in greenhouses. Most of these are indeterminate plants (unlimited growth) that need to be shaped. A small number of varieties of brush tomatoes can be grown in open ground.
We will tell you about the best varieties of grape tomatoes for greenhouses and open ground in this article.
Advantages and disadvantages of a hybrid
Every culture has both advantages and disadvantages. Let's start with the positive aspects of tomato:
- early ripening;
- high fruiting rate;
- easy to care for;
- possibility of breeding in all regions;
- formation of ovaries in any weather conditions;
- strong immunity to diseases;
- excellent taste of fruits;
- marketable condition;
- simultaneous maturation;
- long-term storage;
- possibility of long-term transportation.
The disadvantages include the need for formation, regular pinching and mandatory staking of seedlings.
Disease resistance of the variety
The tomato variety Cheerful Neighbor has average resistance to diseases. At air temperatures below +18 degrees and high humidity, the plant can be affected by rot and late blight. Antifungal drugs are used for prevention and treatment:
- Quadris;
- Ridomil;
- Fitosporin M;
- Fundazol;
- Bordeaux mixture.
Opponents of chemicals use an aqueous solution of whey, potassium permanganate, and ash.
Preventive treatment against diseases is mandatory when growing this variety.
Farmer reviews
Gardeners who have planted the Neighbor's Envy tomato in their beds confidently recommend it to other gardeners. Many experienced summer residents harvest twice during the summer, since the early ripening periods allow time to grow the second wave in the greenhouse.
Alexandra, Taganrog: “The neighbor’s Envy grew the tomato in the same way as other similar crops: tied, pinched, fertilized. The result was excellent. The fruits are large, juicy, delicious, and simply lick your fingers. I made a lot of preparations and still have some left over for fresh dishes. In a word, all the neighbors are the envy of them.”
Svetlana, Krasnodar: “I planted it for the first time, but it is already clear that the hybrid is extraordinary. There are at least 10 tomatoes on each cluster, and there are a lot of fruiting clusters on the seedling! All fruits are smooth, identical, beautiful. I go into the greenhouse, and my heart skips a beat with joy that I have such a miracle.”
Landing algorithm
Tomato Neighbor's Envy (a description of the variety and photos of seedlings can be viewed in the article) requires a specific planting pattern for better development of sprouts.
When planting a plant, you must familiarize yourself with the following rules:
- plant picking occurs during the formation of 1-2 true leaves;
- 2-month-old seedlings are suitable for the greenhouse, the planting period of which is April-May. For open ground, stronger seedlings are required, which are planted in June (the seedling should have 6-7 true leaves);
- planting scheme for tomato – 30 cm by 50 cm.
You can use a peat cup to transplant and grow tomatoes. This will speed up the process and also ensure an influx of useful minerals in the first days due to the decomposition of the container.