Despite a certain amount of prejudice against hybrids, they are confidently gaining space in gardens. Tomato Jaguar F1 is one of these high-quality, productive and early hybrid varieties, the taste of which pleases many summer residents.
| Height | Landing location | Ripening time | Fruit color | Fruit size | Origin | Fruit shape |
| Tall | Greenhouse, Open ground | Early ripening | Reds | Average | Hybrid | Round |
Description and characteristics of the variety
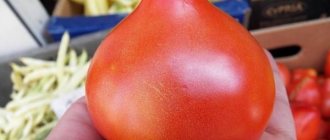
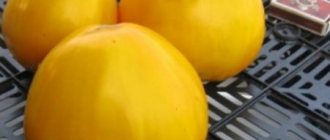
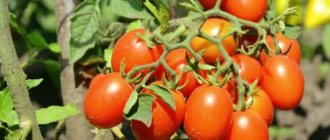
Jaguar F1 tomatoes have indeterminate bushes with a height of 1.6 m. Their roots are powerful, the stems are strong, covered with an average number of leaves. The fruits grow in small clusters of up to 5 pieces each. The weight of one tomato is up to 180 g, they are round, red, with smooth shiny skin, smooth and in excellent presentation. There is some ribbing.
The pulp is fleshy, juicy, without wateriness, dense and does not crack. Has a pronounced aroma. Tomatoes are suitable for canning and pickling, fresh consumption, preparing stews, soups, other dishes, juices and pastes.
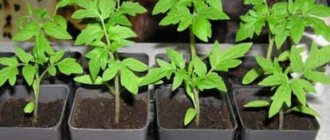
Growing tomato seedlings
Hybrid seeds, processed using special technology and painted in a bright color, do not require pre-sowing soaking or dressing. They are sown immediately in prepared soil.
The soil for sowing tomato seeds should be loose and nutritious.
You can use peat-sand compost. You can take ordinary soil from the garden or vegetable garden (but not from the area where nightshades grew last year), mix it with half the volume of sawdust. Add wood ash (half a liter jar to a bucket of soil). It’s good to add superphosphate (3-4 tablespoons). Drainage is required.
If seedlings are grown indoors, use low boxes. Prepared soil is poured onto the drainage layer, grooves are made in it, and seeds are sown in them. Lightly crush with earth and compact so that the seeds, when germinating, do not lift the soil layer.
Tips for caring for seedlings:
- The box with the sown seeds is covered with glass or plastic film and placed in a warm place. Every day they ventilate and see if the soil is dry. If necessary, water with warm water.
- Good lighting is not necessary at this stage. But as soon as the seeds have hatched and sprouted, the box with seedlings should be placed in the brightest place. This usually happens on the 5th day.
- The room temperature should be lowered to 12-15°C, and at night to 8°C. This will prevent the seedlings from stretching, which often occurs in low light and high temperatures. In addition, she will be hardened. After a week, when the seedlings have become stronger, they can be grown at a temperature of 18-20°C. At night it should be lower, about 10°C.
- After the seedlings have formed a second true leaf, they are planted in separate dishes, plastic or even glass glasses. You can use peat briquettes. If you run out of individual dishes, you can plant the remaining seedlings into deep boxes at a distance of about 5 cm from each other. You can use plastic ones from under vegetables, cover the bottom and walls with newspapers. The soil will not be able to fall out of such a box, and excess moisture will easily drain away through the paper. This form of planting is convenient because it is easy and convenient to take them out into the fresh air for hardening. Usually, when diving, part of the seedling's root is torn off. If this does not happen, you need to pinch it off manually. This will contribute to the formation of a powerful root system. When planting in cups, the soil is not poured to the top. About 4 cm is left in order to add soil as the plants grow. This is done once every 10 days. If there are a lot of seedlings, plant 2 plants in each pot. When it becomes clear which of them is stronger, the second copy is torn off at soil level.
- Feeding is carried out once every 10 days. Nitrogen fertilizers will make seedlings grow faster. This is not always appropriate. Such fertilizers are used only when seedlings for some reason are stunted in growth. But young tomatoes need phosphorus fertilizers. You can put a couple of nitrophoska grains in each pot. Then add soil and water the plant.
- For fungal diseases, a few days before planting, they are shed with a pink solution of potassium permanganate.
Agrotechnical measures
In order to achieve the maximum effect from growing the Lyubasha hybrid with minimal effort, time and money, you should first become familiar with the correct technology of agrotechnical measures.
Growing seedlings
The timing of sowing Lyubasha F1 tomato seeds depends on the climate zone and usually occurs in mid-February - early March. It is also possible to calculate based on the fact that transplantation into open ground is carried out 50 days after the appearance of the first shoots. A necessary condition is the absence of night frosts. Seeds should be planted in a pre-prepared soil mixture, which includes:
- Loose soil, disinfected from pests. For this purpose, it is recommended to dry it in the oven for 40 minutes.
- Lowland peat.
- Humus.
- Rotted manure.
For planting seedlings, any container in which you can plant seeds in a row (wooden boxes, plastic containers with pre-made holes to drain excess water) is suitable. Seedlings are practically not demanding in terms of lighting, humidity and temperature conditions. It can even be grown in an apartment (preferably on the south side) using additional lighting.
Tomato seeds are planted in a row, and the distance between them should be at least 3-4 cm. The depth of the holes is about 1 cm. After that, the soil is watered, covered with cling film, and the containers with seedlings are transferred to a warm place.
Caring for seedlings of the Lyubasha hybrid is standard. The light period is at least 12 hours a day. Temperature in the room: in the first week – no more than +23÷+25°С, in the second week – +20°С. Watering is carried out as the soil dries: the first three weeks - every 6-7 days, then - 4-5 days. Under no circumstances should the soil be over-watered, otherwise the seedlings may die.
At the stage of growing seedlings, the soil does not need to be fed. However, if there are doubts about its quality, it is recommended to apply a complex fertilizer containing phosphorus, potassium and magnesium in the first week. Then fertilizing is done when three leaves have already formed on the stem. In this case, fertilizers rich in nitrogen and potassium are applied.
Transplanting seedlings into a greenhouse or open ground
The first step is to prepare holes for planting seedlings at a distance of 50 cm from each other. After that, they are filled with water and humus is poured into each, mixed with mineral fertilizers.
Before removing seedlings from containers, the soil should be moistened to prevent possible damage to the roots and to easily release the seedlings from the container. In order to properly grab the bushes, you need to carefully grab their trunk and slowly remove the plant from the soil. Next, the bush is installed vertically in the hole and sprinkled with compost. Then you should mulch the soil using sawdust, straw or grass clippings.
Caring for Lyubasha tomatoes
Formation of bushes. In order to obtain the most generous harvest, the manufacturer recommends forming Lyubasha hybrid bushes into 2-3 stems, which depends on the frequency of planting. If per 1 sq. m of soil, no more than four plants are planted, formation is carried out in 3 stems. To do this, you should leave two stepsons that grow above and below the first flower cluster.
With a denser planting, it is preferable to leave only two stems on the hybrid bushes - the main and secondary ones from the bottom of the first flower cluster. The remaining side shoots must be removed as they appear. Despite the fact that the bushes are medium-sized, it is recommended to tie them to supports, since the harvest puts a lot of stress on them, as a result of which the tomatoes may sink to the ground. The stems, in turn, become very thick, even thicker than the stakes to which they are tied.
Watering. Watering is carried out mainly in the evening with a frequency of one (spring and early summer) to several (mid-summer) days a week.
After watering, it is advisable to loosen the soil and weed it out of weeds.
Feeding. Fertilizers are first applied two weeks after planting the seedlings. Then the soil should be fed every ten days. Mullein, mineral fertilizers and chicken droppings can be used as fertilizing. Throughout the growing season, tomato bushes should be re-fed - sprayed with preparations of effective microorganisms (EM), as well as a solution of wood ash.
How to grow tomatoes
By the time of transplantation, the seedlings should have 5–7 true leaves and formed young roots.
Landing
The soil is prepared two weeks before transplanting. They dig it up and add a complex of minerals. Do not forget that the hybrid is susceptible to late blight, so tomato beds are spilled with copper sulfate.
Planting pattern: 40 cm - distance between seedlings, 60 cm - row spacing. For 1 sq. m place 4-5 plants in a checkerboard pattern. With this method of planting, each bush receives a sufficient amount of light and ventilation.
This is especially important for those species that are susceptible to fungal diseases
Further care
As they take root in the beds, the seedlings begin to be regularly watered and fertilized. Water moderately, not exceeding the humidity, but not leaving the soil dry. To ensure that the soil retains moisture longer, the beds are mulched with straw or sawdust. After watering, the soil is loosened for better oxygen access.
Another important factor when caring for a hybrid is removing weeds. Weeds pull a lot of nutrients from the ground that are necessary for the development of seedlings. In addition, many pests that are dangerous to tomatoes live and reproduce in them.
Fertilizing helps seedlings receive additional nutrition for full development. They are applied at least three times per season: during flowering, during the formation of ovaries and at the time of fruiting.
Fertilize with a complex of minerals or organic matter. During flowering, fertilizing with a predominant content of phosphorus is used and boric acid is added, and during fruiting - potassium substances. From organic matter, add mullein infusion or bird droppings in a ratio of 1:15.
Features of care and possible difficulties
Despite their short stature, the plants must be tied to a support. When transplanting, wooden stakes or metal rods are installed next to the seedlings, to which the stem and fruitful branches are fixed as they grow. The crop is characterized by an increased rate of fruiting, so neither the stem nor the branches can withstand the weight of ripe fruits.
Form a bush with 2 stems
With this technique, you can achieve maximum efficiency, which is especially important when breeding on an industrial scale. Plants are pruned regularly due to the large number of side shoots. If they are not removed, this will lead to thickening of the plantings.
If they are not removed, this will lead to thickening of the plantings.
Diseases and pests
Vulnerability to late blight necessitates regular preventive measures. It should be remembered that planting a hybrid next to crops of the nightshade family (eggplant, peppers, potatoes) increases the risk of fungal diseases.
Regular prevention includes:
- moderate watering with control of the humidity level in the beds;
- regular loosening;
- hilling and mulching beds;
- treating the soil with copper sulfate before planting;
- spraying plants with manganese solution.
If a tomato is planted next to crops from the nightshade family, all plants are sprayed. When affected by a fungus, it is treated with fungicidal agents - “Fitosporin” or “HOM”.
Among the pests that are dangerous for the hybrid are aphids, the Colorado potato beetle and the mole cricket. The mole cricket moves underground and is difficult to notice. Therefore, measures are taken in advance by burying crushed cloves of garlic or fish heads in the beds. They repel pests with their unpleasant smell.
The Colorado potato beetle is collected by hand, carefully inspecting each seedling from all sides. When there is a large concentration of the pest, the drug “Prestige” or “Commander” is used.
To prevent aphids from attacking the plants, each stem is treated with a soap solution, which is prepared from one piece of laundry soap dissolved in a bucket of warm water.
Care instructions
Experienced gardeners advise forming plants into 1-2 shoots. If grown in a greenhouse, the bushes can reach 2 meters, in open ground - up to 1.5 meters. To ensure that the fruits do not fall to the ground and there is no risk of the stem breaking under the weight of the tomatoes, the bushes must be tied to installed crossbars or trellises. It is recommended to tear off the stepsons and lower leaves in a timely manner.
Regular loosening of the soil will help normalize the supply of oxygen to the roots. It must be carried out carefully so as not to damage the root system. Weeding and hilling are also required. Plants should be watered moderately. There is no need to allow waterlogging. Unpretentious bushes tolerate drought well, but to achieve better results in harvesting, it is advisable to avoid this. It is necessary to water once a week with warm, settled water.
It is imperative to apply complex mineral fertilizers several times a season. The additives should contain nitrogen-containing compounds, as well as phosphorus-potassium mixtures. To prevent and control harmful insects, it is necessary to spray the bushes with insecticidal preparations. Every year it is recommended to change the place for planting tomatoes. The variety is quite resistant to tobacco mosaic, verticillium and fusarium. Tomato bushes grow well after vegetable crops such as onions, cabbage, parsley, carrots and parsley.
Jaguar tomatoes grow well throughout our country. This makes them very popular among gardeners. All avid gardeners note the excellent taste of the variety, unpretentiousness in care and to the region of growth. A versatile vegetable suitable for preparing and eating fresh.
Selecting a location and creating conditions for successful tomato growth
A spacious greenhouse with a temperature control system and good ventilation is best suited for growing Dutch tomato seeds.
Conditions for good tomato growth:
- before planting, the soil temperature should be at least 15 degrees;
- seeds are planted in cassette-shaped pots with holes in the bottom;
- pots with seeds are well watered, covered with film or glass and placed in a dark place;
- after two weeks, the seedlings are transplanted to a permanent place;
- no more than three tomato bushes should grow per 1 sq. m of greenhouse;
- fans are used for proper air exchange in the greenhouse;
- air humidity should be at least 50 percent;
Following these rules for growing Dutch tomato seeds for greenhouses allows you to achieve high yields.