Seed selection
When choosing seeds, it is better to go shopping at a large garden center. Here you can choose exactly the variety you need. You should focus not only on the bright picture, but also on the characteristics of the tomato.
The variety must be zoned and designed for the growing conditions that you have.
More capricious tomatoes can be grown in a greenhouse; here they are protected from sudden temperature changes and are less susceptible to disease. For indoor soil, indeterminate varieties with unlimited growth are usually purchased.
If you only have an outdoor garden bed at your disposal, you need to choose varieties that are resistant to heat, night chill and late blight. For planting outdoors, it is best to purchase seeds of determinate tomatoes - they are quite unpretentious and do not require the use of support.
What conditions are needed for the growth of tomato seedlings?
First of all, you need to remember that the tomato is a light-loving plant, so when sowing in the winter months, seedlings will definitely need lighting. Until the end of March, it is recommended to use fluorescent lamps. The duration of daylight for tomatoes during this period should be at least 12-14 hours.
Another important condition for the proper development of seedlings is compliance with the correct temperature regime.
At the initial stage, seedlings require a daytime temperature of 14-16 °C and a night temperature of 12 °C. After 5-7 days, the temperature is increased to 24 °C during the daytime and 12-14 °C at night.
When to sow in the southern regions
In the southern regions of Russia the climate is quite mild and warm. The summer season and warming begin already in March, and planting tomatoes in a permanent place begins in late March and early April.
Therefore, sowing of seedlings here begins in February, depending on the variety and method of further cultivation.
For late varieties, the end of February and the beginning of March are suitable. It is recommended to sow mid- and early-ripening tomatoes in late March and April.
When to plant tomatoes for seedlings
To determine the timing of planting tomatoes, you need to take into account several factors. The sowing date depends on the climatic zone of cultivation, the characteristics of the variety, and the recommendations of the lunar calendar (for those who adhere to them).
By region
Each region has its own unique climate with its own characteristics. However, sometimes the weather can bring surprises. Experts recommend taking into account the long-term forecast of weather forecasters, or studying statistical data on weather conditions over the past 5 years. The overall picture looks like this:
- In the Moscow region and other regions of the central zone, sowing work is carried out during March, focusing on the fact that seedlings should be planted in the ground towards the end of May.
- In the conditions of Siberia, the Urals, and the Altai Territory, early varieties are sown at the end of February, and mid-season varieties are sown at the beginning of March. Late tomatoes are not grown in these regions, as the plants simply do not have time to produce their harvest.
- For the southern regions, planting seedlings in the ground is permissible as early as April, so it is necessary to sow the seeds in early January.
Helpful advice! If at the time of transplanting the seedlings into the ground there is a sharp deterioration in the weather, leave the plants at home until suitable conditions arise. You can restrain the growth of seedlings by greatly reducing watering and lowering the room temperature to 19 °C.
According to ripening time
Calculating the planting date for a specific variety is simple. You just need to find information on the packaging about how many days it takes for tomatoes to fully ripen, and then add to them 10-15 days, which are necessary for seed pecking and adaptation after picking.
Based on ripening time, tomatoes are divided into several categories:
- Ultra early ripening. They ripen in 40-50 days (transplant into soil at the age of 40-50 days).
- Early. They go through a vegetation cycle in 90-100 days (planting in the ground at the age of 50-55 days).
- Mid-early. They take 100-105 days before harvesting (transplanted into the ground at the age of 55-60 days).
- Mid-season. It takes 105-120 days before the fruits ripen (transplant into the ground at the age of 60-70 days).
- Late ripening. The harvest is ready for harvest in 120-130 days (transplanted into the ground at the age of 70-80 days).
At the time of planting seedlings in the ground, the soil should warm up to 12 °C, and the air should have an average daily temperature of at least 12-15 °C. If tomatoes are planted in a greenhouse, the timing is shifted 2-2.5 weeks earlier.
According to the Lunar calendar for 2022
Once you have determined the appropriate period for sowing tomato seeds for seedlings, it is recommended to coordinate it with the phase of the moon. Lunar calendar data has long been taken into account by farmers when carrying out work.
Practice has shown that plants planted on favorable days grow faster and have good immunity, but if sowing is done on prohibited dates, the quality of the seedlings will not be up to par.
In 2022, the following dates will be favorable for planting tomatoes for seedlings:
- January - 1, 12–16, 24–26, 28, 29;
- February - 1, 6, 8, 12, 15, 18–20, 25–28;
- March - 1, 8–10, 14, 15, 17–20, 24–28;
- April - 12, 18, 20, 21, 27–29.
It is better to set aside unfavorable days for other things. After all, it may happen that the work associated with sowing will simply be in vain.
In 2022, you should not sow on the following days:
- January - 2, 5–7, 18, 20–22, 31;
- February - 5, 7, 13––17, 27;
- March - 2, 3, 5–7, 11–13, 16, 21, 22, 31;
- April - 4, 5, 8–11, 13, 15–17, 19, 20.
If it was not possible to sow on favorable days, this can be done on neutral dates.
On a note! In the case when the seeds are germinated, the sowing date should be considered the day of soaking. Seed growth begins from the moment they enter a moist environment.
Sowing time
The timing of sowing tomatoes depends on the climatic characteristics of the region.
When choosing the time for sowing, it is better to focus on centuries-old traditions and the timing of fruit ripening:
- If varietal hybrid tomatoes of early ripening are selected, then in the south they are sown as seedlings approximately on February 25-27. You can continue sowing tomatoes until March 5th. Planting in open ground can be carried out only 52 days after sowing, which must also be taken into account. If the weather is too cold, many gardeners, having planted already hardened seedlings, stretch film over the beds.
- Medium-ripening tomatoes are sown as seedlings starting on March 1st. Sowing can be done until March 20th. Such varieties are planted in open ground when the seedlings are two months old.
- From March 20th to April 15th, late-ripening tomatoes can be sown. Late varieties are transferred to the beds when the seedlings are 80 days old. Many gardeners advise sown late varieties directly into open ground. These terms apply only to the southern regions.
In the north and in the middle zone, sowing dates directly depend on the weather. On cloudy days, seedlings need to be illuminated and the optimal temperature for their development must be provided. Tomatoes are heat-loving crops, so in northern regions seedlings may die due to lack of light and heat.
In the middle zone, it is advisable to grow seedlings at a temperature of about +22 degrees. Daylight should be about 14 hours. To prevent the seedlings from stretching out, they must be provided with additional lighting.
Typically, in the middle zone and in the northern regions, tomatoes are sown for seedlings between March 15 and March 20. Ultra-early ripening varieties can be sown from April 1st to April 5th. Mid-season varieties in the north are sown between March 20 and April 10.
In cold climates, late-ripening tomato varieties simply do not have time to ripen, so it is advisable to sow them only in heated greenhouses.
How to properly plant tomatoes as seedlings at home on a windowsill
The moment of planting seeds is considered no less important than all other stages of growing tomatoes. You should approach the process with all responsibility - this will help grow healthy and strong seedlings.
Land preparation
The soil for planting seedlings must have sufficient looseness, nutritional value, and moisture capacity. Seedlings germinate best in soil with neutral acidity. Before use, the soil must be disinfected.
You can make your own soil mixture from:
- 2 parts of turf or leaf soil;
- humus - 1 part;
- peat - 1 part;
- sand - 1 part.
The soil must be cleared of debris and foreign impurities and have a uniform structure. A few days before planting, the ground is watered with boiling water or a solution of potassium permanganate to destroy pathogenic microflora and fungi.
If you have time, you can steam the soil in a water bath for 40 minutes to disinfect it, or heat it in the oven.
On a note! You can make the mixture more nutritious by adding a 0.5-liter jar of wood ash to it.
Seed preparation
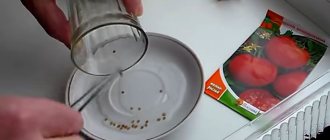
After opening the package, the seeds should be poured onto a white sheet of paper and only large and dense specimens should be selected for planting.
You can also calibrate the material using a saline solution prepared at the rate of 1 teaspoon of salt per glass of water.
- The seeds are poured into a bowl with the solution and left for 5-10 minutes.
- The floating seeds can be thrown away; they are unusable, and the remaining ones should be washed in clean water.
Next, it is necessary to carry out disinfection using hydrogen peroxide or a solution of potassium permanganate.
- The seeds are soaked in the composition for 20-30 minutes (no more).
- After this, the seeds are washed again in plain water and dried at room temperature.
Since swollen seeds germinate better, experts recommend soaking them.
- It is best to take melt or spring water, dip the seeds in it so that they are barely covered, and leave for 2 days.
- You can add Zircon, Epin or sodium humate to the soaking water according to the instructions.
- All these drugs stimulate growth processes.
To harden, soaked seeds can be placed in the refrigerator overnight, repeating this procedure twice.
- To speed up the emergence of seedlings, seeds can be germinated by wrapping them in a damp cloth. At room temperature, the germination process will take 3-4 days.
- It is necessary to ensure that the fabric remains damp at all times. As soon as the sprouts appear, you can start planting.
Planting containers, what to choose
Containers
The classic planting option involves sowing in a wooden box or plastic rectangular container. It is very convenient to care for seedlings in such containers. In a common container it is easier to water plants and move them from place to place.
If you choose between wood and plastic, it is better to give preference to artificial material. A plastic container can be quickly and easily washed with a brush and soap, and is easier to disinfect. The disadvantages of such planting include the need for picking; over time, the plants will become cramped.
The height of the container for seedlings should be 8-10 cm. Several drainage holes must be made in the bottom to drain water. Place the box or container on a pallet.
On a note! It is convenient to remove excess water from the tray after watering with a small syringe.
Growing in snails
An original and relatively new method of obtaining seedlings is growing seedlings in snails. It uses a synthetic backing for the laminate, produced in the form of a tape. This method of sowing requires very little soil.
- On a ribbon spread on the table along the upper edge, place 1 tbsp at small intervals. spoon of earth.
- The seeds are then placed on the soil.
- During operation, the tape is carefully rolled into a roll.
- The finished “snail” is held together with a thin rubber band.
You can make several of these snails and put them in a common container.
The method is mainly used to save space.
Growing in film
A similar principle is used when growing seedlings in diapers. In this case, instead of a common tape, the soil and seeds are laid out on small pieces of film, which are then folded into a neat envelope and also placed in a common container.
Sowing
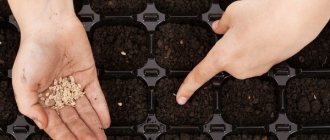
- Before sowing, place a small layer of expanded clay on the bottom of the box and add soil, which is lightly compacted.
- After this, grooves 1 cm deep are cut on the surface of the earth, into which the seeds are placed at intervals of 2 cm.
- There should be a gap of 4 cm between the rows.
- The less dense the planting, the longer the seedlings will not need picking.
- After sowing, the seeds are sprinkled with a thin layer of soil, the plantings are moistened with a spray bottle and covered with film or glass.
You don’t have to make furrows, but simply spread the seeds at a distance of 2 cm from each other, lightly pressing them to the ground with your finger if the seeds are not sprouted. Sprinkle loose soil on top in a 2 cm layer and press it down a little, and then also moisten and cover the crops.
Before germination, the box with seedlings should be in a warm place.
Every day the shelter is raised briefly for ventilation. The top layer of soil should remain slightly moist; if necessary, lightly spray the soil with water.
Preparing for sowing
To grow strong and healthy tomato seedlings at home, the seeds should be properly prepared for sowing. For example, planting material can be infected, like the soil, which usually leads to the death of seedlings.
Germinating tomato seeds is of great importance. Experienced gardeners know that if you germinate tomatoes correctly, you can achieve an increase in yield by as much as 30%.
Variety selection
But first of all, to grow tomatoes, you need to choose the seeds wisely.
There are several important points that you should pay attention to when choosing planting material:
- Varieties are selected based on the climatic conditions of the region.
- Imported varieties can perform very poorly in our climate.
- Be sure to check the expiration date.
- If tomatoes are marked F1, then they have increased resistance to diseases and pests.
- The seeds can be intended for a greenhouse or open ground, which is of great importance when growing tomatoes.
- It is also important when you plan to harvest – varieties can be either early or late.
Another variety of tomatoes differs in purpose:
- Some varieties, for example, “Bull's Heart,” are eaten fresh and are not suitable for preservation.
- There are universal varieties, such as Moskvich, which has excellent taste and is suitable for canning.
- But “Lady fingers” have too thick skin, they are ideal for canning.
Seed disinfection
It is important to properly prepare the seeds of the varieties that are selected for planting. Some manufacturers produce planting material that is immediately ready for sowing - it is covered with a shell containing nutrients.
Seeds collected from your garden must be properly prepared:
- First, you should prepare a strong saline solution by diluting 1 tbsp in a glass of water. l. salt.
- The seeds need to be immersed in the solution. Within 30 minutes, all the debris will float to the surface of the water - empty seeds and damaged ones that need to be removed. Large seeds that will germinate well should sink to the bottom of the glass.
- The seeds are placed on a sieve and washed with running water, and then laid out on a paper towel to dry.
The easiest way to disinfect selected seeds from fungi and various bacteria is to wash them in a manganese solution. It is necessary to dissolve 1 g of potassium permanganate in 100 ml of water. The solution should turn out bright pink. The seeds are immersed in it for 20 minutes. You can also use fungicides instead of potassium permanganate solution, but the seeds are soaked in them for 2 hours.
After any treatment, the seed must be thoroughly dried.
To increase the germination of tomatoes, they are also processed. For example, many summer residents soak seeds in Epin solution or aloe juice.
Soil selection and preparation
Soil is of great importance when sowing tomato seeds for seedlings. There are two options - purchase ready-made soil mixture in a store or mix it yourself. Most experienced gardeners prefer to prepare the soil for sowing on their own. The next stage of preparation for sowing is the selection of high-quality soil.
Preparation of land for sowing seeds begins in the fall. The most suitable mixture is made up of turf, sand and peat, with the addition of humus and ash. Land can be taken from the garden, but only from the area where tomatoes or potatoes did not grow last year. In general, any nightshade crops are very bad predecessors for tomatoes. It is better not to take soil from the beds after such plants.
The optimal soil composition for sowing tomato seeds is as follows:
- 1 share of garden land;
- 2 shares of peat;
- 1 share of compost;
- ½ share of sand.
Add 200 g of ash and 10 g of urea to a bucket of the prepared mixture. Superphosphate is also useful for tomatoes, of which 30 g is added to a bucket of the mixture.
As the seedlings grow, the composition of the soil must be adjusted. So, when preparing for sowing, the soil should contain more sand and less compost. Tomatoes love loose soil, well permeable to air and water. Therefore, to increase the permeability of the soil, sphagnum is added to it. This will help the roots develop freely.
Experienced gardeners plant seedlings in a mixture of sawdust and sand taken in a 2:1 ratio. Such soil can easily be saturated with mineral fertilizers. At the same time, sawdust is a wonderful leavening agent.
The prepared soil must be disinfected before sowing the seeds. This will help kill pathogenic bacteria that lead to the death of seedlings. For this purpose, the soil mixture is either frozen or calcined. You can calcine the soil in the oven. Some also use steaming - keeping the soil over steam - or pouring boiling water over it.
Regardless of whether the soil has been frozen or calcined, just before sowing, the soil is spilled with a solution of manganese. To prepare a disinfecting solution, take 3 g of potassium permanganate per 1 liter of water. You can treat the soil with fungicides.
Selection of containers
It is of great importance in which containers to sow the seeds:
- Many people use special cassettes and peat tablets or pots.
- Gardeners also sow tomatoes in plastic cups and cut-off juice bags.
- You can use shallow boxes made from scrap materials - planks, plywood.
In any case, the container for growing seedlings must have drainage holes to drain excess water during watering.
It is optimal if the height of the container for sowing is about 8-10 cm. It is very inconvenient to sow tomatoes in containers that are too deep and bulky, since during the entire period of seedling development you will have to rearrange it several times.
First shoots, what to do
The appearance of the first shoots can be expected in 4-6 days. In general, this indicator depends on the air temperature in the room. The colder the room, the longer it will take for seedlings to emerge.
For example, at a temperature of +18 °C, sprouts will appear no earlier than after 2 weeks. As soon as you notice the loops of seedlings, the seedlings should immediately be placed in the brightest place and the temperature should be reduced by 6-8 °C.
Do not place the container close to the window glass, it is too cold there. At excessively low temperatures, seedlings will not be able to properly absorb nutrients.
After a week, the temperature should be raised to room temperature (22-24 °C). When the cotyledon leaves appear, the seedlings begin to feed on the roots, so it is advisable to feed the seedlings without waiting for the real leaves to appear. For feeding, use a weak solution of any mineral fertilizer.
From this moment, artificial lighting begins to be used, since it is now that the laying of leaves and flower buds occurs. If there is a lack of lighting at this stage, the tomatoes will begin to lay leaves instead of trusses, as a result the onset of fruiting will be delayed.
Fluorescent lamps should be turned on daily, placing them at a distance of 7-10 cm from the plants. As the seedlings grow, the lamp is moved away so that the light source remains at the same distance.
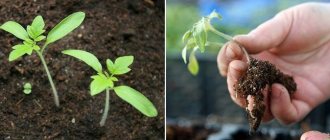
Picking
Tomato roots grow quite quickly. Picking will be needed when the root system fills the entire soil space. If the procedure is late, the seedlings will show signs of starvation and become frail.
Experts believe that it is best to carry out diving 7-10 days after emergence, in the phase of formation of 2 true leaves.
The picking procedure requires care. If the roots are damaged, subsequent plant adaptation will take longer.
- Containers for seedlings are prepared in advance, usually 0.5 liter plastic glasses.
- The soil should be moistened several hours before the procedure to make it easier to remove the plants along with the lump of earth.
- Each seedling is pryed from below with a special spatula or tablespoon and planted in a separate container.
- When planting, plants should be buried down to the cotyledon leaves, and the soil should be lightly compacted.
- After picking, the cups are placed in a shaded place for 1-2 days.
- When the seedlings get a little stronger, they are again given maximum lighting.
Without picking
Some gardeners immediately plant seeds in larger containers to avoid picking. When choosing this planting option, they argue that there will be no need to spend extra time fiddling with seedlings, the plants will not experience stress, and the roots and stems will remain intact.
The process of planting in individual pots differs in that 2-3 seeds must be placed in the hole at once in case some of them do not sprout. Subsequently, one, the strongest, plant is left in the container, and the more stunted ones are carefully cut off with scissors.
A simple way to grow tomatoes without picking - video
Picking tomatoes
In the classic method of growing tomato seedlings, picking is a mandatory procedure. Of course, seedlings can be grown without transplanting into separate containers, but pinching the root when picking and a more spacious “dwelling” will contribute to the development of strong bushes.
Most gardeners carry out picking at the stage of formation of 2-3 true leaves. But there is an opinion that the picking can be carried out earlier. If favorable conditions have been created for the growth of seedlings, then already 8 days after germination it can begin to be planted.
It is advisable to carry out the picking in separate cups with a capacity of at least 300 ml. But this is only realistic when growing a couple of dozen bushes. It is almost impossible to place 150-200 cups in an apartment or on a balcony. Therefore, you can plant seedlings in separate boxes.
Sequencing:
- Before picking, the seedlings should be watered well for a couple of hours.
- It is very convenient to dig up seedlings from the soil with a fork.
- Make a hole for planting a sprout with a pencil.
- The central root must be pinched. Do not tear off more than half the length of the root!
- When picking, seedlings should be buried in the soil in a new place so that the cotyledon leaves are only 1 cm above the soil level.
- Seedlings should be planted in a common box according to a 7x10 cm pattern.
After transplanting, the seedlings are watered with warm water and the boxes are removed in partial shade for a couple of days. The room must be warm. If on the second day the sprouts begin to reach for the light, it means they survived the picking well. Boxes with seedlings should be turned towards the light from time to time.
Growing in peat tablets
One of the convenient methods of growing tomatoes is the method of sowing seeds in peat tablets. Such seedlings can be planted in the ground, bypassing the picking stage.
- The diameter of the tablets must be at least 4 cm.
- They are first filled with warm water, and after swelling they are placed in a transparent plastic container 10-12 cm high.
- In the center of each tablet you need to make a hole for the seeds.
If you have no doubt about the quality of the seeds, you can put one seed in each tablet, otherwise put several, and then remove the weaker plants.
- The seeds should be sprinkled with a thin layer of soil on top.
- Then the plantings are covered with glass, film or a transparent lid.
- As soon as the seeds begin to hatch, the covering is removed.
- Then the seedlings are cared for in the same way as during conventional cultivation.
Containers for seedlings
In order for the sprouts to sprout and be ready for subsequent planting in open ground, it is necessary to provide them with a suitable container. There are quite a lot of them and each has its own advantages and disadvantages:
- A wooden box is considered a classic container for planting seeds. Its advantages are large capacity and convenient transportation. In addition, such a box can be assembled independently, which is quite economical. One of the disadvantages of this method is the weight of the container with earth - wooden boxes are very heavy. In addition, it is difficult to plant sprouts from it in open ground - their roots are easily damaged.
- An alternative to a box can be considered plastic cassettes - they can reach the same size as boxes, but have much less weight. In addition, their length can be easily adjusted using a knife or scissors. The downside of cassettes is their fragility - they easily break when overloaded with soil, which can damage unformed sprouts. They are also not very convenient to transport from place to place.
- Peat containers are environmentally friendly. They can be in the form of pots or tablets. They can be planted directly into the ground along with seedlings. This is a big plus, since the root system is not damaged. However, due to their natural nature, they are susceptible to mold, which can damage the sprouts and reduce germination. In addition, it is very difficult to select an irrigation regime in peat, since it absorbs a lot of water. These containers are among the most expensive, so not everyone can afford them.
- A cheap analogue can be considered ordinary plastic cups, which can be selected according to volume. It is very convenient to extract sprouts from them, since the roots are not damaged - this is their plus. The negative side of using them is the need to make drainage holes; this takes quite a long time, especially if there are a lot of seedlings. In addition, they easily turn over during transportation and can tip over even from a small draft.
- Experienced gardeners use not only the above containers for seedlings. Milk tetra packs are used as a budget option. The top is trimmed, and the lower part is used as a container for seedlings. Sour cream cups and plastic buckets after sauerkraut also work well. The only condition is that you need to wash them well after use to prevent rotting of the roots.
- A little-known, but no less good way is to place seeds in newspaper. To do this, you need to roll up a bag of newspaper, as you would for sunflower seeds, and cover it with soil, forming a stable bottom. This is the most cost-effective type of container for seedlings, which also has good air permeability. The disadvantage of this method is that transportation is quite difficult, since newspaper bags are easily turned over.
Basic seedling care
Seedlings should be intensively illuminated until the end of March. Young plants need daylight lasting up to 14-16 hours. In the first few days of life, this figure should be even higher - up to 20 hours a day. Humidity is also of no small importance for seedlings.
They need to be accustomed to dry indoor air gradually. Therefore, at first it is better to open the film slightly for several hours, constantly increasing this time. The coating can be completely removed after 5-7 days. In the future, it is advisable to maintain air humidity in the room with seedlings at 70%.
The top layer of soil in the container should always remain moderately moist. Tiny plants are watered near the stem itself, releasing water from a syringe. It is necessary to water the seedlings in the morning.
To prevent “black leg”, it is recommended to periodically use a pale solution of potassium permanganate for watering.
Feed the seedlings with a solution of mineral or humic fertilizers every 7-10 days. For vigorously growing plants, it is recommended to replant them in 1 liter pots.
Planting tomato seedlings
The soil in the garden bed or greenhouse should not be ready for planting seedlings at the last moment. Ideally, filling the soil with organic matter, together with digging, is carried out in the fall. This is especially true for open ground. If it was not possible to prepare the soil in the fall, you need to dig it in the spring, but to a shallower depth - 15 cm, versus 25 in the fall. At this time, organic matter and mineral fertilizers are introduced.
Important! Do not add manure in the spring - only mature humus or vegetable compost.
Compost
In spring, the soil is dug up and filled with fertilizers two weeks before planting. The amount of fertilizer is standard, as for other vegetable crops. In a greenhouse, the application rate can be reduced. If you apply it pointwise - into the holes - you will need even less. Per square meter take 5 kg of humus, 1 glass of wood ash and 20 g of nitrophoska. Everything mixes well. The soil is loosened and watered.
In the evening, before planting, the soil is watered thoroughly to wet a layer of at least 20 cm. Wait for a cloudy, warm day. Carry out the landing in the morning.
- Seedlings with a lump are installed in the prepared holes, the distance between which is usually 40 cm.
- It is necessary to deepen each seedling 2 cm compared to its growth level in the pot.
- The seedlings are covered with earth.
- The holes are carefully watered at the rate of 2 liters of warm water for each.
Mistakes when growing seedlings
No matter how hard gardeners try to grow strong seedlings, some of them still make typical mistakes when growing:
- Beginners completely in vain avoid buying hybrid seeds, preferring varietal tomatoes. Don't be afraid of new hybrid products. They are more unpretentious to growing conditions and generous in yield.
- Failure to comply with temperature and light conditions often leads to stretching of seedlings. Gardeners, believing that the plants do not have enough nutrition, begin to feed and water them intensively, which only worsens the situation. Give the seedlings more light, and water and fertilize only when necessary.
- Small, newly emerged seedlings need very little moisture. You should not be too zealous with watering, otherwise the seedlings will be affected by the “black leg” and it will not be possible to save it.
- If the seedlings are not shaded on sunny spring days, burns in the form of white or transparent spots may appear on the leaves. To prevent this, during the midday hours you can block the window with gauze or a sheet of white paper.
- Seedlings may turn yellow and lose leaves if there is insufficient light and excess moisture. In this case, you need to adjust the watering and use additional lighting.