Timing for sowing tomato seeds for seedlings
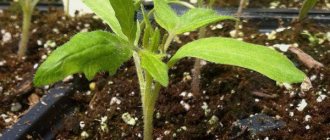
Planning the dates when the sprouts will be transplanted into open ground will help you figure out when it’s best to sow tomato seeds for seedlings. Growing tomato seedlings takes no more than a couple of months. You need to wait until the first true leaves appear.
The weather conditions of the region influence the transplantation of shoots into the ground:
- In the southern regions, warm weather is pleasant already in March. It turns out that grains can be sown without fear at the end of January or February.
- In the north, frosts give way to warmth at the end of May. Therefore, tomato seeds are prepared for sowing in early April.
It doesn’t hurt to look at the favorable days for sowing planting material for seedlings in the lunar calendar.
It has been proven that during the waxing moon, vegetable crops experience rapid sap flow.
If you sow seeds for seedlings these days, shoots will appear in a few days. On the full moon, the fruits fill with juice and smell delicious. During this phase, it will not hurt to harvest, but it is better to avoid trimming the leaves.
Growth stimulants
Treating seeds with growth stimulants will protect the seedling from diseases and help grow young healthy roots, which will subsequently help the rapid formation and ripening of fruits.
Epin-extra
A universal drug - it accelerates seed germination and reduces nitrates, and also hardens the future seedling to bad weather conditions, such as heat and heat.
Zircon
An excellent growth stimulator - improves root formation and increases the number of flower ovaries. In the initial phase of seedling development, the drug provides immunity from powdery mildew and the effects of heavy metals.
When growing this vegetable, it is important to observe the proportions when feeding because “overfeeding” plants is just as dangerous as a lack of fertilizers.
How to feed seedlings to make them plump
Feeding is carried out with such preparations.
Vermicoffee
This drug is more suitable for tomato seedlings. Contains many vitamins, acids and other equally important substances. Completely plant-based.
Azofoska
Excellent for frail and weakly growing tomatoes. Azofoska makes tomatoes meatier and stronger. The use of this drug can also strengthen the root system, protect against external negative factors, improve abundant flowering and increase harvest volume.
Secrets of preparing tomato seeds
In order for tomatoes to show good germination and be resistant to diseases in open ground, it is important to properly prepare the seeds for sowing. The first step is to select high-quality planting material. Large and heavy grains mean they contain a lot of nutrients.
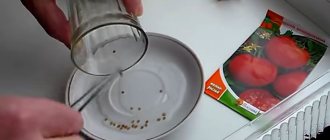
To determine which seeds are suitable for sowing and which are not, planting material is placed in a solution with added salt. Dissolve 1 teaspoon of salt in 1 glass of warm water. The solution is allowed to brew for 10 minutes.
Next, the summer resident looks to see if there are any grains that have floated to the surface of the water. They are removed, and those remaining at the bottom are washed with running water and laid out on gauze on the windowsill to dry.
If the seeds were collected from the last tomato harvest and were kept in a cold room in winter, it is recommended to warm them up for a week to revive them. The initial temperature that is maintained is plus 18 degrees. Gradually increase the temperature and bring it to 80 degrees. The procedure is carried out 1 month before sowing.
Disinfection will help avoid diseases . The most well-known option for disinfecting seeds is to pour them with a weak solution of potassium permanganate for 20 minutes. It would not be superfluous to immerse the planting material for 7 minutes in a 2% solution of hydrogen peroxide, which was previously heated to 45 degrees.
If a gardener takes a thorough approach to preparing tomato seeds for growing seedlings, he needs to take care of increasing the yield even before sowing. Soak the seeds in a nutrient solution, buy fertilizer at the store. Immunocytophyte, Virtan-Micro, Epin, sodium and potassium humates are considered effective.
If it is not possible to purchase industrial formulations, you can get by with folk remedies: aloe juice and freshly squeezed potato juice. After treatment with the nutrient mixture, there is no need to rinse the grains; all that remains is to dry them on the window.
The simplest way to prepare planting material is to soak tomatoes in water at room temperature. The duration of the manipulation is 12 hours. Every 4 hours, gardeners advise draining the water and replacing it with fresh water.
If you missed the deadline for sowing tomato seeds for seedlings, there is no reason to worry. The grains will germinate faster if you place damp gauze or toilet paper on the saucer. The air temperature should not be lower than plus 20 degrees. Don't let the gauze dry out, but don't create a swamp either.
Experts never tire of repeating: tomatoes are heat-loving seedlings. After planting in open ground, it is difficult for plants to tolerate drafts and climate changes, and they begin to get sick. As a result, the harvest leaves much to be desired.
A procedure called hardening will strengthen the immunity of tomato seeds for seedlings. Hardening involves alternating alternating temperatures . The hatched grains are placed in the refrigerator for ½ day at a temperature of +2 degrees. Over the next day, tomatoes are stored at a temperature of 15 to 20 degrees plus. The number of repetitions of the manipulation is 2-3 times.
If you have a compressor, the summer resident should carry out bubbling. The seeds are soaked in warm water, which is supplied with oxygen. One end of the hose is fixed at the bottom of a jar of water and the seeds are lowered inside. The compressor and hose force air into the glass container. As a result, the grains are mixed. Treatment takes 12-13 hours, then there will be a visible effect. Then the planting material is taken out and dried thoroughly. Then they begin sowing.
In peat tablets
The method of growing seedlings is not soilless, but it is quite promising, so ready-made peat tablets are quite easy to use.
You will need the peat tablets themselves and a tray with high walls.
In the period before emergence, the tray with tablets is kept at a temperature of 22 to 28°C. After emergence of seedlings, lower the temperature to 15-18°C. The lower temperature threshold is provided at night, the upper temperature during the day. In this case, daylight hours should last about 15 hours.
Sequencing:
- The tablets are placed in a tray. The recess should be directed upwards.
- Warm water is added little by little until the tablets are completely swollen.
- Squeeze the tablets lightly and pour out excess water.
- The tablets are placed one or two seeds at a time in moist recesses, covering them with peat.
- The tray is covered with a transparent film and placed in a warm place; when condensation forms, the film is lifted and ventilated.
As soon as the shoots appear, remove the film and monitor the temperature and humidity of the soil, as the peat dries out quickly. Water for irrigation should be at least 20ºС. Before germination, water with a spray bottle, after germination - in a tray or under the root. When the seedlings take root well and produce true leaves, remove the mesh from the tablet and plant it in the soil.
What is the best soil for sowing tomato seeds?
A standard soil mixture suitable for sowing tomato planting material in containers consists of the following components:
- Peat - provides excellent drainage, allows air to pass to the roots of tomatoes, absorbs moisture and retains it in the ground for a long time. It wouldn’t hurt to add deoxidizers and chalk to the peat. Dolomite flour is suitable for neutralizing acidic soil. To prevent large fibers from ending up in the glasses, entangling the fragile roots of developing seedlings, the peat is sifted.
- Leaf soil - although it is light and loose, does not have the required amount of nutrients. But leaf soil is quite suitable as a base for soil for tomato seedlings. The only caveat is that you should not take soil under oak and willow; it can retain a large amount of tanning components. Tomatoes cannot tolerate them and may die.
- Sand is an excellent leavening agent, but only if it is clean river sand. There should be no clay in the sand. The sand is washed in water and then placed in a preheated oven.
- Perlite - used if it was not possible to find sand without impurities. The material turns the soil loose and easily absorbs moisture.
- The humus is taken to be rotted. If the composition does not decompose completely, this can lead to the death of the tomatoes. Humus is prepared in advance by mixing manure, branches and trimmed green mass.
- Sawdust is used instead of peat and sand. Before mixing with other components, sawdust is scalded with boiling water.
It is unacceptable to add the following components to the soil for tomato seedlings:
- Organic fertilizers at the decay stage. They generate a significant amount of heat, which is more likely to destroy the grains. Even if the first shoots appear, the shoots will disappear due to too high a temperature.
- Avoid using soil containing clay. Clay turns the soil mixture into a heavy and dense mixture; the roots of the seedlings will not be able to breathe.
- Soil cannot be taken for tomato seedlings near a busy highway or near a chemical, industrial, or metallurgical plant, even if it has not been operating for a long time. The soil retains accumulated heavy metals for decades, and seedlings will certainly absorb them.
Tomato seedlings are tender, so the soil must be disinfected before planting the seeds. In gentle, but at the same time effective ways, summer residents call:
- Freezing. The soil components indicated above are prepared in the fall and left in a bucket on the balcony for the winter. A few days before excavation work, the soil is brought in so that it has time to warm up to room temperature.
- Steaming in a water bath . Destroys bacteria, but preserves microflora beneficial to seeds. Pour water into a large saucepan or basin, covering a distance of 5 cm from the bottom. Lay the bricks and, using a cast iron tripod, place a bucket of soil, and then cover with a tight lid. Steaming takes 2-3 hours.
- Pour boiling water over the soil generously and let it dry completely.
Soil mixtures that are considered the best for tomato seedlings:
- To 1 part of the soil taken from the garden bed, add the same part of leaf soil, sand and humus. Add 10 grams of urea, 25 grams of potassium sulfate and 30 grams of superphosphate into a bucket of water. This nutrient solution should saturate the soil with the missing microelements.
- Mix turf soil with peat and sand. If peat is not available, replace it with purchased soil, but pay attention to the composition. If there are no additives in the purchased soil mixture, add ½ liter of wood ash and 2 tablespoons of superphosphate to the bucket.
- To 2 parts of turf soil, add 1 part of humus and river sand. Add ½ liter of stove wood ash to the mixture per bucket.
Practical advice on how to properly prepare the soil for planting seedlings, as well as other useful recommendations, is given in the following video:
How to determine which elements seedlings lack
If there is a deficiency of some element, plants will certainly give signals in the form of unfavorable changes in appearance. It is important to determine exactly what the seedlings need and urgently take measures to save them. A deficiency of a particular element is expressed in a special way; the signs may be slightly similar, but still differ significantly.
- Nitrogen
With a lack of nitrogen, the growth of seedlings slows down. The new pale green leaves remain small and inconspicuous. They turn yellow, dry out around the edges and fall off. In the lower part, the leaves first lighten and curl, the stem becomes soft, the veins on the back of the leaf and the petioles acquire a bluish-red hue. Nitrogen-containing fertilizing is required: urea, ammonium sulfate, ammonium nitrate, mullein infusion (in low concentration).
- Phosphorus
Phosphorus deficiency manifests itself in slow growth, curled leaves and a purple tint to the leaf blades and stem. It is necessary to apply fertilizers with phosphorus: phosphate rock, superphosphate, ammophos.
- Calcium
Calcium deficiency manifests itself in drying of the tops of seedlings and the tips of young leaves. Calcium nitrate is recommended, on the basis of which foliar or root feeding is prepared.
- Copper
The lack of copper, in which the seedlings acquire a blue-green tint, and the stems and petioles become weakened, must be replenished with nutrient solutions based on copper sulfate or copper sulfate.
- Potassium
With a lack of potassium, seedlings get sick more often, they become more vulnerable to the most minor problems (for example, due to improper watering). Signs: leaves acquire a dark green tint, dry out at the edges, wrinkle and die, and young leaves become smaller and curl. Necessary fertilizers: wood ash, potassium nitrate.
- Magnesium
A lack of magnesium manifests itself in fragility and brittleness of leaves and petioles; yellow and later brown spots may appear on the leaves. Foliar feeding with magnesium nitrate is required.
- Iron
The seedlings lose their natural color; they gradually lighten, starting from the stem and petioles and ending with the tips of the leaf blades. In advanced cases, plants can become almost white. Feeding based on iron sulfate is required.
What tomatoes lack - Lack of nutrients - video
How to choose a container for sowing tomato seeds for seedlings
The quality of future seedlings depends on the container where the tomatoes are grown. There are many containers into which you can sow tomato planting material, from plastic yogurt cups to peat pots. If you choose plastic boxes for seedlings, give preference to containers that fit on window sills with drainage holes.
The boxes are made from wood with your own hands. The height of the boxes is 10 cm. Before placing the grains in the container, a plastic film is placed on the bottom. Then water will not seep through the walls and bottom. Although it wouldn’t hurt to make a pallet either.
Caring for tomato seedlings in wooden boxes is simple. If necessary, containers are moved to the right place and turned with the right side towards daylight. When the sprouts hatch and grow, the seedlings are transplanted into separate cups. If the seedlings are not picked in time, they may grow into the wood or become too tangled.
Gardeners also grow seedlings in trays. Outwardly, they look like boxes, only there are partitions across and along them. The advantages of trays are:
- ease and practicality of use;
- low price of cassettes, durability of use (for 10 years);
- compactness;
- the cells have recesses for drainage of liquid to avoid waterlogging;
- guarantees the absence of the factor of outgrowing a limited space.
Experts advise avoiding cassettes made of polyvinyl chloride and polystyrene. They contain toxic substances that, when the material overheats, are harmful to human health.
The list of disadvantages of using trays for growing tomato seedlings includes the following:
- A small volume of containers causes the soil to dry out. The cassettes are fragile, their walls are unstable.
- If you want to remove the stem from the tray without damaging the earthen ball, you will have to make an effort.
Peat tablets are made from compressed material consisting of nutrients. For tomato seedlings, it is better to choose containers with a diameter of 9 cm. Gradually absorbing water, the containers increase 7 times. After abundant watering and absorption of water, the tablets are ready for use. The grains are sown by making a depression at the top of the tablet.
Now about containers that are inexpensive and have optimal parameters for growing tomato seedlings. These are plastic pots with holes in the bottom for drainage. For tomato sprouts, it is better to buy plastic containers 12-17 cm wide and 12-17 cm high.
Step-by-step sowing of tomato seeds
Sowing tomato seeds for growing seedlings in a common box and in separate glasses requires a certain sequence of actions:
- Fill the container with pre-prepared and slightly damp substrate.
- Using your fingers, form small grooves in the box, maintaining a distance between rows of 3 to 4 cm. If we are talking about pots, 1 tomato seed is buried in each glass.
- In a common container, try to leave 1-2 cm between the grains. Then the roots will not intertwine too closely and the picking will take place without unpleasant consequences.
- Cover the seeds with a small layer of soil and water the pot.
Optimal conditions for growing tomato seedlings
Tomato seedlings prefer the following growing conditions:
- Abundance of light . Place the pots on the windowsill. In February, there is not enough daylight for plants, so use fluorescent lamps. For the first 2 days after the shoots appear, it is advisable to illuminate the boxes without turning off the lamp. Then they adhere to the usual lighting format - no more than 16 hours a day.
- High percentage of humidity . The seedlings should be irrigated a couple of times a day using a spray bottle. It also doesn't hurt to cover a common box or tray with a piece of glass. This way you can recreate the greenhouse conditions for seed growth at home. The glass is removed a couple of weeks after sowing the tomatoes. An alternative option is to use a humidifier. Soil moisture is checked in the morning. If spruce sprouts are drooping and look stale, water them immediately. If this is not done, at 12 noon the shoots will dry out completely and die.
- The daytime temperature in the room is 25 degrees, at night 15 degrees plus. Do not expose the seedlings to direct sunlight - the stems and leaves may burn.
- When the first tomato shoots are formed, fertilizing is applied to the soil . Repeat the procedure every week. The best composition is considered to be a natural fertilizer based on organic matter, for example, made from manure or grass. If you trust industrial fertilizers more, choose vermicompost or humic fertilizer.
Picking and hardening of tomato seedlings
If the tomato seeds were planted in one box, it is better to separate the seedlings from each other after true leaves appear on the shoots. This happens a week after germination. There is no need to separate the roots from the earthen clod. A new container is chosen with a volume of 200 ml. After a couple of weeks, the transplant is carried out again, in pots up to 1 liter in volume.
Approximately 1.5 months after sowing, clusters of flowers will appear on the tomato seedlings. In 2 weeks the seedlings will be transplanted into the garden bed. If you miss this moment, the harvest will be weak. Tomatoes are taken out onto the balcony, gradually increasing the time spent in the fresh air so that the plantings become accustomed to the growing conditions that await them at their summer cottage.
Seating
It is necessary to plant tomatoes after they have 2-3 true leaves. This usually happens within 7-10 days. They are transplanted into a larger container (approximate size - 250 ml), in which they can continue their development. If initially the sowing was not carried out in a heap, or was carried out in cassettes or individual containers, the first transplant can be skipped.
Young shoots must be replanted very carefully. So that they can be easily removed from the container, the soil is moistened. It is convenient to pry the sprouts out of the soil with a dinner fork and pull them out not by the stem, but by the cotyledon leaves. In a new container, plants are planted in deep holes so that the root fits completely into them. Bury the sprouts to the cotyledon leaves. This will allow new roots to develop from the stem. After transplantation, the crop is watered.
The second time the tomato seedlings are planted after 3 weeks. In this case, it is advisable to provide them with individual containers of at least 1 liter in size. The plant is also carefully dug out of the damp soil and transplanted into a new container. In this case, the planting hole must be deep enough so that the root does not bend in it. The soil is compacted and watered.
When picking, do not pinch the main root. In this case, the plant will have the opportunity in open ground to obtain moisture from the lower layers of the earth.
How to protect seedlings from pests and diseases
The sticky surface of tomato leaves will indicate aphids . The bulk of the insects are collected by hand; the remaining individuals are disposed of by spraying with a solution of laundry soap. 25 grams of soap are diluted in 1 liter of water. You can also try treatment with Decis, Inta-Vir, Kinmiks, Fitoverm.
Thrips are identified by silvery spots on the foliage . Fitoverm, Akarin or Vermitek will help destroy them. Spraying with preparations is carried out 3 times. The interval between spraying is a week.
The whitefly moth causes tomato seedlings to dry out . You can remove pests using garlic infusion. Pass 2 cups of peeled garlic cloves through a meat grinder. The mixture is placed in a jar and 1 liter of water is added. Next, cover with a lid. After 5 days, the infusion can be used by first diluting 1 teaspoon in 1 liter of water.
Growing tomato seedlings is a painstaking process. But by paying due attention to preparing the seeds and soil and creating optimal conditions for growing plants, you will reap a tasty and rich harvest that will be the envy of any experienced gardener.
1
0
Copy link
How to fertilize plants when color changes
When the lower leaves turn yellow and growth stops, nitrogen fertilizers are used: urea-46%, ammonium nitrate-34-35%, ammonium sulfate-20.5%.
When the leaves and stems darken, with a violet-crimson color, phosphorus: potassium metaphosphate - 55-60%, ammophos - 50%, simple superphosphate - 15-20%.
The first fertilizing with phosphorus is carried out only when the plant has completely taken root, mainly after picking.
Superphosphate 3-4 g is diluted in 1 liter of water. Then the seedlings are watered at the root. If necessary, repeat the procedure, but not earlier than two weeks.