To the question: is it possible to plant nigella onions before winter, there is only one answer - of course it is possible, especially since such planting has many advantages. Seeds sown in autumn produce hardened planting material that is resistant to diseases and pests. And one more plus: next season you won’t have to think about buying seedlings. When and when to plant nigella onions before winter, sowing and choosing a variety for autumn planting is the topic of our article.
For those who don’t know, let us immediately explain that nigella is the name given to the seeds of onion. In the first year, they produce sets, and then full-fledged onions. To speed up the process, nigella is sown in the fall before winter.
Is it possible to plant chives before winter?
Nigella is the common name for onion seeds that form on onion shoots after ripening. Many gardeners practice sowing seeds before winter, taking advantage of the obvious advantages of this method of growing onions. Among onion varieties, nigella seeds are more diverse than onion set varieties. When choosing nigella seeds, it is easier to decide on the chosen variety and not be disappointed when collecting when the sowing does not give the expected varietal result. Black onions never bolt because they do not have time to gain the required leaf size to form a peduncle.
What does autumn planting onions give?
Before spring, autumn planting has several advantages that will appeal to everyone, especially busy people. First, this approach allows you to save a lot of time: in the spring, even without sowing onions, there is something to do. The method also has other advantages:
- Early harvest. In the middle zone, onions can be harvested in July, in southern latitudes in June, and the feathers can be cut even earlier.
- No diseases. The plant develops when the onion fly is not yet active, and conditions are unsuitable for the development of diseases.
- No shooting. Onion sets are small and most winter varieties do not bolt.
- No weeding. Weeds gain strength in May-June, and onions are already harvested at this time.
- Harvest quality. Winter varieties of onions ultimately produce large heads.
There is only one significant drawback: onions planted in autumn lie worse than spring onions. It can be eaten throughout the year, and for winter storage it is better to plant spring varieties.
Not everyone will like the need to be in the garden in late autumn; such an activity is not for everyone.
Advantages of planting before winter
- The advantages of sowing nigella onions in the fall include the following factors:
- Pre-winter sowing of nigella onions is a natural way of propagating onions and is closest to the natural growing cycle.
- Sowing seeds before winter increases the plant’s immunity, resistance to diseases and pest damage. Onions are obtained with a powerful root system, which manages to form in the first days of spring.
- Saving time when carrying out spring field work in the garden is also an important factor.
- Melt water in the spring will provide the beds with sufficient moisture, which will reduce the frequency of watering.
- There is no need to monitor the timing of sowing - all this will be done by weather conditions and the spring sun.
- Onion beds will be supplied with vitamin greens in early spring, and the resulting bulbs will be well stored. Compared to spring sowing, this is a preferable option.
- A long growing season can be used to obtain full-fledged winter onions by autumn or to obtain a fairly large set.
Harvesting
When to stop watering
Before you start harvesting onions, you need to carefully inspect them. The vegetable has not needed watering since mid-July. Excessive moisture only harms it, especially during storage. Experienced summer residents and gardeners advise covering the area with onions with film starting in July. This approach will protect the vegetable from unnecessary rain. At the same time, it will be of good quality and will last quite a long time.
how to properly remove onions The question of how to properly remove onions is very important. Anyone who wants to have a harvest needs to have as much information as possible about its harvest. From mid-July, it is advisable to rake the soil away from the bulbs so that they can receive solar heat and warm up.
Suitable weather for harvesting
If a person does not know when to harvest onions, then he may miss the required deadline. This will significantly shorten the storage period. Gardeners say that harvesting early is bad, and harvesting late is nothing good. Therefore, you need to know how and when to harvest onions. This should be done at the end of July. The most suitable weather is hot and dry. If you miss the harvest date, the vegetable will not last long.
The main thing is to protect the growing onions from unnecessary moisture in time. It is better to start harvesting in the very last days of July. When you remove onions from the garden, you should not pull them too hard. It is best to dig with a sharp pitchfork or a well-sharpened bayonet shovel. This way there is less chance that the bottom and scales will be damaged. If the weather is warm and sunny, then it is better to leave the dug up onions on the site. It will lie until the evening and dry thoroughly. But before dark you need to collect the vegetables and take them to a well-ventilated room.
How to harvest crops during the rainy season and from wet soil
Sometimes the soil in which onions are grown is very wet or too nitrogenous. Then drying alone will not be enough for successful storage. Infectious diseases of the vegetable, such as neck rot or powdery mildew, may develop.
Preparatory work
Before sowing nigella onions, it is necessary to carry out preparatory work, which includes the correct selection of seeds, their processing and preparation of the site for planting.
Seed sorting
Seeds for cultivation can be purchased in accordance with the chosen variety, or you can grow it yourself, using the variety you like for these purposes. The varietal bulb for obtaining seeds is carefully selected. It should be large, without damage or signs of disease. A bulb planted in spring will throw out an arrow with a peduncle, where nigella seeds will ripen.
Important! Nigella seeds remain viable for only 2 years, so it is advisable to use the seed immediately. In the second year, germination rate decreases by half.
It is advisable to tie the peduncle and tie the inflorescence with the seeds with a light cloth so that the seeds do not fall off prematurely. At the first signs of ripening (the seeds begin to fall out), the flower stalks can be picked and placed in a warm, dry room for ripening.
Both purchased seeds and those prepared independently must be calibrated and the largest ones selected for sowing, which will give stronger seedlings. For these purposes, you can use the method of sifting through a sieve. You can place the seeds in water and mix - the floating seeds are considered immature and are not suitable for further sowing. After this check, the seeds must be dried immediately.
Pre-planting seed treatment
The quality of the seed can be checked by germination on a damp surface of cloth or paper. The best indicator of germination is the germination of more than a third of the total number of nigella seeds. At lower rates, the seed material is unsuitable for sowing. Having decided on the quality, you can begin further preparation - disinfection.
The packaging of purchased seeds must indicate disinfection, and seeds obtained independently should be disinfected by soaking:
- for half an hour in a pale solution of potassium permanganate (1%), and then in a saline solution (200 g per 10 liters of water) for 12 hours;
- for half an hour in aloe juice;
- in a fungicide solution according to the instructions.
This treatment will protect crops from infection by stem nematode and onion fly.
After processing, the seed is thoroughly dried. Find out in more detail how and with what to process onions before planting.
Site preparation
Onion crops love loose (not clayey), moderately moist, humus-sandy soils that are well ventilated to prevent moisture stagnation.
The soil for sowing nigella must be prepared in advance:
- Before the beginning of October for the northern regions and until November for the southern regions, i.e. before the onset of frost, it is necessary to prepare the beds. The site should be located in a sunny place, where there are no trees or shrubs nearby that shade the seedlings.
- If the site is in a lowland, the beds are raised by 20–25 cm to avoid stagnation of water during irrigation or in case of precipitation. Raised beds will warm up faster in the spring and ensure friendly shoots.
- The predecessors in the sowing area should be herbs, potatoes, early cabbage, radishes, cucumbers, carrots, tomatoes or legumes.
- The area is dug up, cleared of weeds and roots, and loosened. You can use the area under fallow or in place of a lawn. In this case, it is enough to remove the top layer of turf, prepare the beds, and leave the passages with grass.
- A nutrient mixture is added to the dug area for each square meter: compost mixture - 6 kg, superphosphate - 50 g, ash - 200 g, and in early spring it is enough to add 25 g of nitrogen fertilizers per 1 m² of bed. You can add sand or sawdust to heavy soil.
How to prepare for landing
Beginning gardeners always have a lot of questions about how to choose seeds, will they sprout, where to make a bed and how to prepare the soil? We answer, preparatory work on the site must be thought through, and some carried out, several weeks before the upcoming planting of seeds.
Preparing the beds
At the beginning of October, you need to dig up the soil and make onion beds on an elevated place. They should be high enough. You need to choose a sunny, well-warmed place for the onions. Garlic or onions should not have grown in this place last year. It would be better if this was a place for planting legumes, cucumbers, carrots, cabbage or radishes. These plants favor the growth of onions.
The soil needs to be fertilized. To do this, you can use wood ash, humus, fertilizers: nitroammophosphate, superphosphate. If the soil is heavy, it needs to be mixed with river sand. When digging and loosening the soil, it is necessary to carefully remove plant roots. The surface is leveled using a rake.
Seed preparation
Usually the seeds come in different sizes. Small seeds may be late and germinate two weeks later than large ones. Calibrating the seeds using a sieve with different cells will help to avoid differences in germination. Nigella onion seeds are sifted and planted according to size.
You can use a jar of water in which the seeds are placed for selection, but this method is more labor-intensive and requires additional drying of the seeds. Properly stored planting material can be planted within 24 months. But gardeners recommend planting fresh seeds.
If you have doubts about the germination of seeds, you can check. Wet gauze with water, put it on a plate, and wrap 10-20 seeds in it. Seal the plate with the seeds tightly with film or a bag. Place in a warm place, check regularly and moisten the gauze. In a week, onion sprouts will appear. If more than 30% of the seeds have sprouted, the batch is good; you can safely sow the seeds in open ground.
Read also: How much salt to put in cabbage when fermenting
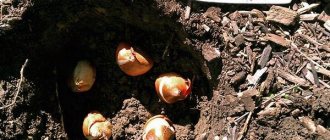
Optimal planting dates before winter
With the onset of stable cold weather, when the soil freezes or snow falls, you can sow nigella onions in the beds. It should be remembered that onion seeds can germinate at a temperature of +2...+4°C during a late thaw, which will lead to the death of seedlings in winter, therefore, based on the weather, sowing is carried out in October-November, depending on the region of cultivation.
Important! The soil under the crops can be watered with a solution of table salt (200 g per bucket of water) to avoid damage to the crops by the onion fly, or sprinkle the sowing grooves with salt.
How to get onion seeds
Do you want to completely switch to your own seed production, but don’t know how to collect onion seeds? Everything is quite simple, although some skills will still be needed.
- Select 5-7 large, healthy bulbs of the same variety.
- In May, plant them in the ground, placing 150 g of compost under each and placing them at a distance of 50 cm from each other.
- Regularly loosen and hill up the plantings, and apply nitrogen fertilizer to the soil twice.
- Tie a bow arrow to a stake and protect it from birds.
- After the onion stalks begin to yellow, cut them off and hang them in a dry, warm place to ripen.
- Shake the mature seeds out of the flower cap, place them in a paper bag and label them.
- How to get your own onion seeds
It’s not difficult to plant onion seeds, but is it easy to wait for them? Read about this in our article.
Landing technology
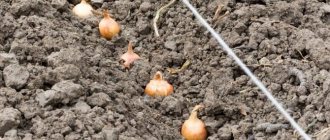
By dividing the planting technology into stages, you can correctly organize the order of sowing onions before winter:
- Sowing of nigella can be done in grooves 2–3 cm deep or scattered. The row spacing is 20–25 cm. The seeds are sown quite densely if thinning is carried out in the future. You can sow beacon crops (radish, lettuce, peas) in the grooves, which with early shoots will indicate the location of the beds with nigella.
- Before winter sowing, it is impossible to check the germination of seeds by soaking (they should germinate only with the onset of spring), so sowing is carried out with dry seeds at a rate of 100 seeds per 1 m². Seed consumption during winter sowing is greater than when sowing in spring.
- The seeds are scattered thickly (the germination rate of chives is average) into the garden bed, slightly crushed, and sprinkled with soil (1–2 cm). Watering the beds after sowing is not recommended. In spring, melt water will ensure sufficient soil moisture.
- Beds in regions with cold winters are mulched with leaves, straw or spruce branches. In the spring, the mulch must be removed to allow the seedlings to germinate.
Predecessors and preparation for planting
The correct technology for growing winter onions requires the right choice of its predecessors. Vetch and peas, beans, any grains except oats, cucumbers and all types of cabbage, tomatoes, mustard, and rapeseed are considered good. You can plant onions in winter on turnips after harvesting carrots and beets.
Harmful crops in this regard that provoke nematode infection are red clover, alfalfa, as well as beans and celery, and potatoes. You can replant onions after onions and garlic, but no more than two years in a row, after which a 4-year break is desirable.
Site selection
To create beds, you need sunny, dry and ventilated places, without stagnant water and shading. If the site is not located on a hill, it is necessary to provide for the possibility of draining melt and rainwater or forming ridges 20-25 cm high. The vegetable loves loose soils, light ones - sandy loam or loamy soil, does not tolerate acidic ones, especially floating and heavy ones.
Predecessor crops must be removed from the area for bulbous plants no later than the end of July to allow natural shrinkage and compaction of the soil to occur.
Soil preparation
After clearing the beds of other vegetables, the soil is dug up, adding 1 kg of urea and 2 kg of potassium chloride per 1 hundred square meters (the latter can be added immediately before planting). If it is depleted, humus (1 kg per 1 sq. m), wood ash, and compost will be useful.
Attention! Adding fresh manure to the soil before planting winter onion sets leads to the abundant formation of green mass and a loose consistency of bulbs unsuitable for long-term storage.
Selection and preparation of seed material
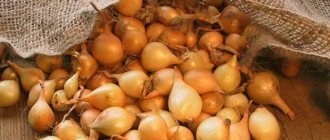
Before sowing, planting material is sorted, dividing by size into:
- wild oatmeal - with a bulb diameter of 1 cm;
- sevok of the 1st category - with a size of 1-1.5 cm;
- sevok of the 2nd category - 1.5-3 cm;
- pickled onion - more than 3 cm in diameter.
The smallest seeds produce the largest turnip bulbs. Such a “trifle” has a small supply of nutrients; it is not enough for shooting. This significantly reduces the likelihood of crop damage even during possible spring frosts. In addition, wild oats and sets dry out quickly, and it can be difficult to create the necessary conditions for them to be properly preserved for spring planting.
The issue of disinfection and subsequent drying of seed remains controversial. Good drying is not an easy task: sowing raw bulbs risks freezing if unexpectedly frozen before rooting; overdrying also risks losing the future harvest.
Most gardeners limit their pre-sowing preparation to calibration only.
Further care
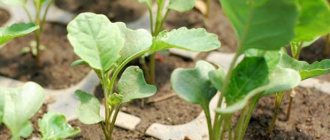
After spring shoots, further care consists of timely watering, thinning, weeding and fertilizing as necessary.
Watering and fertilizing
During the initial formation of the root system, which takes place in the first 2 weeks after germination, the need for moisture is very high. Taking into account precipitation, during the intensive growth phase, watering is carried out 2-3 times a week, avoiding either drying out or waterlogging of the soil. For irrigation, it is advisable to use warm water (+14…+ 17°C). Too warm water will lead to damping off of crops, and cold water will slow down growth and development.
Growing onions from seeds in one season
For those who don’t want to bother for a long time and dream of growing full-fledged onions from seeds in one season, there is a very real, albeit rather troublesome, technology. Not all varieties are suitable for the implementation of such a plan, but only early ones, such as Borodkovsky, Zolotnichok, Carmen, Odintsovets, Early Pink, Red Baron, Sibirsky, etc.
Growing onion seedlings from seeds on a windowsill
Onion seeds for seedlings are sown in boxes 10 cm deep until March 5-12. For germination, use peat soil with microelements or independently enrich it with wood ash at the rate of 0.5 cups per 5 kg. Sprouted seeds are sown to a depth of 1 cm and the containers are left at room temperature, slightly moistened. After the emergence of seedlings, the temperature is reduced to 14-16°C, and the seedlings are thinned out so that there is 2-3 cm between them.
Water the seedlings every other day with warm water and feed them twice with complex mineral fertilizer according to the instructions. By the time of planting, each plant should have 3-4 true leaves.
Planting onions in the ground
In mid-May, seedlings, as a rule, are ready to move to a permanent place. Prepare onions for transplanting as follows:
- water abundantly;
- taken out of the box;
- Leaves and roots are cut by a third;
- Dip the roots into a clay mash.
The bulbs are planted, not deeply buried, at a distance of 8 cm in the row and 20 cm between the rows. Further care is carried out as for ordinary onions, but they are harvested no earlier than mid-August and they try not to store them for a long time.
As you can see, planting onions with seeds in the ground and growing them through seedlings is a very simple task. Try to master this “grandmother’s” technique, and onions will delight you with abundant harvests and high quality every year.
Additional recommendations
To the given rules for sowing nigella onions before winter, you can add the following recommendations:
- To obtain seed material, you need to select full-fledged uterine bulbs measuring 5–10 cm. The selected heads should be stored at a temperature of +2...+8°C; lower storage temperatures will not ensure the release of the peduncle and the ripening of seeds. Before planting in the garden, the bulb must be warmed up (temperature +15...+20°C) and disinfected with a solution of potassium permanganate.
- Onion crops are subject to cross-pollination, so to obtain high-quality seeds yourself, the mother plant should be planted away from the onion beds.
- In spring, you should not allow the formation of a dry soil crust through which tender seedlings will not be able to break through.
- Dense spring nigella shoots can be used as seedlings. To do this, you need to carefully select the sprouted seedlings and transplant them to another place.
- Onions are harvested as they ripen, with lodging and partial yellowing of the leaves. To do this, you need to choose a dry and warm day to dry the onions in the beds. In case of precipitation or dew, put the onions under a canopy. It is advisable to complete the harvest before the onset of prolonged rains and cold nights.
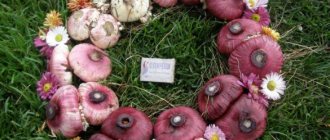
- Careful selection of a variety for cultivation in the appropriate region will help you obtain a full-fledged head or high-quality seed. Traditional varieties of onions: Strigunovsky, Exibishen, Bessonovsky, Karatalsky, Vostorg, Stuttgarten Risen, Centaur, Myachkovsky 300. Red varieties of onions - Red Baron, Danilovsky, Shaman.
Pre-winter sowing of nigella onions is easier and more economical than sowing in spring. The two-year cycle of ripening of onion crops can be accomplished in one season if sowing seeds before winter produces friendly and strong shoots due to compliance with all the conditions for proper cultivation.
Various varieties of winter onions
The correct selection of onion varieties for planting before winter is the key to obtaining a good harvest. New crop hybrids have been created for which short or medium daylight hours are suitable; they form a bulb with no more than 14 hours of daylight. There are many varieties of onions. The description and photo below will help you find out which variety is best to plant before winter.
An early-ripening, high-yielding new variety with medium pungency and sweet taste. This is a hybrid of Dutch origin, which has shown the ability to overwinter in the middle zone. It is not capricious, grows well in different soils, is frost-resistant, practically does not get sick and does not bolt. The ripening period is fast - up to 75 days. Suitable for winter and spring planting.
Centurion
The main thing in describing the centurion onion variety is its high germination rate, up to 100%. Along with this important characteristic, there are other features that are no less attractive: high resistance to disease and freezing, rapid germination.
The vegetable has a round shape, slightly flattened on top. The size of the heads is medium, the taste is spicy, medium hot.
Centurion onion for planting before winter is a good choice
Radar
Dutch variety. Dense scales help to withstand frosts in snowless winters down to -15°C, and in the presence of snow cover - down to -23°C. Resistant to pests, does not bolt. The large weight of the bulbs is attractive to gardeners - growing 150-gram bulbs will not be difficult, and with proper care, the variety will delight you with heads weighing up to 400 g. An important characteristic of the radar is its long shelf life.
Stuttgarten Risen
As a winter onion, this representative of German varieties is an excellent option. Known for its high yield (usually yields at least 5 kg per 1 sq. m) and early ripeness. The full ripening period from sets is 2 months. The bulbs are large, flat-round, weighing up to 200-250 g, with juicy white pulp. Disadvantages include the high susceptibility of the variety to neck rot and powdery downy mildew.
Shakespeare
Onions of this variety have a semi-sharp taste, with juicy, dense flesh. The dry yellow-brown dense scales that protect it allow it to withstand frosts down to -18°C. The shape of the heads is round, the approximate weight is about 100 g. This winter onion also has early germination and is resistant to bolting. Another significant plus is the long shelf life.
Senshui yellow
Another representative of the winter type of varieties of Dutch selection. The shape of the heads is flat-round, weight - 180-250 g. High yield, early ripening senshui onions will delight you with high immunity to diseases and the absence of bolting. Thanks to the dense outer scales, it can be stored for up to six months.
Read also: Lemon for heartburn reviews
Ellan
The variety is widely distributed due to its high yield and very early ripening. The round-flat heads weighing about 120 g are covered with straw-colored scales. A distinctive consumer feature of the Ellan variety is its piquant, sweet-tasting pulp, which does not cause severe lacrimation.
Methods
The method, which is carried out in stages, is to grow onion sets, and the next season from them into onions.
You can get a harvest at once during the season if you plant seeds or ready-made seedlings in the ground in the spring.
The third option involves winter sowing. The material (onion sets) is planted in the fall; the specific timing depends on the climate. As a rule, this is October, perhaps early November. By the way, in this case the issue of variety is very important. Small onion sets do not help the shooter, but large ones may not respond to weather surprises in a timely manner.
Next, let's look at the advantages and disadvantages of growing onions from seeds. We'll tell you what methods and varieties are used, and how to adapt a small space for growing onions. We will touch upon the issues of seed preparation, soil, and crop storage conditions.
Other seed materials
You can also plant onion sets. The material for its production is “chernushka”. These are the seeds that are formed after the flowering of the onion. You can easily get them yourself. Bulbs with this ability to reproduce are formed only in the second year, but it is quite suitable as seed material for onion sets.
You can plant seeds at the end of April, and this is an advantage over seasonal onions. If frost occurs in late spring or the temperature drops, the nigella will withstand this test, while the bulbs will stop growing.
It is necessary to choose a place for future planting and prepare it in advance, so work on forming the beds begins in the fall. Finding the right place for gardening is a whole science. What is known about onions?
Important! You should not sow nigella in an area where garlic has previously ripened. Also, legumes should not be planted nearby. Useful predecessors are cabbage and nightshades.
Not everyone agrees with the opinion that a bed with carrots would be a good neighborhood for onions. For example, watering of onions is stopped at the beginning of August, but carrots require active moistening further. Actively growing carrot tops shade the onion bed, and this is fraught with the development of diseases.
The place should be accessible to sunlight and well ventilated. Loose soil promotes necessary aeration. Stagnation of liquid in the garden bed leads to rotting of the bulbs.
Preparing the soil itself involves digging it up, loosening it, and clearing it of weeds. Traditionally, mineral fertilizers are applied. In this case, the choice is made in favor of potassium-phosphorus compounds, but there is disagreement regarding organics. Some experts believe that manure should not be applied - it stimulates the growth of the green arrow, depriving the turnip of nutrients and slowing down growth. In spring, nitrogen fertilizers are added to the complex.
Important! It is recommended to change the planting site every 3-4 years.
Questions
I want spring onions to grow early in the garden bed. When to plant and how?
In order to get green arrows in early spring, plan planting in the fall (August-September).
You can buy seeds or use those you get yourself. They should first be soaked in water or any growth stimulant for 10-12 hours. Plant the seeds to a depth of 2 cm in moist soil, and apply a layer of mulch on top.
I planted onion sets from the purchased material, and he gave it to the shooter. Is there something wrong with the seeds?
Here the reason is rather different. Planting is usually done in early June. Climate change has caused seasonal temperature variations to change. therefore, an arrow could form. It must be carefully trimmed, and for better growth of the bulb, you can add fertilizer. Make sure that irrigation water does not accumulate in the soil and weed weeds in a timely manner. The bulb grows systematically when the plant has enough nutrients, moisture, and oxygen.
Creation of seed material
To collect the seeds, cut off the so-called boxes on which they are formed, along with the arrow, calculating so that the shoot is 30 centimeters.
The quality of seeds in one box may vary. The ripening process occurs unevenly: first the upper ones, later the lower ones. The appearance of black seeds is a signal to start collecting.
The seeds are small, and a special technique is used to collect them: the boxes are tied into bouquets and hung in a shady and well-ventilated place. A cloth or paper is laid out underneath them, where the seeds are collected as they dry. Thus, nature itself selects the most mature seeds. They are then checked by filling them with water. High-quality seeds are dried, ventilated and stored in paper bags, and it is important that the room is dry. Don't forget to note the collection date.
Important! The shelf life of the seed is 3 years.