Fresh crispy radishes of a delicate pink color are not only very tasty, but also healthy. This vegetable stores a lot of minerals and vitamins. Usually it is grown in open ground or a greenhouse in early spring, and in autumn and winter they only remember the previous harvest. For lovers of this crunchy vegetable, growing radishes on a windowsill will be a real discovery. So, a fresh root vegetable will always delight you with its freshness, benefits and aroma.
Juicy radishes
Is it possible to create a radish bed on a windowsill?
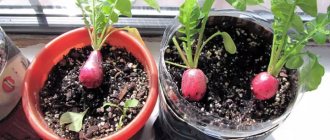
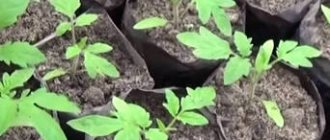
Radishes can easily be sown in small boxes or pots, placed on a windowsill and grown into succulent vegetables. At the same time, a mature root crop will not be inferior in size and taste to its “garden” counterpart. Experienced gardeners sow radishes in this way in the fall and winter, when they really want vitamins.
Growing radishes on a windowsill
The root crop ripens 14-16 days after sowing. But before planting, careful preparation is required: there must be a suitable illuminated place, a convenient container and soil for planting. In addition, you need to be prepared to maintain temperature conditions. But first things first.
Time to plant radishes
Radishes for growing on a windowsill can be planted at any time of the year. It grows equally well in spring and winter, if all necessary conditions are met. Even in freezing cold, fruits can grow juicy and tender with proper care.
Growing radishes on a windowsill
What can I do to prevent radishes from stretching?
Sometimes a root crop grown according to all the rules can stretch upward. What to do to prevent this from happening? First, pay attention to the lighting. Perhaps the light falls on the plants from one side. If so, the radish stretches out, trying to get closer to him. Other possible reasons:
- excess fertilizing and watering;
- increased room temperature;
- lack of lighting;
- excessively deep immersion of seeds in the ground;
- excessive loosening of the soil around the sprouts.
That is, pulling culture upward is always a consequence of improper care. To prevent this from happening, you need to study in advance how to grow radishes on a balcony or windowsill correctly, and only then start planting. If this has already happened, you can try cutting off the tops completely. This will allow the fruits to grow. By the way, there is another problem that novice gardeners often encounter when growing root vegetables at home: the inexpressive taste of grown radishes. An overabundance of fertilizers is usually to blame for this.
Three conditions for successfully growing radishes on a windowsill
Preparing for landing
For better germination of root crops, a novice gardener needs to take into account several important details. The algorithm for preparing for landing is presented in the table below.
Table 1. Preparation for sowing radishes at home
| What should be done? | Implementation | Important nuances |
| Find a place | The most suitable place for an indoor “bed” is a window sill on the south side. With this arrangement, optimal daylight hours are maintained, and the seedlings germinate completely. | When planting in late autumn and winter, do not place pots of radishes on windowsills. Beneath them are hot radiators that can burn young growth. |
| Prepare the container | For planting you can use: - flower pots or flowerpots; - wide but low wooden boxes; — plastic containers; - individual cups or containers with cells. To ensure that the root crops are juicy and evenly developed, you need to choose large pots. The optimal depth of the pot is from 15-20 cm. | The base of any container should have drainage holes for moisture to escape: they will protect the rhizomes from rotting. |
| Fertilize the soil | For radishes, any universal soil, which is sold in flower shops, is enough. Or you can prepare the soil manually. To do this, mix: - 2 parts of garden soil from the site, you can use peat; - 1 part rotted grass; - 1 part sand. For additional mineralization, you can also add 1 part of ash. | Before planting, the soil must be prepared in one of two ways: 1) Cool in the freezer. 2) Fry in a hot oven. After the procedure, the soil is shed with a weak solution of potassium permanganate. Such maneuvers promote disinfection and protect future plantings from disease. The finished soil is sifted to remove all small debris and stones. |
| Prepare the seeds | The seeds need to be inspected and the best ones selected. They should look fresh, be approximately the same size and shape, and be odorless. The seeds have a brown tint. Planting material with an odor, small shape or gray color can sprout with a probability of 40-50%. Seed preparation begins 1-2 days before the planned planting: - seeds are soaked in warm water and left at room temperature for 24 hours; — place in a container with a pink solution of potassium permanganate for 2-3 hours; - remove from the solution and lay out on a paper napkin to dry. Dry seeds are ready for planting in the ground. | The freshness of the seeds can be checked in a simple way - put them in a bowl of water. Seeds can: 1) Sink to the bottom. This means that the seeds are heavy and of high quality. They will rise quickly. 2) Rise to the surface. Old planting material that may not sprout at all. |
In nature, radishes ripen very quickly. If sowing in open ground occurs in mid-April, then by the beginning of May the first fruits will already appear. To provoke the same rapid growth on the windowsill, you need to choose seeds with early ripening. You can read more about growing radishes in open ground in our article.
Quality radish seeds
Diseases and pests
Improper care and other errors during cultivation can lead to radishes being attacked by harmful insects and infections. This is especially true for early ripening varieties growing indoors.
Radishes are susceptible to numerous diseases. Most often they appear when purchasing low-quality planting material. Infected seeds can mix with healthy ones. Another route of penetration is through non-sterile soil.
The most common diseases are:
- white rust;
- clubroot;
- mosaic of leaves;
- powdery mildew;
- peronosporosis;
- gray rot.
Excessive and untimely watering can cause fungal infections.
To prevent the development of the disease, several prevention rules must be followed. Firstly, you need to purchase seeds only from trusted stores. Before sowing, planting material must be kept in a solution of potassium permanganate. Then the risk of infection is eliminated. Secondly, you should not take seeds for sowing if they have incorrect pigmentation, are deformed or are too small.
Another preventative measure is soil sterilization. The procedure is mandatory if the soil for planting radish seedlings on the windowsill is taken from the street. It most likely contains pathogenic microorganisms that can cause disease. The soil is poured onto a baking sheet and placed in the oven for 3-4 hours. Processing temperature – 80 degrees.
Among the pests that you may encounter when growing radishes on a windowsill, the most common are moth caterpillars and white butterflies. They get into the seedlings along with the untreated soil. The main symptom is the presence of damaged sheets. Caterpillars should be collected by hand to prevent them from continuing to eat the plant.
Treatment with insecticidal agents is not recommended, as they can accumulate in the fruits. The use of such products is advisable only when aphids, spider mites and cabbage moths appear. Such pests do not spread to radishes, however, they can affect other indoor plants and cause damage to them.
Radish planting algorithm
When all the elements of the future “bed” are ready, they need to be combined. Small pebbles or broken bricks are placed at the bottom of the pots to create a drainage effect. The earth is poured to the middle of the container. Further planting can occur in two ways.
Option 1. Pot or wooden box
The soil in the pot must be moistened with a spray bottle. The landing algorithm will be like this:
- Using your finger or a pick stick, make holes 5 cm apart. The depth of each notch should not be more than 2 cm.
- One seed is placed in each hole. Plantings are covered with a thin layer of earth or sand.
- The top layer of soil must be moistened with a spray bottle. The finished pots are covered with film or glass.
- The resulting “greenhouses” are removed to a warm, illuminated place until shoots appear. After this, the film is removed.
Important! As radishes grow, the soil must be constantly replenished. This is done to prevent the fruits from coming out. Otherwise, they may get sunburned and become bitter.
Growing radishes in a long box
Option 2. Egg cassettes
This method requires more preparation than planting in pots. However, it is considered the most hygienic and attractive. The algorithm will be like this:
- Paper egg containers must be sanitized. To do this, they are spilled with alcohol or heated in an oven heated to 70 degrees.
- The bottom of each cell is cut off to create small round holes.
Preparing an egg tray for planting radishes
- Take a plastic box of such a size that an egg container with seeds can fit in there without any problems. Place small pebbles at the bottom and cover them with a layer of soil on top.
- Egg containers are immersed in boxes with soil so that the soil appears in the cells.
- Make a hole in each cell and place one seed, similar to pot planting. Sprinkle sand on top and moisten with water from a sprayer.
The container with egg cassettes is covered with film or a plastic bag and put in a warm place for pecking the seeds.
Important! Growing in egg containers has a huge advantage - the soil does not need to be mulched or weeded. Root crops will only require occasional watering.
Growing radishes in egg containers
Prices for egg trays
egg packaging
How to care for young radishes?
Caring for radishes on the windowsill is quite easy. This root crop requires procedures that are also relevant for other young plants. All of them are presented in the table below.
Table 2. Measures for caring for young radish shoots
| What do radishes need? | Peculiarities |
| Watering | Radishes are watered only with a spray bottle. This method of irrigation helps not to wash away the seeds in the soil. But you need to spray generously without flooding the soil. |
| Humidity level | It is important to ensure that the soil is not too wet. High humidity can lead to the development of various diseases, spoils the condition of root crops and attracts parasites. |
| Lighting | In order for the root vegetable to be juicy and crispy, you need to provide it with sufficient lighting. When daylight is short, it is necessary to add artificial lighting in the form of phytolamps or fluorescent lamps. Radishes require 12 to 14 hours of daylight. |
| Temperature | In order for the seeds to germinate faster, it is necessary to create a temperature of +17 to +20 degrees. This root vegetable does not tolerate unbearable heat, so if possible, it is better to take it to the balcony - away from hot radiators. |
| Hardening | 4-5 days after seed germination, you need to “harden” the radishes. To do this, it is placed in a cool place with a temperature of 7-9 degrees for several days, after which it is taken back to the room. |
| Ventilation | After the first shoots appear, the film must be opened regularly to ventilate the seedlings. It is enough to do this every 2 days for 5-10 minutes. During the ventilation process, condensation on the film is removed and weeds are destroyed. |
| Top dressing | Indoor radishes do not require additional fertilizers: they can take all the necessary nutrients directly from the soil. However, if the shoots do not develop strong enough, you can feed the plant with standard compositions for open ground. |
| Thinning | If the radishes were sown in a common box, they will need thinning. The procedure is carried out when the greenery has 2-3 leaves. It is necessary to remove weak shoots, leaving only strong green seedlings. The distance between sprouts should be at least 1.5 cm. |
Radishes that grow on a windowsill in summer can intensify the process of flowering and seed creation. The reason for this is too long daylight hours. To direct all the forces of the flower to the development of the rhizome, in the evenings you need to cover the sprouts with a dark cloth.
Healthy and strong radish tops
When to plant and is it possible in winter?
Radishes can be grown at any time of the year. The main thing is to remember a few important points. This vegetable is considered cold-resistant and can safely tolerate light cold, but excess heat is detrimental to it. The ideal temperature for growing this crop is from +12 to +18 degrees Celsius.
Suitable daylight hours are 10–12 hours. In winter, when there is little sun, you can compensate for the lack of light using fluorescent lamps.
In natural light conditions, it is better to sow the plant at the end of January if the windows face south, and in mid-February if the windows face west or east.
Which radish variety to choose for home growing?
To be on the safe side, it is better to choose seeds of varieties that are resistant to drying out and minimal lighting. It is optimal if they are early ripening varieties: then the harvest can be harvested within 3 weeks after pipping.
The following varieties are ideal for home growing:
In addition, the varieties “Deka”, “Dabel”, “Zarya”, “Diego”, “Carmen” perform well when grown indoors. They ripen quickly, do not crack and are filled with vitamins.
Seeds of an early ripening variety of radish 16 days
Important! On the windowsill you can plant 3 varieties of radishes at once with different readiness periods. This will help provide the family with a fresh, crisp harvest for a long time.
Radish seed prices
radish seeds
Is it possible to grow radishes on the balcony?
On an unglazed cold balcony, crops can only be grown in spring and summer. Typically, the optimal time is mid-April/early May. The final period depends on the planting region: when the air temperature reaches 12 degrees, you can plant radishes on the balcony.
Radishes on the balcony
“Balcony” growing has a number of nuances – both positive and negative:
- on a balcony on the north side, plantings may suffer from a lack of sunlight, which is why the fruits will be small and bitter;
- large space and fresh air on the balcony allow radishes to actively develop;
- on a glazed balcony, especially with a heated floor, you can create a mini-greenhouse: this way radishes can be grown even in cold winter.
The conditions for growing radishes on the balcony will be the same as during normal ripening - sufficient watering and suitable temperature.
Grown radishes in individual cups
Common problems when growing radishes
No matter how unpretentious the plant is, growing it cannot be without problems. The most common of them are presented in the table below.
Table 3. Common problems when growing radishes
| Problem | Cause | Solution |
| Pulling radishes up | The plant is illuminated only on one side, the other is in the shade. | For symmetrical growth, the boxes with seedlings need to be rotated periodically so that the light hits all the plants equally. |
| Overgrowth of tops | Incorrect development of the rhizome as a result of: - frequent watering; — excess fertilizing; - lack of light; - deep location in the ground. | Cut off the tops completely to allow the plant to devote all its energy to root development. |
| Flavorless taste | “Overfeeding” with fertilizers. | Re-sow the radishes in less mineralized soil. |
| Radish cracking and bitter taste | Too obvious a difference between wet soil and dry air, irregular watering. | Ensure sufficient watering and correct temperature for development. |
Radish harvest
Radishes are harvested as they ripen. When mature roots are removed, weaker ones begin to develop. There is no need to keep radishes in the ground: this causes them to become covered with rough skin and become bitter.
Important! Radishes can be sown together with watercress. These crops get along well in one container and allow you to save space in your home garden.
Ready harvest of radishes
Homemade radishes: how to quickly get a rich harvest
It is not at all necessary to feed homemade radishes with fertilizers. In addition, it is better to avoid fertilizing altogether if there are children at home - chemicals can only harm them. However, some gardeners set themselves the goal of growing a huge crop of radishes in a short time. To do this, growth stimulation is used in the form of two supplements:
- First feeding. The first time radishes are fertilized at the age of 7-8 days. As a top dressing, you need to use a solution prepared from mineral mixtures.
- Second feeding. Relevant at the moment the root crop begins to form. Use ready-made fertilizers (5-7 g of composition per bucket of water).
If such feeding causes the radishes to grow too thick, it is recommended to thin them out. Then the remaining fruits will be larger.
Large juicy radish fruits in the ground
Pests and diseases
When ripened indoors, radishes are protected from attack by parasites. However, some diseases may appear on them. This:
- clubroot;
- blackleg;
- bacteriosis
These diseases cannot be cured, so it is best to prevent their occurrence. For prevention, the soil under radishes is treated with a solution of potassium permanganate and fungicides before planting.
Early maturing variety of French Breakfast radish, disease resistant
Growing radishes on a windowsill is suitable not only for gardeners who want to prolong their garden harvest. This is an ideal solution for those who do not have their own garden or summer cottage, but they really want fresh vegetables. In this case, radishes are planted in the spring and harvested in the summer. The most important rule for growing is to water regularly and provide optimal daylight hours.
The nuances of storing radishes
When to Harvest
As they ripen, the radishes are harvested. If the fruits are selectively harvested, the remaining ones will have more room to grow. Radishes must be removed on time, otherwise they will crack and become bitter.
In open ground conditions, as a rule, 16-18 days pass from the moment of seedling emergence to the time of harvesting of radishes. Some varieties require more time to ripen - about 20-35 days. At home, the ripening period is slightly delayed.
The main thing when growing radishes on a window is to pull out the root vegetables in time, otherwise their skin will become very rough and the pulp too bitter.