Potatoes Ilona
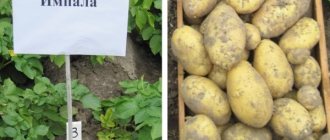
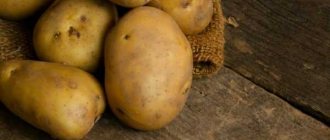
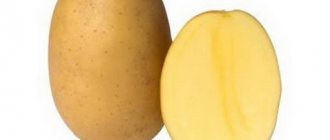
This table variety is classified as mid-season. Harvest 90 days after germination. The tubers of the variety differ in presentation, taste and average size. They form quite quickly. The shape of the potato can be oval or elongated oval.
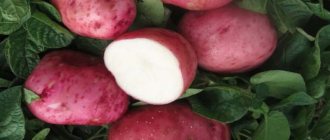
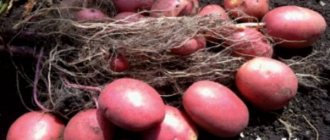
According to the description, the peel without roughness has a beige-yellow tint, there are superficial eyes. The white pulp contains a lot of starch and is crumbly. Fruiting is high. Productivity can be up to 400 kg. The variety is resistant to viral diseases and diseases such as late blight.
Potato variety Ilona
Important! Root vegetables are stored for a long time. Tubers are suitable for boiling, frying, stewing and baking.
Characteristics of the variety
The Ilona potato is characterized by gardeners as a very promising variety, suitable for cultivation for personal consumption, as well as for sale as an early vegetable product.
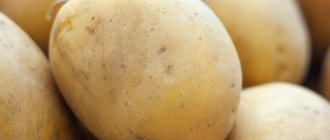
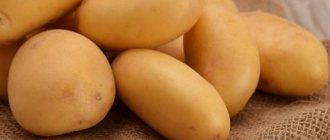
The value of the Ilona variety is the ability to quickly form leveled, marketable tubers with excellent taste, as well as versatility of use. The size of the potato of this variety is medium, the shape is oval or elongated oval, the skin is light, beige-yellow, there are superficial eyes. The pulp is white, starchy, crumbly, and has an excellent taste.
The main advantages and disadvantages of the variety
The main advantages of the variety include:
- quality of root crops;
- high productivity;
- early maturation;
- excellent taste;
- resistance to common diseases;
- versatility of use.
The main disadvantage of the variety is its demands on soil and climate conditions. Because of this, many gardeners prefer another variety.
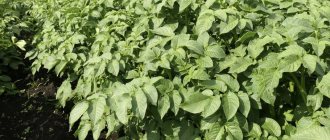
Potato bush Ilona
Planting and growing Ilona potatoes
Before planting potatoes, it is necessary to prepare the planting material and soil. At the beginning, tubers of suitable size are selected. They are transferred to a well-lit place for germination for 30 days. The last stage is the treatment of tubers with special disinfectants and stimulants based on plant components that promote growth and development.
This vegetable crop requires fertile sandy loam soil with a deep arable layer. It must be carefully dug up and leveled in the fall. You can fertilize the soil by adding humus. At the beginning of spring, the soil requires loosening. After this, holes should be made, the depth of which is 8-10 cm. The distance between them should be 35-40 cm. It is also important to calculate the row spacing - 50-60 cm.
Important! The bushes must be ventilated and heated. This will help prevent the appearance of rot and other diseases that impede the development of the plant.
Plant prepared tubers in soil whose temperature is 8-10 °C. It is best for the soil to have:
- pH value – 5.5-6;
- light or granulometric composition;
- high humus content.
MARKOUT – Potato seeds “Ilona”, TM SeedEra – 0.02 grams
- Potatoes "Ilona" are a mid-season variety for table use, the tubers are elongated-oval or oval, with a light yellow skin and white, starchy, crumbly pulp. Potato, tuberous nightshade (lat. Solánum tuberosum) is a species of perennial tuberous herbaceous plants from the genus Solanum of the Solanaceae family. Potato tubers are an important food product.
Growing potatoes from seeds.It is grown by sowing seeds for seedlings in February-March. Before sowing, it is recommended to soak the seeds in water for two days. Hardening at variable temperatures for 10 days is also effective: at night, soaked seeds in trays are kept in the refrigerator at a temperature of +1C, and during the day - indoors at room temperature.
Seeds begin to be sown in boxes from late March to early April. The boxes are filled with a damp mixture of 1 part soil and 4 parts peat, adding fertilizer. The sprouted potato seeds are placed in rows in the ground: 5 cm between seeds and 10 cm between rows. Sprinkle the seeds on top with a 0.5 cm layer of sand, compacting it slightly so that it does not wash off when watering.
Next, the boxes are covered with film or glass and transferred to a warm place, possibly to a film greenhouse. Shoots should appear in a week or two. When two true leaves are formed on the seedlings, you need to pick the seedlings into small plastic cups with drainage holes or into peat tablets. It is necessary to regularly water and weed potato seedlings, and during rooting, feed the plant with ammonium nitrate.
Planting potato seedlings in open ground.
After the frosts end, around the third decade of May, potato seedlings can be planted in open ground. Before planting, you need to dig holes 10 cm deep and add 300 grams of humus into them, while pouring them generously (half a liter of water per hole). The seedlings are buried in the ground so that a stem with three upper leaves remains on the surface.
To protect young potato seedlings from possible temperature changes, the bed is covered with film or spunbond. The shelter is removed when the plants become stronger and warm weather sets in. In dry weather, watering potatoes is done once every two days, regularly weeding and loosening the soil; in addition, during the season it will be necessary to hill up and fertilize the potato bushes at least twice.
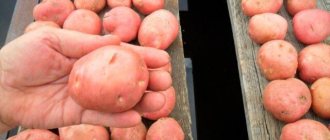
From the very first year, the potato harvest will not be very rich; mini-tubers obtained from potato seeds in the first season weighing from 10 to 50 grams; with good care, you can get up to a kilogram of tubers from one bush, and some tubers will reach 100 grams. The harvest will be even better when grown in a greenhouse.
From the mini-tubers next year you will get super-elite potatoes of the highest quality (first reproduction), from which in the third year super-elite potatoes of good quality will grow, in the fourth year you will get elite potatoes, and from the fifth-sixth year ordinary potatoes will grow and the harvest will begin again decline. Therefore, after five years, you can repeat the entire procedure of growing potatoes from seeds.
Other names: potato, potato seeds.
You can find out more useful information about potatoes and their cultivation from the articles:
—————————- Potato “Ilona” is a medium-sized variety of table value, the bulbs are shaped like oval or oval, with a light yellow skin and white, starchy, pink flesh. Potato, tuberous nightshade (lat. Solánum tuberósum) is a species of rich tuberous herbaceous plants of the genus Solanum of the Solanaceae family. Potato bulbs are an important food product. Virtuation of potatoes from the nasin. The growth of sowing now for seedlings in the fierce birch forest. It is recommended to soak the cloth in water before hanging it for two days. It is also effective to preserve at varying temperatures for 10 days: at night the soaked water in the baths is kept in the refrigerator at a temperature of +1C, and during the day - in a room at room temperature. The birch leaves begin to hang in boxes from the end. The boxes are filled with a mixture of 1 part earth and 4 parts peat, adding goodness. The newly planted potatoes are tossed in the ground in rows: 5 cm between rows and 10 cm between rows. Sprinkle a 0.5 cm ball of sand on top of the top, compacting the bits so as not to rub it when watering.
Next, the boxes are covered with spitting oil or a glass and transferred to a warm place, perhaps to a spitting greenhouse. Please go and show up in a week or two. If at the gathering they are formed into two separate leaves, you need to pick the seedlings into small plastic cups with drainage holes or peat tablets. It is necessary to regularly water and weed the potato seedlings, and then root the plants with ammonium nitrate.
Planting of potato seedlings in wet soil. After the end of frost, around the third decade, grass seedlings and potato seedlings can be planted in wet soil. Before planting, you need to dig holes 10 cm deep and add 300 grams of humus, then pour it out (about a liter of water per hole). The seedlings are buried in the ground so that a stem with three upper leaves appears on the surface.
To protect young potato seedlings from possible temperature changes, cover the bed with spunbond or spunbond. Keep the shelters tidy up when the trees grow thicker and the weather becomes warmer. In dry weather, water the potatoes once every two days, regularly soaking and loosening the soil, so that throughout the season you will need to burn the potato crops twice.
In the first season, the potato harvest will no longer be very rich; in the first season, mini-bulbs from 10 to 50 grams can be taken from one bush, and up to a kilogram of bulbs can be removed from one bush, and tens of bulbs will reach 100 grams The harvest will be even better if grown in a greenhouse. From the mini-bulb to the oncoming river you pick out super-elite potatoes of high yakness (first reproduction), from which on the third river you get super-elite potatoes of good yakness, on the fourth river you get spruce potatoes, and from the fifth - The ultimate fate will be that of potatoes and crops I'm starting to sink more and more. Therefore, after five years you can repeat the entire procedure of growing potatoes from the ground.
Other names: potato, nasal potato.
ogorod.ua
How to properly care for the variety
Proper planting is not enough for a variety to produce a good harvest. It is also necessary to carry out agrotechnical measures to care for potatoes.
Watering
In regions with frequent rainfall, the plant does not need to be watered. In arid regions, it is necessary to water after 3 weeks from the moment of planting and the tops have grown by 10 cm. The second time, it is necessary to water the potatoes after the buds appear. The third watering is necessary when root crops are actively growing.
You can water the plant in different ways. Gardeners can choose a sprinkler method, furrow irrigation or a drip irrigation system.
Loosening
The first loosening is carried out after noticing the first shoots. Do not stop loosening until the tops close. The procedure must be performed around the bushes and between the rows. It is recommended to loosen to a depth of 3 cm.
Depending on the structure of the soil, it is determined how often it needs to be loosened. For loose soil, the procedure is carried out only a few times per season. Clay and loamy soil should be loosened every time after watering.
Feeding
Land can become depleted by planting potatoes in the same area. To improve the soil, you need to apply organic and mineral fertilizers. You can buy fertilizers in the form of granules in specialized stores.
In summer, you must follow the standard feeding schedule:
- When the tops reach 10-15 cm, fertilize the potatoes with ammonium nitrate.
- The plant is fed a second time after the first inflorescences appear. For this, an infusion of ash is used (1 tbsp per bucket of water) with the addition of potassium sulfate (1 tbsp).
- During the period of active tuber formation, the vegetable crop must be fertilized with a solution of slurry, to which 1 tbsp is added. l. superphosphate.
Hilling
The procedure promotes the full formation of tubers. Raking the soil to the potato stems is necessary to increase the supply of oxygen to the roots, to create the conditions necessary for the formation of tubers from stolons.
Several methods of hilling are used. The most common is classic hilling. Here the soil is raked from both sides onto the rows of planted potatoes. The tops of the plant are sprinkled with soil. A groove is made between the rows.
Planting seeds
Soil preparation
This method of cultivation is applicable to regions with warm climates; but it should be remembered that potatoes require a lot of sunlight, increased stem growth begins in the shade, and the tubers turn out to be too small.
It is best to choose legumes as predecessors to potatoes. As a last resort, you can use beets or corn. no circumstances should other nightshade crops be used as a precursor: tomatoes, potatoes, peppers.
In autumn (usually September-August), it is necessary to dig up the area to a depth of 15-20 cm and completely clear it of weeds
Neutral soils are best suited for potatoes, therefore, acidic soils must be limed at this time. For moderately acidic ones, charcoal ash is suitable, for highly acidic ones - lime (3 cups of ash or 2 cups of lime per 1 sq. m, respectively).
After normalizing the acidity, green manure is planted on the site, which is then dug up after 1.5-2 months along with the soil for the winter. Crops such as legumes (grass, rapeseed), cereals (rye, oats) or mustard can act as green manure.
If you don’t want to bother with green manure, you can apply mineral fertilizers to the site. These will be compost or rotted manure; application volumes range from 5 to 10 kg per 1 sq. m. m. If this is not possible, then it is necessary to apply a complex fertilizer in the spring, such as nitroammophoska, based on a consumption of 35-45 g per 1 sq. m. m.
In spring, the soil surface is dug up again, freed from the surface crust, watered and loosened.
Preparing seeds for planting
Seeds require a special procedure designed to stimulate growth - the so-called stratification. Potato stratification is done at high temperatures and lasts relatively short time. To do this, the seeds are placed in a warm, damp place with a temperature of about +42-45°C for a period of 10 to 20 minutes. After which the seeds are dried at room temperature.
Drying is considered complete when the seeds begin to fall off without sticking to each other. Next, you need to either sow the seeds directly into the soil or put them to germination. Typically, germination does not take much time, however, it helps to reject low-quality seeds in the early stages, which is why many gardeners recommend germinating potato seeds.
Germinating potato seeds
To do this, place the seeds between two wet cloths or napkins. In this case, the seeds are poured evenly, filled with water and placed in a warm place, for example, not a radiator or a windowsill. Wipes need to be moistened and ventilated 2-3 times a day. In this case, slightly warm boiled water is used.
After about 1-2 days, the seeds will sprout, and after 3-5 days they will finally hatch. After this, the seeds are ready for planting in the ground.
Planting seeds in open ground
Planting is carried out in mid-May, when at a depth of 10 cm the soil temperature will be around +15°C.
The area allocated for potatoes is thoroughly loosened once again, and holes 3-5 cm deep are made in it, arranged in rows.
The distance between the holes and rows should be about 30-45 cm. 3-5 seeds are placed in each hole, which are covered with soil, mulched and watered. You can use cut grass as mulch.
Instead of holes, you can plant potatoes in furrows about 5 cm deep, located at a distance of 30 cm from each other. The step between groups of 2-3 seeds is about 20-30 cm. The furrows are also filled with earth, mulched and watered.
After about a week, potatoes are observed to peck from the ground . As soon as the seedlings have 2 true leaves, thinning is carried out. In this case, the distance between seedlings should be 25-30 cm, and excess seedlings can easily be transplanted to another place, for example, to a place where the seeds have not sprouted at all, or to any other end of the garden.
Young potato sprouts have a slow growth rate and are constantly plagued by weeds, so controlling them should be a top priority. Loosening the soil, watering, weeding and removing weeds should be done almost daily.
Around the end of June, the seedlings will have grown to the point of medium-sized bushes. Caring for bushes is no longer so difficult; it completely replicates caring for potatoes planted in the usual tuber way.
Relatively good harvest of potatoes grown from seeds
Depending on the variety, seed potatoes are harvested from late September to mid-October. Typically, such a harvest is small: the weight of the tubers rarely exceeds 30-40 g. After harvesting, next year's seed is sent for storage in the basement.
How to harvest and store crops
Mass harvesting begins in the fall after yellowing and lodging of the tops on a sunny day without rain. The extracted tubers are sent for storage after drying and inspection for damage. Dried medium-sized tubers in good condition are suitable for further storage.
It is important to take care of the conditions in which the harvested crop will be stored. Root vegetables are placed in boxes and left in a cool, ventilated and dark room. The sun's rays should not fall on the tubers, otherwise they will germinate. As such a place, you can choose a cellar or basement with a constant air temperature of 2-5 °C. The shelf life percentage of the variety is 99.
Diseases and pests, how to fight
The most dangerous diseases, pests and methods of combating them:
- Colorado potato beetle and its larvae. This is a striped pest of orange and black color. A moderate number of these insects are fought by hand, and the bushes are watered with infusions of wormwood or celandine.
- Scab. Potato skin has growths in the form of gray-black scales. The disease is treated with the drug Zircon.
- Powdery mildew. This is a fungal disease that affects the above-ground part of the plant. A white coating appears on drying and rotting leaves and stems, becoming grayish over time. Means for control – Azocene and Bayleton.
Colorado beetle
Important! In the case of infection with bacterial cancer, no treatment will help. The main signs are dry and withering leaves, damage to the roots and the appearance of large lumpy growths on the fruits.
If you want to please your loved ones with delicious dishes, you should grow Ilona potatoes, because the characteristics of the variety and reviews of its taste are the most positive. Proper planting and timely care are the key to a good harvest.