How to choose the right bean variety for your home
Before planting, you will need to decide which bean plants are needed in the apartment. If it is important to harvest a bountiful harvest of tasty beans, then you need to plant bush-type seed material. If it is important to create a shaded room, climbing decorative beans will cope with this task.
For home growing of plants, it is better to use hybrid self-pollinating varieties.
Asparagus beans
These plants have a short growing season, accelerated ripening of beans and small bushes. Early varieties of this type of plant are successfully grown on window sills or balconies in simple boxes or flower pots, without requiring painstaking care. It is preferable to plant seeds of varieties that are resistant to pests and diseases.
These varieties include:
- Butter king is a plant with large tube-shaped pods. The harvest period is 60 days after planting. Can be used fresh, for canning and freezing.
- Caramel - plants are not susceptible to diseases of legumes. The ripening period for large, sweet beans is 2 months.
- Saxa 615 is a compact hybrid plant, excellent for planting indoors. The tube-shaped pods and beans have many advantages in terms of the content of nutrients and useful minerals and the absence of lignified coarse fibers in the pulp.
What you will need
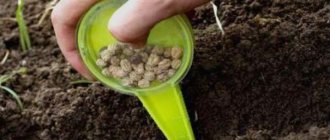
First of all, purchase seeds. Familiarize yourself with the characteristics of the variety you are interested in in advance and choose the most suitable one.
Beans grow quickly and do not require picking, so it is better to plant them immediately in pots of suitable size. Each bush will require from 3 to 5 kg of soil. The crop can be planted either in a common box or in individual containers. You can buy them at any home improvement store.
Important ! The bushes should not interfere with each other, otherwise the yield will decrease.
Decorative climbing beans
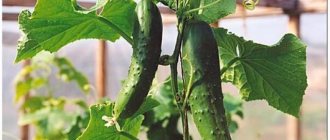
Varieties of this species allow you to grow climbing vines with large foliage and large beans. The seeds are not edible, but they are successfully collected and planted the following season. Giving preference to beauty, they pay attention first of all to the variety of climbing vine, which quickly fills the entire space of the balcony windows.
Among these plants, it is recommended to plant several popular varieties:
- speck;
- Rumba;
- Violet.
The peculiarities of this type of plant are that when the window is covered with beautiful foliage, the further development of the vine in length can be stopped by simply pinching the top pair of leaves; this treatment accelerates the ripening of the beans.
Important! When planting beans at home for the first time, having decided on the type of plant, be sure to purchase several varieties of hybrids and plant them in separate containers. This way you can easily determine your favorite bean variety.
Basic germination methods
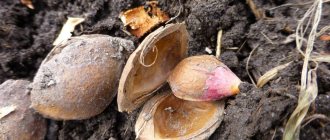
To germinate beans at home, first prepare the seeds. To do this, the seed material is sorted. All dried and wrinkled grains are removed. Beans with signs of spoilage and rot are thrown away. After this, you can quickly germinate the beans at home for food or to grow on your own plot.
How to properly germinate seeds for food
The easiest way to obtain sprouts is to grow them in a flat glass plate. This process looks like this step by step:
- The selected seeds are laid out in one layer on a flat glass dish.
- Then they are covered with damp gauze and the dishes are left in a dark place.
- The gauze is regularly moistened to prevent it from drying out.
Already on the second or third day, small sprouts appear, and after 5-7 days they can be eaten. But many raw foodists eat such sprouts already on the second day after the start of germination.
How to germinate mung beans
Mung beans are small green beans. The sprouts of this legume are consumed as a main dish, added to salads, and used as an ingredient for stews or cutlets. Mung beans are sprouted using the same method as regular beans.
Important! To obtain sprouts from mung bean, only fresh crops are used. Otherwise, the resulting sprouts will contain very little useful substances. First, the mung beans are dipped in cold water for soaking.
After 10 hours, the grains are removed, washed and placed on a sieve. As a result of this soaking, the grains swell and soften. This treatment accelerates the emergence of sprouts
The mung beans are first dipped in cold water for soaking. After 10 hours, the grains are removed, washed and placed on a sieve. As a result of this soaking, the grains swell and soften. This treatment accelerates the emergence of sprouts.
To germinate mung beans, use a small plastic bucket or container with holes made in the bottom. They will get rid of excess liquid in the container. This significantly reduces the likelihood of mold formation.
The bottom of the container is covered with dry gauze. Pre-soaked grains are spread on it in a thin layer. They are sprayed with water and covered with a clean cloth. The container is left for a day in a darkened room. The moisture gradually evaporates. Therefore, every 3 hours the mung beans are sprinkled with water again. The first shoots appear within a day. They can be eaten immediately or wait another 2-3 days.
How to germinate bean seeds in 1 day
To ensure rapid emergence of sprouts, ensure constant hydration of the tissue in which the beans are located. For some varieties, pre-soaking is used. This also speeds up germination. To germinate seeds overnight, growth stimulants are added to the water. The very next day the sprouts will hatch and the seeds can be planted.
The easiest way to quickly sprout grains for food is to place them in a damp cloth. Then the sprouts hatch the next day or every other day. After this they can be eaten.
How to germinate beans for planting
In this case, the roll growing method is used. For this you will need thick polyethylene and toilet paper. A strip equal to the width of toilet paper is cut from a piece of polyethylene. It is laid out on the table and moistened with water. Apply toilet paper along the entire length on top. The selected seeds are laid out in a row, 2 cm from the top edge. Then cover everything with another layer of toilet paper and spray everything with water from a spray bottle.
The entire structure is rolled up and secured with an elastic band so that it does not fall apart. Then pour some water into a wide container and dip the roll of seeds with the free end into the liquid.
After a few days, seedlings appear, but they are not yet strong enough to be planted in the soil. They are grown in rolls for another 10 days before being transplanted into the ground.
Important! Bean seeds cannot be germinated in soil. In this case, they are immediately planted to grow plants.
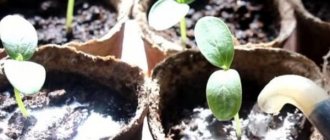
Germination on cotton balls
This method is often used in school experiments to monitor the development of a plant. Any healthy beans from the store will do for this sprouting. Place a cotton pad in a low glass container and place healthy beans on it. The cotton wool is moistened with water and the container is left in the light in a warm place. After a few hours, the germination process begins and the first shoots hatch. Then you can watch how the beans sprout, take photos or film the process.
Is it possible to create conditions suitable for beans at home?
When growing plants on a windowsill, it is necessary to equip a trellis or support for bush beans before planting. In order for the seedlings not to lag behind in development, it is necessary to provide additional lighting to the plants. The minimum daylight hours should be at least 12 hours. This will require installing a lighting fixture with a fluorescent lamp on the balcony.
In all other respects, the rules for planting and caring for plants are the same. The main stage of work is the period of setting flower buds; a caring owner can easily grow plants that provide shade and a harvest of tasty beans.
Growing beautiful vines with large bean pods will require attention to the level of lighting, air humidity and a responsible attitude towards your crops.
Optimal light mode
The culture does not tolerate shading, so for planting, select a well-lit place or arrange additional lighting. However, you need to remember that the daylight hours before fruiting begins should be short, no more than 12 hours.
When growing beans on a windowsill during the winter months, the boxes are placed on the south side. If this is not possible, additional lighting is provided using a phytolamp. At the end of spring and summer, the culture feels great on windows facing west and east.
To determine the difference in yield at different lengths of daylight, it is recommended to conduct an experiment. Young plants of the same variety, grown with the same care, are divided into two groups. The first will develop in short day conditions, the second in natural light.
Seed preparation and sowing
Before preparing seed material for planting, pay attention to its quality. Criteria for selecting quality seeds:
- Dry beans with mechanical damage or signs of damage from pests or diseases are not recommended for planting - it is better to throw away such grains, because the level of germination is minimal and the plant will lag in growth. The best option is large, full seeds with a glossy, smooth outer shell.
- To determine the quality of planting material, it is recommended to fill it with salted water. Dry grains float.
See also
What is a bean - a vegetable or not, what does the plant look like, description and family
Read
Defective beans are thrown away, and good ones are pre-soaked. Germination technology will require several simple operations:
- Clean water is poured into the container, any growth stimulator and manganese are added.
- After stirring the solution, soak a natural fiber napkin, distribute the planting material evenly and fold the fabric like an envelope. The main thing is to block the air supply.
- The tissue with the embryos is placed in a saucer with a thin layer of solution.
- For a day, the saucer is put away in a dark room at room temperature.
As soon as sprouts appear on the beans en masse, it is time to plant the seeds in planting containers.
Beans do not tolerate exposure to negative temperatures; they are a very heat-loving plant. Therefore, if you plan to plant beans on an unheated balcony, work begins when warm weather sets in with a minimum air temperature of 10-15 degrees. Mature legume bushes are able to withstand short-term sudden spring frosts down to -3 C.
The optimal period for planting on an unglazed loggia is the end of May. You can grow the plant on a windowsill in a heated room all year round, but in winter you will need to provide the bushes with additional lighting.
Preparing the soil for planting seeds
The accelerated vegetative period of legume plant development allows you to avoid planting seed material in common seedling boxes and not waste time picking young shoots. Therefore, the soil for seedlings is poured directly into planting pots or other containers.
For better development, you will need to purchase ready-made nutrient soil at a garden store or mix rotted manure and turf soil in equal proportions, which is best taken from a forest or shelterbelt. In the south, the best soil is under acacia trees. 40 g of superphosphate and 100-150 g of wood ash are added to the solution. If the soil has a high level of acidity, it must be brought to a pH level of 6-6.5 using quicklime or dolomite flour.
Such soil will allow for 1 additional feeding of the soil at the stage of the beginning of fruiting of the bushes or during the rapid growth of the climbing species.
Planting stages
The technology for growing and caring for plants is simple, but at an early stage of development, the germination and development of legume bushes depends on the correct execution of the planting process. Determining the time when you need to plant seeds is simple - the plants need to be provided with a minimum temperature of up to +25 C, under these conditions the beans will quickly germinate and begin to develop before the onset of extreme heat.
Below are detailed step-by-step instructions for planting plants.
Stage 1
For each seedling you will need to prepare flower pots, the minimum volume of which is 3 liters. Several granules of expanded clay or broken brick are placed at the bottom to create additional drainage of the soil in the container.
The height and diameter of the planting containers is from 200 mm; in such conditions, the root system of legumes does not lack space during development, and the bushes receive a sufficient amount of nutrition. In a cramped pot, the first shoots will appear later, and the plant will lag significantly behind its neighbors.
Stage 2
The prepared soil must be subjected to heat treatment to disinfect it from pests and diseases. It is better to do this in the oven, although many gardeners recommend using a microwave. After cooling, fill the pots with soil, compact and water the soil with warm water.
Everything is ready for the main stage.
Stage 3 - disembarkation
Make a small hole in the pot up to 50 mm deep. Water the soil again and plant the seeds. A prerequisite is that some of the beans with sprouts (future roots) are laid down and slightly at an angle. If the seed material is of poor quality, you can plant several grains in one pot, and then transplant the weak plant into another. The distance between seedlings is at least 100-150 mm.
See also
The benefits and harms of red beans for the human body: for women, men and children
Read
The grains are covered with a layer of loose nutritious soil on top and a layer of peat is poured to the top to mulch the soil. Each seedling is covered with glass or film to create a constant microclimate for the plants. After emergence of seedlings, the covering material is removed.
Caring for beans at home
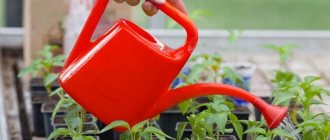
An unpretentious garden plant that does not require any effort to care for. The main thing is to carry out sufficient watering on time, constantly loosen the soil and monitor the health of each bush. At the first sign of problems, the plant is immediately given help. Only such care will allow you to collect a good harvest of beans on the windowsill and decorate the balcony with climbing vines with large pods and beautiful flowers.
Let us examine in more detail the rules for carrying out other operations for caring for bean bushes growing at home.
Optimal light mode
For normal development, plants will need to be provided with lighting so that daylight hours last:
- for young developing plants - 14-16 hours;
- grown bushes, from the moment flowering begins - a 12-hour day.
Under such conditions, plants are able to stop growing for a short period. It is important to remember that sunlight is necessary not only for stems and foliage, the rays saturate the soil with warmth, and optimal conditions are created for the development of plants.
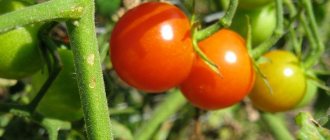
First harvest
As soon as the pods are ripe, they can be picked immediately. If you need to prepare your own seeds, do not pick off the bush until the grains are completely ripe.
Features of the yield of beans grown at home:
- You should not expect a large number of fruits, making allowances for home conditions; about 10 bushes will grow, but the first harvest can be harvested in 2 months.
- If the variety is climbing, then no more than 5 bushes will ripen and the fruits will appear quite late due to low temperatures.
- Beans will give a rich harvest if you provide it with the necessary conditions - high-quality soil and its optimal volume, lighting, regular watering and fertilizing.
Legumes do not require complex care - beans will ripen at home even if there is insufficient air and light.
You can plant and grow beans in your window at any time of the year. Video and photo confirmation that urban beans are a real phenomenon. You don't have to be an avid gardener to plant beans at home. All you need to do is follow some rules and have a little patience.
What and how to feed beans?
An annual plant will not require additional nutrition if the planting soil is prepared correctly. If the beans begin to lag behind in development or the foliage begins to turn yellow, this means that it is necessary to apply nitrogen fertilizer. Spring is the time for organic or nitrogen mineral fertilizer. Summer and early autumn - potassium and phosphorus must be added to the soil.
It is not recommended to apply manure at home; in these conditions, the best option is to purchase a ready-made balanced solution. After dilution in the proportion specified in the instructions for use, the composition is watered on the moistened soil in pots, and after the moisture is absorbed, watered with warm water.
For vines, in addition to root feeding, you will need to carry out foliar feeding of the plants. To do this, you can mix the solution yourself, but it is better to purchase an industrial balanced composition and spray all parts of the plant and the soil in the pot.
Diseases and pests of beans
At home, diseases and pests are not harmful to plants if the windows are covered with mosquito nets and the seeds and soil have been disinfected during preparation. But there are situations when gray rot forms on the bean trunk near the roots, or when overwatering, a fungal disease appears - blackleg. The larvae of various pests, for example, aphids and leaf rollers, can settle on beans.
In such cases, the bushes should be immediately treated with solutions of contact fungicides and insecticides. But when purchasing, pay attention to the volume of the solution. To treat several bushes, you should not purchase a product for preparing 10 or 5 liters of solution.