Harvesting garlic, timing and growing season
Before you start harvesting, you need to focus on the timing and method of growing the vegetable.
As a rule, garlic is planted in the fall (winter). The growing season of winter crops lasts ninety to one hundred and twenty days, harvesting is carried out in mid-late July (it all depends on the growing region). The crop can also be planted in the spring (spring garlic). Its growing season is one hundred and twenty days or more; it is harvested at the end of August - beginning of September. But it is worth noting that the timing of the garlic harvest can be adjusted by the weather. If the summer is cool and humid, then the ripening period of the crop will drag on for five to ten days. But don’t rush and start cleaning early. If a vegetable has not reached its physiological maturity, it simply will not be stored for long. If you are late in harvesting the garlic, the bulb will begin to crumble into cloves.
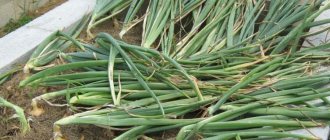
The most ideal time for harvesting comes when the plant's arrows align and the seed box opens. If the variety does not have arrows, then you need to navigate by the tops. As soon as the tops spread on the ground, they begin cleaning.
Preparing garlic for harvesting
About ten days before ripening, the garlic shoots begin to straighten, the plant stops growing, and the bulb begins to fill up. During this period, the leaves of the crop need to be slightly crushed (in common parlance – “trampled”) or tied in a knot. This agrotechnical technique will enhance the outflow of nutrients from the stem and leaves to the bulb. If the summer turns out to be rainy, then this technique does not need to be used. If the soil is moist, then the heads that remain in damp soil for a long time may be affected by fungal diseases.
In order to ensure air flow to the head of garlic, it is necessary to scrape away the soil to about half the size of the bulb. This technique must be performed when the arrows begin to straighten. Using the method will allow the bulb to breathe normally and speed up the ripening of the vegetable by three or even five days.
Timing of cleaning, drying
It is necessary to dig up the crop when the tops of the plant lie down and begin to dry out. Delay in digging vegetables, as they say, is “like death.” Mature teeth can begin to grow rapidly. You should not pull out garlic with your hands, as there is a high probability of damage to the bulb. The bulbs removed from the ground must be left in the garden bed for five to six hours, so that they are blown a little by the breeze and dry in the sun. At nightfall, the harvested crop must be removed under a canopy.
Drying garlic is carried out in a barn, attic or under a canopy for twelve to fifteen days, spreading it out in one or two layers. If the weather permits, you can take the crop out into the fresh air.
If there is a greenhouse at your summer cottage, then this is an ideal place for drying the garlic crop. For eight to ten days, the container with the bulbs is placed in a greenhouse or the heads are scattered in one or two layers. You cannot close the greenhouse even at night. In addition, the garlic heads must be turned over to ensure even drying. If garlic is properly dried, its stem becomes elastic, it gains flexibility and does not break.
Signs of ripening garlic
- the formation of new leaves stops;
- the leaves turn yellow. We do not wait for complete yellowing, since in our variety of garlic at this stage the “shirt” will also rot in the ground, so a little greenery will not harm;
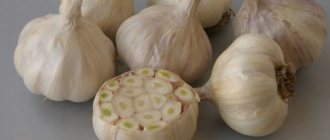
— in bolting varieties of garlic, the caps with bulbs begin to crack (if they are not broken off), in non-shooting varieties, lodging of the leaves is observed (the neck becomes soft). There is no point in waiting for lodging in bolting varieties; they can stand until the snow without changing their position. The exception is the same-year bulbs - their foliage goes down first;
- changing the color of the “shirt”. For each variety of garlic, this sign is individual. It’s difficult to determine anything by the white heads, but varieties like ours can be analyzed - purple longitudinal stripes have appeared, which means it’s ripe. I can’t say for sure about pure purple garlic; I’ve never planted it.
How to properly harvest garlic and prepare for storage
Garlic should be harvested on a sunny, dry day. Let's say there's a little wind. If it rains, cleaning should be postponed until a more appropriate time. For this work you will need a pitchfork or shovel.
The sequence of actions when harvesting garlic in home garden beds:
The plants are carefully dug up, removed from the ground by the tops, and the soil is shaken off the roots. They are placed to dry directly on the beds if the weather is good. The heads are laid out on the ground in one layer
During the day they will be under the sun, and at night they need to be covered from dew with a thick film. If it is cloudy, after sampling the garlic is taken indoors. You need to dry it in a well-ventilated room, barn, summer kitchen or veranda.
After harvesting the garlic, it may take several days until the heads are completely dry. On average it will take a week or two. In dry plants, the tops are cut off with scissors, leaving pieces of the stem 1-2 cm long. The roots are also cut off, but so as not to touch the bottom (accidentally damaged bulbs will need to be put aside separately, since they are unsuitable for storage, in the process they can become infected with pathogens and fungi that penetrate through wounds). You don’t have to cut the tops, but weave short braids from such garlic and hang them in a barn or veranda for storage. For strength, you need to weave thin twine into the braids.
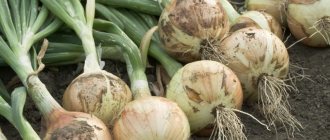
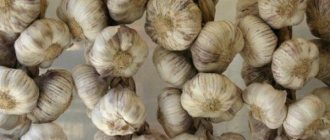
Only the best heads are selected for winter storage: completely intact, without damage, without traces of any diseases, with tightly fitting integumentary scales, without spots. Such bulbs are sorted into large and small fractions. All substandard meats, as well as the heads that have crumbled into the cloves, are selected and stored separately. Garlic intended for planting is also stored separately. These should be the healthiest and largest heads; it is from these that good plants grow that give a bountiful harvest.
Storage conditions:
- For spring varieties - ventilated rooms with air humidity of no more than 80% and no less than 50% and a temperature of approximately 15-20°C.
- For winter varieties - rooms with a temperature of 2-5°C and the same humidity.
While the garlic is stored, you need to watch it, sort through it from time to time and select dried or rotten specimens. They can be used for food if the unusable parts are removed.
If the harvest is small, then it can be stored indoors. For example, it can be placed in clean, dry 3-liter glass jars. Before laying them in, the bottoms of the heads are burned to prevent them from sprouting. The heads are laid in layers, sprinkled with coarse salt. The jars are closed with tight lids and placed in a dark, dry place. You can also dip each head in liquid molten paraffin and, after cooling, also put it in jars.
In an apartment, garlic bulbs can be stored in a cold pantry or on the balcony if it is well insulated. They are also placed in small boxes, baskets or nets. In cold weather, the product needs to be covered with something warm to protect it from frost.
How to store harvested garlic at home
There are many ways to store heads, each with its own characteristics and advantages.
Salt
To keep garlic juicy and fresh during the winter, you can sprinkle it with salt. To do this, the heads are prepared in advance: you need to trim the roots and peel the husks. Some people take the heads apart into cloves, but leave them in the peel. Then the heads or cloves are placed in glass jars and generously sprinkled with salt. In this case, salt serves as a preservative: it does not allow fungi and bacteria to develop, and also allows the fruits to remain juicy and crispy.
Tip: jars of garlic should be stored at a temperature of 0...+5 °C, that is, in the refrigerator or cellar.
Paraffin
This method is better suited for winter garlic, because its heads quickly deteriorate if stored improperly. Paraffin is rarely used for storing root vegetables, but it is an excellent solution for wintering garlic in an apartment with central heating and dampness.
You need to take paraffin candles, cut them into pieces and heat them in a metal container in a water bath. Then you need to carefully take each head by the tail and lower it into melted paraffin for a couple of seconds. After this, the vegetable must be placed on a newspaper so that the wax hardens and forms a breathable protective film. This method allows you to store garlic for a long time, regardless of changes in temperature and air humidity.
Oil solution
Garlic, which is stored in oil, can be used to prepare any dishes, from baked goods to fresh vegetable salads. By the way, garlic oil can be used to season dishes. To store garlic in this way, you need to peel it, wash it, remove spoiled cloves and put it in a sterile glass jar. It is better to use a jar with a metal screw-on lid. Pour vegetable oil (sunflower or olive) on top and place the jar in the refrigerator.
Scythe
You can braid garlic in braids on the 1st or 2nd day after digging. You need to give it time to dry a little, clean off the dirt from the roots, sort it out and start weaving. With this method, you do not need to trim the tops to be able to weave the garlic.
There is no need to make very large braids; 15-20 heads are enough. The ends need to be tied with a rope so that they do not come undone. Such braids are hung in rooms with good ventilation (veranda, barn, kitchen).
Usually harvesting is done when the leaves are dry and yellow, but for storing in a spit, you can dig up the garlic a little earlier.
Bunches
The bunches are collected like a braid, only the tops are not woven, but 7-10 bulbs are tied in bunches. This method is suitable for storage in the attic, shed or kitchen.
Banks
To preserve a vegetable longer, you need to block the access of air and microbes to it. In jars you can store garlic in heads or cloves under a closed lid. You can also sprinkle it with salt or fill it with oil, after cleaning it first.
Boxes
There are several methods for winter storage of garlic (and onions) in boxes:
- The heads can be stored in cardboard or wooden boxes. If they are large, then pour the garlic so that it makes up 2-3 rows, no more (so as not to crush the heads lying below). Next, the boxes are installed in a room where the temperature is no more than + 10 °C and there is good ventilation.
- If the boxes are cardboard, the heads can be sprinkled with flour - it will keep them dry (absorb moisture) and prevent rotting or germination.
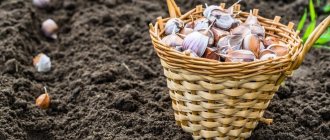
Wicker baskets
The baskets are woven from natural materials, so they are completely environmentally friendly and do not harbor pathogens. Garlic is stored in baskets, as well as in wooden boxes, in ventilated, cool areas.
Nylon stockings
Storage in nylon stockings came to us from the distant past. This method fulfills 2 main goals:
- prevents rotting because the root crops are well ventilated;
- saves space, because vegetables in stockings are hung on nails and do not occupy the refrigerator or shelves in pantries.
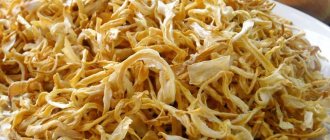
How to make garlic powder
Garlic, which is added to most dishes, is crushed, so it can be immediately ground into powder and stored as a seasoning. It can be added to first and second courses, seasoned salads and used in folk medicine against flu and colds.
The garlic needs to be peeled, cut into slices and dried in the oven at a temperature of 50-80 °C. When the slices dry, they look like chips, then they need to be ground into powder. A coffee grinder or blender is suitable for this.
How to trim garlic for winter storage
Every housewife knows about the beneficial properties and methods of using garlic; there are usually no problems with planting either, but not everyone can keep it fresh and juicy all winter. Let's find out how to properly store this spice.
To store garlic heads, you need to choose the right method according to the type of vegetable. Spring garlic is stored well both in cold and warm conditions; winter varieties are stored only in a cellar or unheated barn.
Pruning of bulbs is carried out both in relation to the roots and in relation to the tops. Anyone who has ever grown this crop on their own knows that the roots of garlic are very long and strong. Incorrectly pruned bulbs may germinate during storage. This is especially true for keeping warm
It is important for everyone not only to preserve the harvest until winter, but also to ensure that the vegetable does not lose its taste and aroma
Trim the roots before drying the garlic. You can leave no more than five millimeters from the bottom. After drying and before storing the crop, we burn the remaining roots. You can use a regular candle for this. There is no need to cut off the tops right away. After drying, you need to decide exactly how the vegetable will be stored:
- in braids;
- in bundles;
- in the refrigerator, in a jar, in boxes.
Garlic tops are very long. Even when stored in braids, up to 30-40 centimeters are left, and the rest is cut off. Then the dried vegetable is woven into braids from the tops and stored in this way. The braids are simply hung in barns, cellars or on glass loggias.
In all other cases, you can leave only a short neck of 3 centimeters
Make sure this neck is dry.
It can be stored in the following ways:
- in wooden boxes with sawdust;
- in a large container with salt or flour;
- in cardboard boxes in a dry place;
- in nets for vegetables.
The main thing to remember is that this vegetable is afraid of moisture. Make sure the bulbs are thoroughly dry before storing them. You also need to remove any damaged heads. They may show mold or signs of infection with a specific disease.
Storing garlic is not very troublesome, but it does require some knowledge. Let's talk about how to trim garlic for storage and how to store it later. In winter, you will be pleased with the juiciness of the vegetable and its excellent taste.
Types of garlic
In addition to these differences, there are also external ones: varieties of spring vegetables have thin soft peel and leaves, but do not have a thick arrow-stem. This feature is characteristic only of winter bolting garlic. The arrow stretches from the very roots and passes through the bulb. We present a table of differences between one type and another.
Signs of ripening garlic heads
Garlic ripens very evenly. Signs of ripening are: yellowing of the lower leaves; drying of the outer films and their acquisition of a color characteristic of the variety; easy separation of cloves; straightening of arrows, previously rolled into rings, in shooting varieties; cracking of boxes with bulbs; tops lodging. These signs are an indicator of technical maturity, when the processes of bulb formation are not yet completed and end after harvesting.
Cracking of the heads (physiological maturity) indicates that the cloves are ready to germinate and the crop needs to be harvested urgently. But this is not always a sign of maturity. Often even unripe heads crack when planting garlic after potatoes.
What to do next?
After the garlic is trimmed, the following actions are performed with it:
- Drying. It must be dried while the weather permits. There are no time restrictions here. Ideally, the heads should be kept in direct sunlight for 2-3 weeks, or at least under a canopy in the open air.
- Bookmark for storage. The specific method may vary. However, if the heads are placed in bags or boxes, they must be sprinkled with an absorbent that absorbs moisture - husks, dry salt, flour or ash.
- Storage. The storage mode stipulates that garlic should be kept in a dark, dry room at a temperature not lower than zero and not higher than +10-15 degrees.
Trimming is not necessary, but it makes storage easier. Therefore, it should be used whenever possible.
Usually, after the garlic has been dug up and dried in the sun, it is trimmed. However, this procedure has some subtleties that many gardeners forget about. Let's try to figure out whether it is necessary to do pruning, whether it is possible to do without it - and if it is still done, how exactly should the heads be trimmed?
Read further:
Preparing for storage: when and how to trim garlic after digging?
Is it necessary and how to trim radishes for winter storage?
Is it necessary and possible to wash garlic after harvesting from the beds?
Preparing the vegetable for storage: how to dry garlic after digging and how long to do it?
Step-by-step instructions on how and when to cut off the arrows of garlic
When to dig up garlic?
Harvesting time is very important for storing garlic. Due to early or, conversely, late harvesting, processes will begin to occur that will negatively affect the storage of garlic heads and significantly shorten its period.
In order to choose the right time for harvesting, you need to pay attention to the flower heads. Most often, gardeners break off the flowering heads, but in order to see when it’s time to harvest the garlic, it’s enough to leave just a couple of pieces
If the garlic is not yet ready for harvesting, then the flower heads are in a bent position and looking down. And if the garlic is ripe, the heads straighten and point vertically upward.
Another sign of garlic that is ready for harvesting is a cracked film on the flower head. As soon as it bursts, the garlic can be removed. If it remains intact, then the time for cleaning has not yet come.
How to properly remove from the garden
- Winter varieties are planted in October. All varieties are prone to arrow formation. The head is formed with large teeth that are placed around the central shaft. Digging of winter garlic begins approximately 85-98 days after the appearance of the first shoots. The time coincides with the last days of July, the beginning of August.
- Spring varieties begin to be planted at the end of March or early April; they do not bolt. Up to 10-12 small lobules are formed in the head, arranged in several rows. The central rod is missing. Harvesting from the garden begins in late August or early September.
A month before the expected harvest, watering and fertilizing are stopped. It is recommended to remove the soil from the bulbs within 10-14 days. This will allow light and air to penetrate underground without obstruction and promote rapid ripening. To harvest a vegetable that is supposed to be stored for a long time, choose a dry, windy day.
Gently shake the soil from each dug head.
Freshly dug crops are left to dry directly on the beds. The sun's rays will dry and disinfect the heads. At night, it is better to put the spicy vegetable indoors or cover it with film. You can tie the tops of several bulbs together and hang them in a well-ventilated area or lay them out in one layer on a flat surface.
The drying process lasts 7-10 days. It is recommended to dry together with the tops, as they contain many nutritional components. Thanks to this, the heads become juicy, aromatic and healthy.
Many gardeners wonder whether it is necessary and whether it is possible to wash garlic immediately after harvesting from the beds. Excessive moisture of the harvested crop, especially in rainy weather, increases the risk of rotting and the spread of various infections. Such a crop does not last long and loses its taste.
How to dry garlic after harvesting - remember the important things!
To successfully preserve the harvested crop, it is necessary to properly prepare it for storage. Therefore, further on how to dry garlic after harvesting. Once the bulbs are dug up, they are left to dry in the garden bed. In order not to worry about possible getting wet during rains, it is better to place the vegetable on wooden flooring, which can easily be covered with a canopy or film. Drying will be faster if the heads are arranged in one row, loosely.
Roots and leaves should not be removed during drying. The teeth take up the remaining nutrients found in these parts of the plant and ripen. The whole process takes about two weeks. Then the leaves are cut off. They are left when they are going to store garlic in bunches or braids. The roots are also removed, they are cut with a knife or scissors. Many gardeners set the roots on fire, which allows them to be removed without leaving any residue; this is additional protection against damage.
When trimming, garlic is inspected, damaged heads are sorted out, they can be processed and frozen, and used for preparations. The top easily removable scales with the remains of the earth are also removed, but you should not remove the entire cover of the garlic. After processing, the heads are left to dry until they begin to rustle when they are picked. Now the garlic is ready for winter storage.
What to do with processing residues (husks, tops, etc.)
Spoiled garlic is not suitable for composting. It is immediately thrown away. The remnants from processing can still serve the summer resident. After peeling, the husk is dried and then used as an absorbent. Garlic roots are suitable for composting in small quantities. They enrich rotten organic matter.
Tops are rarely put into compost. It's of little use; it gives away the beneficial substances to the head of garlic. The leaves are burned, and the ash is used as an independent fertilizer, mixed with mineral fertilizer.
How to properly prepare garlic for storage?
Well-dried heads can withstand long winter storage, retain their taste and beneficial properties. They are stored in the following ways:
- in jars with salt;
- in flour, ash or sawdust;
- in nylon or linen bags;
- in a refrigerator;
- in paraffin;
- in grids.
After collection, the heads are dried, cleared of soil and prepared for long-term storage. An error at any stage can lead to molding of vegetables, loss of taste and beneficial properties. Timely collection in dry weather will help minimize losses.
If the heads are covered with dirt, then there are two rules:
- You can wash it only if the vegetable will be stored in cloves. After washing, keep for a long time in a dry, ventilated area.
- It is forbidden to wash the heads during subsequent storage. Dry cleaning only is acceptable.
Cleaning
Clumps of earth and adhering soil are carefully knocked off the assembled heads. You don't have to clean it, just dry it well. The remaining soil will crumble. Lay out on the garden bed and leave to dry in the sun. If the ground is wet, then transfer it to thick cardboard. In damp weather, dry indoors or under a canopy.
Afterwards, exfoliate the dirt from the head manually. Mechanical processing is minimal when growing heads in soil with a high concentration of sand. It is more difficult to get rid of contaminants when growing in chernozem or clay soil.
Drying
Garlic is dried in several stages
This is important for preparing for long-term storage
The process can be divided into three parts:
- The first time is dried for up to five days immediately after collection. Experienced gardeners, in good weather conditions, wait for the leaves to dry completely.
- After trimming, leave it to dry again. You can stop at this stage by choosing the appropriate method.
- Finally, the heads are left to dry in a dark place. There should be no contact with sunlight, high humidity, or dampness.
It is better to prepare garlic for final drying in advance, and it is advisable not to delay it until the rains begin. Late preparation will negatively affect the taste of the vegetable.
Rejection of low-quality crops
Dried and peeled vegetables are sorted by hand. The gardener separates the good heads from the bad ones. Strong, dry vegetables with uniform, dense husks will withstand long-term drying. Those that have broken down into heads, darkened, or with softened places are not subject to selection. Processing the dug garlic is a mandatory step. You can't store good vegetables with dying ones. The following are subject to culling:
- heads damaged by tools;
- affected by pests, worms or insects;
- deformed and darkened.
Heads damaged by a shovel or pitchfork are not left for storage, but they can be eaten immediately after collection. The vegetable still retains its taste and does not lose its beneficial properties. Unsuitable heads should not be placed in the compost heap. They will negatively affect the rotting process. Damaged and deformed vegetables are thrown away.
Tops trimming
Trimming stems and roots is part of the preparation for storage. Using pruning shears or a sharp knife, cut off the tops and roots so that the beneficial properties remain in the head of garlic. When cutting the root, leave a few millimeters, depending on the nature of the future use of the vegetables:
- up to 10 millimeters for subsequent planting;
- up to 5 millimeters for long-term storage;
- up to 3 millimeters for sale.
Experienced summer residents seal the cut edges of the tops and roots with wax. When pruning leaves, storage is also taken into account. To collect the bunches, a “tail” of up to fifteen centimeters is left, with other methods – up to three centimeters.
Gardeners often scorch the edges of the root or cut top and can treat the entire surface of the head with paraffin. The latter method is used to preserve useful substances in case of improper storage conditions. Melted paraffin will also prevent drying, while the flesh will remain juicy and spicy.
Peeling
Garlic is stored both in heads and cloves. The latter option requires less storage space. Additional processing of the crop is required. The hard husk is removed with a sharp knife. This is done carefully so as not to damage the integrity of the cloves. The assembled parts are left to dry. At this time, you can prepare the absorbent. Use:
- flour;
- salt;
- sawdust;
- sand;
- onion peels, etc.
Any composition that will absorb excess moisture will do. With each month of storage, the percentage of moisture loss decreases. Peeling is an optional stage, depending only on the preferences of the owner of the crop.
Proper pruning of garlic after harvest: the bulbs will be stored until next summer
And also do not sprout, do not deteriorate, and do not dry out. Yes, yes, it turns out that such a nuance as proper trimming of garlic after harvesting greatly affects its keeping quality. This, I would say, is the main point in storing the crop. In this case, the garlic along with the tops must dry thoroughly before trimming. Within a week, or even ten days. Probably, many of you harvested garlic at the end of July - so an educational program on pruning garlic will come in handy.
After digging the crop out of the garden, let the garlic “rest” and ventilate for 3-4 hours. During this time, the nodules can be cleaned of adhering soil. My dad and I do this: like onions, garlic, after harvesting, goes to the attic to ripen, along with the tops and roots. We cut off the roots of the plant along with the foliage, about a couple of weeks after planting the crop for drying. There is no point in rushing to trim before this time - in this case, the neck of the onion will still be too vigorous and juicy, the roots will be “alive”, such garlic will then quickly disappear. So we wait for a good period of ripening of the garlic head and only then cut it off - while lying in the attic, the remaining nutrients will move from the tops to the onion. The skin of the garlic will not be as loose and thick as that of freshly dug, and the aroma will be a little less muted. The neck of the onion, although it will remain as dense, will still feel thinner to the touch and, so to speak, “more fragile” - if desired, it can be easily trimmed with scissors. It is in this condition that it is better to trim the garlic.
Happy owners of sheds and storage facilities where they can store supplies for the winter, as a rule, hardly cut off the tops of garlic. They trim the top a little, trim the roots and weave beautiful “braids”. These braids are stored hanging, and the garlic feels great.
If you don’t have time to weave braids, and there’s nowhere to store them in this form, make “bouquets”. This is my dad's and my way. Garlic tops are cut off with sharp pruners or scissors at a height of 10-15 cm from the bulb, then the crop is collected into bunches. You can store such “bouquets” by hanging them or simply putting them in boxes. The long “pipe” of garlic protects the plant from rotting and early germination - convenient and practical.
For those who have nowhere to put the “bouquets”, and there is not enough harvest to make braids, you can cut the garlic about a couple of cm from the bulb. Such trimmed crops are best stored in the refrigerator or cellar. But keep in mind that in damp conditions - and the cellar, as a rule, is a damp room, the garlic will grow in the spring and will be susceptible to rotting. So check your bins more often.
Some go even further and “bathe” the garlic heads in liquid paraffin before storing them. I probably don’t understand this, even though the method is justified. Wasting time on a tedious procedure when a bag of garlic is waiting for you is not for me. To each his own, in general. How do you trim and store garlic?
Root pruning
The roots of the bulbs are trimmed as follows:
- 1-3 mm – if sale is planned. Such heads look more attractive to the buyer, and at the same time leave less excess weight, which will not make it possible to accuse the seller of adding weight to the product due to useless elements.
- 3-5 mm – for edible garlic left for long-term storage. This is the optimal size so that the head does not lose nutrients and retains its taste and aroma until the next harvest.
- 5-10 mm – for heads left as planting material. For such garlic, you don’t need to use any trimming at all - however, it needs special storage conditions so that the cloves do not start growing ahead of time.
In addition, some gardeners cut the roots based on the size of the head: the larger it is, the longer the roots can be left. This method is more optimal for storage, but requires considerable experience in handling a specific variety and knowledge of its characteristics. Therefore, this option is not recommended for beginners in vegetable growing or for those using new varieties.
In addition to trimming, the following processing methods can be used for long-term storage of garlic:
- Cauterization of roots with an open flame.
- Sealing the cut head with melted wax or paraffin. In this case, either molten material is dripped onto the cut, or after cutting the head is dipped with the bottom into wax or paraffin, and after hardening it is dried.
This treatment eliminates the possibility that the head will begin to grow - and it can be stored for at least 3-4 weeks longer than untreated.
This treatment makes the garlic ungerminating. It can only be used for those vegetables that are to be stored or sold.
Pros and cons of pruning
Pruning has both positive and negative sides. The benefits include the following:
- Compact for storage. Trimmed heads take up less space than untrimmed ones. It’s easier to put them in boxes, cover them with onion or garlic peels and store them in a dark, dry and cool place.
- A properly pruned root crop does not completely lose its viability (and can be used as planting material in the next season), but is not inclined to grow during storage.
- After trimming the heads, it is easier to sort through, discarding those that have mechanical damage (caused by careless cleaning) or from pests. Damaged heads are not stored - they are either disposed of if the damage is excessive, or eaten first.
However, pruning also has disadvantages. These include the following factors:
- Excessively short or untimely pruning damages the heads and they are not preserved.
- Some storage methods (such as braiding garlic) require preserving dry tops. For them, pruning is contraindicated.
Thus, whether or not to trim garlic is up to the gardener to decide. In doing so, he must take into account the following factors:
- What type of garlic? The storage of spring and winter crops differs significantly. The longer the storage period, the greater the need for pruning.
- How will the garlic be stored? To weave braids, the tops must be left - in other cases, they only take up extra space.
- What condition are the heads in? It is better to leave insufficiently dried garlic in the condition it is in, rather than trim it ahead of time.
Should the arrows be removed?
At the ends of the arrows, aerial seeds are formed, which retain the varietal characteristics of the mother plant. Therefore, if you need to update planting material, the arrows of several plants are left:
- Bulbs are collected in autumn;
- dried;
- planted before winter or spring, depending on the type (winter or spring).
Next year they will produce full teeth suitable for planting.
All other arrows are broken off when they reach 10-15 cm, otherwise the plants will spend nutrients to form seeds. It is better to break out the arrows in the first half of the day, when they are elastic and fragile.
They can be used for food by cutting into 3-4 cm pieces, boiling in salted water and frying in vegetable oil with ketchup.
Infusion of arrows is also used for the prevention and control of spider mites, carrot flies and aphids.
Further storage
Harvested crops must be properly stored. After complete drying, they are collected in boxes and transferred indoors. At each stage, moisture ingress is excluded. The algorithm follows:
carefully clean the heads from any remaining soil; they sort through the harvest and throw away the unusable fruits; cut off the root, tops; The cut of the root and stem is sealed with melted paraffin.
Store in this form in boxes, bags, glass jars. Ash, sawdust, dried sand, and dry husks are used as absorbents. Often stored in braids. The treated heads are woven together with leaves and hung. It is more convenient to leave them in nets, hanging them. Storing with cloves also involves peeling (removing the husk).
The cloves should only be placed in an absorbent substance; housewives prefer flour. Before peeling, you can wash the husks, but then leave them until completely dry. Large heads are laid separately for planting material. Humidity in the room is unacceptable, otherwise the fruits will rot.
The maturity of garlic is determined by a number of factors, supported by the lunar calendar. After timely collection, the vegetables are dried, peeled and prepared for storage. Error-free implementation of activities guarantees a long shelf life of the crop without loss.
Previous GarlicWhen to harvest winter garlic from the garden in Siberia Next GarlicWhen to harvest garlic from the garden in the Urals in 2020
When after digging should you start preparing?
If the leaves have wilted by more than a third, then you can harvest. To check, dig out a couple of heads. They should be covered with dense scales. Processing time depends on weather conditions. On rainy days, the garlic is left under a canopy until completely dry; on hot days, you can start preparing it on the third day after collection.
Advice! It is not recommended to wash the heads if non-clove storage is intended. Contact with moisture is prohibited.
Experienced gardeners process garlic on the fifth day after harvest. Excess moisture evaporates, the husk becomes stronger. Dampness is a danger at this stage; during rainy weeks, dry storage must be ensured before preparation. Otherwise, the heads will become covered with fungi and mold and will not survive winter storage.
See also: When to remove spring garlic from the beds
Ways to store garlic in winter
To ensure that garlic does not lose its appearance and qualities during storage, it is necessary to choose a rational preservation method. There are two types:
- With the warm method, the room temperature should not exceed +200C, air humidity is not recommended to exceed 50-70%.
- The cold method implies a temperature of +2+40C, a high level of humidity (70-90%). The best place is in the refrigerator. This choice is suitable for a winter vegetable; its maintenance period is not too long and therefore it is recommended to use it within a short time (up to 4-6 months after harvest). Its representatives often begin to get sick when lying down for a longer period of time. They easily lose moisture, dry out or sprout.
The following methods of preserving the original qualities of the harvested crop are distinguished:
- In pigtails. This is a simple and economical way. The heads are woven together using stems and hung.
- The slices are placed in a basket, they are well ventilated, the container has a large number of holes. Cardboard boxes are also suitable for this purpose, but it is worth making holes in them for ventilation, as well as plastic boxes.
- Double bag - take a canvas bag, put a plastic bag on top of it, and put slices inside both of them. With the help of a double layer, the necessary moisture is retained inside the bag, which contributes to long-term preservation.
- Glass jar - it should be sterilized, place the unpeeled slices separately and close with a tight lid. You can cover it with flour, but then the lid is not used. Salt layers are also suitable - alternate salt and garlic cloves.
- In oil. The heads are cleaned and then filled with some kind of vegetable oil. The head is divided into teeth, the damaged ones are removed (they will still be poorly stored). After this, the heads are placed in sterile glass containers and filled with oil. Next, the containers are hermetically sealed and transferred to the cellar.
- Manipulation of roots - they are dipped in wax, paraffin or set on fire to slightly char.
Optimal conditions
Garlic is a unique plant that is unpretentious to storage conditions. It can be perfectly preserved all winter, both warm and cold.
However, there are still limitations:
- when stored warm, the optimal temperature is from +15 to +20 °C;
- Cold storage is possible at temperatures from +2 to +4 °C.
However, humidity can range from 50 to 80%, which is a fairly wide range.
One of the favorite ways of many housewives is storing garlic in glass jars.
Preparation for wintering garlic in jars takes place in several stages:
- Disassemble the heads into cloves.
- Dry them at room temperature for about 5 days.
- Place the garlic cloves in jars.
- Do not cover with a lid, place in a dry place.
In a refrigerator
Can garlic be stored in the refrigerator? The refrigerator is a salvation in matters of food safety. Traditionally, housewives store pumpkin, broccoli, peppers, cauliflower and other vegetables in the refrigerator.
To store garlic in the refrigerator you need:
- Dry the heads well.
- Place them in paper bags.
- If desired, sprinkle with salt or onion skins.
- Store in the refrigerator separately from other vegetables.
Carrots can also be perfectly preserved in onion skins.
How to store garlic in the refrigerator in this video:
A method loved by many housewives. To store garlic in salt you need:
- Prepare garlic for storage: sort and dry.
- Take boxes made of plywood.
- Pour salt into the bottom of the boxes.
- Lay out a row of garlic.
- Add salt.
- Place another row on top.
Such rows can be laid out up to 4-5 in one box. Garlic in salt also stores well in jars.
Twisted in a meat grinder
If the heads begin to deteriorate, this storage method is used to save the entire harvest. For this:
- They choose good cloves and throw away the spoiled cloves.
- Peel the garlic.
- Grind using a meat grinder.
- Salted.
- Placed in jars.
- Close the jars with plastic lids.
- Place in the refrigerator.
This option is suitable not only in case of crop damage, but as one of many storage methods. If the harvest is very rich, it is better to store some of the garlic. Also, this garlic mass can be used for emergency preservation of certain products from spoilage, for example, in the country.
The disadvantage of this method is the short shelf life, but the advantage is that you always have ready-made garlic mass on hand.
In purified form
Peeled garlic should only be stored in the refrigerator. It just won’t last long in its natural state. To increase the shelf life of such garlic, you can place it in a jar and fill it with oil.
An alternative is to store the peeled garlic in a sterilized jar. To do this, clean, dry garlic cloves are placed in a pre-sterilized jar, covered with a plastic lid and placed in the refrigerator.
The method is simple:
- Peel the garlic cloves.
- Pour a little to taste into the jar: olive, sunflower, etc.
- Place the garlic tightly in a jar with oil.
- Close the lid and put it in the refrigerator.
This method can also be used to store green onions.
In fabric bags
Take rag bags that you can sew yourself from the remains of unnecessary fabric. Dip the bags into a strong saline solution. After that, dry it. Place the heads of garlic into “salted” bags. The salt has saturated the fabric, thereby creating an obstacle for pathogenic bacteria. Garlic will last a long time.
By the way, you can store dried vegetables in fabric bags, for example, broccoli or kale.
In paraffin
The method is unusual, but effective. Garlic heads are dipped in melted paraffin. It envelops them and freezes. Garlic in a paraffin coating can be stored for about six months. The same processing method is also used for storing gladioli bulbs.
Garlic is placed in three-liter jars with the heads in the position in which they grew in the garden. Sprinkle each row of garlic with flour. These jars are stored open in a cool place: the refrigerator or on the balcony.
Instead of salt and flour, the garlic is sprinkled with fresh sawdust, preferably pine sawdust. The garlic is placed in plywood boxes or boxes and stored in a dry, cool place. By the way, many housewives successfully store carrots in sawdust.
How to preserve garlic at home until spring? 12 ways to store garlic in this video:
How to properly store winter crops?
It is recommended to store winter garlic heads at a temperature no higher than +3 °C.
The required temperature regime can be created in the cellar, basement or on an insulated balcony. Conveniently stored in wicker baskets, cardboard boxes or plywood boxes. The dried heads can be tied into buns or braids and hung from the ceiling in a dark, dry and cool room. They should be carefully inspected periodically and damaged ones should be removed.
An effective way to store it is in salt. To do this, you will need a wooden box with small holes for ventilation. The prepared dry heads are carefully placed in it and each row is sprinkled with a large amount of coarse salt. In this way, you can store winter varieties in a glass jar. Instead of salt, flour is also used, which absorbs moisture well.
If there are a lot of individual cloves left, they can be cleaned and placed in a jar with vegetable oil. Garlic can be stored in the refrigerator this way for up to 4 months. In addition to the fact that the cloves can be used to prepare various dishes, we get aromatic and tasty garlic oil. For this method you can use sunflower, flaxseed or olive oil.
To protect the heads from drying out, they can be wrapped in 2 layers of cling film. It is effective to store garlic in paraffin; for this, paraffin candles are melted in a water bath. The heads, held by the rod, are carefully lowered into paraffin, and then allowed to drain. The paraffin film will protect against drying out and various pathogens.
It is convenient to store the harvest in canvas bags, sprinkling the heads with dried onion peels. A small harvest can be kept directly in the refrigerator. Storage near heating devices is not allowed. Using one of the listed methods, you can preserve the crop without loss of beneficial and taste qualities for 4 to 6 months.